Animator32
•
1 recomendación•346 vistas

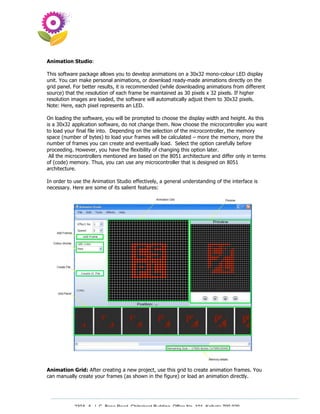
Designed and developed by Insforia Technologies, the Animation Studio allows you to develop animations on a 30x32 mono-colour LED display unit. You can make personal animations, or download ready-made animations directly on the grid panel. For better results, it is recommended (while downloading animations from different source) that the resolution of each frame be maintained as 30 pixels x 32 pixels. If higher resolution images are loaded, the software will automatically adjust them to 30x32 pixels.

Recomendados
Más contenido relacionado
La actualidad más candente
La actualidad más candente (20)
Destacado
Destacado (9)
Similar a Animator32
Similar a Animator32 (20)
Último
Último (20)
Animator32
- 1. Animation Studio: This software package allows you to develop animations on a 30x32 mono-colour LED display unit. You can make personal animations, or download ready-made animations directly on the grid panel. For better results, it is recommended (while downloading animations from different source) that the resolution of each frame be maintained as 30 pixels x 32 pixels. If higher resolution images are loaded, the software will automatically adjust them to 30x32 pixels. Note: Here, each pixel represents an LED. On loading the software, you will be prompted to choose the display width and height. As this is a 30x32 application software, do not change them. Now choose the microcontroller you want to load your final file into. Depending on the selection of the microcontroller, the memory space (number of bytes) to load your frames will be calculated – more the memory, more the number of frames you can create and eventually load. Select the option carefully before proceeding. However, you have the flexibility of changing this option later. All the microcontrollers mentioned are based on the 8051 architecture and differ only in terms of (code) memory. Thus, you can use any microcontroller that is designed on 8051 architecture. In order to use the Animation Studio effectively, a general understanding of the interface is necessary. Here are some of its salient features: Animation Grid: After creating a new project, use this grid to create animation frames. You can manually create your frames (as shown in the figure) or load an animation directly. 230A, A. J. C. Bose Road, Chitrakoot Building, Office No. 101, Kolkata 700 020. Tel : 91-33-3052 1316, Fax: 91-33-3052 1319.
- 2. Add Frame: Once you have created the frame, use this option to transfer your animation to the Grid Panel. Once transferred, you can now create another frames. The frame thus created will be dynamically stored in memory. Colour choose : Choose the colour of LED in which you prefer to see your animations in. This option is for simulation purpose only and will not effect the final file. Grid Panel: When frames are created on the animation grid and added, they get stored on the grid panel. The frames can be reviewed on this panel. There are three more functions that operate within this panel. On right-clicking a frame, you are provided with three options (as shown in the figure): 1. Load frame: Loads the current frame on the Animation Grid. Once done, you can edit/modify it. 2. Remove frame : This option deletes the selected frame. 3. Insert frame : Inserts the existing frame (displayed on the Animation Grid), prior to the selected frame. Preview: This lets you preview your animation (created using frames on the grid panel). It also provides you an outlook of how your animation would look when transferred on the display unit. You can play, pause, fast-forward and fast-rewind your animation. In order to change the speed, vary from 1 (fastest) to 10 (slowest) from the Speed drop-down box as shown in the figure. Memory Space: Each frame is made up of 128 bytes. Depending on the IC selected, the remaining number of bytes left is shown. 230A, A. J. C. Bose Road, Chitrakoot Building, Office No. 101, Kolkata 700 020. Tel : 91-33-3052 1316, Fax: 91-33-3052 1319.
- 3. Toolbar: File: Create a new animation project or load an existing project. New Project: Create a new animation project. Save the project in the desired location after naming it. Once you have created a new project and saved it, you can start framing animations on the grid (displayed in black and gray, where each gray dot indicates a single LED). Before commencing your animations, it is recommended that you select the colour in which you want the frames to be displayed. In order to make your animation manually, left-click on pixels (dots). Alternately, you can also drag (while keeping the left-click button pressed). On the other hand, to remove a coloured pixel, right-click. Similarly, drag around the area (while keeping the right-click button pressed) to deselect pixels. Open Project: Open an existing project. Animation studio can be launched directly by clicking the existing intermediate file (.apj file). Once loaded, you can add or delete frames in the existing project. Note that if the project is being loaded from Animation Studio the width and height should be set correctly while loading. If there is a mismatch, none of the frames will be loaded. Save : Saves the project with your existing frames. This will create an intermediate file (.apj file) that can be opened and edited later also. Add Image: You can add ready made animations to animation studio by selecting this option. Animation Studio will automatically break your existing animation into a number of frames and calculate the memory consumption of the same. It is thus advisable to make sure that the IC selected initially should support your animation. In a situation where the number of frames is more than the memory capacity of the selected IC, the frames at the end will be truncated. It is to be noted that this option is activated only when a new project is created or when an existing project is opened. Image (Color Invert): Same as Add Image function. Only the colours will be inverted, i.e each frame, when loaded, will be loaded as an inverted frame. Exit : Quit Application. Shortcut Alt+ F4. Edit : There are four options here, wherein any part/section of a frame can be edited by means of cut, copy, paste and delete. When any of these options are selected you will be prompted to choose the row and column number. This can seen on each of the frames as position number, where the first digit indicates rows, and, the second digit indicates columns. It will always be in RxC format. To find out the position number of any of the pixel (LED), hover the cursor over it. The position will be displayed at the bottom. For editing frames, these positions are to be tracked. The entire frame can also be cleared. To use the editing option, you need to have at least one frame in the grid panel. Cut (Ctrl+x) : Use this option when you want to cut a certain section of the frame and paste it elsewhere. You can paste the selected portion on the same frame or on various other frames after loading them. Here’s an example: 230A, A. J. C. Bose Road, Chitrakoot Building, Office No. 101, Kolkata 700 020. Tel : 91-33-3052 1316, Fax: 91-33-3052 1319.
- 4. Fig 1.1 : Cut Example – Frame Loaded In order to modify figure 1.1, follow these steps: Fig 1.2: Selection of Rows and Columns for the Cut Option Choose the Cut option (Ctrl+X or from the Edit drop down menu). You will be prompted for the row and the column number. In the example shown, rows from 11 to 230A, A. J. C. Bose Road, Chitrakoot Building, Office No. 101, Kolkata 700 020. Tel : 91-33-3052 1316, Fax: 91-33-3052 1319.
- 5. 22 and columns from 9 to 10 are selected. The selected portion will be trimmed from the existing frame and ready to be pasted elsewhere. Fig 1.3: Using the Paste option after Cutting To paste the selected pixels, press Ctrl+V (or select this option from the menu). Now, left click on the pixel where the selected cells are to be pasted. Copy: Use this option when you want to copy a certain section of the frame and paste it elsewhere. Unlike cut, this option will not trim the existing pixels. You can paste the copied pixels on the same frame or on various other frames after loading them. Here’s an example: 230A, A. J. C. Bose Road, Chitrakoot Building, Office No. 101, Kolkata 700 020. Tel : 91-33-3052 1316, Fax: 91-33-3052 1319.
- 6. Fig 2.1: Selection of Pixels for Copy option Choose the Copy option (Ctrl+C or from the drop down menu). You will be prompted for the row and the column number. In the example shown, rows from 11 to 22 and columns from 9 to 10 are selected. The selected portion will be copied from the existing frame and ready to be pasted elsewhere. Fig 2.2: Using the paste option after copying. To paste the selected pixels, press Ctrl+V (or select this option from the menu). 230A, A. J. C. Bose Road, Chitrakoot Building, Office No. 101, Kolkata 700 020. Tel : 91-33-3052 1316, Fax: 91-33-3052 1319.
- 7. Now, left click on the pixel where the selected cells are to be pasted. Unlike cut, the selected pixels that were copied are still intact. Paste (Ctrl+V): The option is to be used after the Cut/Copy option. After selecting the pixels to be either cut or copied, press Ctrl+V (or select it from the Edit drop down menu) and click on the pixel where selected cells are to be pasted. In case of an overlap, the existing pixels will be overwritten. For details, refer example in the Cut / Copy section. Delete (Del): Use this option when you neither want to cut/copy the selected pixels. The ‘Delete’ just deletes the selected pixels. Note that unlike Cut, Copy and Paste, this option is limited only to the current frame and cannot be used in other frames. Every time you load a frame, you need to select the pixels to be deleted. Here’s an example: Fig 3.1 : Using the Del option Choose the Delete option (Del or from the drop down menu). You will be prompted for the row and the column number. In the example shown, rows from 11 to 22 and columns from 9 to 10 are selected. 230A, A. J. C. Bose Road, Chitrakoot Building, Office No. 101, Kolkata 700 020. Tel : 91-33-3052 1316, Fax: 91-33-3052 1319.
- 8. Fig 3.2 : Selected pixels deleted from the existing frame. From fig 3.2, you can see that the selected portion is deleted from the existing frame. Note that this cannot be pasted elsewhere. Clear All (Ctrl+B) : Use this option when you want clear the entire frame. Tools : IC Select (Ctrl+M): You can select amongst 4 different IC’s (microcontrollers) to load your code into. They are SM8958 (Syncmos), AT89S51, AT89S52 and AT89C55WD. Depending on the controller selected, the usable/available space (in Kb) will be shown. Note that a single frame consumes 128 bytes of memory. Create IC File (Ctrl+D): Once you have created all your frames, the last step is to create the IC file. By clicking this option, the final file is created (in bin format). Load this file in the application software of your programming device. Program your controller and test it on the hardware. Record Animation (Ctrl+P): This option records your frames/animation and converts it in a movie format (.gif). Once saved, this feature can be predominantly used when you want to see/review the animations without opening Animation Studio. Preview (Ctrl+U): Preview the animation in Full Screen Mode. Left-Click twice to exit this mode. Effects: These are some in-built effects provided in Animation Studio that help you create animations automatically. Using these options creatively can save you a lot of manual work and time. In all the options here, you need to select the rows and columns for which the effect is to be used for. Flash: Use this option when you want flash your frames. This option can be used in two different ways: Flash the complete frame. 230A, A. J. C. Bose Road, Chitrakoot Building, Office No. 101, Kolkata 700 020. Tel : 91-33-3052 1316, Fax: 91-33-3052 1319.
- 9. Flash a certain section of the frame (after selecting the corresponding rows and columns). These two examples will help you understand its usage better: Example: Flashing of complete frame. Fig 4.1: Flash example for complete frame. This can be used when you want to flash the entire frame. After creating your frame choose the Flash option. You will then be prompted to select the rows and columns. Keep the default settings and proceed. Once done, you will see (on Grid Panel) that a blank frame is preceded with the original frame. Depending on the number of times you want to flash your frame, keep selecting this option. 230A, A. J. C. Bose Road, Chitrakoot Building, Office No. 101, Kolkata 700 020. Tel : 91-33-3052 1316, Fax: 91-33-3052 1319.
- 10. Fig 4.2: A blank frame precedes the original frame. Example 2: Flashing only a certain section of the frame: 230A, A. J. C. Bose Road, Chitrakoot Building, Office No. 101, Kolkata 700 020. Tel : 91-33-3052 1316, Fax: 91-33-3052 1319.
- 11. Fig 4.3: Flashing only a certain section of the frame. In order to flash only a certain section of the frame, select the rows and columns accordingly. From Fig 4.3, let us assume that only character ‘C’ is to be flashed. As shown in the figure, start and end columns are selected as 4 and 13 respectively; start and end rows are selected as 1 and 13 respectively. Once done, a new frame (as shown in fig 4.4) is created (which precedes the original frame) without character ‘C’. 230A, A. J. C. Bose Road, Chitrakoot Building, Office No. 101, Kolkata 700 020. Tel : 91-33-3052 1316, Fax: 91-33-3052 1319.
- 12. Fig 4.4: Flashing a certain section of a frame. Curtain: There are 6 sub-categories in this section. Left to Right: This curtain effect divides your animation frame into number of frames from left to right. Depending on the number of columns selected, your animation frame will be divided accordingly. For e.g. if you select your start column and end column as 5 and 12 respectively, your animation will be divided into 7 frames. Note that for curtain effects Left to Right and Right to Left, the creation/division of frames depends on the difference between the 230A, A. J. C. Bose Road, Chitrakoot Building, Office No. 101, Kolkata 700 020. Tel : 91-33-3052 1316, Fax: 91-33-3052 1319.
- 13. start and end columns. Fig 5.1: Selection of rows for Left to Right Curtain Example As shown in the figure, select the start column and end column. If you intend to create a left-to-right effect on the complete frame then selecting the start and end rows is redundant. If, however, you want to create frames selectively on only a certain section of the frame, you have to choose the start and end rows too. According to the rows and columns settings, Animation Studio will divide either the entire frame from left to right or only the selected section as per the settings. 230A, A. J. C. Bose Road, Chitrakoot Building, Office No. 101, Kolkata 700 020. Tel : 91-33-3052 1316, Fax: 91-33-3052 1319.
- 14. Fig 5.2: Single frame divided from Left to Right From Fig 5.2, you can see that the complete frame is divided into 15 frames as per the selection of columns (from 10 to 24, Fig 5.1) 230A, A. J. C. Bose Road, Chitrakoot Building, Office No. 101, Kolkata 700 020. Tel : 91-33-3052 1316, Fax: 91-33-3052 1319.
- 15. Right to Left: This effect works in accordance with the Left to Right curtain effect. Fig 6.1: Selection for Right to Left Effect. In order to use this effect, create your animation frame and then select the ‘Right to Left’ option and shown in Fig 6.1. 230A, A. J. C. Bose Road, Chitrakoot Building, Office No. 101, Kolkata 700 020. Tel : 91-33-3052 1316, Fax: 91-33-3052 1319.
- 16. Fig 6.2 : Selection of Rows and Columns for Right to Left Effect As shown in fig 6.2, select the start column and end column. If you intend to create a right-to-left effect on the complete frame then selecting the start and end rows is redundant. If, however, you want to create frames selectively on only a certain section of the frame, you have to choose the start and end rows too. According to the rows and columns settings, Animation Studio will divide either the entire frame from right to left or only the selected section as per the settings. 230A, A. J. C. Bose Road, Chitrakoot Building, Office No. 101, Kolkata 700 020. Tel : 91-33-3052 1316, Fax: 91-33-3052 1319.
- 17. Fig 6.3: Single frame divided from Right to Left From Fig 6.3, you can see that the complete frame is divided into 15 frames as per the selection of columns (from 10 to 24, Fig 6.2). It is to be noted that even if the effect divides the frames from Right-to-Left, the start and end columns must be specified from left to right. So, from the aforementioned example see that the start and end columns are selected as 10 and 24. Top to Bottom: Unlike Left to Right and Right to Left curtain effects, the division of frames for Top to Bottom and Bottom-to-Top curtain effects is based on rows instead of columns. According to the rows and columns settings, Animation Studio will divide either the entire frame from top to bottom or only the selected section as per the settings. 230A, A. J. C. Bose Road, Chitrakoot Building, Office No. 101, Kolkata 700 020. Tel : 91-33-3052 1316, Fax: 91-33-3052 1319.
- 18. Fig 7.1: Top to Bottom Curtain Effect In order to use this effect, create your animation frame and then select the Right-to-Left option and shown in Fig 6.1. 230A, A. J. C. Bose Road, Chitrakoot Building, Office No. 101, Kolkata 700 020. Tel : 91-33-3052 1316, Fax: 91-33-3052 1319.
- 19. Fig 7.2: Selection of Rows and Columns for Top to Bottom curtain effect This curtain effect divides your animation frame into number of frames from top to bottom. Depending on the number of rows selected, your animation frame will be divided accordingly. For example, if you select the start row and end row as 7 and 25 respectively, as shown in Fig 7.2, the animation will be divided into 18 frames. Note that for curtain effects Top-to-Bottom and Bottom-to-Top, the creation/division of frames depends on the difference between the start and end rows. 230A, A. J. C. Bose Road, Chitrakoot Building, Office No. 101, Kolkata 700 020. Tel : 91-33-3052 1316, Fax: 91-33-3052 1319.
- 20. Fig 7.3: Single frame divided from Top to Bottom. From Fig 7.3, see that the complete frame is divided into 18 frames as per the selection of rows (from 7 to 25, Fig 7.2) Bottom to Top: This effect works in accordance with the Top to Bottom curtain effect. 230A, A. J. C. Bose Road, Chitrakoot Building, Office No. 101, Kolkata 700 020. Tel : 91-33-3052 1316, Fax: 91-33-3052 1319.
- 21. Fig 8.1 : Bottom to Top Curtain Effect. In order to use this effect, create your animation frame and then select the ‘Bottom to Top’ option and shown in Fig 8.1. 230A, A. J. C. Bose Road, Chitrakoot Building, Office No. 101, Kolkata 700 020. Tel : 91-33-3052 1316, Fax: 91-33-3052 1319.
- 22. Fig 8.2: Selection of Rows and Columns for Bottom to Top Curtain Effect As shown in fig 8.2, select the start row and end row. If you intend to create a bottom to top effect on the complete frame then selecting the start and end columns is redundant. If, however, you want to create frames selectively on only a certain section of the frame, you have to choose the start and end columns too. According to the rows and columns settings, Animation Studio will divide either the entire frame from bottom to top or only the selected section as per the settings. 230A, A. J. C. Bose Road, Chitrakoot Building, Office No. 101, Kolkata 700 020. Tel : 91-33-3052 1316, Fax: 91-33-3052 1319.
- 23. Fig 8.3: Single frame divided from Bottom to Top From Fig 8.3, see that the complete frame is divided into 18 frames as per the selection of rows (from 7 to 25, Fig 8.2). It is to be noted that even if the effect divides the frames from Bottom-to-Top, the start and end rows must be specified from Top-to-Bottom. So, from the aforementioned example see that the start and end rows are selected as 7 and 25. Left Corner: This curtain effect divides your animation frame into number of frames from the top left and bottom right corner. Depending on the number of rows and columns selected, your animation frame will be divided accordingly. For this effect to work, it is mandatory to select equal number of rows and columns. For better results, you should make your animation frame in a way that utilizes 230A, A. J. C. Bose Road, Chitrakoot Building, Office No. 101, Kolkata 700 020. Tel : 91-33-3052 1316, Fax: 91-33-3052 1319.
- 24. same number of rows and columns. Here’s an example: Fig 9.1: Left corner curtain example. In order to use this effect, create your animation frame and select the ‘Left Corner’ option as shown in Fig 9.1. Note that in order to use this effect effectively, ensure that the number of rows and columns selected are equal. For e.g., a square block (as shown in fig 9.1) 230A, A. J. C. Bose Road, Chitrakoot Building, Office No. 101, Kolkata 700 020. Tel : 91-33-3052 1316, Fax: 91-33-3052 1319.
- 25. Fig 9.2: Selection of Rows and Columns for Left Corner Curtain Effect As shown in fig 9.2, select equal number of rows and columns. You will be prompted to do so, if the selection is incorrect. From the figure, see that rows from 10 to 23 and columns from 10 to 23 are selected. Animation Studio will divide the entire frame starting from top left corner and bottom right corner, into a number of frames. Note that unlike all the other curtain effects, mentioning both rows and columns is mandatory for this effect. 230A, A. J. C. Bose Road, Chitrakoot Building, Office No. 101, Kolkata 700 020. Tel : 91-33-3052 1316, Fax: 91-33-3052 1319.
- 26. Fig 9.3: Left corner curtain effect From fig 9.3, see that the initial frame is divided into number of frames starting from top left corner and bottom right corner simultaneously. It is worth mentioning again that this effect is only possible when the desired frame formed is framed with equal rows and columns. Right Corner: This curtain effect works in accordance with the left corner. It divides the selected animation frame into number of frames from the top right and bottom left corner. Depending on the number of rows and columns selected, the animation frame will be divided accordingly. For this effect to work, it is mandatory to select equal number of rows and columns. For better results, make the animation frame in a way that utilizes same number of rows and columns. Here’s an example: 230A, A. J. C. Bose Road, Chitrakoot Building, Office No. 101, Kolkata 700 020. Tel : 91-33-3052 1316, Fax: 91-33-3052 1319.
- 27. Fig 10.1: Right corner curtain example. In order to use this effect, create the animation frame and select the ‘Right Corner’ option as shown in Fig 10.1. Note that in order to use this effect effectively, ensure that the number of rows and columns selected are equal. For e.g., a square block (as shown in fig 10.1) 230A, A. J. C. Bose Road, Chitrakoot Building, Office No. 101, Kolkata 700 020. Tel : 91-33-3052 1316, Fax: 91-33-3052 1319.
- 28. Fig 10.2 Selection of Rows and Columns for Right Corner Curtain Effect As shown in fig 10.2, select equal number of rows and columns. You will be prompted to do so, if the selection is incorrect. From the figure, see that rows from 10 to 23 and columns from 10 to 23 are selected. Animation Studio will divide the entire frame starting from top right corner and bottom left corner, into a number of frames. Note that unlike all the other curtain effects, mentioning both rows and columns is mandatory for this effect. 230A, A. J. C. Bose Road, Chitrakoot Building, Office No. 101, Kolkata 700 020. Tel : 91-33-3052 1316, Fax: 91-33-3052 1319.
- 29. Fig 10.3: Right corner curtain effect From fig 10.3, see that the initial frame is divided into number of frames starting from top right corner and bottom left corner simultaneously. It is worth mentioning again that this effect is only possible when the desired frame formed is framed with equal rows and columns. Help About Us: Animation Studio is developed by Conic Systems Private Limited, Kolkata, W.B., India. For more details and other software related products please visit us at http://www.conicsystems.net. We have tried our best to provide you with a robust help documentation. In case you still have any queries regarding Animation Studio, please mail us at support@conicsystems.net and we’ll be glad to assist you. 8051 Pin Diagram: You can refer this pin diagram while configuring your hardware. For further details, refer datasheet of any 40-pin DIP microcontroller that is based on the 8051 architecture. 230A, A. J. C. Bose Road, Chitrakoot Building, Office No. 101, Kolkata 700 020. Tel : 91-33-3052 1316, Fax: 91-33-3052 1319.
- 30. 230A, A. J. C. Bose Road, Chitrakoot Building, Office No. 101, Kolkata 700 020. Tel : 91-33-3052 1316, Fax: 91-33-3052 1319.