Wood tube bamboo journal 6 - italian bamboo rodmakers association
•
1 recomendación•663 vistas

Como construir un tubo porta caña de madera.

Recomendados
Recomendados
Más contenido relacionado
La actualidad más candente
La actualidad más candente (20)
Destacado
Destacado (18)
Similar a Wood tube bamboo journal 6 - italian bamboo rodmakers association
Similar a Wood tube bamboo journal 6 - italian bamboo rodmakers association (20)
Más de Anibal Ruben Reyes
Más de Anibal Ruben Reyes (20)
Último
Último (20)
Wood tube bamboo journal 6 - italian bamboo rodmakers association
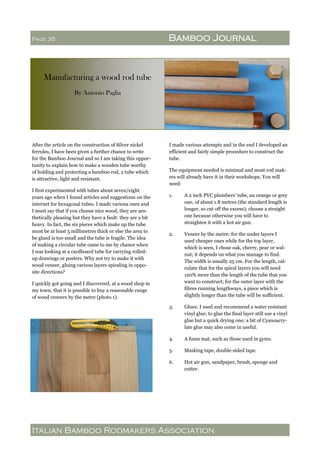
- 1. Italian Bamboo Rodmakers Association Page 35 Bamboo Journal Manufacturing a wood rod tube By Antonio Paglia After the article on the construction of Silver nickel ferrules, I have been given a further chance to write for the Bamboo Journal and so I am taking this oppor- tunity to explain how to make a wooden tube worthy of holding and protecting a bamboo rod, a tube which is attractive, light and resistant. I first experimented with tubes about seven/eight years ago when I found articles and suggestions on the internet for hexagonal tubes. I made various ones and I must say that if you choose nice wood, they are aes- thetically pleasing but they have a fault: they are a bit heavy. In fact, the six pieces which make up the tube must be at least 5 millimetres thick or else the area to be glued is too small and the tube is fragile. The idea of making a circular tube came to me by chance when I was looking at a cardboard tube for carrying rolled- up drawings or posters. Why not try to make it with wood veneer, gluing various layers spiraling in oppo- site directions? I quickly got going and I discovered, at a wood shop in my town, that it is possible to buy a reasonable range of wood veneers by the metre (photo 1). I made various attempts and in the end I developed an efficient and fairly simple procedure to construct the tube. The equipment needed is minimal and most rod mak- ers will already have it in their workshops. You will need: 1. A 2 inch PVC plumbers’ tube, an orange or grey one, of about 1.8 metres (the standard length is longer, so cut off the excess); choose a straight one because otherwise you will have to straighten it with a hot air gun. 2. Veneer by the metre: for the under layers I used cheaper ones while for the top layer, which is seen, I chose oak, cherry, pear or wal- nut; it depends on what you manage to find. The width is usually 25 cm. For the length, cal- culate that for the spiral layers you will need 120% more than the length of the tube that you want to construct; for the outer layer with the fibres running lengthways, a piece which is slightly longer than the tube will be sufficient. 3. Glues: I used and recommend a water resistant vinyl glue; to glue the final layer still use a vinyl glue but a quick drying one; a bit of Cyanoacry- late glue may also come in useful. 4. A foam mat, such as those used in gyms. 5. Masking tape, double-sided tape. 6. Hot air gun, sandpaper, brush, sponge and cutter.
- 2. Italian Bamboo Rodmakers Association Page 36 Bamboo Journal Firstly, take the veneer for the base and cut it length- ways with the cutter in roughly 8.5 centimetre strips (photo 2). It is very important that the long sides are parallel and that the cut is exact, otherwise when you go to glue them in spirals, it will be difficult to match up the sides. On one of the long sides you need to stick a strip of sticky tape, placing only half on the veneer (photo 3). This will stop the glue from seeping through from the first layer of wood to the PVC, which will make it very difficult, if not impossible, to take away the support tube. Given that the craft glue dries quickly, it may help to get another person to assist you from this point on: they will hold one end of the PVC tube and turn it while you wind the wood. Now you can make the first layer. Wet the veneer with a sponge or spray so that it bends and does not break when it is wound, since it is only 0.6 millimetres thick. Position the veneer so that the sticky part of the tape is at the top (photo 4). Stick it down with tape at one end of the PVC tube and begin to wind it round, aligning the sides without overlapping them. It is better to have a small gap than an overlap; otherwise you will have to sand it down in order to have a flat surface on which to glue the subse- quent layers, if the tube is not perfectly cylindrical. Once you have finished winding the veneer round, glue the end down with the sticky tape. Dilute a bit of craft glue with 20% of water and begin gluing the sec- ond layer. Spread the glue on the veneer, stick the end down with the tape at one end of the tube and wind it round in the opposite direction to the layer under- neath. Be careful not to create overlaps. Let it dry and use the same process for the third layer. If you try to take it off the support you will see that it is quite solid (although not comparable to aluminium tubes or PVC tubes covered in material) and very light. Three spiral layers and one covering layer are resilient enough for a thickness of little more than 2 millimetres. It is clear that the tube will not withstand squashing but, on the other hand, a wooden tube should not be manhan- dled. If you want to strengthen it, you can do so by adding other spiral layers. If you want to sand be- tween each layer, you can make little tools which imi- tate the curve of the tube. Take the leftover part of the PVC tube and cut it lengthways so that you have two half tubes, and then shorten them to about 15 centi- metres.
- 3. Italian Bamboo Rodmakers Association Page 37 Bamboo Journal Heat one of the half tubes with a hot air gun until it becomes soft, then place it on the wooden tube, make it stick and wait until it cools. Once it has hard- ened, take it off and stick the sandpaper on the in- side with double-sided tape and use it to remove the small bumps (photo 5). Do not use too hard a grit or press too hard. You can make four of these, one for each type of curve, in order to correct all four layers of wood. The gluing of the last layer is the most delicate phase because it completes the external, visible part of the tube and so errors are not allowed. If you decide to glue it in a spiral it will be stronger but, in my opin- ion, less attractive, but this is up to you. For this, you should cut a strip of veneer of about 10 with a cutter. As I mentioned above, it is of fundamental impor- tance that the long sides are perfectly parallel and that the cut is exact so that you have a large rectangle and not a large trapezium. Even if you are one milli- metre out, you will have difficulty getting it to stick to your cylindrical tube without overlap or gaps. Glue it in the same way as the previous layers and the gluing phase will be finished. Be careful to re- move the excess glue with a damp sponge immedi- ately; if not, once it has dried, you will find it difficult to get it off without ruining the wood. If, on the other hand, you decide to make it with the fibres parallel to the length of the tube, this is what you need to do. Measure the exact circumference of the wooden tube, then cut the usual strip of veneer calculating the width as the circumference plus 2 millimetres. This must be done with great care. It is very difficult to glue it all at once and obtain a good result. You need to use a quick drying glue and work a section at a time, using at least four sections. Place the veneer rectangle on the tube so that the long side is parallel to the tube’s axis. Try to spread it out well, and stick just the corners down with a few drops of Cyanoacrylate glue (photo 6). Then, dilute a bit of fast-drying vinyl glue and brush it the whole length of the veneer, creating a strip of about 2/3 centimetres. Clean off the excess glue and lay the tube on the foam mat with the glued section touching the mat (photo 7).
- 4. Italian Bamboo Rodmakers Association Page 38 Bamboo Journal Press down and after 7/8 minutes it will be ready. Spread a layer of glue on another strip of about 4/5 centimetres and then lie it on the mat and press down; remove any air bubbles by turning the tube (photo 8). The diluted glue will make the veneer damp but if you get the feeling that it could break if you bend it, wet it with the sponge too. Continue like this until you have glued just over three quarters of the veneer. At this point you will need to trim the free edge so that it ex- actly fits with the glued edge. The extra two millime- ters may seem excessive but it is better to sand it down than to have a gap. When sanding down, do as you think best but remem- ber that the veneer is very fragile. I made a little tool with a very narrow U section (photo 5), the veneer slides between the two wooden sections without bend- ing dangerously. When you have finished sanding down, glue, remove the excess glue, place on the mat and press down. The sealing could also be done by overlapping the two edges, in this case you need to sand a 2 mm strip on both sides to a taper (one in the opposite direction to the other) so that when they overlap there are no bumps. I prefer the first option. When the glue has dried you can take the support tube out, the sticky tape on the inside can be easily re- moved by pulling one of the ends. You can finish off the tube with a coat of diluted wood filler paint and by lightly rubbing wire wool over it or, even better, with wax. The lids need to be made of wood. It is useful if you have a lathe, but if you do not, do not worry as, in my opinion, you can make simple ones by hand (photo 9). The wooden tube is now ready (photo 10) for your precious rods. As I said at the beginning, it is attractive, light and resistant. Good luck with your work. Antonio Paglia (translator Heloise Kerr-Wilson)