تربية دجاج التسمين لمدة 35 يوم
•
0 recomendaciones•107 vistas

Aviagen brief low broiler kill weights

Recomendados
Más contenido relacionado
La actualidad más candente
La actualidad más candente (20)
Destacado
Destacado (20)
Similar a تربية دجاج التسمين لمدة 35 يوم
Similar a تربية دجاج التسمين لمدة 35 يوم (20)
Último
Último (20)
تربية دجاج التسمين لمدة 35 يوم
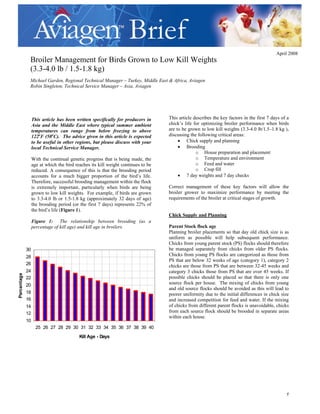
- 1. 1 This article has been written specifically for producers in Asia and the Middle East where typical summer ambient temperatures can range from below freezing to above 122o F (50o C). The advice given in this article is expected to be useful in other regions, but please discuss with your local Technical Service Manager. With the continual genetic progress that is being made, the age at which the bird reaches its kill weight continues to be reduced. A consequence of this is that the brooding period accounts for a much bigger proportion of the bird’s life. Therefore, successful brooding management within the flock is extremely important, particularly when birds are being grown to low kill weights. For example, if birds are grown to 3.3-4.0 lb or 1.5-1.8 kg (approximately 32 days of age) the brooding period (or the first 7 days) represents 22% of the bird’s life (Figure 1). Figure 1: The relationship between brooding (as a percentage of kill age) and kill age in broilers. This article describes the key factors in the first 7 days of a chick’s life for optimizing broiler performance when birds are to be grown to low kill weights (3.3-4.0 lb/1.5–1.8 kg ), discussing the following critical areas: • Chick supply and planning • Brooding o House preparation and placement o Temperature and environment o Feed and water o Crop fill • 7 day weights and 7 day checks Correct management of these key factors will allow the broiler grower to maximize performance by meeting the requirements of the broiler at critical stages of growth. Chick Supply and Planning Parent Stock flock age Planning broiler placements so that day old chick size is as uniform as possible will help subsequent performance. Chicks from young parent stock (PS) flocks should therefore be managed separately from chicks from older PS flocks. Chicks from young PS flocks are categorized as those from PS that are below 32 weeks of age (category 1), category 2 chicks are those from PS that are between 32-45 weeks and category 3 chicks those from PS that are over 45 weeks. If possible chicks should be placed so that there is only one source flock per house. The mixing of chicks from young and old source flocks should be avoided as this will lead to poorer uniformity due to the initial differences in chick size and increased competition for feed and water. If the mixing of chicks from different parent flocks is unavoidable, chicks from each source flock should be brooded in separate areas within each house. April 2008 Broiler Management for Birds Grown to Low Kill Weights (3.3-4.0 lb / 1.5-1.8 kg) Michael Garden, Regional Technical Manager – Turkey, Middle East & Africa, Aviagen Robin Singleton, Technical Service Manager – Asia, Aviagen 10 12 14 16 18 20 22 24 26 28 30 25 26 27 28 29 30 31 32 33 34 35 36 37 38 39 40 Kill Age - Days Percentage
- 2. 2 Transport from hatchery to farm Providing chicks with access to feed at an early stage will increase utilization of the yolk sac nutrients, improve early digestive tract development and gut immunity and lead to improved early growth, robustness and uniformity. Chick transport needs to be planned to take full advantage of this. Ideally chicks should be placed on the farm within 6-8 hours of hatch. Chicks lose about 0.14 oz (4 g) in weight (under normal conditions) for every 24 hours without feed and water. In hot climates this can be more, especially when the vehicles used have little or no environmental control or the time from hatchery to farm is long. Planning of hatch times and time of transport are therefore critical to minimize dehydration and stress to the chicks. Brooding House Preparation and Placement House preparation should be completed prior to chick arrival so that chicks can be placed into the brooding area immediately. The brooding layout will depend on whether the house heating system is whole house or spot heating (see Figures 2 and 3). Figure 2: Spot brooding layout Figure 3: Whole house brooding The chicks should be gently placed into the brooding area as soon as possible after arrival, being placeded quickly and evenly on to paper and feed over the brooding area. The use of paper prevents the chicks from eating the litter material, increases activity and allows a greatly increased feeding area. A minimum of 25% and preferably 100% of the floor in the brooding area should be covered in paper. The amount of paper will depend on whether it is whole house or spot brooding and on what type of litter material is used. Feed should be distributed onto this paper before the chicks arrive. Where half house brooding is used with an increased initial chick density (approximately 3 - 4 chicks per ft² or 35 to 40 chicks per m²) feeding and drinking space should not be compromised. It is recommended that a sample of chicks should be weighed individually and the CV calculated at placement, this will give a good indication of chick condition. Temperature and Environment It is important that the house is maintained at the correct temperature if the birds are to be active and develop a good appetite. Temperature in the brooding area should be considered in two parts, firstly the temperature of the air (measured at chick height and in the vicinity of the feeders and drinkers) and secondly the temperature of the litter. Air temperature should be 86o F (30o C) and litter temperature 82-86o F (28-30°C) when the chicks are placed. House temperature will be greatly influenced by local environmental conditions and must be correlated to the effective temperature perceived by the chick. Variation in relative humidity (RH) will influence the effective temperature experienced by the chicks. Higher RH reduces evaporative heat loss, increasing the effective temperature; lower RH decreases the effective temperature. Regionally, big variations will occur in RH so it is critical that when and where low RH occurs care is taken to increase RH in the brooding area. RH% should ideally range between 60-70%, this can be difficult to achieve, especially in dry, hot climates. Humidifiers/high pressure foggers (700 – 1000 psi or 49 – 70 bar; with a 5 micron droplet size) or the addition of surface water may help in some situations. Brooding temperature settings should be adjusted if RH increases above 70% or falls below 60% while responding to changes in chick behavior. It is easy to assume the litter temperature is correct if air temperature is. However, unless the preferred temperatures are achieved at least 24 hours before placement, there can be big differences between air and litter temperature. This is especially so in areas where there are big diurnal temperature differences. If chicks are standing on litter that is <82°F (<28°C) they may become chilled through their feet. Once the chicks become chilled problems will occur. Chick behavior is the best indicator as to whether the correct temperatures are being achieved and should be monitored closely in the first 7 days.
- 3. 3 Figures 4 and 5 indicate chick behavior when the correct temperatures are achieved. Figure 4: Correct bird distribution under spot brooders Figure 5: Correct bird distribution in whole house brooding Feed and water Feed and water must be available immediately to the chicks at placement. At this time it is essential that there is enough feed and water space. To ensure this, supplementary feeders and drinkers should be provided (see Figure 6). Achieving the correct light intensity in the brooding area will help chicks to find the feed and water and stay active; 30-40 lux should be used for the first 7 days. Figure 6: Supplementary feeders and drinkers for newly placed chicks Small amounts of feed should continue to be distributed onto the paper frequently (every 2-3 hours), particularly during the first 24 hours. Supplementary feeding in this way will stimulate and encourage the chicks’ instinctive pecking behavior, by creating noise and movement as the chicks walk on the paper and the feed. After 3 days the birds should be eating from the pans or tray feeding system only and the paper can be removed. Feed form at this stage is crucial and the feed should be a good quality sieved crumb. Manual pan feeders should be accessible by the chick from placement and have a low depth. Feeders should be emptied daily to prevent the build up of any fines/dust. During the first 7 days additional supplementary drinkers should be provided. This is essential in hot dry climates and where bell drinkers are used. Drinkers should be positioned to ensure that chicks do not have to travel more than 1m for access to water in the first 24 hours. Unrestricted access to a supply of fresh, good quality clean water is essential. Steps can be taken to ensure that water is as cool as possible. For example, flushing drinker lines, using cool pads, positioning tankers and drinkers underground or insulating. All drinkers must be easily accessed by the whole flock. Nipple drinkers should be placed and maintained at eye level of the chick during the first 24 hours. Thereafter, the nipple drinker should be placed at a height at which the bird is able to drink. The back of the chick should form an angle of 45° with the floor whilst drinking is in progress. As the bird grows, drinker height should be adjusted accordingly (see Broiler Management Guide for further information). One nipple drinker for every 8-10 birds should be supplied. For bell drinkers in hot climates, one drinker for every 60 birds should be provided. Adhering to these targets will ensure correct drinking space through the growing period. Crop Fill (Monitoring of appetite development) When they first start to feed, chicks will tend to eat a good meal. If the chicks are feeding and drinking properly the crop fills with a mixture of food and water. Gentle handling of the chicks within the first 48 hours can give a good indication as to whether the chicks have eaten and had a drink. Ideally, the crop should be full and rounded (see Figure 7, page 4) and the contents should have a soft consistency. If the crop contents are stiff, or the original texture of the feed can be felt through the crop wall, then little or no water has been consumed.
- 4. 4 Figure 7: A chick showing good crop fill Crop fill should be monitored for the first 72 hours and an initial check at 2 hours will indicate if chicks have found feed and water at placement. Checks at 60 hours and 72 hours are important to confirm that all birds have found feed and water and that the transition onto mechanical or manual feeders has occurred. Ventilation Providing good air quality for the chick is critical. Even short periods of exposure to high ammonia levels can negatively affect bodyweight gain and feed efficiency and increase the risk of damage to the eyes and cardiovascular and respiratory systems. As a rule of thumb, the required minimum ventilation airflow rate for starting chicks is 0.10–0.20 CFM/bird/minute or 0.16-0.4 m3 /bird/hour - depending on outside temperature and internal air quality condition. Air speed at chick level should be low and kept below 30 ft/min (0.15 m/sec) to ensure a good environment and start. 7 day weight and 7 day checks When growing birds to a low kill weight, getting the birds off to a good start and achieving a good 7 day bodyweight is critical. The major objective in the first few days of life is to get the broiler chick eating and drinking. If broiler chicks are restricted in their feeding and drinking during this time, by management or environmental factors, performance will be depressed. The potential 7 day bodyweight of the modern broiler chick is +/-6.3 oz (+/-180 g). If the chicks achieve a 7 day bodyweight of 5.6 oz (160 g) or more (approximately 4.5-5 times the day old chick weight), this is an indication that they have had a good start. If a flock is achieving less than this, then the brooding management and nutrition must be reviewed. The importance of achieving a good 7 day weight is further emphasized when it is considered that for every 0.35 oz (10 g) improvement in 7 day bodyweight gained, an improvement of 1.4-2.1 oz (40–60 g) will be achieved at 35 days (under good management conditions). Figure 8: The relationship between an improvement in liveweight at 7 days of age and liveweight achieved at 35 days (under good management). Broiler management after 7 days Although brooding management is critical when killing at low bodyweights, appropriate management must also be employed for the remainder of the birds’ life if a good early start is to be built upon. Water intake High environmental temperature can impact heavily on water intake. The water intake of chickens is approximately double that of feed intake (1.8:1) in normal conditions. However, in hot environments water intake will be increased up to 3 times that of feed intake. Time of Check Target crop fill (% of birds with full crops) 2 hours after placement 75% 12 hours after delivery 85%> 24 hours after delivery 95%> 48 hours after delivery 100% 60 hours after delivery 100% 72 hours after delivery 100% +.35 oz +1.4-2.1 oz
- 5. 5 Figure 9: Effect of Environmental Temperature on Water Intake. (Based on daily feed consumption defined in the Ross Broiler Performance Objectives and the assumption that water intake increases by 3.33% per o F increase in temperature [6% per o C] over 70o F [21o C], Singleton, 2004). 0 200 400 600 800 1000 1200 0 1 2 3 4 5 6 7 8 9 Age (weeks) WaterIntake(ml/chick/day) 65°F 75°F 85°F 95°F It is important to monitor the feed to water ratio daily and check that birds are drinking sufficient water. Allowances should be made for increased water intake at higher temperatures (3.6% increase per degree over 70o F or 6.5% increase per degree over 21o C). For further information on water intake see the Aviagen Brief on Water Quality. 8 to 14 days of Age Management of temperature and air quality is critical at this stage. In spot brooder type systems pens are being opened up and by 14 days the birds will be given access to the whole house. A big danger at this stage can be over ventilating the house and birds becoming chilled due to high wind speeds, especially in tunnel housing systems. Feed management remains a priority and the volume of feed in the track or pans should be reduced. The idea of this is that the mechanical feeders will be run more frequently with a lower volume of feed in each pan or track, resulting in fresh feed being circulated and reducing build up of dust each time the system is run. This can be done by using time clocks on track feeders or by putting a bright light over the control pans on pan systems, to encourage birds to feed from the control pans and activate the system (obviously birds must be feeding from the control pan if this is to work). For manual systems tube feeders should be given fresh feed 2 to 3 times per day. Average daily gain can be affected when the transition from crumbs to pellets takes place and care must be taken to minimize selective feeding; this is a big problem if there is a high percentage of fines in the feed. Pellets used at this stage should be 0.078 - 0.118 in (2-3 mm) short cut. 15 to 21 days This is the time when feeders must be managed correctly to maximize potential growth. Feed integrity must be maintained and fines kept to a minimum. A high percentage of fines in the mechanical feeders will affect feeding space per bird, due to birds spending longer eating which in turn creates a barrier for other birds wanting to eat. This will cause a feed restriction at the time when maximum consumption is required. Feeding space should be approximately 65 birds to a pan (13 inches or 33cm diameter) for birds grown up to 3.3 lbs (1.5kg). 22 days to depletion At this time in the bird’s life the temperature heat load starts to build up in the house and ventilation and cooling management are the priority in order to keep the broiler in its comfort zone. The environment must be managed to ensure birds eat and drink. If the bird starts to show heat stress, growth rate will be reduced as energy is expended during panting and appetite is depressed. Managing stocking density is essential in preventing this and stocking density in terms of kg per m² or lbs/ft2 (biomass) is the key factor. In hot climates stocking density will depend on the environmental temperature and humidity and the ventilation system. Stocking density should be adjusted depending on the age and weight at which the flock is to be killed. Conclusion To grow broilers successfully to lower weights attention to the smallest detail is essential. Remember, the average flock will be about 768 hours (32 days) old at slaughter and one day is 3% of the birds’ life - this means that there is little or no time to recover if the flock has deviated from the standard. This means that good management during the brooding period is critical in broilers that are killed at low bodyweights. However, appropriate management must also be employed for the remainder of the birds’ life if a good early start is to be built upon. Growers must ensure that best management practices are there to support the genetic potential of the Ross broiler. This is done by understanding the biological needs of the birds and adapting management to maximize Average Daily Gain. 0408-AVN-009