SEG101
•Descargar como DOC, PDF•
0 recomendaciones•358 vistas

Tocadiscos diseño madera. Tocadiscos Retro con entrada USB 218.30€ 129.00€ Tocadiscos de diseño, secciones en madera. Tocadiscos de diseño claramente retro, pero aportando los avances de la tecnología actual. Entrada USB, mando a distancia, salidas para altavoces, tres velocidades, etc... Un buen Tocadiscos a un muy buen precio.

Recomendados
Más contenido relacionado
La actualidad más candente
La actualidad más candente (17)
Destacado
Destacado (17)
Similar a SEG101
Similar a SEG101 (20)
SEG101
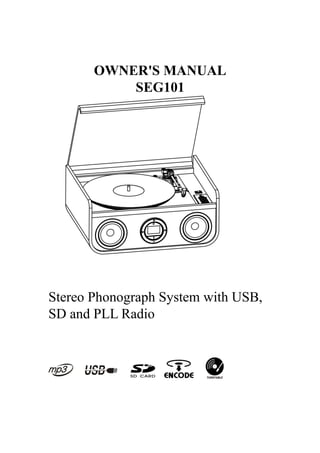
- 1. OWNER'S MANUAL SEG101 Stereo Phonograph System with USB, SD and PLL Radio
- 2. CAUTION TO PREVENT FIRE OR SHOCK HAZARD,DO NOT USE THIS PLUG WITH ANEXTENSION CORD,RECEP TACLE OR OTHER OUTLET UNLESS THE BLADES CAN BE FULLY INSERTED TO PREVENT BLADE EXPOSURE.TO PREVENT FIRE OR SHOCK HAZARD,DONOT EXPOSE THISAPPLINACE TO RAIN OR MOISTURE. IMPORTANT SAFETY INSTRUCTIONS 1.) Read these instructions. 2.) Keep these instructions. 3.) Heed all warnings. 4.) Follow all warnings. 5.) Do not use this apparatus near water. 6.) Clean only with dry cloth. 7.) Do not block any ventilation openings.Install in accordance with the manufacturer's instructions. 8.) Do not install near any heat sources such as radiators,heat registers,stoves,or other apparatus (including amplifiers)that produce heat. 9.) Do not defeat the safety purpose of the polarized or grounding type plug. A polarized plug has two blades with one wider than the other. A grounding type plug has two blades and a third grounding prong.The wide blade or the third prong is provided for your safety.if the provided plug does not fit into you outlet,consult an electrician for replacement of the obsolete outlet. 10.) Protect the power cord from being walked on or pinched particularly at plugs,convenience receptacles,and point where they exit from the apparatus. 11.) Only use attachments / accessories specified by the manufacturer. 12.) Unplug this apparatus during lightning storms or when unused for long periods of time 13.) Refer all servicing to qualified service personnel.Servicing is required when the apparatus has been damaged in any way,such as power-supply cord or plug is damaged,liquid has been spilled or objects have fallen into the apparatus,the apparatus has been exposed to rain or moisture,does not operate normally,or has been dropped. 14.) This appliance shall not be exposed to dripping or splashing water and no object filled with liquids such as vases shall be placed on the apparatus. 15.) Do not overload wall outlet.Use only power source as indicated. 16.) Use replacement parts as specified by the manufacturer. 17.) The product may be mounted to a wall only if recommended by the manufacturer. 18.) Upon completion of any service or repairs to this product,ask the service technician to perform safety checks.
- 3. PREPARATION FOR USE UNPACKING AND SET UP ·Carefully remove the unit from the display carton and remove all packing material from the unit. ·Unwind the DC power plug and extend it to its full length. ·Unwind the FM Antenna wire and extend it to its full length. ·Unwind the speakers and extend it to its full length(open the speakers fastener(L/R) ·Place the unit on a stable,level surface,convenient to an AC outlet,out of Direct sunlight,and away from sources of excess heat,dust,moisture, humidity,or strong magnetic fields. ·Connect the plug to your AC outlet. ·Raise the lid to expose the phonograph.The phonograph has been secured For shipment with a transit screw.Use a coin or screwdriver to turn the transit screw clockwise.This will allow the turntable to"float"
- 4. ·Remove the opaque white plastic stylus Cover from the phonograph stylus by Sliding it in the direction of the arrow. Discard the stylus cover. ·Remove the twist-tie that was used to secure the tone arm during shipment. ·Release the tone arm lock lever. ·Connect the plug to your AC Outlet. POWER SOURCE This system is used dc adaptor operate on normal 240V 50HZ DC only. Attempting to operate from any other power source may cause damage to the system,and such damage is not covered by your warranty. NOTE:If this plug will not fit into your outlet,you probably have an out-dated Non-polarized AC outlet.You should have you outlet changed by a qualified Please pull the power plug during shock and unused for a long time. The power plug and power jack should be matched as a suitable make and Break device,in order to make operation conveniently. IMPORTANT:Raising And Lowering The Lid To open the lid,raise it as far as it will go until the lid support bracket"locks"in The open position. To close the lid,lift it upward slightly until the lid support TO AVOID DAMAGING THE CABINET OR THE LID,NEVER FORCE THE LID CLOSED. ALWAYS RAISE THE LID TO RELEASE THE LID SUPPORT BRACKET. PROTECT YOUR FURNITURE This model is equipped with non-skid rubber "feet" to prevent the product from Moving when you operate the controls. These "feet" are made from non-migrating Rubber material specially formulated to avoid leaving any marks or stains on Your furniture. However certain types of oil based furniture polishes,wood preservatives, or cleaning sprays may cause the rubber "feet" to soften,and Leave marks or a rubber residue on the furniture. To prevent any damage to your Furniture we strongly recommend that you purchase small self-adhesive felt Pads, available at hardware stores and home improvement centres everywhere, And apply these pads to the bottom of the rubber "feet" before you place the Product on fine wooden furniture.
- 5. LOCATION OF CONTROLS AND INDICATORS FRONT PANEL 1.) Phonograph Lid. 15.) PRESET/FOLDER-button 2.) Turntable. 16.) PROGRAM button 3.) Speakers 17.) ID3 button 4.) STOP button 18.) EQ button 5.) LCD display 19.) REPEAT button 6.) FM MODE button 20.) PRESET/FOLDER+ button 7.) VOLUME-button 21.) TUNING/SKIP+ button 8.) FUNCTION button 22.) RECORD button 9.) VOLUME+ button 23.) SD CARD slot 10.) PLAY/PAUSE button 24.) USB port 11.) POWER switch 12.) Tone Arm 13.) TUNING/BAND button 14.) TUNING/SKIP-button
- 6. BACK PANEL 25.) FM antenna 26.) AUX IN Jack 27.) LINE OUT Jack (R/L) 28.) AC power cord REMOTE CONTROL OPERATION: R1) PROGRAM. R2) RECORD. R3) REPEAT. R4) PLAY/PAUSE. R5) DN/FB(SKIP REV.). R6) UP/FF(SKIP Forward.). R7) STOP. R8) TRACK-10. R9) TRACK+10. R10) RANDOM. NOTE:All of the buttons on the remote control have the same function as these buttons in the unit.This remote control just used for CD/MP3,USB mode. PHONOGRAPH 1.) Turntable. 2.) 45 RPM Adapter. 3.) Transit Screw. 4.) Cue Lever. 5.) Speed Selector (33&45&78 RPM). 6.) Tone Arm Lock. 7.) Tone Arm with Stylus.
- 7. BASIC FUNCTION Switching on the unit Note: Before switching on the unit,Please make sure that all connections have Been got ready. Press the POWER button the LCD display will illuminate and show HELLO moving.Press FUNCTION button to select playing mode [USB/CARD/AUX/ TUNER/PHONO]. To adjust volume Hold the electronic VOLUME UP/DOWN control to increase or decrease volume. Built-in Different Equalizer System This unit has a built-in equalizer system,Preset EQ button while playing to select different music style (sound tone): FLAT, CLASSIC, ROCK, POP and JAZZ. ID3 SYSTEM When plays a USB or SD or AUX, Press the ID3 button,if the track file is write in "ID3" it will automatically to search the information of "FOLDER NAME" "ARTIST NAME" and "TITLE NAME" to show in the display. And press the ID3 Button again,the display will show "ID3 OFF" and change to normal. RADIO OPERATION TUNING IN RADIO STATIONS 1. Press the FUNCTION button to select TUNER mode,the display will show "TUNER". 2. Press the BAND button to select the desired wave band: AM/FM. In FM Position,press the FM mode button to select the FM MONO/FM ST.mode. 3. Tune to desired station by pressing the FF/UP or FM/DN, the display will Show the band frequency. 4. Press the VOLUME+ or VOLUME-control to desired volume level. 5. Extend FM ANTENNA to its full length if you are listening to FM broadcasting. Gently rock the unit back and forth to get the best reception when you are Listening to AM program, or place the unit in an open location.
- 8. Note: When you are receiving FM stereo program, the display will show "((((ST))))". 6. To turn off the radio, press the FUNCTION button to enter USB or CARD or AUX or PHONO operation, or switch off the unit by pressing POWER Stations. RADIO AUTO SCAN (SEARCH) Rotate the FF/UP or FB/DN control for 1 or 2 seconds, the unit will auto scan Until having found a strong signal program, rotate and hold again to search other Stations. RADIO STATION MEMORY OPERATION You may pre-store 40 (AM and FM) radio stations in memory for your Preference controlled by remote handset, so as you can listen to your desired Station directly and quickly, no need to tuning and search for again. NOTE: you may pre-store 40 (10 for AM and 30 for FM) radio stations in Memory for your preference controlled by remote handset. 1.Press the FUNCTION button to Set the unit to TUNER mode. 2.Press PROGRAM button to select band (AM or FM), Tune into a station. 3.Press PROGRAM button,"MEMORY"shows on the display. Then press the M+/FOLDER+button to select the first storing location(fig2). 4.Press PROGRAM button again to store. 5.Search another station, repeat steps (3) & (4) until all desired stations stored. Up to 40 stations can be programmed (10 for AM and 30 for FM). 6.Press M+/FOLDER+button to listen to the stored station directly. USB PLAYBACK 1.Press the FUNCTION button to select USB mode. 2.Connect the USB Flash Disk Device into the USB PORT. 3.If the USB is readable,the display will show USB and The total number of Tracks after several seconds. 4.Press the PLAY/PAUSE button to start playback, the display will show as the fig 3. 5.Press the STOP button to stop playing.The display will show total number of Tracks (fig4). CAUTION: ·Do not use any USB extension cable for connecting the USB stick which may Cause harmful interference ·In case of malfunction due to electrostatic discharge, just reset the product
- 9. (reconnect of power source may be required) to resume normal operation. SD/MMC CARD INSTALLATION AND REMOVE Press the card towards the SD/MMC CARD slot, when the installation is well Done, a "click" sound will be heard. To remove the SD/MMC card,press the Card gently the card will flick out. Now you can remove the card out of the card Slot. SD/MMC CARD PLAYBACK 1.Press the FUNCTION button to select CARD mode. 2.Connect the SD card to the SD CARD INPUT slot.The LCD will display total Number of tracks stored inside the card (fig5). 3.Press the PLAY/PAUSE button to start playing. Press the PLAY/PAUSE button Once again to temporarily stop.The track number will flash. 4.Press the STOP button to stop playing.THE display will show total number of Tracks. 5.Proceed repeat play (repeat 1/repeat folder/repeat all)/program play/skip up And down operation follow the steps described in above "USING THE CARD/MP3". SELECTING A DESIRED TRACK/PASSAGE To select a desired track ·Press the FF/UP or FB/DN button repeatedly in stop mode or during playing Until the desired track appears on the display. ·Press PLAY/PAUSE button to start play. To search for a particular passage during playback (track scanning at High speed) Press and hold FF/UP or FB/DN button to scan the current playing track at High speed until desired point (passage), then release the button, playback Will start again from this point. PROGRAM TRACKS Program tracks of USB/SD are possible when playback is stopped. Up to 99 Tracks can be stored in the memory in any order. 1.In stop mode, press PROGRAM button to enter program setting, the "PROG" Will show and the "F00 PO1"will show on the display (fig6). 2.Press M+/FOLDER+ to select the FOLDER,then press the FF/UP or FB/DN Button to select the first desired track to be programmed. 3.Press PROGRAM button to enter. The display changes to show "F01 P02" (fig7). 4.Repeat steps 1,2 & 3 to store other desired tracks until all tracks Programmed. 5.Press PLAY/PAUSE button to start playback in the order you programmed.
- 10. 6.Press STOP button to stop program playback. NOTE: You can press STOP button when the disc stopped to clear the memory. REPEAT PLAY You can play one track or all tracks on the disc repeatedly. To Repeat a Single Track 1.Press REPEAT button once in play, The REPEAT 1 symbol will steady on. The current track will be played over and over again till you press STOP Button (fig8). 2.To cancel repeat play, press REPEAT button until the "REPEAT 1symbol" goes off. To repeat all the Tracks 1.Press REPEAT three time in play,The "REPEAT ALL" will be steady on. All tracks on the disc will be played over and over again till you press STOP Button (fig9). 2.To cancel repeat play, press REPEAT button until the "REPEAT ALL" goes off. To repeat current Directory 1.Press REPEAT button twice in play mode, "REPEAT FOLDER" shows steady on the display, The current directory will be played repeatedly until the STOP Button is pressed (fig10). 2.Press the REPEAT button until the "REPEAT FOLDER" disappear to cancel. Note: 1.Repeat function also can be done in stop mode. 2.Repeat current directory must be with folder in your USB or SD CARD.
- 11. PHONO PLAY BACK This system includes a full-size, 3-speed, belt-drive turntable. You can play 33, 45, and 78 RPM records. 1.) Press the VOLUME+ or VOLUME- control to a low level. 2.) Press the FUNCTION button to select(AUX/USB/CARD/TUNER/PHONO) To the PHONO position, the display shows "PHONO" 3.) Make sure that you have removed the stylus cover from the stylus and Have released the Tone Arm Lock that secured the tone arm to the tone arm rest. 4.) Set the turntable Speed Selector to the appropriate speed, 33, 45, or 78 RPM. If you are playing 45 RPM singles, place the 45 RPM adapter on The centre spindle. 5.) Place your record on the centre spindle. 6.) Raise the CUE lever to lift the tone arm off its rest. Move the tone arm to The edge of the record. The turntable starts automatically. Use the CUE Lever to gently lower the tone arm onto the record. 7.) Adjust the VOLUME+/- control to the desired level. 8.) When the tone arm reaches the end of the record it automatically returns to The tone arm rest and the record player stops. 9.) To turn the system "off", press the POWER switch NOTE:Do not turn or stop the turntable manually. Moving or jarring the Turntable without securing the Tone Arm clamp could result in damage to the Tone Arm. IMPORTANT!! ·TO PROTECT THE TURNTABLE FROM DAMAGE DURING TRANSPORTATION, A SILVER TRANSIT SCREW IS LOCATED AT THE UPPER RIGHT OF THE TURNTABLE PLATFORM. ·BEFORE PLAYING, PLEASE USE A SCREWDRIVER TO TURN THE TRANSIT SCREW IN CLOCKWISE DIRECTION (SCREW GOING DOWN) COMPLETELY TO UNLOCK THE TURNTABLE. ·TO LOCK THE TURNTABLE AGAING FOR TRANSPORTATION, PLEASE TURN THE SCREW IN COUNTER-CLOCKWISE DIRECTION. ·REMOVE THE ROUND PAPER CARD ON THE TURNTABLE BEFORE PUTTING YOUR RECORD ON THE CENTER SPINDLE.
- 12. AUX IN RECORDING 1.) Press the VOLUME+ or VOLUME-control to set the volume to a low level. 2.)Press the function button (AUX/USB/SD/TUNER/PHONO) to AUX Position, insert the AUX line into the AUX in jack. 3.) Press FF/UP or FB/DN button to choose record the desired track. 4.) Plug U Disk into USB port or insert the SD CARD into the SD CARD slot, the "USB" or "CARD" indicator will show on the display, press RECORD button Once to enter into Record mode, "REC" indicator goes on. Press RECORD Button twice will start to record the playing track into USB, the track will be re- Start play from the beginning of the selected track. "REC" indicator flashes. 5.) Press STOP button will cancel the record function. Press STOP button Once will stop RECORD mode, and "REC" indicator goes "Off", press Twice will stop CD playing. NOTE:When the player Playback AUX, the display will show "AUX" PROGRAM RECORDING This feature allows you choose the desired tracks to be recorded at one time. 1.) Program tracks you want to record, procedures are the same as those of Program playback step 1-4 on page 8, 9 Program indicator remains "On". 2.) Press FF/UP or FB/DN control to choose the desired on in the Programmed tracks. 3.) Plug U Disc into USB port or insert the SD CARD into the SD CARD slot. Press PLAY/PAUSE button to begin play the programmed tracks,press RECORD button twice to start record. "REC" indicator flashes. The Display will show the playing track number, "AUX" and folder name of the Track selected. For example:"001" AUX "f01". 4.) Press STOP button once will cancel the record function and " REC" Indicator goes "Off", Otherwise the recording will be from the first track To the end of the programmed tracks. 5.) After the last track has been recorded, the player stops and the display Shows the total number. The program sequence has been canceled in the memory. The PROG . Indicator goes "Off".
- 13. PHONO RECORDING 1.) Press the VOLUME+ or VOLUME- to set the volume to a low level. 2.) Press the function button(AUX/USB/SD/TUNER/PHONO) to PHONO Position."PHONO" will be shown on the display. 3.) Plug U Disk into USB socket or insert the SD CARD into the SD CARD slot. Place the record on the turntable center and play the record. Press RECORD button twice to enter into record mode.The player will re-start Play the first point of the track to be selected. "REC" will be shown on the display and "REC" indicator remain flash. The recording will be from the First to the end of the phono record. 4.) Press STOP button once will stoop RECORD mode, and "REC" indicator Goes "Off" . "PHONO" will be shown on the display and phono record will Continue to playback. 5.) Press the POWER switch to turn off the system. NOTE: You may refer to playback of USB to play the recorded tracks in USB. AUX IN OPERATION Insert the audio cable (not included) into the matching"AUX IN" socket of The unit(TR-W188),opera te A as usual and through the speaker of TR-W188, We can hear the sound exported from A. LINE OUT OPERATION This system includes a set of LINE OUT sockets (L/R) which allow you to record From the Radio or phonograph of this system to an external recording device Such as a cassette recorder. Mini-Disc,etc. In any play mode, insert the audio Cable (not include) into the matching "LINE OUT " socket of the unit, operate TR-W188 as usual , and through the speakers of B, you can hear the sound Exported from TR-W188.