3. If
you
select
sign
up,
enter
your
email
and
you
will
receive
a
confirmaMon
email.
4. Click
the
confirmaMon
link
on
the
email
and
you
will
be
directed
to
the
‘acMvate
your
account’
page.
Fill
out
your
details
and
click
conMnue.
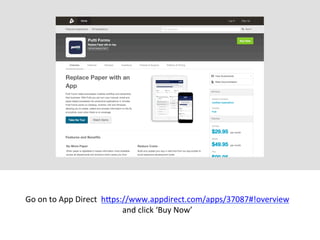
5. You
will
then
be
directed
to
the
buy
now
page
where
you
need
to
select
your
desired
plan
and
a
design
package
if
required.
Then
click
conMnue.
6. You
will
then
be
directed
to
the
‘buy
now’
page.
Select
your
desired
plan
and
a
design
package,
if
required.
Then
click
conMnue.
7. On
the
next
page,
enter
your
payment
details,
PayPal
or
Credit
Card.
Then
click
conMnue.
(Clicking
PayPal
will
redirect
you
to
PayPal
payment
screen).
8. Once
your
details
have
been
added
you
need
accept
the
Ts
&
Cs
and
click
to
place
the
order
9. Once
the
order
has
been
placed
you
will
receive
an
order
receipt.
On
this
page
click
to
go
to
ApplicaMons.
10. Select Putti Forms on the applications
screen on your App Direct account
11. Fill out the form to create your instance that will be used to create forms, assign users and read submissions etc.
The Company URL determines your Putti Forms address so choose something simple and convenient.
The password is for accessing the iOS or Android Putti Forms app.
After clicking submit, it may take a short time to set up your instance, so please be patient.
12. Once your instance has been created you, will be taken to your Putti Forms
dashboard. Here holds the information regarding how many forms, users etc you
have, which will depend on the plan you selected.
13. From the dashboard you can start creating your forms by clicking
the forms tab on the top menu bar