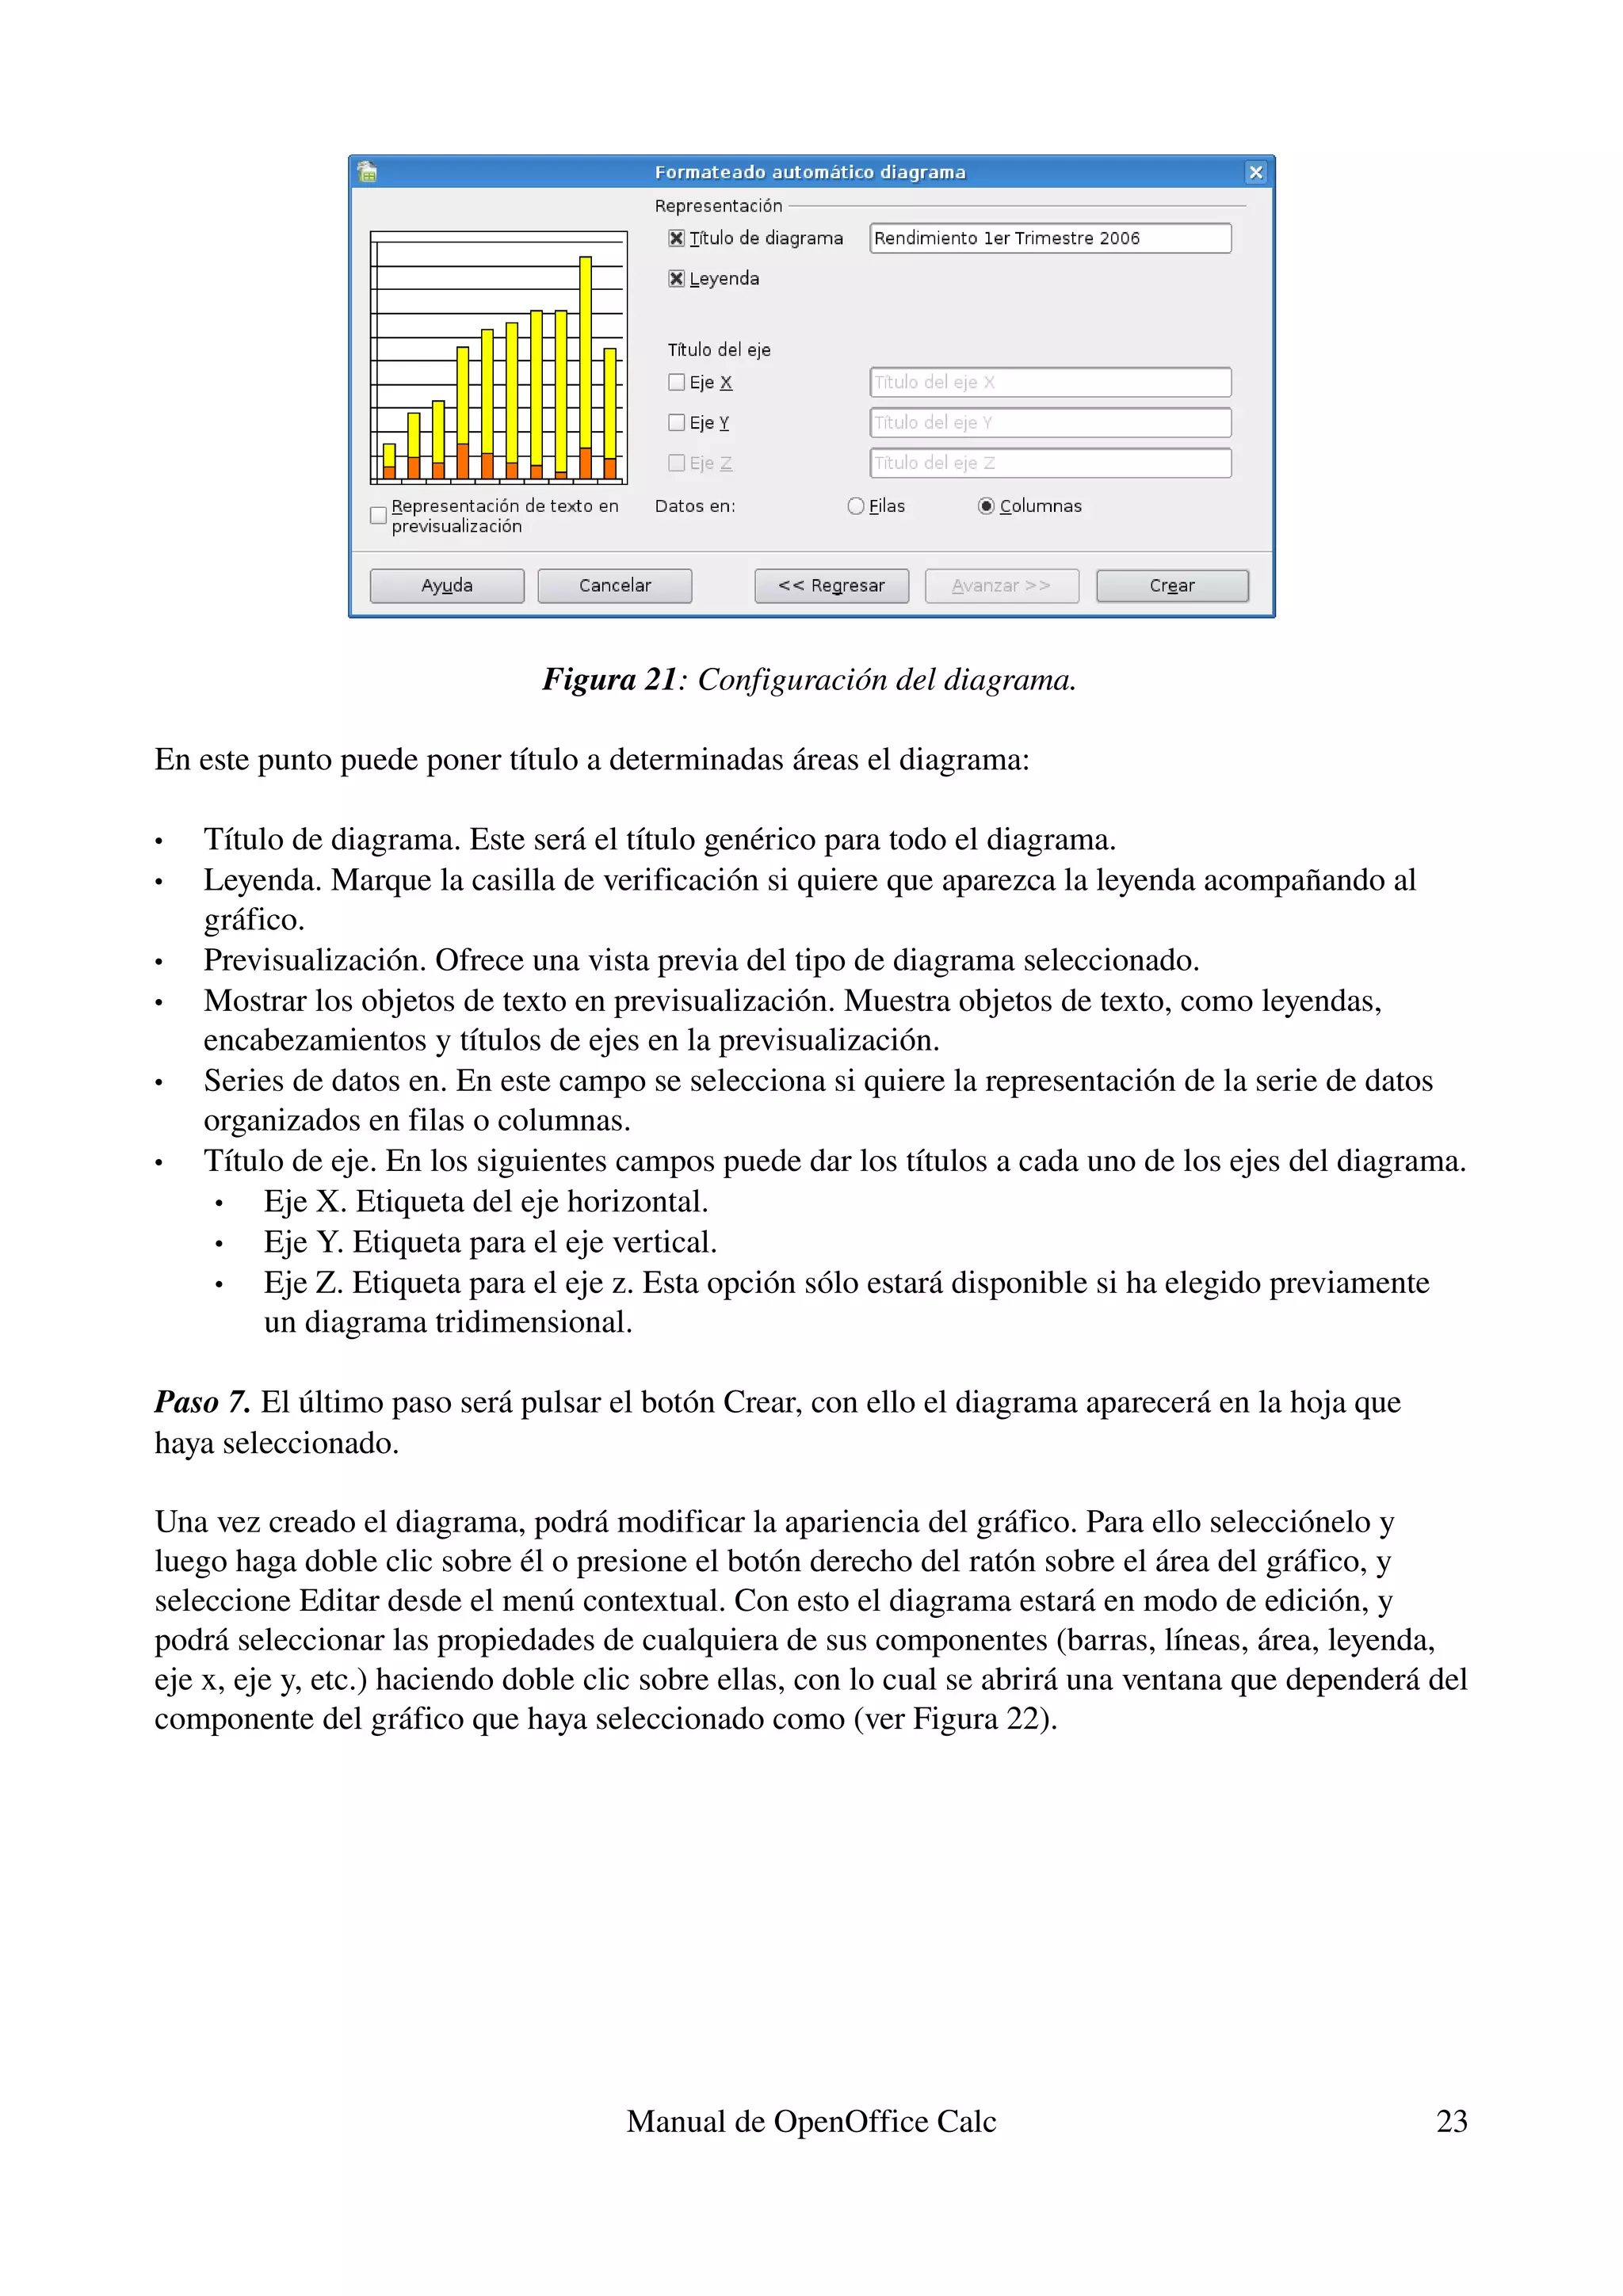
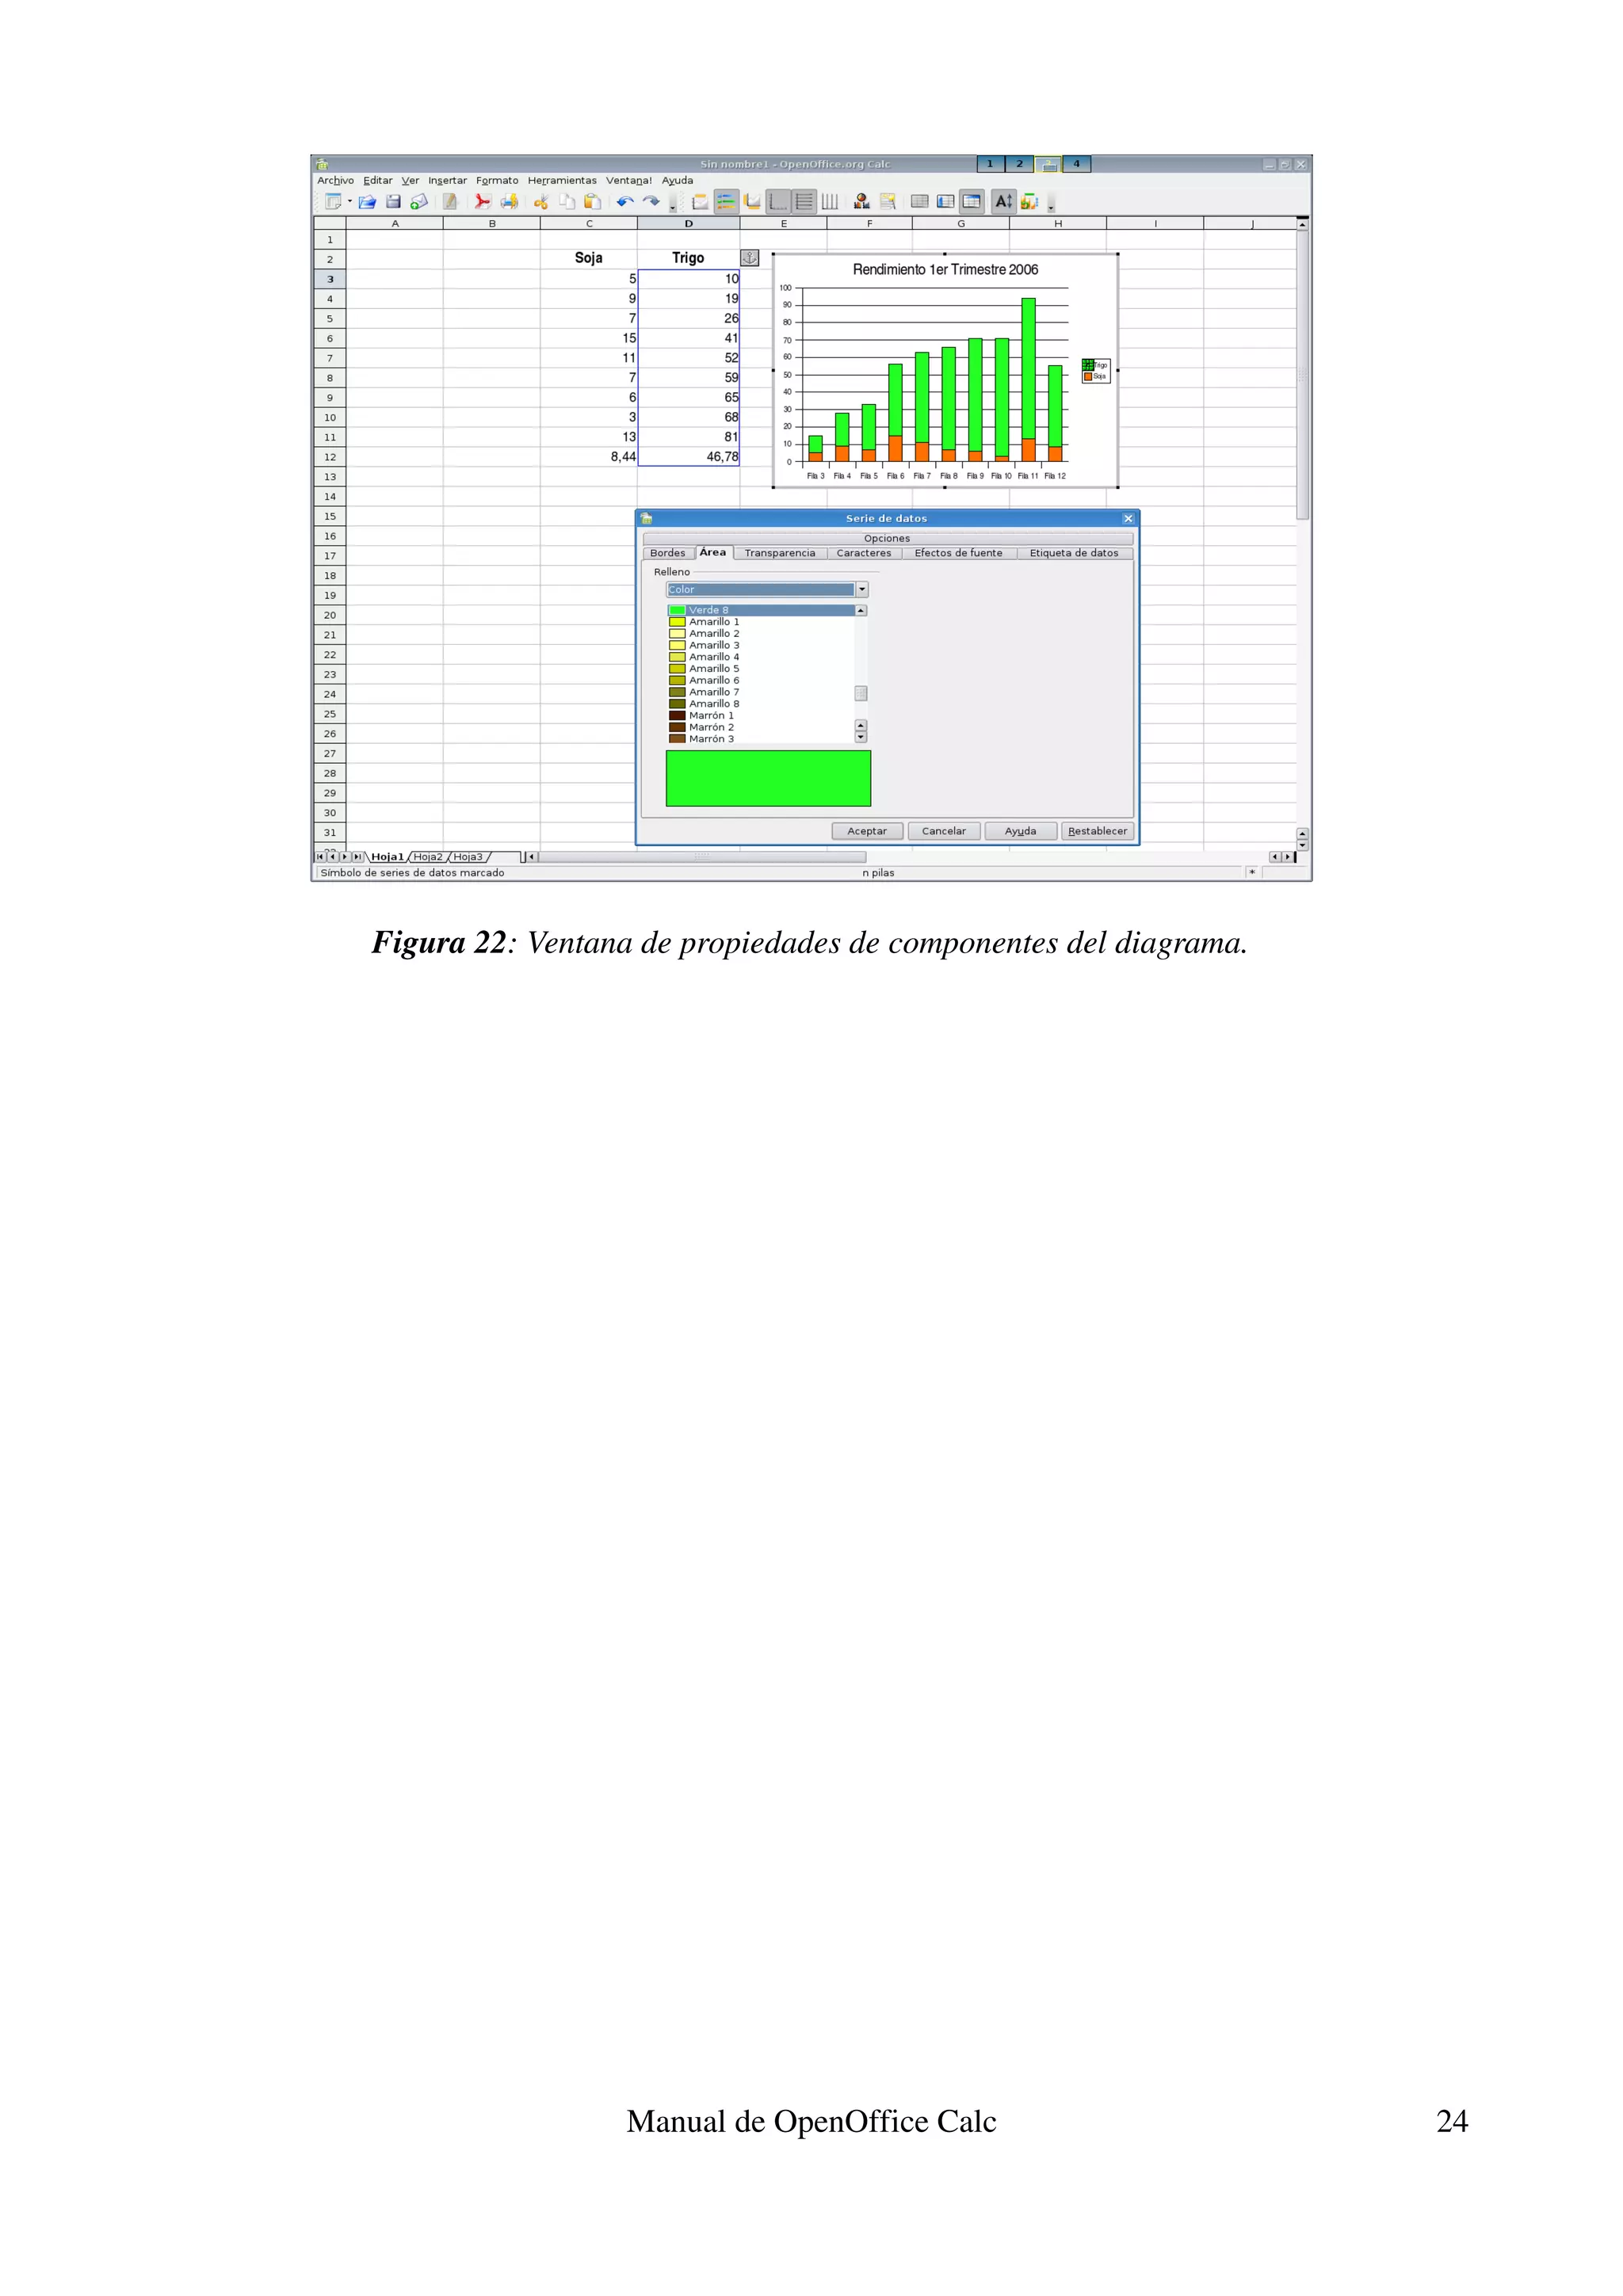
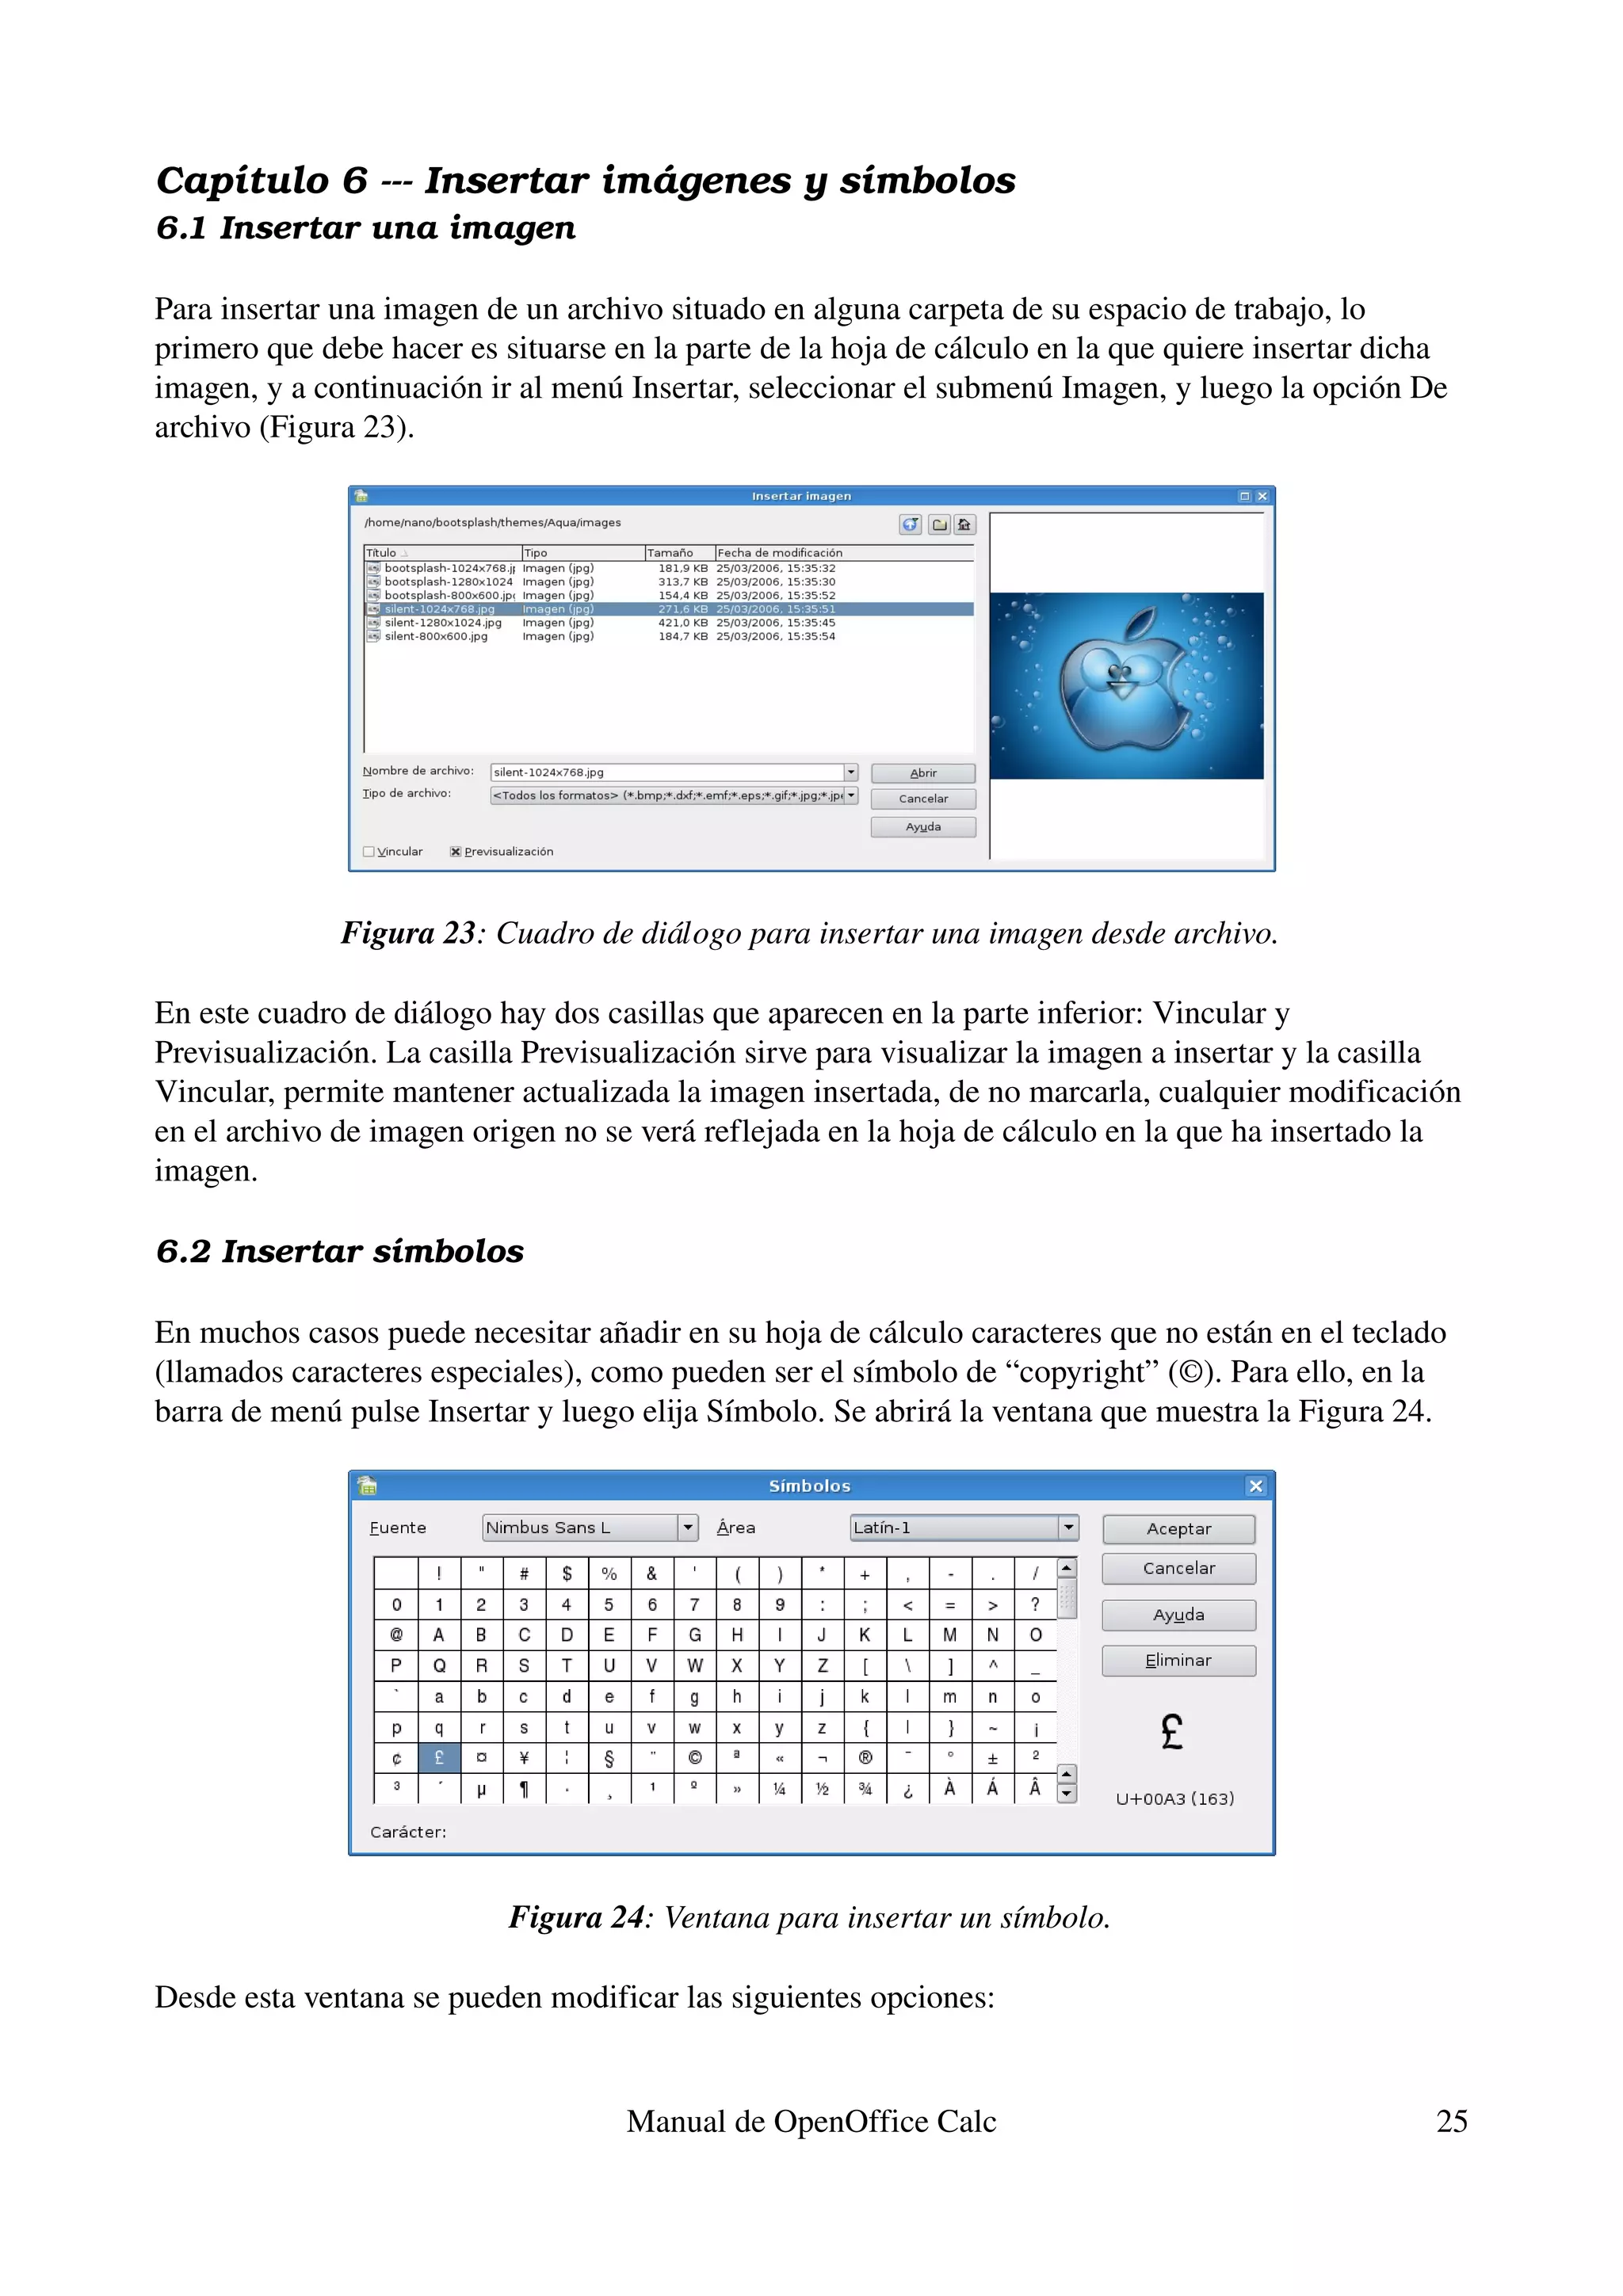
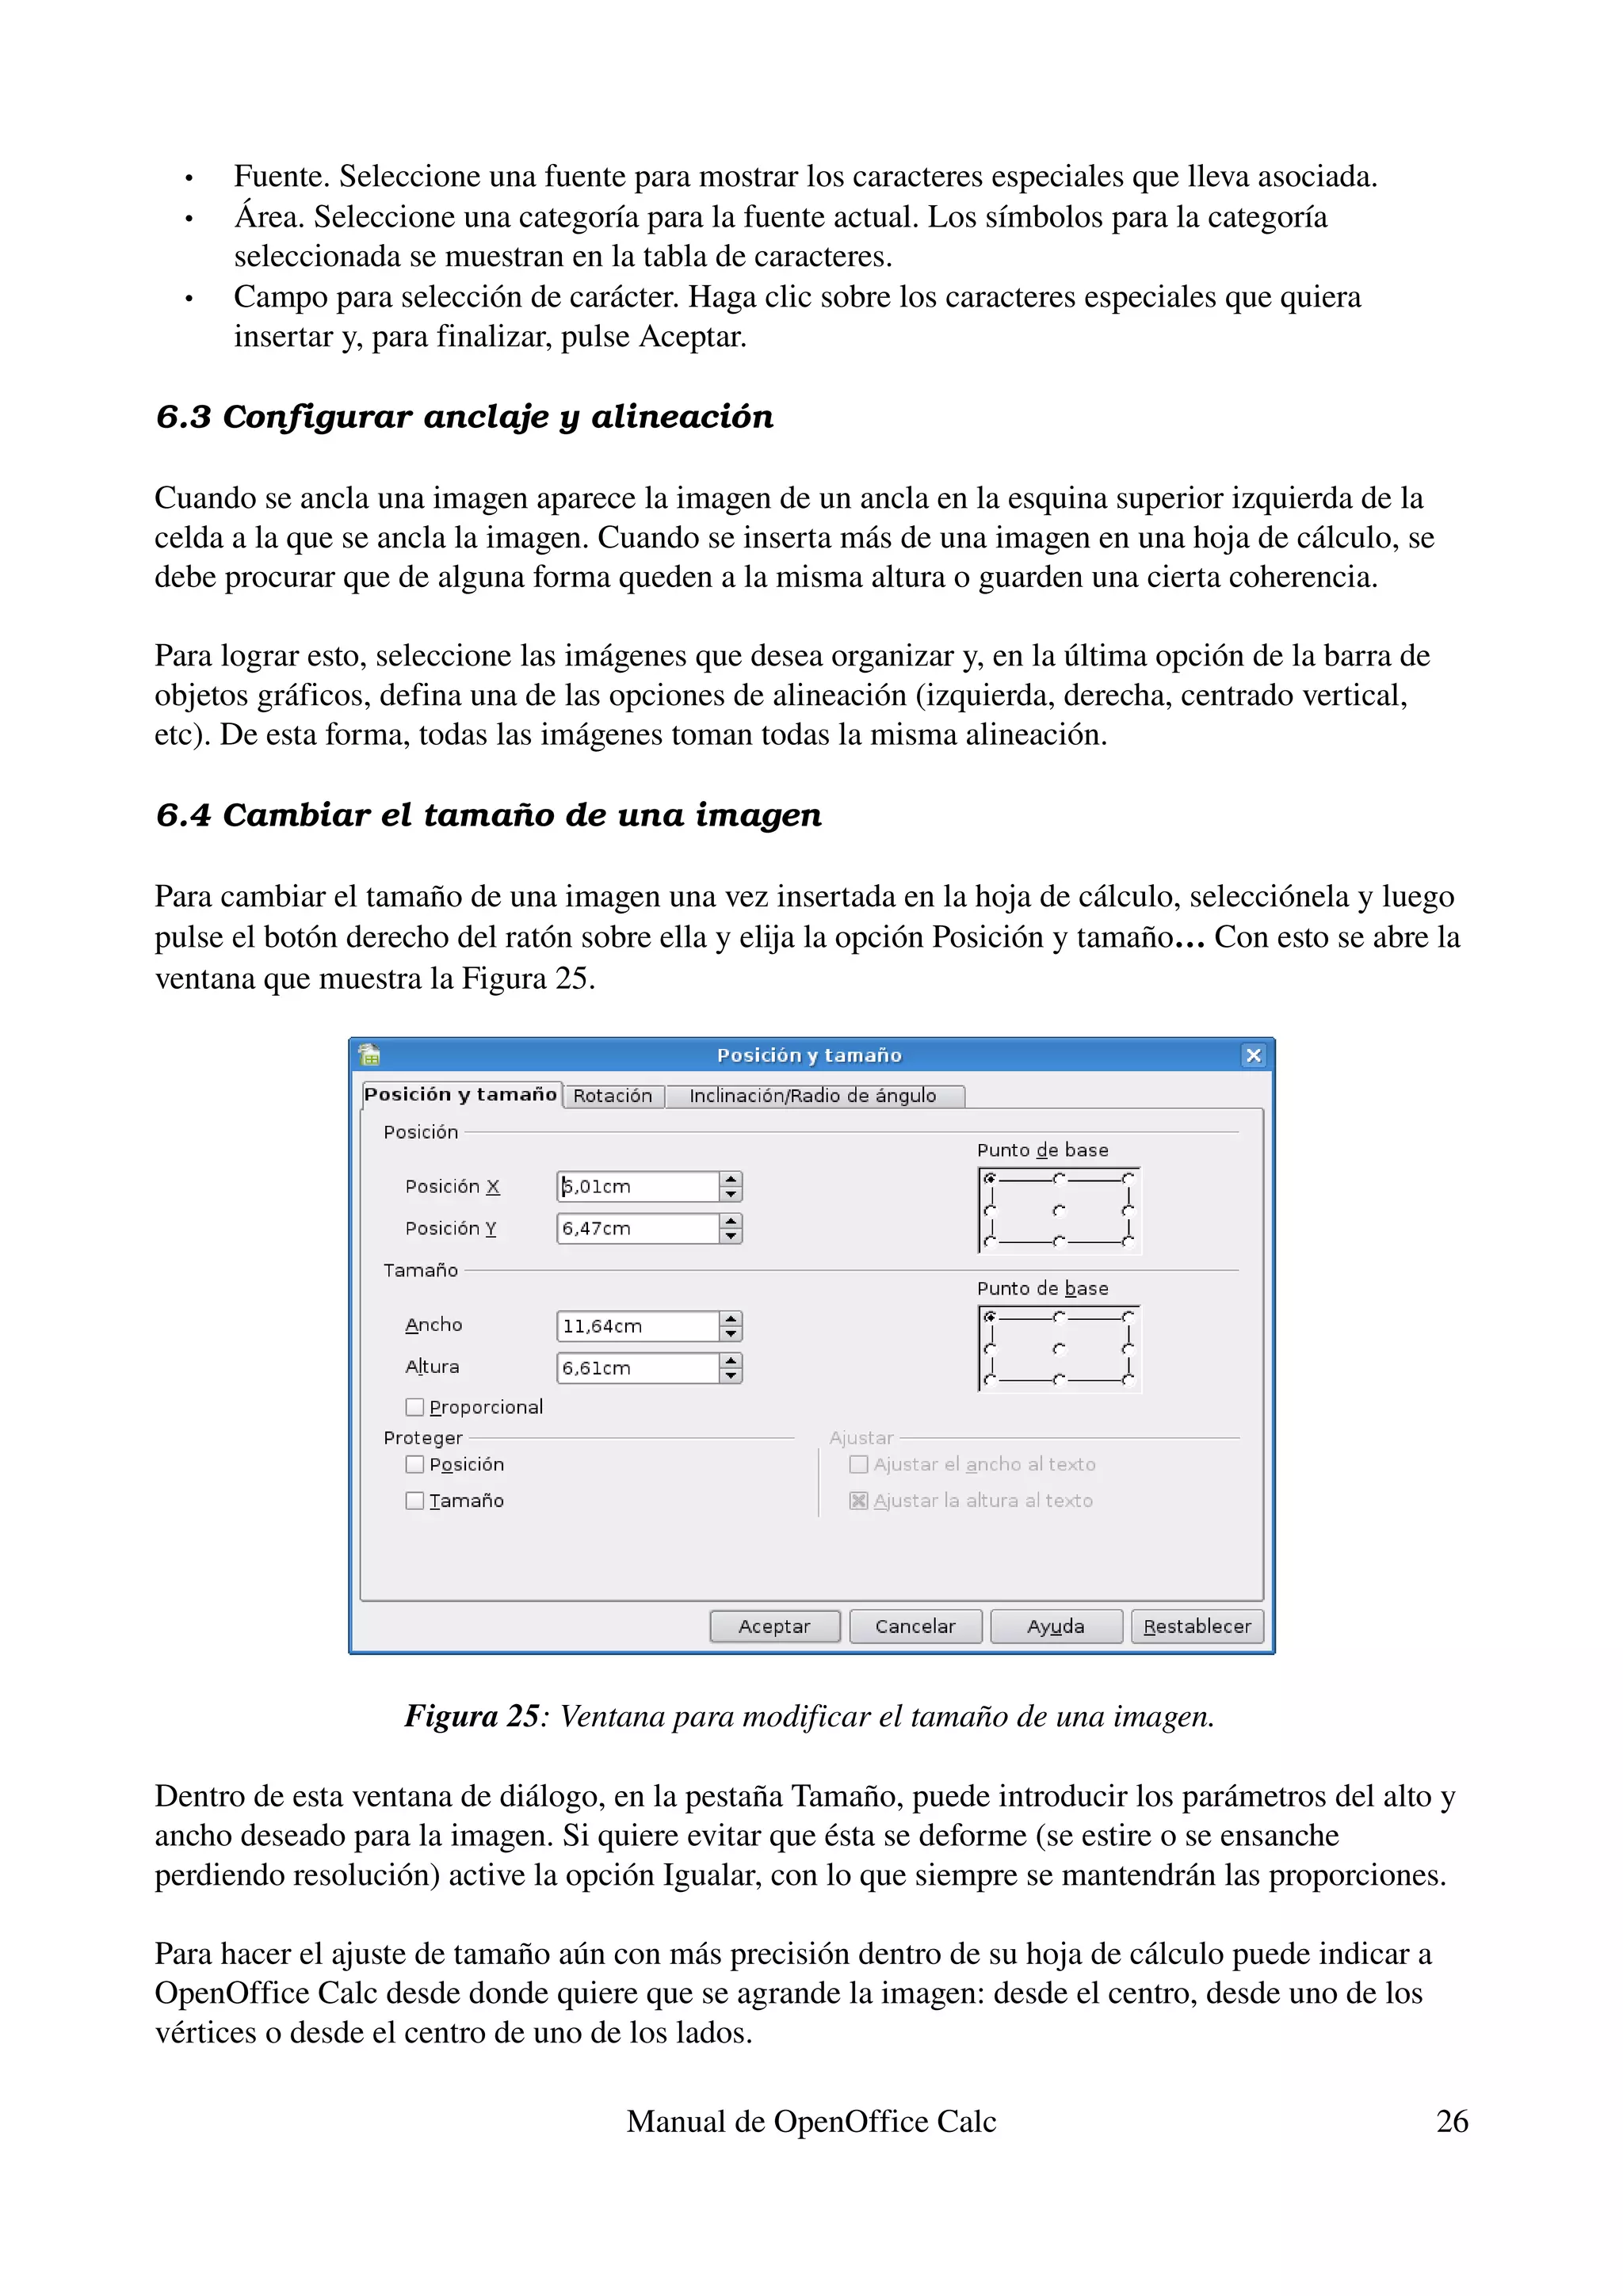
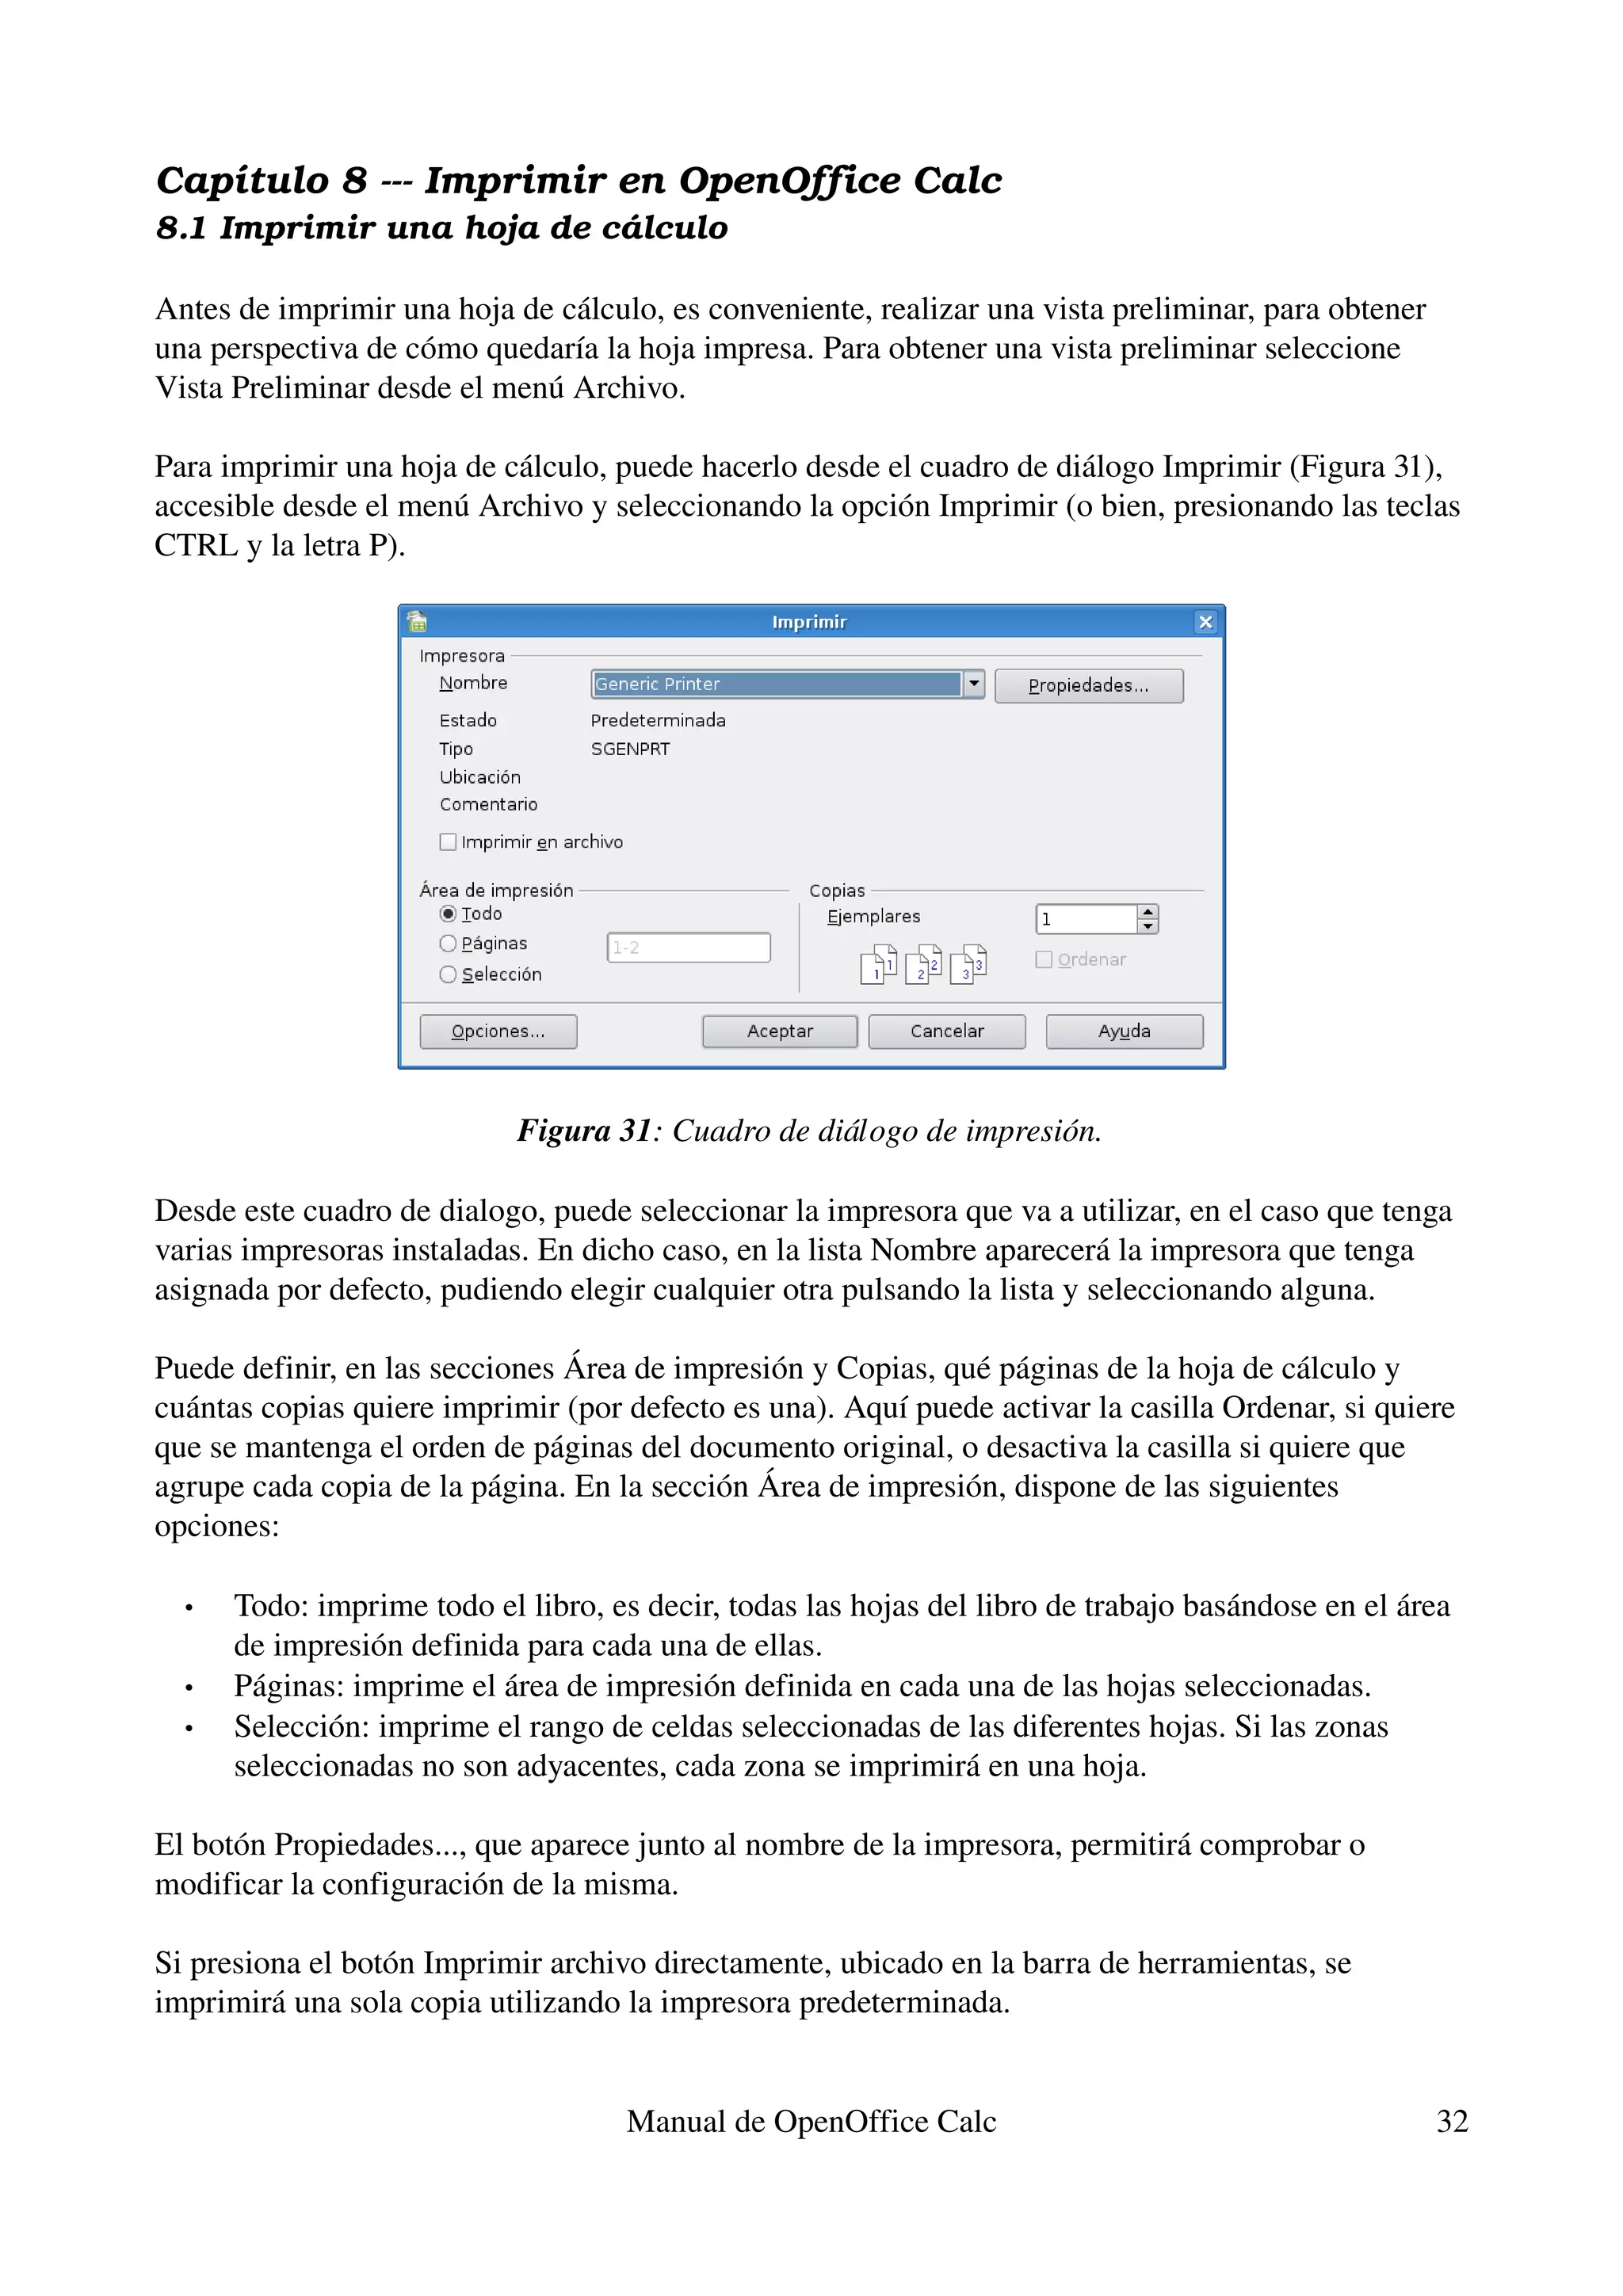
Este documento presenta un manual de OpenOffice Calc. Contiene 8 capítulos que describen cómo usar las principales funciones de la hoja de cálculo, incluida la edición de celdas, la inserción de filas y columnas, el uso de fórmulas y funciones, la creación de gráficos e imágenes, y la impresión. El manual también incluye un apéndice sobre la licencia de software libre GNU GPL que rige la distribución y modificación del propio manual.
3. Contenido
Capítulo 1 Introducción a OpenOffice Calc
1.1 Introducción..............................................................................................................................................5
1.2 Acceder a OpenOffice Calc......................................................................................................................5
1.3 Abrir y guardar hojas de calculo...............................................................................................................6
1.4 Salir de OpenOffice Calc..........................................................................................................................8
Capítulo 2 Edición y formato de celdas
2.1 Modificar o eliminar contenido de una celda...........................................................................................10
2.2 Cortar, copiar y pegar datos......................................................................................................................10
2.3 Pegado especial.........................................................................................................................................11
2.4 Asignar formato a una celda.....................................................................................................................12
2.5 Aplicar autoformato..................................................................................................................................13
Capítulo 3 Manejo de filas y columnas
3.1 Insertar filas, columnas y celdas...............................................................................................................15
3.2 Modificar el tamaño de filas y columnas.................................................................................................16
3.3 Ocultar y mostrar filas o columnas...........................................................................................................16
3.4 Proteger celdas..........................................................................................................................................17
Capítulo 4 Uso de fórmulas y funciones
4.1 Barra de fórmulas.....................................................................................................................................18
4.2 Función para calcular el promedio...........................................................................................................18
4.3 Funciones de mínimo, máximo y contar..................................................................................................19
4.4 Funciones anidadas...................................................................................................................................19
Capítulo 5 Crear gráficos
5.1 Pasos a seguir en la creación de gráficos..................................................................................................21
Capítulo 6 Insertar imágenes y símbolos
6.1 Insertar una imagen..................................................................................................................................25
6.2 Insertar un símbolo...................................................................................................................................25
6.3 Configurar anclaje y alineación................................................................................................................26
6.4 Cambiar el tamaño de una imagen...........................................................................................................26
6.5 Modificar propiedades de una imagen.....................................................................................................27
Capítulo 7 Herramientas
7.1 Ordenar datos............................................................................................................................................28
7.2 Uso de filtros.............................................................................................................................................29
7.3 Buscar y reemplazar texto.........................................................................................................................30
Capítulo 8 Imprimir en OpenOffice Calc
8.1 Imprimir una hoja de cálculo.....................................................................................................................32
Manual de OpenOffice Calc 3
7. Si se quiere crear una nueva hoja de cálculo, se debe acceder a la opción Nuevo del menú Archivo y
seleccionar Hoja de cálculo (ver Figura 5).
Figura 5: Crear nueva Hoja de cálculo.
Cuando se tiene más de una hoja de cálculo abierta, se puede acceder a ellas a través de la barra de
tareas, donde se encuentran visibles. Para pasar de una hoja de cálculo a otra sólo debe hacer clic
sobre la ventana minimizada en dicha barra, o a través del menú Ventana y pulsar sobre el nombre
del archivo que quiere visualizar.
Para guardar una hoja de cálculo a la que se le ha realizado modificaciones, debe pulsar Guardar en
la barra de herramientas o desde el menú Archivo. Para utilizar un nombre o ubicación diferente,
debe seleccionar la opción Guardar como (ver Figura 6).
Figura 6: Guardar la planilla con el Cuadro de diálogo Guardar como.
Manual de OpenOffice Calc 7
10. Capítulo 2 Edición y formato de celdas
2.1 Modificar o eliminar contenido de una celda
Para modificar el contenido de una celda, es posible realizar alguna de las siguientes operaciones:
• Seleccionar la celda y realizar un doble clic de ratón
• Seleccionar la celda y a continuación pulsar la tecla F2
Al realizar alguna de estas operaciones, es posible editar el contenido de la celda. Con las teclas de
dirección puede desplazarse por el contenido de la celda o bien situarse en cualquier lugar con un
clic de ratón. Una vez realizadas las correcciones pulse la tecla Enter.
Para eliminar el contenido completo de una o más celdas, una vez seleccionada(s), pulse la tecla
Supr o Delete, luego de esto el contenido de la celda será eliminado.
2.2 Cortar, copiar y pegar datos
Con OpenOffice Calc puede copiar o cortar (mover) celdas desde y hacia cualquier otra celda, hoja
de calculo, libro de OpenOffice Calc u otra aplicación.
Las operaciones de copiar y cortar se diferencian básicamente en que la primera de ellas mantiene
los datos en su localización original, realizando un duplicado de los mismos, mientras que la opción
cortar borra los datos de la ubicación de origen. Estas operaciones pueden ser hechas con la técnica
de arrastrar y colocar.
Para cortar o mover datos usando arrastrar y colocar, seleccione el rango de origen, sitúe el puntero
del ratón en alguno de los bordes del rango seleccionado, haga un clic de ratón, y sin soltar el botón,
arrastre el bloque seleccionado hasta dejarlo en la posición que desee. Para copiar datos es lo
mismo, pero, en este caso, una vez seleccionado el rango origen, se debe mantener pulsada la tecla
Control mientras se arrastra el bloque seleccionado.
También puede cortar o copiar datos a través del portapapeles, así, mientras los datos no se peguen,
se mantienen en un espacio de memoria (llamado Portapapeles). Para cortar o copiar datos debe
seleccionar el rango (las celdas), y posteriormente llevarlo al portapapeles mediante alguna de las
siguientes opciones:
• Seleccionar el comando Cortar o el de Copiar del menú Edición.
• Seleccionar el comando Cortar o el de Copiar del menú Edición desde el menú contextual que
aparece al hacer clic con el botón derecho del ratón sobre la zona seleccionada.
• Hacer clic en el botón cortar o copiar, de la barra de herramientas estándar.
• Presionar las tecla CTRL y la letra X, para cortar, o bien, la letra CTRL y la C, para copiar.
Para pegar los datos copiados o cortados, no es necesario seleccionar todo el rango de destino, basta
con seleccionar la primera celda del rango, y luego presionar las teclas CTRL y la letra V, o ir al
comando Pegar, desde el menú editar o desde el menú contextual que se despliega al hacer clic con
el botón derecho en el lugar donde se desea dejar los datos del portapapeles.
Manual de OpenOffice Calc 10
13. • En Efectos de fuentes, puede escoger diferentes opciones para enriquecer el formato de la
celda o celdas seleccionadas.
• Desde Alineación, puede modificar la forma en que se alinean dentro de la celda los datos
seleccionados.
• En Borde puede escoger el tipo de líneas que rodearán las celdas seleccionadas, su grosor,
estilo, posición, etc.
• En Fondo, puede escoger un color para el fondo de la celda o del conjunto de celdas
seleccionadas.
Algunas de las opciones disponibles en el cuadro de diálogo de Atributos de Celda, las puede
encontrar disponibles en los botones de la barra de herramientas Formato.
2.5 Aplicar autoformato
Para darle un formato atractivo a las celdas de forma más fácil, puede utilizar la herramienta de
formateado automático. Para empezar, seleccione el área de datos a la que le quiere aplicar un
formato (el área mínima a la que le puede aplicar un formato es de 3 filas por 3 columnas), luego,
en la barra de menú vaya a Formato y seleccione AutoFormato, tras lo cual se verá la ventana de la
Figura 11.
Figura 11: Cuadro de diálogo de AutoFormato.
El botón Opciones permite elegir qué características de formato quiere aplicar:
• Formato numérico. Para que los datos de la celda a aplicar el formato siga siendo de tipo
numérico.
• Bordes. Conserva los bordes que haya definido para nuestras celdas.
• Fuente. Si marca esta opción el tipo de letra no se alterará al aplicar el formato.
• Modelo. Marcar esta opción mantendrá el modelo de imagen original.
• Alineación. Si ha seleccionado previamente una alineación centrada, a la izquierda o a la
derecha ésta no se cambiará.
• Ajustar ancho/alto. Por defecto, cuando aplica un formato automático se produce un ajuste
automático de las filas y columnas al ancho y al alto. Marque esta opción si no quiere que se
produzca este ajuste.
Pulse Aceptar para que se aplique el formato.
Si no hay algún formato automático que se ajuste a sus necesidades, podrá crear su propio formato
desde el botón Añadir del cuadro de diálogo Formato automático. El área de datos mínima para
Manual de OpenOffice Calc 13
18. Capítulo 4 Uso de fórmulas y funciones
4.1 Barra de fórmulas
En las celdas de la hoja de cálculo, es posible introducir distintos tipos de datos y también fórmulas.
Cuando se introducen datos en una celda estos datos aparecen en la celda activa y en la Barra de
Fórmulas, como se muestra en la Figura 16.
Figura 16: Datos en barra de fórmulas.
Para ingresar una fórmula debe escribir como primer carácter de la celda un signo igual ("="), lo
que siga a continuación de ese signo, debe ser una expresión matemática válida, ya sea formada a
partir de las operaciones básicas (+,,/,x) o de funciones.
Dentro de la barra de fórmulas existen 3 iconos:
• Piloto automático de funciones: Este icono activa el asistente para funciones, que le permite
utilizar funciones matemáticas de diferente índole dentro de la hoja de cálculo.
• Aplicar: Es el botón con la marca de verificar verde de la barra de fórmulas. Al hacer clic
sobre él se valida el valor para introducirlo en la celda.
• Rechazar: Este icono restaura el contenido de la celda a su valor inicial. De este modo no se
introducen los datos y la celda mantendrá el valor anterior.
4.2 Función para calcular el promedio
La función promedio resulta de gran utilidad a la hora de calcular la media aritmética de una serie
de números (por ejemplo las notas de una asignatura).
Tal como muestra la Figura 17, la función se introduce del siguiente modo: =PROMEDIO(n1;n2;…
n). El rango de datos que va entre los paréntesis, y sobre el que se va a calcular el promedio
(parámetros), son ingresados automáticamente al seleccionarlos con el ratón.
Manual de OpenOffice Calc 18
22. Figura 19: Seleccionar tipo de diagrama.
• Representar texto en previsualización. Muestra los textos que acompañan al diagrama, como
leyendas, encabezamientos y títulos de ejes.
• Datos en. En este campo se selecciona si quiere la representación de la serie de datos
organizados en filas o columnas.
• Seleccione un tipo de diagrama. Seleccione el tipo de diagrama que desea crear.
Paso 5. Pulse el botón Avanzar y se mostrarán una serie de posibilidades “extras” en cuanto a la
presentación del tipo de diagrama que ha elegido en el paso anterior (ver Figura 20).
Figura 20: Seleccionar alguna variante del tipo de diagrama.
Paso 6. Pulse Avanzar para llegar al último paso de la creación de una gráfica (Figura 21).
Manual de OpenOffice Calc 22
23. Figura 21: Configuración del diagrama.
En este punto puede poner título a determinadas áreas el diagrama:
• Título de diagrama. Este será el título genérico para todo el diagrama.
• Leyenda. Marque la casilla de verificación si quiere que aparezca la leyenda acompañando al
gráfico.
• Previsualización. Ofrece una vista previa del tipo de diagrama seleccionado.
• Mostrar los objetos de texto en previsualización. Muestra objetos de texto, como leyendas,
encabezamientos y títulos de ejes en la previsualización.
• Series de datos en. En este campo se selecciona si quiere la representación de la serie de datos
organizados en filas o columnas.
• Título de eje. En los siguientes campos puede dar los títulos a cada uno de los ejes del diagrama.
• Eje X. Etiqueta del eje horizontal.
• Eje Y. Etiqueta para el eje vertical.
• Eje Z. Etiqueta para el eje z. Esta opción sólo estará disponible si ha elegido previamente
un diagrama tridimensional.
Paso 7. El último paso será pulsar el botón Crear, con ello el diagrama aparecerá en la hoja que
haya seleccionado.
Una vez creado el diagrama, podrá modificar la apariencia del gráfico. Para ello selecciónelo y
luego haga doble clic sobre él o presione el botón derecho del ratón sobre el área del gráfico, y
seleccione Editar desde el menú contextual. Con esto el diagrama estará en modo de edición, y
podrá seleccionar las propiedades de cualquiera de sus componentes (barras, líneas, área, leyenda,
eje x, eje y, etc.) haciendo doble clic sobre ellas, con lo cual se abrirá una ventana que dependerá del
componente del gráfico que haya seleccionado como (ver Figura 22).
Manual de OpenOffice Calc 23
26. • Fuente. Seleccione una fuente para mostrar los caracteres especiales que lleva asociada.
• Área. Seleccione una categoría para la fuente actual. Los símbolos para la categoría
seleccionada se muestran en la tabla de caracteres.
• Campo para selección de carácter. Haga clic sobre los caracteres especiales que quiera
insertar y, para finalizar, pulse Aceptar.
6.3 Configurar anclaje y alineación
Cuando se ancla una imagen aparece la imagen de un ancla en la esquina superior izquierda de la
celda a la que se ancla la imagen. Cuando se inserta más de una imagen en una hoja de cálculo, se
debe procurar que de alguna forma queden a la misma altura o guarden una cierta coherencia.
Para lograr esto, seleccione las imágenes que desea organizar y, en la última opción de la barra de
objetos gráficos, defina una de las opciones de alineación (izquierda, derecha, centrado vertical,
etc). De esta forma, todas las imágenes toman todas la misma alineación.
6.4 Cambiar el tamaño de una imagen
Para cambiar el tamaño de una imagen una vez insertada en la hoja de cálculo, selecciónela y luego
pulse el botón derecho del ratón sobre ella y elija la opción Posición y tamaño… Con esto se abre la
ventana que muestra la Figura 25.
Figura 25: Ventana para modificar el tamaño de una imagen.
Dentro de esta ventana de diálogo, en la pestaña Tamaño, puede introducir los parámetros del alto y
ancho deseado para la imagen. Si quiere evitar que ésta se deforme (se estire o se ensanche
perdiendo resolución) active la opción Igualar, con lo que siempre se mantendrán las proporciones.
Para hacer el ajuste de tamaño aún con más precisión dentro de su hoja de cálculo puede indicar a
OpenOffice Calc desde donde quiere que se agrande la imagen: desde el centro, desde uno de los
vértices o desde el centro de uno de los lados.
Manual de OpenOffice Calc 26
29. Figura 28: Cuadro de dialogo Ordenar.
En la ventana de Ordenar se nos pide definir los siguientes parámetros:
• Ordenar según. Se selecciona la columna que desee utilizar como criterio de orden principal,
es decir, la columna por la que se empezará a ordenar.
• Ascendente. Ordena la selección del valor mínimo al máximo, es decir, de la A a la Z o del 0
al 9.
• Descendente. Ordena la selección del valor máximo al mínimo, es decir, de la Z a la A o del 9
al 0.
• Después según. Se selecciona la columna que quiere que se utilice como criterio de orden
secundario. Este dato es opcional.
Cuando ordena a partir de una columna se reorganizan las filas que ha indicado como criterio y
también sus adyacentes, manteniendo con ello la coherencia de la información en su hoja de
cálculo.
7.2 Uso de filtros
La herramienta de AutoFiltro inserta, en una o más columnas de datos, una lista desplegable con
todos los datos distintos que se presenten en cada columna, y permite seleccionar uno de esos
valores como criterio de búsqueda para mostrar sólo las filas que se ajusten a ese valor y ocultar las
demás.
Para aplicar filtro automático, primero seleccione las columnas en las que estén los datos que quiere
filtrar. Luego, en el menú Datos, seleccione Filtro y desde allí AutoFiltro. Finalmente, para filtrar
pulse en la flecha desplegable del encabezado de la columna y elija el elemento por el que quiera
filtrar.
Cuando haya hecho la selección en el desplegable, sólo aparecerán las filas cuyo contenido coincida
con el del filtro. El resto de las filas permanecerán ocultas.
Si quiere volver a mostrar todas las filas, pulse la flecha de filtrado en la columna o columnas que
haya seleccionado previamente y elija la opción todo. Para dejar de utilizar el AutoFiltro seleccione
Manual de OpenOffice Calc 29
35. The Document may include Warranty Disclaimers next to the notice which states that this License
applies to the Document. These Warranty Disclaimers are considered to be included by reference in
this License, but only as regards disclaiming warranties: any other implication that these Warranty
Disclaimers may have is void and has no effect on the meaning of this License.
A.3.2. VERBATIM COPYING
You may copy and distribute the Document in any medium, either commercially or
noncommercially, provided that this License, the copyright notices, and the license notice saying
this License applies
to the Document are reproduced in all copies, and that you add no other conditions whatsoever to
those of this License. You may not use technical measures to obstruct or control the reading or
further
copying of the copies you make or distribute. However, you may accept compensation in exchange
for copies. If you distribute a large enough number of copies you must also follow the conditions in
section 3.
You may also lend copies, under the same conditions stated above, and you may publicly display
copies.
A.4.3. COPYING IN QUANTITY
If you publish printed copies (or copies in media that commonly have printed covers) of the
Document, numbering more than 100, and the Document's license notice requires Cover Texts, you
must enclose the copies in covers that carry, clearly and legibly, all these Cover Texts: FrontCover
Texts on the front cover, and BackCover Texts on the back cover. Both covers must also clearly and
legibly identify you as the publisher of these copies. The front cover must present the full title with
all words of the title equally prominent and visible. You may add other material on the covers in
addition. Copying with changes limited to the covers, as long as they preserve the title of the
Document and satisfy these conditions, can be treated as verbatim copying in other respects.
If the required texts for either cover are too voluminous to fit legibly, you should put the first ones
listed (as many as fit reasonably) on the actual cover, and continue the rest onto adjacent
pages.
If you publish or distribute Opaque copies of the Document numbering more than 100, you must
either include a machinereadable Transparent copy along with each Opaque copy, or state in or
with each Opaque copy a computernetwork location from which the general networkusing public
has access to download using publicstandard network protocols a complete Transparent copy of the
Document, free of added material. If you use the latter option, you must take reasonably prudent
steps,
when you begin distribution of Opaque copies in quantity, to ensure that this Transparent copy will
remain thus accessible at the stated location until at least one year after the last time you distribute
an
Opaque copy (directly or through your agents or retailers) of that edition to the public.
It is requested, but not required, that you contact the authors of the Document well before
redistributing any large number of copies, to give them a chance to provide you with an updated
Manual de OpenOffice Calc 35
36. version of the Document.
A.5.4. MODIFICATIONS
You may copy and distribute a Modified Version of the Document under the conditions of sections
2 and 3 above, provided that you release the Modified Version under precisely this License, with the
Modified Version filling the role of the Document, thus licensing distribution and modification of
the Modified Version to whoever possesses a copy of it. In addition, you must do these things in the
Modified Version:
A. Use in the Title Page (and on the covers, if any) a title distinct from that of the Document, and
from those of previous versions (which should, if there were any, be listed in the History section
of the Document). You may use the same title as a previous version if the original publisher of
that version gives permission.
B. List on the Title Page, as authors, one or more persons or entities responsible for authorship of
the modifications in the Modified Version, together with at least five of the principal authors of
the Document (all of its principal authors, if it has fewer than five), unless they release you from
this requirement.
C. State on the Title page the name of the publisher of the Modified Version, as the publisher.
D. Preserve all the copyright notices of the Document.
E. Add an appropriate copyright notice for your modifications adjacent to the other copyright
notices.
F. Include, immediately after the copyright notices, a license notice giving the public permission to
use the Modified Version under the terms of this License, in the form shown in the Addendum
below.
G. Preserve in that license notice the full lists of Invariant Sections and required Cover Texts given
in the Document's license notice.
H. Include an unaltered copy of this License.
I. Preserve the section Entitled "History", Preserve its Title, and add to it an item stating at least the
title, year, new authors, and publisher of the Modified Version as given on the Title Page. If there
is no section Entitled "History" in the Document, create one stating the title, year, authors, and
publisher of the Document as given on its Title Page, then add an item describing the Modified
Version as stated in the previous sentence.
J. Preserve the network location, if any, given in the Document for public access to a Transparent
copy of the Document, and likewise the network locations given in the Document for previous
versions it was based on. These may be placed in the "History" section. You may omit a network
location for a work that was published at least four years before the Document itself, or if the
original publisher of the version it refers to gives permission.
Manual de OpenOffice Calc 36
37. K. For any section Entitled "Acknowledgements" or "Dedications", Preserve the Title of the section,
and preserve in the section all the substance and tone of each of the contributor
acknowledgements and/or dedications given therein.
L. Preserve all the Invariant Sections of the Document, unaltered in their text and in their titles.
Section numbers or the equivalent are not considered part of the section titles.
M. Delete any section Entitled "Endorsements". Such a section may not be included in the
Modified Version.
N. Do not retitle any existing section to be Entitled "Endorsements" or to conflict in title with any
Invariant Section.
O. Preserve any Warranty Disclaimers.
If the Modified Version includes new frontmatter sections o appendices that qualify as Secondary
Sections and contain no material copied from the Document, you may at your option designate
some or all of these sections as invariant. To do this, add their titles to the list of Invariant Sections
in the Modified Version's license notice. These titles must be distinct from any other section titles.
You may add a section Entitled "Endorsements", provided it contains nothing but endorsements of
your Modified Version by various partiesfor example, statements of peer review or that the text has
been approved by an organization as the authoritative definition of a standard.
You may add a passage of up to five words as a FrontCover Text, and a passage of up to 25 words
as a BackCover Text, to the end of the list of Cover Texts in the Modified Version. Only one
passage of
FrontCover Text and one of BackCover Text may be added by (or through arrangements made by)
any one entity. If the Document already includes a cover text for the same cover, previously added
by you or by arrangement made by the same entity you are acting on behalf of, you may not add
another; but you may replace the old one, on explicit permission from the previous publisher that
added the old one.
The author(s) and publisher(s) of the Document do not by this License give permission to use their
names for publicity for or to assert or imply endorsement of any Modified Version.
A.6.5. COMBINING DOCUMENTS
You may combine the Document with other documents released under this License, under the terms
defined in section 4 above for modified versions, provided that you include in the combination all of
the Invariant Sections of all of the original documents, unmodified, and list them all as Invariant
Sections of your combined work in its license notice, and that you preserve all their Warranty
Disclaimers.
The combined work need only contain one copy of this License, and multiple identical Invariant
Sections may be replaced with a single copy. If there are multiple Invariant Sections with the same
name but different contents, make the title of each such section unique by adding at the end of it, in
parentheses, the name of the original author or publisher of that section if known, or else a unique
Manual de OpenOffice Calc 37
38. number. Make the same adjustment to the section titles in the list of Invariant Sections in the license
notice of the combined work.
In the combination, you must combine any sections Entitled "History" in the various original
documents, forming one section Entitled "History"; likewise combine any sections Entitled
"Acknowledgements", and any sections Entitled "Dedications". You must delete all sections
Entitled "Endorsements".
A.7.6. COLLECTIONS OF DOCUMENTS
You may make a collection consisting of the Document and other documents released under this
License, and replace the individual copies of this License in the various documents with a single
copy that is included in the collection, provided that you follow the rules of this License for
verbatim copying of each of the documents in all other respects.
You may extract a single document from such a collection, and distribute it individually under this
License, provided you insert a copy of this License into the extracted document, and follow this
License in all other respects regarding verbatim copying of that document.
A.8.7. AGGREGATION WITH INDEPENDENT WORKS
A compilation of the Document or its derivatives with other separate and independent documents or
works, in or on a volume of a storage or distribution medium, is called an "aggregate" if the
copyright resulting from the compilation is not used to limit the legal rights of the compilation's
users beyond what the individual works permit. When the Document is included in an aggregate,
this License does not apply to the other works in the aggregate which are not themselves
derivative works of the Document.
If the Cover Text requirement of section 3 is applicable to these copies of the Document, then if the
Document is less than one half of the entire aggregate, the Document's Cover Texts may be placed
on
covers that bracket the Document within the aggregate, or the electronic equivalent of covers if the
Document is in electronic form. Otherwise they must appear on printed covers that bracket the
whole
aggregate.
A.9.8. TRANSLATION
Translation is considered a kind of modification, so you may distribute translations of the Document
under the terms of section 4. Replacing Invariant Sections with translations requires special
permission from their copyright holders, but you may include translations of some or all Invariant
Sections in addition to the original versions of these Invariant Sections. You may include a
translation of this License, and all the license notices in the Document, and any Warranty
Disclaimers, provided that you also include the original English version of this License and the
original versions of those notices and disclaimers. In case of a disagreement between the translation
and the original version of this License or a notice or disclaimer, the original version will prevail.
If a section in the Document is Entitled "Acknowledgements", "Dedications", or "History", the
Manual de OpenOffice Calc 38