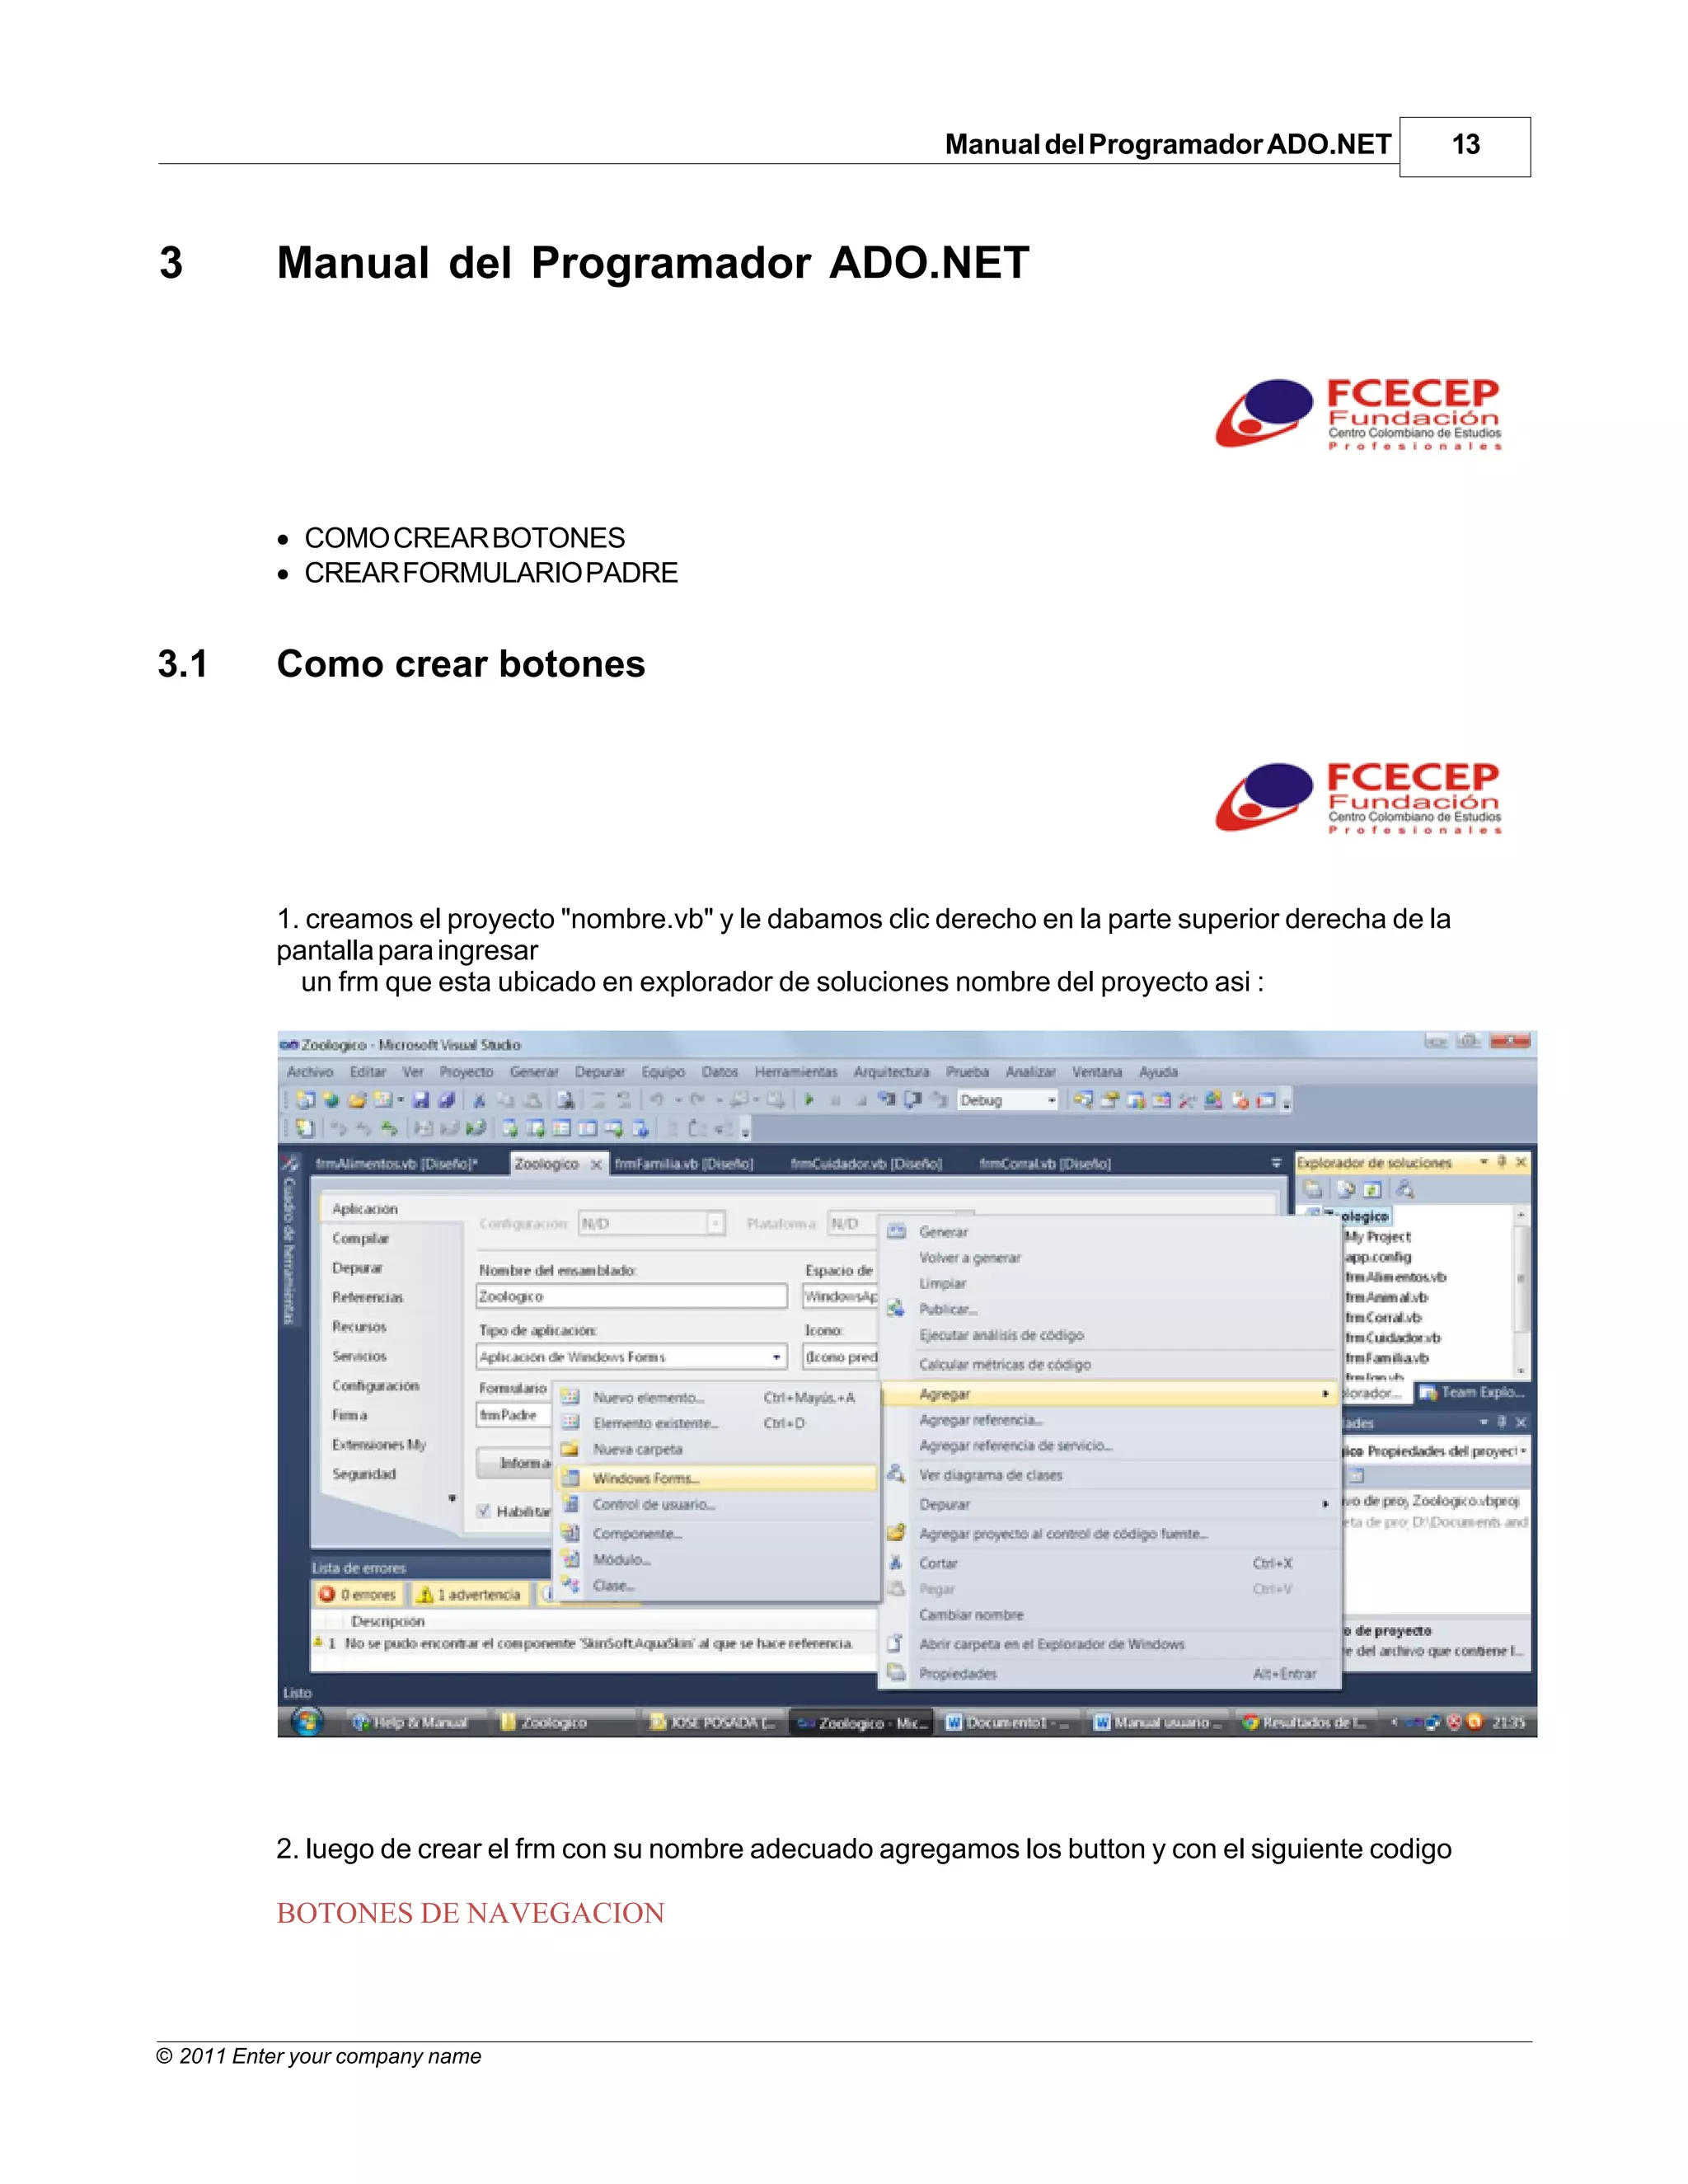
Manual Usuario

                                                               © 2011 Enter your company name


Note:
To change the product logo for your own print manual or PDF,
click "Tools > Manual Designer" and modify the print manual
template.
Title page 1
                         Use this page to introduce the product

                                                     by Enter your company name


This is "Title Page 1" - you may use this page to introduce
your product, show title, author, copyright, company logos,
etc.

This page intentionally starts on an odd page, so that it is
on the right half of an open book from the readers point of
view. This is the reason why the previous page was blank
(the previous page is the back side of the cover)
Manual Usuario

© 2011 Enter your company name

All rights reserved. No parts of this work may be reproduced in any form or by any means - graphic, electronic, or
mechanical, including photocopying, recording, taping, or information storage and retrieval systems - without the written
permission of the publisher.

Products that are referred to in this document may be either trademarks and/or registered trademarks of the respective
owners. The publisher and the author make no claim to these trademarks.

While every precaution has been taken in the preparation of this document, the publisher and the author assume no
responsibility for errors or omissions, or for damages resulting from the use of information contained in this document or
from the use of programs and source code that may accompany it. In no event shall the publisher and the author be liable
for any loss of profit or any other commercial damage caused or alleged to have been caused directly or indirectly by this
document.

Printed: noviembre 2011 in (whereever you are located)


                                               Special thanks to:
 Publisher
                                               All the people who contributed to this document, to mum and dad
 ...enter name...
                                               and grandpa, to my sisters and brothers and mothers in law, to
 Managing Editor                               our secretary Kathrin, to the graphic artist who created this great
                                               product logo on the cover page (sorry, don't remember your name
 ...enter name...                              at the moment but you did a great work), to the pizza service down
                                               the street (your daily Capricciosas saved our lives), to the copy
 Technical Editors                             shop where this document will be duplicated, and and and...
 ...enter name...
 ...enter name...                              Last not least, we want to thank EC Software who wrote this great
                                               help tool called HELP & MANUAL which printed this document.

 Cover Designer
 ...enter name...

 Team Coordinator
 ...enter name...

 Production
 ...enter name...
4      Manual Usuario


Table of Contents
          Foreword                                                                                                                                  5

  Part I Presentacion                                                                                                                               7

 Part II Manual de Usuario ADO.NET                                                                                                                  9
      1 Manejo de botones en formularios
             ...................................................................................................................................    9
      2 Imagen
             ...................................................................................................................................   10

 Part III Manual del Programador ADO.NET                                                                                                           13
      1 Como crear botones
           ...................................................................................................................................     13
      2 Crear...................................................................................................................................
              formulario padre                                                                                                                     19

          Index                                                                                                                                     0


                                                                                                                    © 2011 Enter your company name
Foreword   5


                                       Foreword


                                   This is just another title page
                                 placed between table of contents
                                             and topics


© 2011 Enter your company name
Top Level Intro
This page is printed before a new
     top-level chapter starts


          Part

                                    I
Presentacion   7


1          Presentacion


© 2011 Enter your company name
Top Level Intro
This page is printed before a new
     top-level chapter starts


          Part

                                    II
Manual de Usuario ADO.NET       9


2          Manual de Usuario ADO.NET


           · MANEJO DE BOTONES EN UN FORMULARIO

           · IMAGEN

2.1        Manejo de botones en formularios


           BOTONES DE NAVEGACION


           BOTON "PRIMER REGISTRO"


           Este botón nos permitirá dirigirnos al primer registro de nuestro formulario o base de datos


           BOTON ANTERIOR DE UN REGISTRO


           Este botón nos permitirá dirigirnos hacia un registro anterior de donde estemos


           BOTON SIGUIENTE DE UN REGISTRO


           Este botón nos permite navegar los registros siguientes


           BOTON FINAL DE REGISTROS


© 2011 Enter your company name
10      Manual Usuario


       Este botón nos permite ir directamente al ultimo registro


       BOTONES DE OPERACIÓN

       BOTON AGREGAR Y GUARDAR UN REGISTRO


       En este botón tenemos 2 funciones la cual es agregar registro y guardar el registro, también desde este
       código cambiamos la imagen del botón modificar


       BOTON MODIFICAR Y DESHACER


       En este botón tenemos 2 funciones que nos permite modificar y deshacer un registro


       BOTON ELIMINAR

       Este boton nos permite eliminar un registro


2.2    Imagen


                                                                                   © 2011 Enter your company name
Manual de Usuario ADO.NET   11


© 2011 Enter your company name
Top Level Intro
This page is printed before a new
     top-level chapter starts


          Part

                                    III
Manual del Programador ADO.NET          13


3          Manual del Programador ADO.NET


           · COMO CREAR BOTONES
           · CREAR FORMULARIO PADRE


3.1        Como crear botones


           1. creamos el proyecto "nombre.vb" y le dabamos clic derecho en la parte superior derecha de la
           pantalla para ingresar
             un frm que esta ubicado en explorador de soluciones nombre del proyecto asi :


           2. luego de crear el frm con su nombre adecuado agregamos los button y con el siguiente codigo

           BOTONES DE NAVEGACION


© 2011 Enter your company name
14        Manual Usuario


     BOTON "PRIMER REGISTRO"


      Private Sub btnfirst_Click(ByVal sender As System.Object, ByVal e As System.
     EventArgs) Handles btnfirst.     Click

             'Para ir al primero, simplemente asignamos cero a la variable de la fila
     actual y llamamos al método          de mostrar los datos.

               fila = 0
               mostrarDatos(fila)

           End Sub


     3. BOTON "ANTERIOR DE UN REGISTRO"


     Private Sub btnprev_Click_1(ByVal sender As System.Object, ByVal e As System.
     EventArgs) Handles btnprev.Click

               'Para ir al anterior simplemente le restamos uno al valor de la fila
     actual,
               'pero debemos hacer una comprobación de que no sea menor de cero, ya que
     es
               'posible que estemos en el primer registro.

               fila = fila - 1
                If fila < 0 Then fila = 0
               mostrarDatos(fila)

           End Sub


     4. BOTON "SIGUIENTE DE UN REGISTRO"


      'Para ir al siguiente, hacemos lo mismo que antes, pero en lugar de restar uno,
             'lo que hacemos es añadir uno al valor de la fila actual, y en el caso de
     que sea
             'mayor que la última fila, pues nos quedamos en esa última fila.

                                                                     © 2011 Enter your company name
Manual del Programador ADO.NET       15


                      Dim uf As Integer = dt.Rows.Count - 1
                     fila = fila + 1
                      If fila > uf Then fila = uf
                     mostrarDatos(fila)

                End Sub

               Private Sub btnlast_Click(ByVal sender As System.Object, ByVal e As System.
           EventArgs) Handles btnlast.Click

                      'Para ir al último, averiguamos cual es la última fila, que como vemos
                      'es el valor devuelto por la propiedad Count de la colección de filas
           (Rows),
                      'menos uno, ya que como sabemos todos los arrays y colecciones de .NET
           siempre
                      'empiezan con el índice cero.

                     fila = dt.Rows.Count - 1
                     mostrarDatos(fila)

                End Sub


           5. BOTON FINAL DE REGISTROS


                     'Para ir al último, averiguamos cual es la última fila, que como vemos
                      'es el valor devuelto por la propiedad Count de la colección de filas
           (Rows),
                      'menos uno, ya que como sabemos todos los arrays y colecciones de .NET
           siempre
                      'empiezan con el índice cero.

                     fila = dt.Rows.Count - 1
                     mostrarDatos(fila)

                End Sub


           6. BOTON AGREGAR Y GUARDAR UN REGISTRO


           Private Sub btnnew_Click(ByVal sender As System.Object, ByVal e As System.EventArgs
           ) Handles btnnew.Click

© 2011 Enter your company name
16     Manual Usuario


                'Crea un nuevo registro y luego el mismo boton se convierte en Guardar
     registro
                'teniendo encuenta la propiedad tag del boton.
                '.tag nos permite realizar dos funciones en un mismo boton.
                'En este caso (Crear un nuevo registro y Guardar el Registro)
                With btnnew

                 If .Tag = "new" Then
                     .Tag = "guardar"
                    .BackgroundImage = Image.FromFile("C:UsersJonathanDesktop
     ZoologicoImagenessave.png")

                       txtIDali.Enabled = True
                       txtNomali.Enabled = True

                       'Crea una fila en memoria temporal.
                       'Crea nuevo registro.
                       Dim dr As DataRow = dt.NewRow

                        'Asignar los datos al campos de txt de la fila.
                       asignarDatos(dr)

                        'Añadir datos a la tabla.
                       dt.Rows.Add(dr)

                       'Guarda Físicamente los datos en la base de datos.
                       Try

                            If CInt("0" & dr("IDalimento").ToString) = 0 Then
                                dt = New DataTable
                                da.Fill(dt)
                            End If
                            'Posicionarlo en la última fila.
                           btnlast_Click(Nothing, Nothing)

                       Catch ex As DBConcurrencyException
                           MessageBox.Show("Error de concurrencia:" & vbCrLf & ex.Message)
                       Catch ex As Exception

                       End Try

                       txtIDali.Focus()
                       OcultarBoton()

                       'Aquí realizamos la segunda función del botón.

                 ElseIf .Tag = "guardar" Then
                     .Tag = "new"
                    .BackgroundImage = Image.FromFile("C:UsersJonathanDesktop
     ZoologicoImagenesnew.png")
                     MsgBox("Registro Guardado.", vbOKOnly, "Nuevo Registro")

                       btnedit.Tag = "Edit/Deshacer"

                                                                        © 2011 Enter your company name
Manual del Programador ADO.NET   17


                          btnedit.BackgroundImage = Image.FromFile("C:UsersJonathanDesktop
           ZoologicoImagenesedit.                 png")

                                 txtIDali.Enabled = False
                                 txtNomali.Enabled = False
                                 MostrarBoton()
                                 BotonGuardar()

                          End If
                      End With

                End Sub


           7. BOTON MODIFICAR Y DESHACER


           Private Sub btnedit_Click(ByVal sender As System.Object, ByVal e As System.
           EventArgs) Handles btnedit.Click

                      'Este botón nos permite editar un registro que se encuentre en la base de
           datos.
                      'también podemos deshacer la edita del registro si cometemos un error.

                   With btnedit
                       If .Tag = "Edit" Then
                           .Tag = "deshacer"
                           .BackgroundImage = Image.FromFile("C:UsersJonathanDesktop
           ZoologicoImagenesundo.png")
                           btnnew.Tag = "guardar"
                          btnnew.BackgroundImage = Image.FromFile("C:UsersJonathanDesktop
           ZoologicoImagenessave.                  png")
                           txtIDali.Enabled = True
                           txtNomali.Enabled = True
                           txtIDali.Focus()

                       ElseIf .Tag = "deshacer" Then
                           .Tag = "Edit"
                          .BackgroundImage = Image.FromFile("C:UsersJonathanDesktop
           ZoologicoImagenesedit.png")
                           btnnew.Tag = "new"
                          btnnew.BackgroundImage = Image.FromFile("C:UsersJonathanDesktop
           ZoologicoImagenesnew.                  png")
                           fila = 0
                          mostrarDatos(fila)

                                 MsgBox("Editada Cancelada (Deshacer)")
                                 txtIDali.Enabled = False


© 2011 Enter your company name
18     Manual Usuario


                         txtNomali.Enabled = False

                 End If
             End With

         End Sub


     8. BOTON ELIMINAR


     Private Sub btndelete_Click(ByVal sender As System.Object, ByVal e As System.
     EventArgs) Handles btndelete.Click

             'Este botón nos permite eliminar el registro actual.

            A = MsgBox("Desea Borrar Este Registro?", 1 + 48, "Advertencia")
            If A = 1 Then
                ' Eliminar la fila actual
                If fila < 0 OrElse fila > dt.Rows.Count - 1 Then Exit Sub

                   Try
                     ' Eliminar la fila de la tabla
                    dt.Rows(fila).Delete()
                     ' Actualizar físicamente la base de datos
                     da.Update(dt)
                     ' Aceptar los cambios en la copia local
                    dt.AcceptChanges()
                     'Posicionarlo en la ultima fila
                     btnlast_Click(Nothing, Nothing)
                 Catch ex As DBConcurrencyException
                     MessageBox.Show("Error de concurrencia:" & vbCrLf & ex.Message)
                 Catch ex As Exception
                     MessageBox.Show(ex.Message)
                 End Try
             ElseIf A = 2 Then
                 MsgBox("El Registro no ha sido Borrado")
             End If
         End Sub


                                                                    © 2011 Enter your company name
Manual del Programador ADO.NET          19


3.2        Crear formulario padre


           1. creamos el proyecto "nombre.vb" y le dabamos clic derecho en la parte superior derecha de la
           pantalla para ingresar
             un frm que esta ubicado en explorador de soluciones nombre del proyecto asi :


© 2011 Enter your company name
20      Manual Usuario


     2. al nuevo form le ponemos como nombre "frmpadre" le agregamos herramientas que estan en la parte
     izquierda de la pantalla la cual se llama cuadro de herramientas le agregamos :


     · Menustrip


                                                                             © 2011 Enter your company name
Manual del Programador ADO.NET           21


           3. Este Menustrip despliega sub menus llamados toolstripmenuitem, a cada uno de las tablas creada
           tendran que ir y
              crear un form nuevo y desde el formulario padre llamar ese form.

           Private Sub AlimentoToolStripMenuItem_Click(ByVal sender As System.Object, ByVal e
           As System.EventArgs) Handles AlimentoToolStripMenuItem.Click
                   frmAlimentos.Show() 'muestra el form alimentos
                   frmAnimal.Hide()     'oculta form animal
                   frmCorral.Hide()
                   frmCuidador.Hide()
                   frmFamilia.Hide()


© 2011 Enter your company name
22   Manual Usuario


                      Endnotes 2... (after index)


                                                    © 2011 Enter your company name
Back Cover

Manual usuario ado.net

  • 1.
    Manual Usuario © 2011 Enter your company name Note: To change the product logo for your own print manual or PDF, click "Tools > Manual Designer" and modify the print manual template.
  • 2.
    Title page 1 Use this page to introduce the product by Enter your company name This is "Title Page 1" - you may use this page to introduce your product, show title, author, copyright, company logos, etc. This page intentionally starts on an odd page, so that it is on the right half of an open book from the readers point of view. This is the reason why the previous page was blank (the previous page is the back side of the cover)
  • 3.
    Manual Usuario © 2011Enter your company name All rights reserved. No parts of this work may be reproduced in any form or by any means - graphic, electronic, or mechanical, including photocopying, recording, taping, or information storage and retrieval systems - without the written permission of the publisher. Products that are referred to in this document may be either trademarks and/or registered trademarks of the respective owners. The publisher and the author make no claim to these trademarks. While every precaution has been taken in the preparation of this document, the publisher and the author assume no responsibility for errors or omissions, or for damages resulting from the use of information contained in this document or from the use of programs and source code that may accompany it. In no event shall the publisher and the author be liable for any loss of profit or any other commercial damage caused or alleged to have been caused directly or indirectly by this document. Printed: noviembre 2011 in (whereever you are located) Special thanks to: Publisher All the people who contributed to this document, to mum and dad ...enter name... and grandpa, to my sisters and brothers and mothers in law, to Managing Editor our secretary Kathrin, to the graphic artist who created this great product logo on the cover page (sorry, don't remember your name ...enter name... at the moment but you did a great work), to the pizza service down the street (your daily Capricciosas saved our lives), to the copy Technical Editors shop where this document will be duplicated, and and and... ...enter name... ...enter name... Last not least, we want to thank EC Software who wrote this great help tool called HELP & MANUAL which printed this document. Cover Designer ...enter name... Team Coordinator ...enter name... Production ...enter name...
  • 4.
    4 Manual Usuario Table of Contents Foreword 5 Part I Presentacion 7 Part II Manual de Usuario ADO.NET 9 1 Manejo de botones en formularios ................................................................................................................................... 9 2 Imagen ................................................................................................................................... 10 Part III Manual del Programador ADO.NET 13 1 Como crear botones ................................................................................................................................... 13 2 Crear................................................................................................................................... formulario padre 19 Index 0 © 2011 Enter your company name
  • 5.
    Foreword 5 Foreword This is just another title page placed between table of contents and topics © 2011 Enter your company name
  • 6.
    Top Level Intro Thispage is printed before a new top-level chapter starts Part I
  • 7.
    Presentacion 7 1 Presentacion © 2011 Enter your company name
  • 8.
    Top Level Intro Thispage is printed before a new top-level chapter starts Part II
  • 9.
    Manual de UsuarioADO.NET 9 2 Manual de Usuario ADO.NET · MANEJO DE BOTONES EN UN FORMULARIO · IMAGEN 2.1 Manejo de botones en formularios BOTONES DE NAVEGACION BOTON "PRIMER REGISTRO" Este botón nos permitirá dirigirnos al primer registro de nuestro formulario o base de datos BOTON ANTERIOR DE UN REGISTRO Este botón nos permitirá dirigirnos hacia un registro anterior de donde estemos BOTON SIGUIENTE DE UN REGISTRO Este botón nos permite navegar los registros siguientes BOTON FINAL DE REGISTROS © 2011 Enter your company name
  • 10.
    10 Manual Usuario Este botón nos permite ir directamente al ultimo registro BOTONES DE OPERACIÓN BOTON AGREGAR Y GUARDAR UN REGISTRO En este botón tenemos 2 funciones la cual es agregar registro y guardar el registro, también desde este código cambiamos la imagen del botón modificar BOTON MODIFICAR Y DESHACER En este botón tenemos 2 funciones que nos permite modificar y deshacer un registro BOTON ELIMINAR Este boton nos permite eliminar un registro 2.2 Imagen © 2011 Enter your company name
  • 11.
    Manual de UsuarioADO.NET 11 © 2011 Enter your company name
  • 12.
    Top Level Intro Thispage is printed before a new top-level chapter starts Part III
  • 13.
    Manual del ProgramadorADO.NET 13 3 Manual del Programador ADO.NET · COMO CREAR BOTONES · CREAR FORMULARIO PADRE 3.1 Como crear botones 1. creamos el proyecto "nombre.vb" y le dabamos clic derecho en la parte superior derecha de la pantalla para ingresar un frm que esta ubicado en explorador de soluciones nombre del proyecto asi : 2. luego de crear el frm con su nombre adecuado agregamos los button y con el siguiente codigo BOTONES DE NAVEGACION © 2011 Enter your company name
  • 14.
    14 Manual Usuario BOTON "PRIMER REGISTRO" Private Sub btnfirst_Click(ByVal sender As System.Object, ByVal e As System. EventArgs) Handles btnfirst. Click 'Para ir al primero, simplemente asignamos cero a la variable de la fila actual y llamamos al método de mostrar los datos. fila = 0 mostrarDatos(fila) End Sub 3. BOTON "ANTERIOR DE UN REGISTRO" Private Sub btnprev_Click_1(ByVal sender As System.Object, ByVal e As System. EventArgs) Handles btnprev.Click 'Para ir al anterior simplemente le restamos uno al valor de la fila actual, 'pero debemos hacer una comprobación de que no sea menor de cero, ya que es 'posible que estemos en el primer registro. fila = fila - 1 If fila < 0 Then fila = 0 mostrarDatos(fila) End Sub 4. BOTON "SIGUIENTE DE UN REGISTRO" 'Para ir al siguiente, hacemos lo mismo que antes, pero en lugar de restar uno, 'lo que hacemos es añadir uno al valor de la fila actual, y en el caso de que sea 'mayor que la última fila, pues nos quedamos en esa última fila. © 2011 Enter your company name
  • 15.
    Manual del ProgramadorADO.NET 15 Dim uf As Integer = dt.Rows.Count - 1 fila = fila + 1 If fila > uf Then fila = uf mostrarDatos(fila) End Sub Private Sub btnlast_Click(ByVal sender As System.Object, ByVal e As System. EventArgs) Handles btnlast.Click 'Para ir al último, averiguamos cual es la última fila, que como vemos 'es el valor devuelto por la propiedad Count de la colección de filas (Rows), 'menos uno, ya que como sabemos todos los arrays y colecciones de .NET siempre 'empiezan con el índice cero. fila = dt.Rows.Count - 1 mostrarDatos(fila) End Sub 5. BOTON FINAL DE REGISTROS 'Para ir al último, averiguamos cual es la última fila, que como vemos 'es el valor devuelto por la propiedad Count de la colección de filas (Rows), 'menos uno, ya que como sabemos todos los arrays y colecciones de .NET siempre 'empiezan con el índice cero. fila = dt.Rows.Count - 1 mostrarDatos(fila) End Sub 6. BOTON AGREGAR Y GUARDAR UN REGISTRO Private Sub btnnew_Click(ByVal sender As System.Object, ByVal e As System.EventArgs ) Handles btnnew.Click © 2011 Enter your company name
  • 16.
    16 Manual Usuario 'Crea un nuevo registro y luego el mismo boton se convierte en Guardar registro 'teniendo encuenta la propiedad tag del boton. '.tag nos permite realizar dos funciones en un mismo boton. 'En este caso (Crear un nuevo registro y Guardar el Registro) With btnnew If .Tag = "new" Then .Tag = "guardar" .BackgroundImage = Image.FromFile("C:UsersJonathanDesktop ZoologicoImagenessave.png") txtIDali.Enabled = True txtNomali.Enabled = True 'Crea una fila en memoria temporal. 'Crea nuevo registro. Dim dr As DataRow = dt.NewRow 'Asignar los datos al campos de txt de la fila. asignarDatos(dr) 'Añadir datos a la tabla. dt.Rows.Add(dr) 'Guarda Físicamente los datos en la base de datos. Try If CInt("0" & dr("IDalimento").ToString) = 0 Then dt = New DataTable da.Fill(dt) End If 'Posicionarlo en la última fila. btnlast_Click(Nothing, Nothing) Catch ex As DBConcurrencyException MessageBox.Show("Error de concurrencia:" & vbCrLf & ex.Message) Catch ex As Exception End Try txtIDali.Focus() OcultarBoton() 'Aquí realizamos la segunda función del botón. ElseIf .Tag = "guardar" Then .Tag = "new" .BackgroundImage = Image.FromFile("C:UsersJonathanDesktop ZoologicoImagenesnew.png") MsgBox("Registro Guardado.", vbOKOnly, "Nuevo Registro") btnedit.Tag = "Edit/Deshacer" © 2011 Enter your company name
  • 17.
    Manual del ProgramadorADO.NET 17 btnedit.BackgroundImage = Image.FromFile("C:UsersJonathanDesktop ZoologicoImagenesedit. png") txtIDali.Enabled = False txtNomali.Enabled = False MostrarBoton() BotonGuardar() End If End With End Sub 7. BOTON MODIFICAR Y DESHACER Private Sub btnedit_Click(ByVal sender As System.Object, ByVal e As System. EventArgs) Handles btnedit.Click 'Este botón nos permite editar un registro que se encuentre en la base de datos. 'también podemos deshacer la edita del registro si cometemos un error. With btnedit If .Tag = "Edit" Then .Tag = "deshacer" .BackgroundImage = Image.FromFile("C:UsersJonathanDesktop ZoologicoImagenesundo.png") btnnew.Tag = "guardar" btnnew.BackgroundImage = Image.FromFile("C:UsersJonathanDesktop ZoologicoImagenessave. png") txtIDali.Enabled = True txtNomali.Enabled = True txtIDali.Focus() ElseIf .Tag = "deshacer" Then .Tag = "Edit" .BackgroundImage = Image.FromFile("C:UsersJonathanDesktop ZoologicoImagenesedit.png") btnnew.Tag = "new" btnnew.BackgroundImage = Image.FromFile("C:UsersJonathanDesktop ZoologicoImagenesnew. png") fila = 0 mostrarDatos(fila) MsgBox("Editada Cancelada (Deshacer)") txtIDali.Enabled = False © 2011 Enter your company name
  • 18.
    18 Manual Usuario txtNomali.Enabled = False End If End With End Sub 8. BOTON ELIMINAR Private Sub btndelete_Click(ByVal sender As System.Object, ByVal e As System. EventArgs) Handles btndelete.Click 'Este botón nos permite eliminar el registro actual. A = MsgBox("Desea Borrar Este Registro?", 1 + 48, "Advertencia") If A = 1 Then ' Eliminar la fila actual If fila < 0 OrElse fila > dt.Rows.Count - 1 Then Exit Sub Try ' Eliminar la fila de la tabla dt.Rows(fila).Delete() ' Actualizar físicamente la base de datos da.Update(dt) ' Aceptar los cambios en la copia local dt.AcceptChanges() 'Posicionarlo en la ultima fila btnlast_Click(Nothing, Nothing) Catch ex As DBConcurrencyException MessageBox.Show("Error de concurrencia:" & vbCrLf & ex.Message) Catch ex As Exception MessageBox.Show(ex.Message) End Try ElseIf A = 2 Then MsgBox("El Registro no ha sido Borrado") End If End Sub © 2011 Enter your company name
  • 19.
    Manual del ProgramadorADO.NET 19 3.2 Crear formulario padre 1. creamos el proyecto "nombre.vb" y le dabamos clic derecho en la parte superior derecha de la pantalla para ingresar un frm que esta ubicado en explorador de soluciones nombre del proyecto asi : © 2011 Enter your company name
  • 20.
    20 Manual Usuario 2. al nuevo form le ponemos como nombre "frmpadre" le agregamos herramientas que estan en la parte izquierda de la pantalla la cual se llama cuadro de herramientas le agregamos : · Menustrip © 2011 Enter your company name
  • 21.
    Manual del ProgramadorADO.NET 21 3. Este Menustrip despliega sub menus llamados toolstripmenuitem, a cada uno de las tablas creada tendran que ir y crear un form nuevo y desde el formulario padre llamar ese form. Private Sub AlimentoToolStripMenuItem_Click(ByVal sender As System.Object, ByVal e As System.EventArgs) Handles AlimentoToolStripMenuItem.Click frmAlimentos.Show() 'muestra el form alimentos frmAnimal.Hide() 'oculta form animal frmCorral.Hide() frmCuidador.Hide() frmFamilia.Hide() © 2011 Enter your company name
  • 22.
    22 Manual Usuario Endnotes 2... (after index) © 2011 Enter your company name
  • 23.