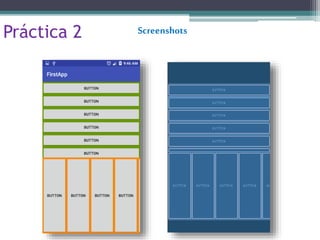
Reportes de Actividades
Erick Alberto Soltero García
4G “Programación”
Desarrollo de Aplicaciones Móviles
Parcial 2
Práctica 1:
• Actividad 1
• Actividad 2
• Actividad 3
• Actividad 4
• Actividad 5
• Actividad 6
<LinearLayout
xmlns:android="http://schemas.android.com/apk/res/android"
android:orientation="vertical"
android:layout_width="match_parent"
android:layout_height="match_parent"
android:layout_weight="1"
android:background="@android:color/darker_gray">
<TextView
android:text="Lista de invitados"
android:layout_width="wrap_content"
android:layout_height="wrap_content"
android:background="#51af4c"
android:textSize="24sp"
/>
<TextView
android:text="Erick"
android:layout_width="match_parent"
android:layout_height="wrap_content"
android:background="#51af4c"
android:textSize="24sp" />
<TextView
android:text="Adrian"
android:layout_width="wrap_content"
android:layout_height="wrap_content"
android:background="#51af4c"
android:textSize="24sp" />
<TextView
android:text="Xania"
android:layout_width="wrap_content"
android:layout_height="wrap_content"
android:background="#51af4c"
android:textSize="24sp" />
</LinearLayout>
Código XMLActividad 1
Actividad 1 Screenshots
Llevar a cabo esta actividad representó para mi
comenzar con el desarrollo de aplicaciones
móviles. Con esta actividad aprendí como
insertar elementos “TextView”, determinar la
altura y longitud que abarca un “TextView” y
cambiar el color del fondo de un “TextView”.
ConclusiónActividad 1
<LinearLayout
xmlns:android="http://schemas.android.com/apk/res/android"
android:orientation="vertical"
android:layout_width="match_parent"
android:layout_height="match_parent"
android:background="@android:color/holo_green_dark">
<TextView
android:text="Lista de invitados"
android:layout_width="match_parent"
android:layout_height="wrap_content"
android:layout_weight="1"
android:background="#4c79af"
android:textSize="24sp" />
<TextView
android:text="Erick"
android:layout_width="match_parent"
android:layout_height="wrap_content"
android:layout_weight="1"
android:background="#c71358"
android:textSize="24sp" />
<TextView
android:text="Adrian"
android:layout_width="match_parent"
android:layout_height="wrap_content"
android:layout_weight="1"
android:background="#e4cc15"
android:textSize="24sp" />
<TextView
android:text="Xania"
android:layout_width="match_parent"
android:layout_height="wrap_content"
android:layout_weight="1"
android:background="#1bbc22"
android:textSize="24sp" />
</LinearLayout>
Código XMLActividad 2
Actividad 2 Screenshots
En esta actividad aprendí a asignar un tamaño a
los “TextView”, de forma que el espacio
disponible sea ocupado equitativamente por
cada uno de los “TextView”.
ConclusiónActividad 2
<LinearLayout
xmlns:android="http://schemas.android.com/apk/res/android"
xmlns:app="http://schemas.android.com/apk/res-auto"
android:layout_width="match_parent"
android:layout_height="match_parent"
android:orientation="vertical"
android:visibility="visible">
<ImageView
android:layout_width="wrap_content"
android:layout_height="wrap_content"
android:layout_weight="1"
android:scaleType="centerCrop"
android:src="@drawable/hk" />
<TextView
android:layout_width="match_parent"
android:layout_height="wrap_content"
android:layout_weight="0"
android:background="#009688"
android:text="Welcome User!"
android:textColor="@android:color/white"
android:textSize="24sp" />
<TextView
android:layout_width="match_parent"
android:layout_height="wrap_content"
android:layout_weight="0"
android:background="#009688"
android:text="Have a nice day!"
android:textColor="@android:color/white"
android:textSize="24sp" />
</LinearLayout>
Código XMLActividad 3
Actividad 3 Screenshots
Al realizar esta actividad pude aprender a añadir
imágenes en un Layout. Hacer esto representó
una ligera dificultad para mí, ya que no lograba
entender cómo añadir imágenes, pero
finalmente fui capaz de entenderlo.
Pienso que haber aprendido a añadir imágenes en
un Layout me será de gran utilidad en futúras
prácticas.
ConclusiónActividad 3
<RelativeLayout
xmlns:android="http://schemas.android.com/apk/res/android"
android:layout_width="match_parent"
android:layout_height="match_parent"
android:padding="16dp">
<TextView
android:text="I'm in this corner"
android:layout_width="wrap_content"
android:layout_height="wrap_content"
android:layout_alignParentBottom="true"
android:layout_alignParentLeft="true"/>
<TextView
android:text="No, Up here"
android:layout_width="wrap_content"
android:layout_height="wrap_content"
android:layout_alignParentTop="true"
android:layout_alignParentLeft="true"/>
<TextView
android:text="wait, I'm here"
android:layout_width="wrap_content"
android:layout_height="wrap_content"
android:layout_alignParentBottom="true"
android:layout_alignParentRight="true"/>
<TextView
android:text="Actually, I'm here"
android:layout_width="wrap_content"
android:layout_height="wrap_content"
android:layout_alignParentTop="true"
android:layout_alignParentRight="true"/>
</RelativeLayout>
Código XMLActividad 4
Actividad 4 Screenshots
Tras finalizar esta actividad aprendí como alinear
los “TextView” en distintos lugares del Layout.
Finalizar esta actividad me resultó muy fácil, ya
que comprendí a la perfección como alinear los
“TextView”.
ConclusiónActividad 4
<RelativeLayout
xmlns:android="http://schemas.android.com
/apk/res/android"
android:layout_width="match_parent"
android:layout_height="match_parent"
android:background="@android:color/holo_
orange_dark">
<TextView
android:id="@+id/lyla"
android:layout_width="wrap_content"
android:layout_height="wrap_content"
android:layout_alignParentBottom="true"
android:layout_alignParentLeft="true"
android:background="#030c8c"
android:textSize="24sp"
android:textColor="#fcfcfc"
android:text="Lyla"
/>
<TextView
android:id="@+id/me"
android:layout_width="wrap_content"
android:layout_height="wrap_content"
android:layout_alignParentBottom="true"
android:layout_toRightOf="@id/lyla"
android:textSize="24sp"
android:text="Me"
/>
<TextView
android:id="@+id/natalie"
android:layout_width="wrap_content"
android:layout_height="wrap_content"
android:textSize="24sp"
android:text="Natalie"/>
<TextView
android:id="@+id/jennie"
android:layout_width="wrap_content"
android:layout_height="wrap_content"
android:layout_alignParentBottom="true"
android:layout_alignParentRight="true"
android:textSize="24sp"
android:text="Jennie"/>
<TextView
android:id="@+id/amy"
android:layout_width="wrap_content"
android:layout_height="wrap_content"
android:layout_alignParentBottom="true"
android:layout_toLeftOf="@id/jennie"
android:textSize="24sp"
android:text="Amy"/>
<TextView
android:id="@+id/omoju"
android:layout_width="wrap_content"
android:layout_height="wrap_content"
android:layout_alignParentRight="true"
android:layout_above="@id/jennie"
android:textSize="24sp"
android:text="Omoju"
/>
<TextView
android:id="@+id/kunal"
android:layout_width="wrap_content"
android:layout_height="wrap_content"
android:layout_alignParentTop="true"
android:layout_toRightOf="@id/natalie"
android:textSize="24sp"
android:text=" Kunal"
/>
<TextView
android:id="@+id/ben"
android:layout_width="wrap_content"
android:layout_height="wrap_content"
android:layout_alignParentTop="true"
android:layout_toRightOf="@id/kunal"
android:textSize="24sp"
android:text="Ben"/>
<TextView
android:id="@+id/kaguro"
android:layout_width="wrap_content"
android:layout_height="wrap_content"
android:layout_alignParentTop="true"
android:layout_alignParentRight="true"
android:textSize="24sp"
android:text="Kagure"/>
</RelativeLayout>>
Código XMLActividad 5
Actividad 5 Screenshots
Realizar esta actividad me ayudó a entender como
alinear los “TextView” en relación a otros “Text
View”. Realizar esta actividad me resulto
regularmente difícil, ya que tuve que escribir una
gran parte del código, sin embargo no tuve
mayores dificultades ya que entendí como
alinear elementos entre sí.
ConclusiónActividad 5
<LinearLayout
xmlns:android="http://schemas.android.com/apk/res/android"
xmlns:app="http://schemas.android.com/apk/res-auto"
android:layout_width="match_parent"
android:layout_height="match_parent"
android:orientation="vertical"
android:visibility="visible">
<ImageView
android:layout_width="wrap_content"
android:layout_height="wrap_content"
android:layout_weight="1"
android:scaleType="centerCrop"
android:layout_margin="10sp"
android:src="@drawable/hk" />
<TextView
android:layout_width="match_parent"
android:layout_height="wrap_content"
android:layout_weight="0"
android:layout_marginLeft="10sp"
android:layout_marginRight="10sp"
android:background="#009688"
android:text="Welcome User!"
android:textColor="@android:color/white"
android:textSize="24sp" />
<TextView
android:layout_width="match_parent"
android:layout_height="wrap_content"
android:layout_weight="0"
android:layout_marginLeft="10sp"
android:layout_marginRight="10sp"
android:layout_marginBottom="10sp"
android:background="#009688"
android:text="Have a nice day!"
android:textColor="@android:color/white"
android:textSize="24sp" />
</LinearLayout>
Código XMLActividad 6
Actividad 6 Screenshots
Llevar a cabo esta actividad me llevó a
comprender cómo utilizar los margenes, tanto
para imágenes como para “TextViews”.
Realizar esta aplicación me fue muy fácil, pues
entender el funcionamiento de los márgenes no
fue difícil.
ConclusiónActividad 6
<?xml version="1.0" encoding="utf-8"?>
<android.support.constraint.ConstraintLayout
xmlns:android="http://schemas.android.com/apk/
res/android"
xmlns:app="http://schemas.android.com/apk/res-
auto"
xmlns:tools="http://schemas.android.com/tools"
android:layout_width="match_parent"
android:layout_height="match_parent">
<LinearLayout
android:layout_width="match_parent"
android:layout_height="match_parent"
android:orientation="vertical"
android:background="@android:color/holo_green
_dark">
<ScrollView
android:layout_width="match_parent"
android:layout_height="match_parent"
android:layout_weight="1"
app:layout_constraintDimensionRatio="w,1:1"
tools:ignore="MissingConstraints"
tools:layout_editor_absoluteX="0dp"
tools:layout_editor_absoluteY="0dp">
<LinearLayout
android:layout_width="match_parent"
android:layout_height="wrap_content"
android:orientation="vertical">
<Button
android:id="@+id/button25"
android:layout_width="match_parent"
android:layout_height="wrap_content"
android:text="Button" />
<Button
android:id="@+id/button26"
android:layout_width="match_parent"
android:layout_height="wrap_content"
android:text="Button" />
<Button
android:id="@+id/button27"
android:layout_width="match_parent"
android:layout_height="wrap_content"
android:text="Button" />
<
</ScrollView>
<HorizontalScrollView
android:id="@+id/horizontalScrollView"
android:layout_width="match_parent"
android:layout_weight="1"
android:layout_height="match_parent"
tools:ignore="MissingConstraints"
tools:layout_editor_absoluteX="0dp"
tools:layout_editor_absoluteY="261dp">
<LinearLayout
android:layout_width="wrap_content"
android:layout_height="match_parent"
android:orientation="horizontal"
android:background="@android:color/holo_orang
e_dark">
<Button
android:id="@+id/Button16"
android:layout_width="wrap_content"
android:layout_height="match_parent"
android:layout_weight="1"
android:text="Button" />
<Button
android:id="@+id/Button17"
android:layout_width="wrap_content"
android:layout_height="match_parent"
android:layout_weight="1"
android:text="Button" />
<Button
android:id="@+id/Button18"
android:layout_width="wrap_content"
android:layout_height="match_parent"
android:layout_weight="1"
android:text="Button" />
<Button
android:id="@+id/Button19"
android:layout_width="wrap_content"
android:layout_height="match_parent"
android:layout_weight="1"
android:text="Button" />
<Button
android:id="@+id/Button20"
android:layout_width="wrap_content"
android:layout_height="match_parent"
android:layout_weight="1"
android:text="Button" />
</LinearLayout>
</HorizontalScrollView>
</LinearLayout>
</android.support.constraint.ConstraintLayout>
Código XMLPráctica 2
Práctica 2 Screenshots
Esta práctica me ayudó a entender el
funcionamiento de los “ScrollViews”,
horizontales y verticales.
Realizar esta actividad me resultó difícil, ya que
no comprendía como utilizar el “ScrollView”, y se
me presentaron numerosas dificultades.
ConclusiónPráctica 2

Reportes de actividades