SlideShare una empresa de Scribd logo
1 de 60
Descargar para leer sin conexión
Tutorial: como ejecutar un proyecto opengl y netbeans 6.9.1


Este tutorial lo realice con el propósito de ayudar a otros en cuanto a la conexión y prueba
de los programas en opengl y netbeans.


Primero descarguen las librerías que ocuparemos lwjgl-sourse-2.7.1.zip , lwjgl-docs-
2.7.1.zip,lwjgl-2.7.1.zip


Tutorial: Pedro López Salazar Instituto tecnológico Superior de Zapopan Página 1
Tutorial: como ejecutar un proyecto opengl y netbeans 6.9.1

http://sourceforge.net/projects/java-game-lib/files/Official%20Releases/LWJGL%202.7.1/


Descarga este código y alójalo en tu escritorio

http://sites.google.com/site/tlazalohua/


Tutorial: Pedro López Salazar Instituto tecnológico Superior de Zapopan Página 2
Tutorial: como ejecutar un proyecto opengl y netbeans 6.9.1

Enseguida descomprime el archivo lwjgl-2.7.1.zip      y la carpeta que lleva el mismo nombre
y alójalos en tus documentos.


a   lwjgl


Das doble clic a esta carpeta recién cambiada el nombre das clic a la carpeta doc y en ella
ay un archivo llamada readme a esta dale doble clic.


Tutorial: Pedro López Salazar Instituto tecnológico Superior de Zapopan Página 3
Tutorial: como ejecutar un proyecto opengl y netbeans 6.9.1


Esto se hace para saber que el programa este funcionando correctamente. Ábrelo con un bloq
de notas.


Enseguida Accesa al comando ejecutar o oprime las teclas inicio + r


Escribe cmd y enter


Tutorial: Pedro López Salazar Instituto tecnológico Superior de Zapopan Página 4
Tutorial: como ejecutar un proyecto opengl y netbeans 6.9.1


Enseguida te aparece la pantalla negra el objetivo es acesar a la carpeta donde se encuentra
el archivo de prueba que esta dentro de la carpeta lwjgl para ello sigue estos pasos:


Mete a tus documentos , a la carpeta lwjgl


Enseguida nos vamos al archivo que abrimos anterior mete llamado readme de la carpeta doc
y pegamos este escrito:


Tutorial: Pedro López Salazar Instituto tecnológico Superior de Zapopan Página 5
Tutorial: como ejecutar un proyecto opengl y netbeans 6.9.1

nota: debemos de borrarle el signo de mayor que

java -cp .;res;jarlwjgl.jar;jarlwjgl_test.jar;jarlwjgl_util.jar;jarjinput.jar;
-Djava.library.path=native<Windows

asi que daría:

java -cp .;res;jarlwjgl.jar;jarlwjgl_test.jar;jarlwjgl_util.jar;jarjinput.jar;
-Djava.library.path=nativewindows

nos vamos a la ventana de el cmd y damos clic en pegar


Si en tu caso fue Linux debes de poner Linux en lugar de windows


El siguiente paso es irnos de nuevo a nuestro archivo readme y copiar este código


Tutorial: Pedro López Salazar Instituto tecnológico Superior de Zapopan Página 6
Tutorial: como ejecutar un proyecto opengl y netbeans 6.9.1


Copiarlo y pegarlo en cmd (la pantalla negra)


Tutorial: Pedro López Salazar Instituto tecnológico Superior de Zapopan Página 7
Tutorial: como ejecutar un proyecto opengl y netbeans 6.9.1


Enseguida daremos enter y saldrá un jueguito


Tutorial: Pedro López Salazar Instituto tecnológico Superior de Zapopan Página 8
Tutorial: como ejecutar un proyecto opengl y netbeans 6.9.1


Ahora es momento de enfocarnos a nuestro proyecto que crearemos en netbeans y opengl


Tutorial: Pedro López Salazar Instituto tecnológico Superior de Zapopan Página 9
Tutorial: como ejecutar un proyecto opengl y netbeans 6.9.1


Tutorial: Pedro López Salazar Instituto tecnológico Superior de Zapopan Página 10
Tutorial: como ejecutar un proyecto opengl y netbeans 6.9.1


Como vemos ya creamos nuestro proyecto


Tutorial: Pedro López Salazar Instituto tecnológico Superior de Zapopan Página 11
Tutorial: como ejecutar un proyecto opengl y netbeans 6.9.1

Si no se visualizamos la carpeta del proyecto sigamos estos pasos:


Lo siguiente es crear un paquete


Mi paquete se llamo miopengl


Tutorial: Pedro López Salazar Instituto tecnológico Superior de Zapopan Página 12
Tutorial: como ejecutar un proyecto opengl y netbeans 6.9.1


Lo siguiente un frame dentro del paquete


Y damos finish


Tutorial: Pedro López Salazar Instituto tecnológico Superior de Zapopan Página 13
Tutorial: como ejecutar un proyecto opengl y netbeans 6.9.1


En este momento creamos nuestro frame


nota importante: Es necesario que en este momento pongas en set
layout a este panel que creamos


Tutorial: Pedro López Salazar Instituto tecnológico Superior de Zapopan Página 14
Tutorial: como ejecutar un proyecto opengl y netbeans 6.9.1

sigamos estos pasos:


en la parte de abajo donde aparecen los frames da clic derecho


Tutorial: Pedro López Salazar Instituto tecnológico Superior de Zapopan Página 15
Tutorial: como ejecutar un proyecto opengl y netbeans 6.9.1


Y asi se mostrar


Enseguida arrastra un panel y arrástralo donde esta en frame.


Tutorial: Pedro López Salazar Instituto tecnológico Superior de Zapopan Página 16
Tutorial: como ejecutar un proyecto opengl y netbeans 6.9.1


A este panel es necesario ponerle nombre para ello vete a inspector
selecciona el panel da clic derecho.


Tutorial: Pedro López Salazar Instituto tecnológico Superior de Zapopan Página 17
Tutorial: como ejecutar un proyecto opengl y netbeans 6.9.1


En este momento ya tiene nombre nuestro panel que agregamos
enseguida tenemos que agregarle un toggle botón


Tutorial: Pedro López Salazar Instituto tecnológico Superior de Zapopan Página 18
Tutorial: como ejecutar un proyecto opengl y netbeans 6.9.1


Ponle el nombre animar


Y dale nombre al toggle button


Tutorial: Pedro López Salazar Instituto tecnológico Superior de Zapopan Página 19
Tutorial: como ejecutar un proyecto opengl y netbeans 6.9.1


Ahora es momento de irnos a nuestro constructor del Frame ventana y
damos clic en sourse.


Tutorial: Pedro López Salazar Instituto tecnológico Superior de Zapopan Página 20
Tutorial: como ejecutar un proyecto opengl y netbeans 6.9.1


private Claseopengl pnLog1;

  /** Creates new form Ventana */

  public Ventana() {

    initComponents();


      try{

Tutorial: Pedro López Salazar Instituto tecnológico Superior de Zapopan Página 21
Tutorial: como ejecutar un proyecto opengl y netbeans 6.9.1

         pnLog1= new Claseopengl();

        }


            catch (org.lwjgl.LWJGLException e){

              System.out.println(e.getMessage());

              }


             add (pnLog1 , java.awt.BorderLayout.CENTER);

             this.setSize(680,450);


  }

enseguida nos vamos a la ventana de diseño:

al botón damos un evento:


pnLog1.start();


Tutorial: Pedro López Salazar Instituto tecnológico Superior de Zapopan Página 22
Tutorial: como ejecutar un proyecto opengl y netbeans 6.9.1


Ahora que ya terminamos con el programa debemos de crear una clase y lo
meteremos dentro de nuestro paquete. Sigamos estos pasos:


Tutorial: Pedro López Salazar Instituto tecnológico Superior de Zapopan Página 23
Tutorial: como ejecutar un proyecto opengl y netbeans 6.9.1


Tutorial: Pedro López Salazar Instituto tecnológico Superior de Zapopan Página 24
Tutorial: como ejecutar un proyecto opengl y netbeans 6.9.1

El paso siguiente es abrir el archivo descargado llamado : OpenGL

Es necesario cambiarle el nombre de la clase y el nombre del constructor y borrarle
el main.


Tutorial: Pedro López Salazar Instituto tecnológico Superior de Zapopan Página 25
Tutorial: como ejecutar un proyecto opengl y netbeans 6.9.1

El código completo quedaría asi:


package miopengl;


/**

*

* @author pedro

*/

import org.lwjgl.opengl.GL11;

import org.lwjgl.util.glu.GLU;


public class Claseopengl extends org.lwjgl.opengl.AWTGLCanvas implements Runnable {


    private Thread thread;


    public float rtri;       // Angle For The Triangle ( NEW )

    public float rquad;          // Angle For The Quad   ( NEW )


    public float xTras;

    public float yTras;

    public float zTras;


    public float xRot;

    public float yRot;

    public float zRot;


    public Claseopengl() throws org.lwjgl.LWJGLException {

Tutorial: Pedro López Salazar Instituto tecnológico Superior de Zapopan Página 26
Tutorial: como ejecutar un proyecto opengl y netbeans 6.9.1

      super();

 }


 private void ejes() {

     GL11.glBegin(GL11.GL_LINES);

      GL11.glColor3f(1.0f, 0.0f, 0.0f);

      GL11.glVertex3f(0.0f, 0.0f, 0.0f);

      GL11.glVertex3f(10.0f, 0.0f, 0.0f);


      GL11.glColor3f(0.0f, 1.0f, 0.0f);

      GL11.glVertex3f(0.0f, 0.0f, 0.0f);

      GL11.glVertex3f(0.0f, 10.0f, 0.0f);


      GL11.glColor3f(0.0f, 0.0f, 1.0f);

      GL11.glVertex3f(0.0f, 0.0f, 0.0f);

      GL11.glVertex3f(0.0f, 0.0f, 10.0f);

     GL11.glEnd();

 }


 private void triangulo() {

      GL11.glPushMatrix();

       //GL11.glLoadIdentity();

       GL11.glTranslatef(-1.5f,0.0f,-6.0f);       // Move Left 1.5 Units And Into The Screen 6.0

       GL11.glRotatef(rtri,0.0f,1.0f,0.0f);       // Rotate The Triangle On The Y axis ( NEW )

       GL11.glBegin(GL11.GL_TRIANGLES);                  // Drawing Using Triangles

        GL11.glColor3f(1.0f,0.0f,0.0f);       // Red

        GL11.glVertex3f( 0.0f, 1.0f, 0.0f);   // Top Of Triangle (Front)

        GL11.glColor3f(0.0f,1.0f,0.0f);       // Green

        GL11.glVertex3f(-1.0f,-1.0f, 1.0f);    // Left Of Triangle (Front)


Tutorial: Pedro López Salazar Instituto tecnológico Superior de Zapopan Página 27
Tutorial: como ejecutar un proyecto opengl y netbeans 6.9.1

       GL11.glColor3f(0.0f,0.0f,1.0f);          // Blue

       GL11.glVertex3f( 1.0f,-1.0f, 1.0f);       // Right Of Triangle (Front)

       GL11.glColor3f(1.0f,0.0f,0.0f);          // Red

       GL11.glVertex3f( 0.0f, 1.0f, 0.0f);       // Top Of Triangle (Right)

       GL11.glColor3f(0.0f,0.0f,1.0f);          // Blue

       GL11.glVertex3f( 1.0f,-1.0f, 1.0f);       // Left Of Triangle (Right)

       GL11.glColor3f(0.0f,1.0f,0.0f);          // Green

       GL11.glVertex3f( 1.0f,-1.0f, -1.0f);         // Right Of Triangle (Right)

       GL11.glColor3f(1.0f,0.0f,0.0f);          // Red

       GL11.glVertex3f( 0.0f, 1.0f, 0.0f);       // Top Of Triangle (Back)

       GL11.glColor3f(0.0f,1.0f,0.0f);          // Green

       GL11.glVertex3f( 1.0f,-1.0f, -1.0f);         // Left Of Triangle (Back)

       GL11.glColor3f(0.0f,0.0f,1.0f);          // Blue

       GL11.glVertex3f(-1.0f,-1.0f, -1.0f);         // Right Of Triangle (Back)

       GL11.glColor3f(1.0f,0.0f,0.0f);          // Red

       GL11.glVertex3f( 0.0f, 1.0f, 0.0f);       // Top Of Triangle (Left)

       GL11.glColor3f(0.0f,0.0f,1.0f);          // Blue

       GL11.glVertex3f(-1.0f,-1.0f,-1.0f);        // Left Of Triangle (Left)

       GL11.glColor3f(0.0f,1.0f,0.0f);          // Green

       GL11.glVertex3f(-1.0f,-1.0f, 1.0f);        // Right Of Triangle (Left)

      GL11.glEnd();                           // Finished Drawing The Triangle

     GL11.glPopMatrix();

     rtri+=0.5f;                     // Increase The Rotation Variable For The Triangle ( NEW )

 }


 private void cubo() {

     GL11.glPushMatrix();

      GL11.glTranslatef(1.5f,0.0f,-7.0f);          // Move Right 1.5 Units And Into The Screen 6.0

      GL11.glRotatef(rquad,1.0f,1.0f,1.0f);              // Rotate The Quad On The X axis ( NEW )


Tutorial: Pedro López Salazar Instituto tecnológico Superior de Zapopan Página 28
Tutorial: como ejecutar un proyecto opengl y netbeans 6.9.1

    GL11.glColor3f(0.5f,0.5f,1.0f);         // Set The Color To Blue One Time Only

    GL11.glBegin(GL11.GL_QUADS);                  // Draw A Quad

     GL11.glColor3f(0.0f,1.0f,0.0f);       // Set The Color To Green

     GL11.glVertex3f( 1.0f, 1.0f,-1.0f);   // Top Right Of The Quad (Top)

     GL11.glVertex3f(-1.0f, 1.0f,-1.0f);    // Top Left Of The Quad (Top)

     GL11.glVertex3f(-1.0f, 1.0f, 1.0f);   // Bottom Left Of The Quad (Top)

     GL11.glVertex3f( 1.0f, 1.0f, 1.0f);   // Bottom Right Of The Quad (Top)

     GL11.glColor3f(1.0f,0.5f,0.0f);       // Set The Color To Orange

     GL11.glVertex3f( 1.0f,-1.0f, 1.0f);   // Top Right Of The Quad (Bottom)

     GL11.glVertex3f(-1.0f,-1.0f, 1.0f);    // Top Left Of The Quad (Bottom)

     GL11.glVertex3f(-1.0f,-1.0f,-1.0f);    // Bottom Left Of The Quad (Bottom)

     GL11.glVertex3f( 1.0f,-1.0f,-1.0f);    // Bottom Right Of The Quad (Bottom)

     GL11.glColor3f(1.0f,0.0f,0.0f);       // Set The Color To Red

     GL11.glVertex3f( 1.0f, 1.0f, 1.0f);   // Top Right Of The Quad (Front)

     GL11.glVertex3f(-1.0f, 1.0f, 1.0f);   // Top Left Of The Quad (Front)

     GL11.glVertex3f(-1.0f,-1.0f, 1.0f);    // Bottom Left Of The Quad (Front)

     GL11.glVertex3f( 1.0f,-1.0f, 1.0f);   // Bottom Right Of The Quad (Front)

     GL11.glColor3f(1.0f,1.0f,0.0f);       // Set The Color To Yellow

     GL11.glVertex3f( 1.0f,-1.0f,-1.0f);    // Bottom Left Of The Quad (Back)

     GL11.glVertex3f(-1.0f,-1.0f,-1.0f);    // Bottom Right Of The Quad (Back)

     GL11.glVertex3f(-1.0f, 1.0f,-1.0f);    // Top Right Of The Quad (Back)

     GL11.glVertex3f( 1.0f, 1.0f,-1.0f);   // Top Left Of The Quad (Back)

     GL11.glColor3f(0.0f,0.0f,1.0f);       // Set The Color To Blue

     GL11.glVertex3f(-1.0f, 1.0f, 1.0f);   // Top Right Of The Quad (Left)

     GL11.glVertex3f(-1.0f, 1.0f,-1.0f);    // Top Left Of The Quad (Left)

     GL11.glVertex3f(-1.0f,-1.0f,-1.0f);    // Bottom Left Of The Quad (Left)

     GL11.glVertex3f(-1.0f,-1.0f, 1.0f);    // Bottom Right Of The Quad (Left)

     GL11.glColor3f(1.0f,0.0f,1.0f);       // Set The Color To Violet

     GL11.glVertex3f( 1.0f, 1.0f,-1.0f);   // Top Right Of The Quad (Right)


Tutorial: Pedro López Salazar Instituto tecnológico Superior de Zapopan Página 29
Tutorial: como ejecutar un proyecto opengl y netbeans 6.9.1

       GL11.glVertex3f( 1.0f, 1.0f, 1.0f);      // Top Left Of The Quad (Right)

       GL11.glVertex3f( 1.0f,-1.0f, 1.0f);      // Bottom Left Of The Quad (Right)

       GL11.glVertex3f( 1.0f,-1.0f,-1.0f);      // Bottom Right Of The Quad (Right)

      GL11.glEnd();                          // Done Drawing The Quad

     GL11.glPopMatrix();

     rquad-=0.5f;                      // Decrease The Rotation Variable For The Quad   ( NEW )

 }


         /**

          * Override this to do initialising of the context.

          * It will be called once from paint(), immediately after

          * the context is created and made current.

          */

 @Override

         protected void initGL() {

     GL11.glEnable(GL11.GL_TEXTURE_2D); // Enable Texture Mapping

     GL11.glShadeModel(GL11.GL_SMOOTH); // Enable Smooth Shading

     GL11.glClearColor(0.0f, 0.0f, 0.0f, 0.0f); // Black Background

     GL11.glClearDepth(1.0); // Depth Buffer Setup

     GL11.glEnable(GL11.GL_DEPTH_TEST); // Enables Depth Testing

     GL11.glDepthFunc(GL11.GL_LEQUAL); // The Type Of Depth Testing To Do


     GL11.glMatrixMode(GL11.GL_PROJECTION); // Select The Projection Matrix

     GL11.glLoadIdentity(); // Reset The Projection Matrix


     // Calculate The Aspect Ratio Of The Window

     GLU.gluPerspective(

      45.0f,

      (float) this.getWidth() / (float) this.getHeight(),


Tutorial: Pedro López Salazar Instituto tecnológico Superior de Zapopan Página 30
Tutorial: como ejecutar un proyecto opengl y netbeans 6.9.1

    0.1f,

    100.0f);

   GL11.glMatrixMode(GL11.GL_MODELVIEW); // Select The Modelview Matrix


   // Really Nice Perspective Calculations

   GL11.glHint(GL11.GL_PERSPECTIVE_CORRECTION_HINT, GL11.GL_NICEST);

          }


          /** Override this to do painting */

 @Override

          protected void paintGL() {


  GL11.glClear(GL11.GL_COLOR_BUFFER_BIT | GL11.GL_DEPTH_BUFFER_BIT);                // Clear The Screen
And The Depth Buffer


  GL11.glLoadIdentity();                    // Reset The Current Modelview Matrix


  GL11.glTranslatef(xTras, yTras, zTras);

  GL11.glRotatef(xRot, 1.0f, 0.0f, 0.0f);

  GL11.glRotatef(yRot, 0.0f, 1.0f, 0.0f);

  GL11.glRotatef(zRot, 0.0f, 0.0f, 1.0f);


  ejes();

  triangulo();

  cubo();


  try {

   this.swapBuffers();

  } catch (org.lwjgl.LWJGLException e){


Tutorial: Pedro López Salazar Instituto tecnológico Superior de Zapopan Página 31
Tutorial: como ejecutar un proyecto opengl y netbeans 6.9.1

             e.printStackTrace();

        }

                }


    public void start() {

        thread = new Thread(this);

        thread.setPriority(Thread.MIN_PRIORITY);

        thread.start();

    }


    public void stop() {

        if (thread != null) {

            thread.interrupt();

        }

        thread = null;

    }


    public void run() {

        Thread me = Thread.currentThread();

        while (thread == me) {

            repaint();

        }

        thread = null;

    }


}


Tutorial: Pedro López Salazar Instituto tecnológico Superior de Zapopan Página 32
Tutorial: como ejecutar un proyecto opengl y netbeans 6.9.1


Damos clic en new library


Tutorial: Pedro López Salazar Instituto tecnológico Superior de Zapopan Página 33
Tutorial: como ejecutar un proyecto opengl y netbeans 6.9.1


Y damos clic en ok en mi caso como ya lo tengo agregado por eso me
salio de color rojo el mensaje.


Lo que tenemos que hacer en seguida es agregar los jar a nuestra
librería recién creada llamada lwjgl:


Tutorial: Pedro López Salazar Instituto tecnológico Superior de Zapopan Página 34
Tutorial: como ejecutar un proyecto opengl y netbeans 6.9.1


Damos clic en add jar


Damos doble clic a la carpeta


Tutorial: Pedro López Salazar Instituto tecnológico Superior de Zapopan Página 35
Tutorial: como ejecutar un proyecto opengl y netbeans 6.9.1


Damos doble clic en jar


Seleccionamos los 4 y damos en agreagrar


Tutorial: Pedro López Salazar Instituto tecnológico Superior de Zapopan Página 36
Tutorial: como ejecutar un proyecto opengl y netbeans 6.9.1


Y asi aparecerán


Nos vamos en sourse y agregaremos otra librería


Tutorial: Pedro López Salazar Instituto tecnológico Superior de Zapopan Página 37
Tutorial: como ejecutar un proyecto opengl y netbeans 6.9.1


Nos vamos a nuestro documentos y damos clic en agregar


En javadoc hacemos lo mismo


Tutorial: Pedro López Salazar Instituto tecnológico Superior de Zapopan Página 38
Tutorial: como ejecutar un proyecto opengl y netbeans 6.9.1


Y así agregamos las librerías.


Tutorial: Pedro López Salazar Instituto tecnológico Superior de Zapopan Página 39
Tutorial: como ejecutar un proyecto opengl y netbeans 6.9.1


Damos clic derecho a nuestro proyecto elegimos en el menú contextual
la opción propiedades


Tutorial: Pedro López Salazar Instituto tecnológico Superior de Zapopan Página 40
Tutorial: como ejecutar un proyecto opengl y netbeans 6.9.1


Damos clic en agregar librerías y lo agregamos:


Tutorial: Pedro López Salazar Instituto tecnológico Superior de Zapopan Página 41
Tutorial: como ejecutar un proyecto opengl y netbeans 6.9.1


En run agregamos también esta misma librería:


Tutorial: Pedro López Salazar Instituto tecnológico Superior de Zapopan Página 42
Tutorial: como ejecutar un proyecto opengl y netbeans 6.9.1


Copiamos este código del archivo readme y lo pegamos


Tutorial: Pedro López Salazar Instituto tecnológico Superior de Zapopan Página 43
Tutorial: como ejecutar un proyecto opengl y netbeans 6.9.1


-Djava.library.path=


Enseguida tenemos que pegar la extensión donde se encuentran los .ddl


Accesamos a nuestros documentos y damos clic a la carpeta


Tutorial: Pedro López Salazar Instituto tecnológico Superior de Zapopan Página 44
Tutorial: como ejecutar un proyecto opengl y netbeans 6.9.1


Damos clic en native


Damos clic en la carpeta Windows


Tutorial: Pedro López Salazar Instituto tecnológico Superior de Zapopan Página 45
Tutorial: como ejecutar un proyecto opengl y netbeans 6.9.1


Seleccionamos la dirección que se encuantra en la parte de arriba


Tutorial: Pedro López Salazar Instituto tecnológico Superior de Zapopan Página 46
Tutorial: como ejecutar un proyecto opengl y netbeans 6.9.1


Damos cli en ok y nuestro programa estará funcionando al 100 %


-Djava.library.path=C:UserspedroDocumentslwjglnativewindows


Tutorial: Pedro López Salazar Instituto tecnológico Superior de Zapopan Página 47
Tutorial: como ejecutar un proyecto opengl y netbeans 6.9.1

Shift + F6


Tutorial: Pedro López Salazar Instituto tecnológico Superior de Zapopan Página 48
Tutorial: como ejecutar un proyecto opengl y netbeans 6.9.1

Si damos clic en animar las imagine s se moverán.


Código de la ventana:

/*

* To change this template, choose Tools | Templates

* and open the template in the editor.

*/


/*

* Ventana.java

*

* Created on 8/06/2011, 12:51:12 PM

*/


package miopengl;

Tutorial: Pedro López Salazar Instituto tecnológico Superior de Zapopan Página 49
Tutorial: como ejecutar un proyecto opengl y netbeans 6.9.1


/**

*

* @author pedro

*/

public class Ventana extends javax.swing.JFrame {

private Claseopengl pnLog1;

    /** Creates new form Ventana */

    public Ventana() {

        initComponents();


          try{

            pnLog1= new Claseopengl();

            }


                catch (org.lwjgl.LWJGLException e){

                  System.out.println(e.getMessage());

                  }


                 add (pnLog1 , java.awt.BorderLayout.CENTER);

                 this.setSize(680,450);


    }


    /** This method is called from within the constructor to

     * initialize the form.

     * WARNING: Do NOT modify this code. The content of this method is


Tutorial: Pedro López Salazar Instituto tecnológico Superior de Zapopan Página 50
Tutorial: como ejecutar un proyecto opengl y netbeans 6.9.1

  * always regenerated by the Form Editor.

  */

  @SuppressWarnings("unchecked")

  // <editor-fold defaultstate="collapsed" desc="Generated Code">

  private void initComponents() {


      pnHerramientas = new javax.swing.JPanel();

      btnAnimar = new javax.swing.JToggleButton();


      setDefaultCloseOperation(javax.swing.WindowConstants.EXIT_ON_CLOSE);


      btnAnimar.setText("Animar");

      btnAnimar.addActionListener(new java.awt.event.ActionListener() {

            public void actionPerformed(java.awt.event.ActionEvent evt) {

                btnAnimarActionPerformed(evt);

            }

      });


    javax.swing.GroupLayout pnHerramientasLayout = new
javax.swing.GroupLayout(pnHerramientas);

      pnHerramientas.setLayout(pnHerramientasLayout);

      pnHerramientasLayout.setHorizontalGroup(

            pnHerramientasLayout.createParallelGroup(javax.swing.GroupLayout.Alignment.LEADI
NG)

      .addGroup(javax.swing.GroupLayout.Alignment.TRAILING,
pnHerramientasLayout.createSequentialGroup()

                .addContainerGap(javax.swing.GroupLayout.DEFAULT_SIZE, Short.MAX_VALUE)

                .addComponent(btnAnimar))

      );

Tutorial: Pedro López Salazar Instituto tecnológico Superior de Zapopan Página 51
Tutorial: como ejecutar un proyecto opengl y netbeans 6.9.1

      pnHerramientasLayout.setVerticalGroup(

            pnHerramientasLayout.createParallelGroup(javax.swing.GroupLayout.Alignment.LEADI
NG)

            .addGroup(pnHerramientasLayout.createSequentialGroup()

                .addGap(52, 52, 52)

                .addComponent(btnAnimar)

                .addContainerGap(225, Short.MAX_VALUE))

      );


      getContentPane().add(pnHerramientas, java.awt.BorderLayout.LINE_START);


      pack();

 }// </editor-fold>


 private void btnAnimarActionPerformed(java.awt.event.ActionEvent evt) {

      pnLog1.start();

 }


 /**

 * @param args the command line arguments

 */

 public static void main(String args[]) {

      java.awt.EventQueue.invokeLater(new Runnable() {

            public void run() {

                new Ventana().setVisible(true);

            }

      });

 }

Tutorial: Pedro López Salazar Instituto tecnológico Superior de Zapopan Página 52
Tutorial: como ejecutar un proyecto opengl y netbeans 6.9.1


    // Variables declaration - do not modify

    private javax.swing.JToggleButton btnAnimar;

    private javax.swing.JPanel pnHerramientas;

    // End of variables declaration


}


Código de la clase


package miopengl;


/**

*

* @author pedro

*/

import org.lwjgl.opengl.GL11;

import org.lwjgl.util.glu.GLU;


public class Claseopengl extends org.lwjgl.opengl.AWTGLCanvas implements Runnable {


    private Thread thread;


    public float rtri;       // Angle For The Triangle ( NEW )

    public float rquad;          // Angle For The Quad   ( NEW )


Tutorial: Pedro López Salazar Instituto tecnológico Superior de Zapopan Página 53
Tutorial: como ejecutar un proyecto opengl y netbeans 6.9.1

 public float xTras;

 public float yTras;

 public float zTras;


 public float xRot;

 public float yRot;

 public float zRot;


 public Claseopengl() throws org.lwjgl.LWJGLException {

      super();

 }


 private void ejes() {

     GL11.glBegin(GL11.GL_LINES);

      GL11.glColor3f(1.0f, 0.0f, 0.0f);

      GL11.glVertex3f(0.0f, 0.0f, 0.0f);

      GL11.glVertex3f(10.0f, 0.0f, 0.0f);


      GL11.glColor3f(0.0f, 1.0f, 0.0f);

      GL11.glVertex3f(0.0f, 0.0f, 0.0f);

      GL11.glVertex3f(0.0f, 10.0f, 0.0f);


      GL11.glColor3f(0.0f, 0.0f, 1.0f);

      GL11.glVertex3f(0.0f, 0.0f, 0.0f);

      GL11.glVertex3f(0.0f, 0.0f, 10.0f);

     GL11.glEnd();


Tutorial: Pedro López Salazar Instituto tecnológico Superior de Zapopan Página 54
Tutorial: como ejecutar un proyecto opengl y netbeans 6.9.1

 }


 private void triangulo() {

     GL11.glPushMatrix();

      //GL11.glLoadIdentity();

      GL11.glTranslatef(-1.5f,0.0f,-6.0f);        // Move Left 1.5 Units And Into The Screen 6.0

      GL11.glRotatef(rtri,0.0f,1.0f,0.0f);        // Rotate The Triangle On The Y axis ( NEW )

      GL11.glBegin(GL11.GL_TRIANGLES);                   // Drawing Using Triangles

       GL11.glColor3f(1.0f,0.0f,0.0f);        // Red

       GL11.glVertex3f( 0.0f, 1.0f, 0.0f);    // Top Of Triangle (Front)

       GL11.glColor3f(0.0f,1.0f,0.0f);        // Green

       GL11.glVertex3f(-1.0f,-1.0f, 1.0f);     // Left Of Triangle (Front)

       GL11.glColor3f(0.0f,0.0f,1.0f);        // Blue

       GL11.glVertex3f( 1.0f,-1.0f, 1.0f);    // Right Of Triangle (Front)

       GL11.glColor3f(1.0f,0.0f,0.0f);        // Red

       GL11.glVertex3f( 0.0f, 1.0f, 0.0f);    // Top Of Triangle (Right)

       GL11.glColor3f(0.0f,0.0f,1.0f);        // Blue

       GL11.glVertex3f( 1.0f,-1.0f, 1.0f);    // Left Of Triangle (Right)

       GL11.glColor3f(0.0f,1.0f,0.0f);        // Green

       GL11.glVertex3f( 1.0f,-1.0f, -1.0f);      // Right Of Triangle (Right)

       GL11.glColor3f(1.0f,0.0f,0.0f);        // Red

       GL11.glVertex3f( 0.0f, 1.0f, 0.0f);    // Top Of Triangle (Back)

       GL11.glColor3f(0.0f,1.0f,0.0f);        // Green

       GL11.glVertex3f( 1.0f,-1.0f, -1.0f);      // Left Of Triangle (Back)

       GL11.glColor3f(0.0f,0.0f,1.0f);        // Blue

       GL11.glVertex3f(-1.0f,-1.0f, -1.0f);      // Right Of Triangle (Back)

       GL11.glColor3f(1.0f,0.0f,0.0f);        // Red


Tutorial: Pedro López Salazar Instituto tecnológico Superior de Zapopan Página 55
Tutorial: como ejecutar un proyecto opengl y netbeans 6.9.1

       GL11.glVertex3f( 0.0f, 1.0f, 0.0f);      // Top Of Triangle (Left)

       GL11.glColor3f(0.0f,0.0f,1.0f);          // Blue

       GL11.glVertex3f(-1.0f,-1.0f,-1.0f);       // Left Of Triangle (Left)

       GL11.glColor3f(0.0f,1.0f,0.0f);          // Green

       GL11.glVertex3f(-1.0f,-1.0f, 1.0f);       // Right Of Triangle (Left)

      GL11.glEnd();                          // Finished Drawing The Triangle

     GL11.glPopMatrix();

     rtri+=0.5f;                     // Increase The Rotation Variable For The Triangle ( NEW )

 }


 private void cubo() {

     GL11.glPushMatrix();

      GL11.glTranslatef(1.5f,0.0f,-7.0f);         // Move Right 1.5 Units And Into The Screen 6.0

      GL11.glRotatef(rquad,1.0f,1.0f,1.0f);           // Rotate The Quad On The X axis ( NEW )

      GL11.glColor3f(0.5f,0.5f,1.0f);            // Set The Color To Blue One Time Only

      GL11.glBegin(GL11.GL_QUADS);                        // Draw A Quad

       GL11.glColor3f(0.0f,1.0f,0.0f);          // Set The Color To Green

       GL11.glVertex3f( 1.0f, 1.0f,-1.0f);      // Top Right Of The Quad (Top)

       GL11.glVertex3f(-1.0f, 1.0f,-1.0f);       // Top Left Of The Quad (Top)

       GL11.glVertex3f(-1.0f, 1.0f, 1.0f);      // Bottom Left Of The Quad (Top)

       GL11.glVertex3f( 1.0f, 1.0f, 1.0f);      // Bottom Right Of The Quad (Top)

       GL11.glColor3f(1.0f,0.5f,0.0f);          // Set The Color To Orange

       GL11.glVertex3f( 1.0f,-1.0f, 1.0f);      // Top Right Of The Quad (Bottom)

       GL11.glVertex3f(-1.0f,-1.0f, 1.0f);       // Top Left Of The Quad (Bottom)

       GL11.glVertex3f(-1.0f,-1.0f,-1.0f);       // Bottom Left Of The Quad (Bottom)

       GL11.glVertex3f( 1.0f,-1.0f,-1.0f);       // Bottom Right Of The Quad (Bottom)

       GL11.glColor3f(1.0f,0.0f,0.0f);          // Set The Color To Red


Tutorial: Pedro López Salazar Instituto tecnológico Superior de Zapopan Página 56
Tutorial: como ejecutar un proyecto opengl y netbeans 6.9.1

       GL11.glVertex3f( 1.0f, 1.0f, 1.0f);      // Top Right Of The Quad (Front)

       GL11.glVertex3f(-1.0f, 1.0f, 1.0f);      // Top Left Of The Quad (Front)

       GL11.glVertex3f(-1.0f,-1.0f, 1.0f);      // Bottom Left Of The Quad (Front)

       GL11.glVertex3f( 1.0f,-1.0f, 1.0f);      // Bottom Right Of The Quad (Front)

       GL11.glColor3f(1.0f,1.0f,0.0f);         // Set The Color To Yellow

       GL11.glVertex3f( 1.0f,-1.0f,-1.0f);      // Bottom Left Of The Quad (Back)

       GL11.glVertex3f(-1.0f,-1.0f,-1.0f);      // Bottom Right Of The Quad (Back)

       GL11.glVertex3f(-1.0f, 1.0f,-1.0f);      // Top Right Of The Quad (Back)

       GL11.glVertex3f( 1.0f, 1.0f,-1.0f);      // Top Left Of The Quad (Back)

       GL11.glColor3f(0.0f,0.0f,1.0f);         // Set The Color To Blue

       GL11.glVertex3f(-1.0f, 1.0f, 1.0f);      // Top Right Of The Quad (Left)

       GL11.glVertex3f(-1.0f, 1.0f,-1.0f);      // Top Left Of The Quad (Left)

       GL11.glVertex3f(-1.0f,-1.0f,-1.0f);      // Bottom Left Of The Quad (Left)

       GL11.glVertex3f(-1.0f,-1.0f, 1.0f);      // Bottom Right Of The Quad (Left)

       GL11.glColor3f(1.0f,0.0f,1.0f);         // Set The Color To Violet

       GL11.glVertex3f( 1.0f, 1.0f,-1.0f);      // Top Right Of The Quad (Right)

       GL11.glVertex3f( 1.0f, 1.0f, 1.0f);      // Top Left Of The Quad (Right)

       GL11.glVertex3f( 1.0f,-1.0f, 1.0f);      // Bottom Left Of The Quad (Right)

       GL11.glVertex3f( 1.0f,-1.0f,-1.0f);      // Bottom Right Of The Quad (Right)

      GL11.glEnd();                          // Done Drawing The Quad

     GL11.glPopMatrix();

     rquad-=0.5f;                     // Decrease The Rotation Variable For The Quad   ( NEW )

 }


        /**

        * Override this to do initialising of the context.

        * It will be called once from paint(), immediately after


Tutorial: Pedro López Salazar Instituto tecnológico Superior de Zapopan Página 57
Tutorial: como ejecutar un proyecto opengl y netbeans 6.9.1

       * the context is created and made current.

       */

 @Override

      protected void initGL() {

   GL11.glEnable(GL11.GL_TEXTURE_2D); // Enable Texture Mapping

   GL11.glShadeModel(GL11.GL_SMOOTH); // Enable Smooth Shading

   GL11.glClearColor(0.0f, 0.0f, 0.0f, 0.0f); // Black Background

   GL11.glClearDepth(1.0); // Depth Buffer Setup

   GL11.glEnable(GL11.GL_DEPTH_TEST); // Enables Depth Testing

   GL11.glDepthFunc(GL11.GL_LEQUAL); // The Type Of Depth Testing To Do


   GL11.glMatrixMode(GL11.GL_PROJECTION); // Select The Projection Matrix

   GL11.glLoadIdentity(); // Reset The Projection Matrix


   // Calculate The Aspect Ratio Of The Window

   GLU.gluPerspective(

    45.0f,

    (float) this.getWidth() / (float) this.getHeight(),

    0.1f,

    100.0f);

   GL11.glMatrixMode(GL11.GL_MODELVIEW); // Select The Modelview Matrix


   // Really Nice Perspective Calculations

   GL11.glHint(GL11.GL_PERSPECTIVE_CORRECTION_HINT, GL11.GL_NICEST);

      }


      /** Override this to do painting */


Tutorial: Pedro López Salazar Instituto tecnológico Superior de Zapopan Página 58
Tutorial: como ejecutar un proyecto opengl y netbeans 6.9.1

 @Override

          protected void paintGL() {


   GL11.glClear(GL11.GL_COLOR_BUFFER_BIT | GL11.GL_DEPTH_BUFFER_BIT);               // Clear
The Screen And The Depth Buffer


  GL11.glLoadIdentity();                    // Reset The Current Modelview Matrix


  GL11.glTranslatef(xTras, yTras, zTras);

  GL11.glRotatef(xRot, 1.0f, 0.0f, 0.0f);

  GL11.glRotatef(yRot, 0.0f, 1.0f, 0.0f);

  GL11.glRotatef(zRot, 0.0f, 0.0f, 1.0f);


  ejes();

  triangulo();

  cubo();


  try {

      this.swapBuffers();

  } catch (org.lwjgl.LWJGLException e){

       e.printStackTrace();

  }

          }


 public void start() {

  thread = new Thread(this);

  thread.setPriority(Thread.MIN_PRIORITY);

  thread.start();

Tutorial: Pedro López Salazar Instituto tecnológico Superior de Zapopan Página 59
Tutorial: como ejecutar un proyecto opengl y netbeans 6.9.1

    }


    public void stop() {

        if (thread != null) {

            thread.interrupt();

        }

        thread = null;

    }


    public void run() {

        Thread me = Thread.currentThread();

        while (thread == me) {

            repaint();

        }

        thread = null;

    }


}


Tutorial: Pedro López Salazar Instituto tecnológico Superior de Zapopan Página 60

Más contenido relacionado

La actualidad más candente

Manual de uso para mplab
Manual de uso para mplabManual de uso para mplab
Manual de uso para mplabFabioPorras
 
Programas de net beans8
Programas de net beans8Programas de net beans8
Programas de net beans8Heidiie Hdz
 
201595533 maestrosdelweb-curso-django-1-pdf
201595533 maestrosdelweb-curso-django-1-pdf201595533 maestrosdelweb-curso-django-1-pdf
201595533 maestrosdelweb-curso-django-1-pdfGalvi Yanez
 
Programas de net beans7
Programas de net beans7Programas de net beans7
Programas de net beans7Heidiie Hdz
 
Programas de net beans6
Programas de net beans6Programas de net beans6
Programas de net beans6Heidiie Hdz
 
[Drupal campspain2017] Contribuir a Drupal, de 0 a 100
[Drupal campspain2017] Contribuir a Drupal, de 0 a 100[Drupal campspain2017] Contribuir a Drupal, de 0 a 100
[Drupal campspain2017] Contribuir a Drupal, de 0 a 100Keopx
 
Docker - Entorno de trabajo configurado en 1 minuto [WCBilbao]
Docker - Entorno de trabajo configurado en 1 minuto [WCBilbao]Docker - Entorno de trabajo configurado en 1 minuto [WCBilbao]
Docker - Entorno de trabajo configurado en 1 minuto [WCBilbao]Keopx
 
Cuckoosandbox
CuckoosandboxCuckoosandbox
CuckoosandboxTensor
 
Programa de net beans3
Programa de net beans3Programa de net beans3
Programa de net beans3Heidiie Hdz
 
Taller: Prueba Unitaria con JUnit en NetBeans
Taller: Prueba Unitaria con JUnit en NetBeansTaller: Prueba Unitaria con JUnit en NetBeans
Taller: Prueba Unitaria con JUnit en NetBeansEmerson Garay
 
Presentación Multimedia - Django
Presentación Multimedia - DjangoPresentación Multimedia - Django
Presentación Multimedia - DjangoViviana Trujillo
 

La actualidad más candente (15)

Introducción a Groovy
Introducción a GroovyIntroducción a Groovy
Introducción a Groovy
 
Manual de uso para mplab
Manual de uso para mplabManual de uso para mplab
Manual de uso para mplab
 
Programas de net beans8
Programas de net beans8Programas de net beans8
Programas de net beans8
 
201595533 maestrosdelweb-curso-django-1-pdf
201595533 maestrosdelweb-curso-django-1-pdf201595533 maestrosdelweb-curso-django-1-pdf
201595533 maestrosdelweb-curso-django-1-pdf
 
Programas de net beans7
Programas de net beans7Programas de net beans7
Programas de net beans7
 
Programas de net beans6
Programas de net beans6Programas de net beans6
Programas de net beans6
 
[Drupal campspain2017] Contribuir a Drupal, de 0 a 100
[Drupal campspain2017] Contribuir a Drupal, de 0 a 100[Drupal campspain2017] Contribuir a Drupal, de 0 a 100
[Drupal campspain2017] Contribuir a Drupal, de 0 a 100
 
Docker - Entorno de trabajo configurado en 1 minuto [WCBilbao]
Docker - Entorno de trabajo configurado en 1 minuto [WCBilbao]Docker - Entorno de trabajo configurado en 1 minuto [WCBilbao]
Docker - Entorno de trabajo configurado en 1 minuto [WCBilbao]
 
Fortran
FortranFortran
Fortran
 
Manual Jclic
Manual JclicManual Jclic
Manual Jclic
 
Cuckoosandbox
CuckoosandboxCuckoosandbox
Cuckoosandbox
 
Programa de net beans3
Programa de net beans3Programa de net beans3
Programa de net beans3
 
1
11
1
 
Taller: Prueba Unitaria con JUnit en NetBeans
Taller: Prueba Unitaria con JUnit en NetBeansTaller: Prueba Unitaria con JUnit en NetBeans
Taller: Prueba Unitaria con JUnit en NetBeans
 
Presentación Multimedia - Django
Presentación Multimedia - DjangoPresentación Multimedia - Django
Presentación Multimedia - Django
 

Similar a Tutorialdenetbeansyopenglpedrolopezsalazar 120103154712-phpapp02

Como instalar Prolog en Windows
Como instalar Prolog en WindowsComo instalar Prolog en Windows
Como instalar Prolog en WindowsCesarMartinez474
 
Guia de entornos de programacion unidad 1 semestre 2
Guia de entornos de programacion unidad 1 semestre 2Guia de entornos de programacion unidad 1 semestre 2
Guia de entornos de programacion unidad 1 semestre 2K Manuel TN
 
Manual de Practicas de Open GL con Dev C++
Manual de Practicas de Open GL con Dev C++Manual de Practicas de Open GL con Dev C++
Manual de Practicas de Open GL con Dev C++Alincita Simon
 
Instalacion de java y sus herramientas
Instalacion de java y sus herramientasInstalacion de java y sus herramientas
Instalacion de java y sus herramientasJuan Diaz Calixtro
 
Introduccic3b3n bc3a1sica-a-netbeans-para-desarrollo-java - copia
Introduccic3b3n bc3a1sica-a-netbeans-para-desarrollo-java - copiaIntroduccic3b3n bc3a1sica-a-netbeans-para-desarrollo-java - copia
Introduccic3b3n bc3a1sica-a-netbeans-para-desarrollo-java - copiaesekazz
 
Algoritmos geneticos con JGAP
Algoritmos geneticos con JGAPAlgoritmos geneticos con JGAP
Algoritmos geneticos con JGAPGabyNarvaez
 
Tutorial eclipse 1
Tutorial eclipse 1Tutorial eclipse 1
Tutorial eclipse 1ivan ramirez
 
Tutorial de eclipse
Tutorial de eclipseTutorial de eclipse
Tutorial de eclipsejavierot99
 

Similar a Tutorialdenetbeansyopenglpedrolopezsalazar 120103154712-phpapp02 (20)

Glpk+java+windows
Glpk+java+windowsGlpk+java+windows
Glpk+java+windows
 
Como instalar Prolog en Windows
Como instalar Prolog en WindowsComo instalar Prolog en Windows
Como instalar Prolog en Windows
 
Guia de entornos de programacion unidad 1 semestre 2
Guia de entornos de programacion unidad 1 semestre 2Guia de entornos de programacion unidad 1 semestre 2
Guia de entornos de programacion unidad 1 semestre 2
 
Manual de Practicas de Open GL con Dev C++
Manual de Practicas de Open GL con Dev C++Manual de Practicas de Open GL con Dev C++
Manual de Practicas de Open GL con Dev C++
 
Instalacion de java y sus herramientas
Instalacion de java y sus herramientasInstalacion de java y sus herramientas
Instalacion de java y sus herramientas
 
Netbeans
Netbeans Netbeans
Netbeans
 
Introduccic3b3n bc3a1sica-a-netbeans-para-desarrollo-java - copia
Introduccic3b3n bc3a1sica-a-netbeans-para-desarrollo-java - copiaIntroduccic3b3n bc3a1sica-a-netbeans-para-desarrollo-java - copia
Introduccic3b3n bc3a1sica-a-netbeans-para-desarrollo-java - copia
 
Algoritmos geneticos con JGAP
Algoritmos geneticos con JGAPAlgoritmos geneticos con JGAP
Algoritmos geneticos con JGAP
 
manual de eclipse
manual de eclipse manual de eclipse
manual de eclipse
 
Tutorial eclipse3
Tutorial eclipse3Tutorial eclipse3
Tutorial eclipse3
 
Tutorial de eclipse
Tutorial de eclipseTutorial de eclipse
Tutorial de eclipse
 
File
FileFile
File
 
Tutorial eclipse 1
Tutorial eclipse 1Tutorial eclipse 1
Tutorial eclipse 1
 
Empezando eclipse
Empezando eclipseEmpezando eclipse
Empezando eclipse
 
Tutorial de eclipse
Tutorial de eclipseTutorial de eclipse
Tutorial de eclipse
 
Tutorial Eclipse
Tutorial EclipseTutorial Eclipse
Tutorial Eclipse
 
Tutorial 2
Tutorial 2Tutorial 2
Tutorial 2
 
File (1)
File (1)File (1)
File (1)
 
MANUAL DE ECLIPSE
MANUAL DE ECLIPSEMANUAL DE ECLIPSE
MANUAL DE ECLIPSE
 
Tutorial Eclipse 2
Tutorial Eclipse 2Tutorial Eclipse 2
Tutorial Eclipse 2
 

Último

Arenas Camacho-Practica tarea Sesión 12.pptx
Arenas Camacho-Practica tarea Sesión 12.pptxArenas Camacho-Practica tarea Sesión 12.pptx
Arenas Camacho-Practica tarea Sesión 12.pptxJOSEFERNANDOARENASCA
 
R1600G CAT Variables de cargadores en mina
R1600G CAT Variables de cargadores en minaR1600G CAT Variables de cargadores en mina
R1600G CAT Variables de cargadores en minaarkananubis
 
Crear un recurso multimedia. Maricela_Ponce_DomingoM1S3AI6-1.pptx
Crear un recurso multimedia. Maricela_Ponce_DomingoM1S3AI6-1.pptxCrear un recurso multimedia. Maricela_Ponce_DomingoM1S3AI6-1.pptx
Crear un recurso multimedia. Maricela_Ponce_DomingoM1S3AI6-1.pptxNombre Apellidos
 
Mapa-conceptual-del-Origen-del-Universo-3.pptx
Mapa-conceptual-del-Origen-del-Universo-3.pptxMapa-conceptual-del-Origen-del-Universo-3.pptx
Mapa-conceptual-del-Origen-del-Universo-3.pptxMidwarHenryLOZAFLORE
 
trabajotecologiaisabella-240424003133-8f126965.pdf
trabajotecologiaisabella-240424003133-8f126965.pdftrabajotecologiaisabella-240424003133-8f126965.pdf
trabajotecologiaisabella-240424003133-8f126965.pdfIsabellaMontaomurill
 
El uso de las TIC's en la vida cotidiana.
El uso de las TIC's en la vida cotidiana.El uso de las TIC's en la vida cotidiana.
El uso de las TIC's en la vida cotidiana.241514949
 
GonzalezGonzalez_Karina_M1S3AI6... .pptx
GonzalezGonzalez_Karina_M1S3AI6... .pptxGonzalezGonzalez_Karina_M1S3AI6... .pptx
GonzalezGonzalez_Karina_M1S3AI6... .pptx241523733
 
tics en la vida cotidiana prepa en linea modulo 1.pptx
tics en la vida cotidiana prepa en linea modulo 1.pptxtics en la vida cotidiana prepa en linea modulo 1.pptx
tics en la vida cotidiana prepa en linea modulo 1.pptxazmysanros90
 
El uso de las tic en la vida ,lo importante que son
El uso de las tic en la vida ,lo importante  que sonEl uso de las tic en la vida ,lo importante  que son
El uso de las tic en la vida ,lo importante que son241514984
 
Actividad integradora 6 CREAR UN RECURSO MULTIMEDIA
Actividad integradora 6    CREAR UN RECURSO MULTIMEDIAActividad integradora 6    CREAR UN RECURSO MULTIMEDIA
Actividad integradora 6 CREAR UN RECURSO MULTIMEDIA241531640
 
Cortes-24-de-abril-Tungurahua-3 año 2024
Cortes-24-de-abril-Tungurahua-3 año 2024Cortes-24-de-abril-Tungurahua-3 año 2024
Cortes-24-de-abril-Tungurahua-3 año 2024GiovanniJavierHidalg
 
PARTES DE UN OSCILOSCOPIO ANALOGICO .pdf
PARTES DE UN OSCILOSCOPIO ANALOGICO .pdfPARTES DE UN OSCILOSCOPIO ANALOGICO .pdf
PARTES DE UN OSCILOSCOPIO ANALOGICO .pdfSergioMendoza354770
 
definicion segun autores de matemáticas educativa
definicion segun autores de matemáticas  educativadefinicion segun autores de matemáticas  educativa
definicion segun autores de matemáticas educativaAdrianaMartnez618894
 
Plan de aula informatica segundo periodo.docx
Plan de aula informatica segundo periodo.docxPlan de aula informatica segundo periodo.docx
Plan de aula informatica segundo periodo.docxpabonheidy28
 
Presentación inteligencia artificial en la actualidad
Presentación inteligencia artificial en la actualidadPresentación inteligencia artificial en la actualidad
Presentación inteligencia artificial en la actualidadMiguelAngelVillanuev48
 
El uso delas tic en la vida cotidiana MFEL
El uso delas tic en la vida cotidiana MFELEl uso delas tic en la vida cotidiana MFEL
El uso delas tic en la vida cotidiana MFELmaryfer27m
 
Medidas de formas, coeficiente de asimetría y coeficiente de curtosis.pptx
Medidas de formas, coeficiente de asimetría y coeficiente de curtosis.pptxMedidas de formas, coeficiente de asimetría y coeficiente de curtosis.pptx
Medidas de formas, coeficiente de asimetría y coeficiente de curtosis.pptxaylincamaho
 
ATAJOS DE WINDOWS. Los diferentes atajos para utilizar en windows y ser más e...
ATAJOS DE WINDOWS. Los diferentes atajos para utilizar en windows y ser más e...ATAJOS DE WINDOWS. Los diferentes atajos para utilizar en windows y ser más e...
ATAJOS DE WINDOWS. Los diferentes atajos para utilizar en windows y ser más e...FacuMeza2
 
FloresMorales_Montserrath_M1S3AI6 (1).pptx
FloresMorales_Montserrath_M1S3AI6 (1).pptxFloresMorales_Montserrath_M1S3AI6 (1).pptx
FloresMorales_Montserrath_M1S3AI6 (1).pptx241522327
 
La era de la educación digital y sus desafios
La era de la educación digital y sus desafiosLa era de la educación digital y sus desafios
La era de la educación digital y sus desafiosFundación YOD YOD
 

Último (20)

Arenas Camacho-Practica tarea Sesión 12.pptx
Arenas Camacho-Practica tarea Sesión 12.pptxArenas Camacho-Practica tarea Sesión 12.pptx
Arenas Camacho-Practica tarea Sesión 12.pptx
 
R1600G CAT Variables de cargadores en mina
R1600G CAT Variables de cargadores en minaR1600G CAT Variables de cargadores en mina
R1600G CAT Variables de cargadores en mina
 
Crear un recurso multimedia. Maricela_Ponce_DomingoM1S3AI6-1.pptx
Crear un recurso multimedia. Maricela_Ponce_DomingoM1S3AI6-1.pptxCrear un recurso multimedia. Maricela_Ponce_DomingoM1S3AI6-1.pptx
Crear un recurso multimedia. Maricela_Ponce_DomingoM1S3AI6-1.pptx
 
Mapa-conceptual-del-Origen-del-Universo-3.pptx
Mapa-conceptual-del-Origen-del-Universo-3.pptxMapa-conceptual-del-Origen-del-Universo-3.pptx
Mapa-conceptual-del-Origen-del-Universo-3.pptx
 
trabajotecologiaisabella-240424003133-8f126965.pdf
trabajotecologiaisabella-240424003133-8f126965.pdftrabajotecologiaisabella-240424003133-8f126965.pdf
trabajotecologiaisabella-240424003133-8f126965.pdf
 
El uso de las TIC's en la vida cotidiana.
El uso de las TIC's en la vida cotidiana.El uso de las TIC's en la vida cotidiana.
El uso de las TIC's en la vida cotidiana.
 
GonzalezGonzalez_Karina_M1S3AI6... .pptx
GonzalezGonzalez_Karina_M1S3AI6... .pptxGonzalezGonzalez_Karina_M1S3AI6... .pptx
GonzalezGonzalez_Karina_M1S3AI6... .pptx
 
tics en la vida cotidiana prepa en linea modulo 1.pptx
tics en la vida cotidiana prepa en linea modulo 1.pptxtics en la vida cotidiana prepa en linea modulo 1.pptx
tics en la vida cotidiana prepa en linea modulo 1.pptx
 
El uso de las tic en la vida ,lo importante que son
El uso de las tic en la vida ,lo importante  que sonEl uso de las tic en la vida ,lo importante  que son
El uso de las tic en la vida ,lo importante que son
 
Actividad integradora 6 CREAR UN RECURSO MULTIMEDIA
Actividad integradora 6    CREAR UN RECURSO MULTIMEDIAActividad integradora 6    CREAR UN RECURSO MULTIMEDIA
Actividad integradora 6 CREAR UN RECURSO MULTIMEDIA
 
Cortes-24-de-abril-Tungurahua-3 año 2024
Cortes-24-de-abril-Tungurahua-3 año 2024Cortes-24-de-abril-Tungurahua-3 año 2024
Cortes-24-de-abril-Tungurahua-3 año 2024
 
PARTES DE UN OSCILOSCOPIO ANALOGICO .pdf
PARTES DE UN OSCILOSCOPIO ANALOGICO .pdfPARTES DE UN OSCILOSCOPIO ANALOGICO .pdf
PARTES DE UN OSCILOSCOPIO ANALOGICO .pdf
 
definicion segun autores de matemáticas educativa
definicion segun autores de matemáticas  educativadefinicion segun autores de matemáticas  educativa
definicion segun autores de matemáticas educativa
 
Plan de aula informatica segundo periodo.docx
Plan de aula informatica segundo periodo.docxPlan de aula informatica segundo periodo.docx
Plan de aula informatica segundo periodo.docx
 
Presentación inteligencia artificial en la actualidad
Presentación inteligencia artificial en la actualidadPresentación inteligencia artificial en la actualidad
Presentación inteligencia artificial en la actualidad
 
El uso delas tic en la vida cotidiana MFEL
El uso delas tic en la vida cotidiana MFELEl uso delas tic en la vida cotidiana MFEL
El uso delas tic en la vida cotidiana MFEL
 
Medidas de formas, coeficiente de asimetría y coeficiente de curtosis.pptx
Medidas de formas, coeficiente de asimetría y coeficiente de curtosis.pptxMedidas de formas, coeficiente de asimetría y coeficiente de curtosis.pptx
Medidas de formas, coeficiente de asimetría y coeficiente de curtosis.pptx
 
ATAJOS DE WINDOWS. Los diferentes atajos para utilizar en windows y ser más e...
ATAJOS DE WINDOWS. Los diferentes atajos para utilizar en windows y ser más e...ATAJOS DE WINDOWS. Los diferentes atajos para utilizar en windows y ser más e...
ATAJOS DE WINDOWS. Los diferentes atajos para utilizar en windows y ser más e...
 
FloresMorales_Montserrath_M1S3AI6 (1).pptx
FloresMorales_Montserrath_M1S3AI6 (1).pptxFloresMorales_Montserrath_M1S3AI6 (1).pptx
FloresMorales_Montserrath_M1S3AI6 (1).pptx
 
La era de la educación digital y sus desafios
La era de la educación digital y sus desafiosLa era de la educación digital y sus desafios
La era de la educación digital y sus desafios
 

Tutorialdenetbeansyopenglpedrolopezsalazar 120103154712-phpapp02

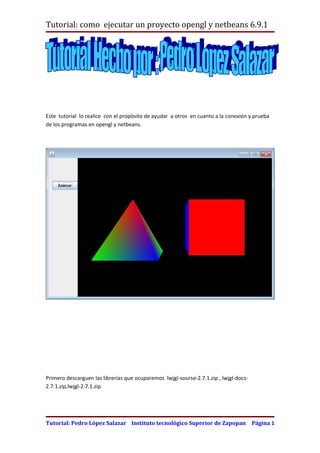
  • 1. Tutorial: como ejecutar un proyecto opengl y netbeans 6.9.1 Este tutorial lo realice con el propósito de ayudar a otros en cuanto a la conexión y prueba de los programas en opengl y netbeans. Primero descarguen las librerías que ocuparemos lwjgl-sourse-2.7.1.zip , lwjgl-docs- 2.7.1.zip,lwjgl-2.7.1.zip Tutorial: Pedro López Salazar Instituto tecnológico Superior de Zapopan Página 1
  • 2. Tutorial: como ejecutar un proyecto opengl y netbeans 6.9.1 http://sourceforge.net/projects/java-game-lib/files/Official%20Releases/LWJGL%202.7.1/ Descarga este código y alójalo en tu escritorio http://sites.google.com/site/tlazalohua/ Tutorial: Pedro López Salazar Instituto tecnológico Superior de Zapopan Página 2
  • 3. Tutorial: como ejecutar un proyecto opengl y netbeans 6.9.1 Enseguida descomprime el archivo lwjgl-2.7.1.zip y la carpeta que lleva el mismo nombre y alójalos en tus documentos. a lwjgl Das doble clic a esta carpeta recién cambiada el nombre das clic a la carpeta doc y en ella ay un archivo llamada readme a esta dale doble clic. Tutorial: Pedro López Salazar Instituto tecnológico Superior de Zapopan Página 3
  • 4. Tutorial: como ejecutar un proyecto opengl y netbeans 6.9.1 Esto se hace para saber que el programa este funcionando correctamente. Ábrelo con un bloq de notas. Enseguida Accesa al comando ejecutar o oprime las teclas inicio + r Escribe cmd y enter Tutorial: Pedro López Salazar Instituto tecnológico Superior de Zapopan Página 4
  • 5. Tutorial: como ejecutar un proyecto opengl y netbeans 6.9.1 Enseguida te aparece la pantalla negra el objetivo es acesar a la carpeta donde se encuentra el archivo de prueba que esta dentro de la carpeta lwjgl para ello sigue estos pasos: Mete a tus documentos , a la carpeta lwjgl Enseguida nos vamos al archivo que abrimos anterior mete llamado readme de la carpeta doc y pegamos este escrito: Tutorial: Pedro López Salazar Instituto tecnológico Superior de Zapopan Página 5
  • 6. Tutorial: como ejecutar un proyecto opengl y netbeans 6.9.1 nota: debemos de borrarle el signo de mayor que java -cp .;res;jarlwjgl.jar;jarlwjgl_test.jar;jarlwjgl_util.jar;jarjinput.jar; -Djava.library.path=native<Windows asi que daría: java -cp .;res;jarlwjgl.jar;jarlwjgl_test.jar;jarlwjgl_util.jar;jarjinput.jar; -Djava.library.path=nativewindows nos vamos a la ventana de el cmd y damos clic en pegar Si en tu caso fue Linux debes de poner Linux en lugar de windows El siguiente paso es irnos de nuevo a nuestro archivo readme y copiar este código Tutorial: Pedro López Salazar Instituto tecnológico Superior de Zapopan Página 6
  • 7. Tutorial: como ejecutar un proyecto opengl y netbeans 6.9.1 Copiarlo y pegarlo en cmd (la pantalla negra) Tutorial: Pedro López Salazar Instituto tecnológico Superior de Zapopan Página 7
  • 8. Tutorial: como ejecutar un proyecto opengl y netbeans 6.9.1 Enseguida daremos enter y saldrá un jueguito Tutorial: Pedro López Salazar Instituto tecnológico Superior de Zapopan Página 8
  • 9. Tutorial: como ejecutar un proyecto opengl y netbeans 6.9.1 Ahora es momento de enfocarnos a nuestro proyecto que crearemos en netbeans y opengl Tutorial: Pedro López Salazar Instituto tecnológico Superior de Zapopan Página 9
  • 10. Tutorial: como ejecutar un proyecto opengl y netbeans 6.9.1 Tutorial: Pedro López Salazar Instituto tecnológico Superior de Zapopan Página 10
  • 11. Tutorial: como ejecutar un proyecto opengl y netbeans 6.9.1 Como vemos ya creamos nuestro proyecto Tutorial: Pedro López Salazar Instituto tecnológico Superior de Zapopan Página 11
  • 12. Tutorial: como ejecutar un proyecto opengl y netbeans 6.9.1 Si no se visualizamos la carpeta del proyecto sigamos estos pasos: Lo siguiente es crear un paquete Mi paquete se llamo miopengl Tutorial: Pedro López Salazar Instituto tecnológico Superior de Zapopan Página 12
  • 13. Tutorial: como ejecutar un proyecto opengl y netbeans 6.9.1 Lo siguiente un frame dentro del paquete Y damos finish Tutorial: Pedro López Salazar Instituto tecnológico Superior de Zapopan Página 13
  • 14. Tutorial: como ejecutar un proyecto opengl y netbeans 6.9.1 En este momento creamos nuestro frame nota importante: Es necesario que en este momento pongas en set layout a este panel que creamos Tutorial: Pedro López Salazar Instituto tecnológico Superior de Zapopan Página 14
  • 15. Tutorial: como ejecutar un proyecto opengl y netbeans 6.9.1 sigamos estos pasos: en la parte de abajo donde aparecen los frames da clic derecho Tutorial: Pedro López Salazar Instituto tecnológico Superior de Zapopan Página 15
  • 16. Tutorial: como ejecutar un proyecto opengl y netbeans 6.9.1 Y asi se mostrar Enseguida arrastra un panel y arrástralo donde esta en frame. Tutorial: Pedro López Salazar Instituto tecnológico Superior de Zapopan Página 16
  • 17. Tutorial: como ejecutar un proyecto opengl y netbeans 6.9.1 A este panel es necesario ponerle nombre para ello vete a inspector selecciona el panel da clic derecho. Tutorial: Pedro López Salazar Instituto tecnológico Superior de Zapopan Página 17
  • 18. Tutorial: como ejecutar un proyecto opengl y netbeans 6.9.1 En este momento ya tiene nombre nuestro panel que agregamos enseguida tenemos que agregarle un toggle botón Tutorial: Pedro López Salazar Instituto tecnológico Superior de Zapopan Página 18
  • 19. Tutorial: como ejecutar un proyecto opengl y netbeans 6.9.1 Ponle el nombre animar Y dale nombre al toggle button Tutorial: Pedro López Salazar Instituto tecnológico Superior de Zapopan Página 19
  • 20. Tutorial: como ejecutar un proyecto opengl y netbeans 6.9.1 Ahora es momento de irnos a nuestro constructor del Frame ventana y damos clic en sourse. Tutorial: Pedro López Salazar Instituto tecnológico Superior de Zapopan Página 20
  • 21. Tutorial: como ejecutar un proyecto opengl y netbeans 6.9.1 private Claseopengl pnLog1; /** Creates new form Ventana */ public Ventana() { initComponents(); try{ Tutorial: Pedro López Salazar Instituto tecnológico Superior de Zapopan Página 21
  • 22. Tutorial: como ejecutar un proyecto opengl y netbeans 6.9.1 pnLog1= new Claseopengl(); } catch (org.lwjgl.LWJGLException e){ System.out.println(e.getMessage()); } add (pnLog1 , java.awt.BorderLayout.CENTER); this.setSize(680,450); } enseguida nos vamos a la ventana de diseño: al botón damos un evento: pnLog1.start(); Tutorial: Pedro López Salazar Instituto tecnológico Superior de Zapopan Página 22
  • 23. Tutorial: como ejecutar un proyecto opengl y netbeans 6.9.1 Ahora que ya terminamos con el programa debemos de crear una clase y lo meteremos dentro de nuestro paquete. Sigamos estos pasos: Tutorial: Pedro López Salazar Instituto tecnológico Superior de Zapopan Página 23
  • 24. Tutorial: como ejecutar un proyecto opengl y netbeans 6.9.1 Tutorial: Pedro López Salazar Instituto tecnológico Superior de Zapopan Página 24
  • 25. Tutorial: como ejecutar un proyecto opengl y netbeans 6.9.1 El paso siguiente es abrir el archivo descargado llamado : OpenGL Es necesario cambiarle el nombre de la clase y el nombre del constructor y borrarle el main. Tutorial: Pedro López Salazar Instituto tecnológico Superior de Zapopan Página 25
  • 26. Tutorial: como ejecutar un proyecto opengl y netbeans 6.9.1 El código completo quedaría asi: package miopengl; /** * * @author pedro */ import org.lwjgl.opengl.GL11; import org.lwjgl.util.glu.GLU; public class Claseopengl extends org.lwjgl.opengl.AWTGLCanvas implements Runnable { private Thread thread; public float rtri; // Angle For The Triangle ( NEW ) public float rquad; // Angle For The Quad ( NEW ) public float xTras; public float yTras; public float zTras; public float xRot; public float yRot; public float zRot; public Claseopengl() throws org.lwjgl.LWJGLException { Tutorial: Pedro López Salazar Instituto tecnológico Superior de Zapopan Página 26
  • 27. Tutorial: como ejecutar un proyecto opengl y netbeans 6.9.1 super(); } private void ejes() { GL11.glBegin(GL11.GL_LINES); GL11.glColor3f(1.0f, 0.0f, 0.0f); GL11.glVertex3f(0.0f, 0.0f, 0.0f); GL11.glVertex3f(10.0f, 0.0f, 0.0f); GL11.glColor3f(0.0f, 1.0f, 0.0f); GL11.glVertex3f(0.0f, 0.0f, 0.0f); GL11.glVertex3f(0.0f, 10.0f, 0.0f); GL11.glColor3f(0.0f, 0.0f, 1.0f); GL11.glVertex3f(0.0f, 0.0f, 0.0f); GL11.glVertex3f(0.0f, 0.0f, 10.0f); GL11.glEnd(); } private void triangulo() { GL11.glPushMatrix(); //GL11.glLoadIdentity(); GL11.glTranslatef(-1.5f,0.0f,-6.0f); // Move Left 1.5 Units And Into The Screen 6.0 GL11.glRotatef(rtri,0.0f,1.0f,0.0f); // Rotate The Triangle On The Y axis ( NEW ) GL11.glBegin(GL11.GL_TRIANGLES); // Drawing Using Triangles GL11.glColor3f(1.0f,0.0f,0.0f); // Red GL11.glVertex3f( 0.0f, 1.0f, 0.0f); // Top Of Triangle (Front) GL11.glColor3f(0.0f,1.0f,0.0f); // Green GL11.glVertex3f(-1.0f,-1.0f, 1.0f); // Left Of Triangle (Front) Tutorial: Pedro López Salazar Instituto tecnológico Superior de Zapopan Página 27
  • 28. Tutorial: como ejecutar un proyecto opengl y netbeans 6.9.1 GL11.glColor3f(0.0f,0.0f,1.0f); // Blue GL11.glVertex3f( 1.0f,-1.0f, 1.0f); // Right Of Triangle (Front) GL11.glColor3f(1.0f,0.0f,0.0f); // Red GL11.glVertex3f( 0.0f, 1.0f, 0.0f); // Top Of Triangle (Right) GL11.glColor3f(0.0f,0.0f,1.0f); // Blue GL11.glVertex3f( 1.0f,-1.0f, 1.0f); // Left Of Triangle (Right) GL11.glColor3f(0.0f,1.0f,0.0f); // Green GL11.glVertex3f( 1.0f,-1.0f, -1.0f); // Right Of Triangle (Right) GL11.glColor3f(1.0f,0.0f,0.0f); // Red GL11.glVertex3f( 0.0f, 1.0f, 0.0f); // Top Of Triangle (Back) GL11.glColor3f(0.0f,1.0f,0.0f); // Green GL11.glVertex3f( 1.0f,-1.0f, -1.0f); // Left Of Triangle (Back) GL11.glColor3f(0.0f,0.0f,1.0f); // Blue GL11.glVertex3f(-1.0f,-1.0f, -1.0f); // Right Of Triangle (Back) GL11.glColor3f(1.0f,0.0f,0.0f); // Red GL11.glVertex3f( 0.0f, 1.0f, 0.0f); // Top Of Triangle (Left) GL11.glColor3f(0.0f,0.0f,1.0f); // Blue GL11.glVertex3f(-1.0f,-1.0f,-1.0f); // Left Of Triangle (Left) GL11.glColor3f(0.0f,1.0f,0.0f); // Green GL11.glVertex3f(-1.0f,-1.0f, 1.0f); // Right Of Triangle (Left) GL11.glEnd(); // Finished Drawing The Triangle GL11.glPopMatrix(); rtri+=0.5f; // Increase The Rotation Variable For The Triangle ( NEW ) } private void cubo() { GL11.glPushMatrix(); GL11.glTranslatef(1.5f,0.0f,-7.0f); // Move Right 1.5 Units And Into The Screen 6.0 GL11.glRotatef(rquad,1.0f,1.0f,1.0f); // Rotate The Quad On The X axis ( NEW ) Tutorial: Pedro López Salazar Instituto tecnológico Superior de Zapopan Página 28
  • 29. Tutorial: como ejecutar un proyecto opengl y netbeans 6.9.1 GL11.glColor3f(0.5f,0.5f,1.0f); // Set The Color To Blue One Time Only GL11.glBegin(GL11.GL_QUADS); // Draw A Quad GL11.glColor3f(0.0f,1.0f,0.0f); // Set The Color To Green GL11.glVertex3f( 1.0f, 1.0f,-1.0f); // Top Right Of The Quad (Top) GL11.glVertex3f(-1.0f, 1.0f,-1.0f); // Top Left Of The Quad (Top) GL11.glVertex3f(-1.0f, 1.0f, 1.0f); // Bottom Left Of The Quad (Top) GL11.glVertex3f( 1.0f, 1.0f, 1.0f); // Bottom Right Of The Quad (Top) GL11.glColor3f(1.0f,0.5f,0.0f); // Set The Color To Orange GL11.glVertex3f( 1.0f,-1.0f, 1.0f); // Top Right Of The Quad (Bottom) GL11.glVertex3f(-1.0f,-1.0f, 1.0f); // Top Left Of The Quad (Bottom) GL11.glVertex3f(-1.0f,-1.0f,-1.0f); // Bottom Left Of The Quad (Bottom) GL11.glVertex3f( 1.0f,-1.0f,-1.0f); // Bottom Right Of The Quad (Bottom) GL11.glColor3f(1.0f,0.0f,0.0f); // Set The Color To Red GL11.glVertex3f( 1.0f, 1.0f, 1.0f); // Top Right Of The Quad (Front) GL11.glVertex3f(-1.0f, 1.0f, 1.0f); // Top Left Of The Quad (Front) GL11.glVertex3f(-1.0f,-1.0f, 1.0f); // Bottom Left Of The Quad (Front) GL11.glVertex3f( 1.0f,-1.0f, 1.0f); // Bottom Right Of The Quad (Front) GL11.glColor3f(1.0f,1.0f,0.0f); // Set The Color To Yellow GL11.glVertex3f( 1.0f,-1.0f,-1.0f); // Bottom Left Of The Quad (Back) GL11.glVertex3f(-1.0f,-1.0f,-1.0f); // Bottom Right Of The Quad (Back) GL11.glVertex3f(-1.0f, 1.0f,-1.0f); // Top Right Of The Quad (Back) GL11.glVertex3f( 1.0f, 1.0f,-1.0f); // Top Left Of The Quad (Back) GL11.glColor3f(0.0f,0.0f,1.0f); // Set The Color To Blue GL11.glVertex3f(-1.0f, 1.0f, 1.0f); // Top Right Of The Quad (Left) GL11.glVertex3f(-1.0f, 1.0f,-1.0f); // Top Left Of The Quad (Left) GL11.glVertex3f(-1.0f,-1.0f,-1.0f); // Bottom Left Of The Quad (Left) GL11.glVertex3f(-1.0f,-1.0f, 1.0f); // Bottom Right Of The Quad (Left) GL11.glColor3f(1.0f,0.0f,1.0f); // Set The Color To Violet GL11.glVertex3f( 1.0f, 1.0f,-1.0f); // Top Right Of The Quad (Right) Tutorial: Pedro López Salazar Instituto tecnológico Superior de Zapopan Página 29
  • 30. Tutorial: como ejecutar un proyecto opengl y netbeans 6.9.1 GL11.glVertex3f( 1.0f, 1.0f, 1.0f); // Top Left Of The Quad (Right) GL11.glVertex3f( 1.0f,-1.0f, 1.0f); // Bottom Left Of The Quad (Right) GL11.glVertex3f( 1.0f,-1.0f,-1.0f); // Bottom Right Of The Quad (Right) GL11.glEnd(); // Done Drawing The Quad GL11.glPopMatrix(); rquad-=0.5f; // Decrease The Rotation Variable For The Quad ( NEW ) } /** * Override this to do initialising of the context. * It will be called once from paint(), immediately after * the context is created and made current. */ @Override protected void initGL() { GL11.glEnable(GL11.GL_TEXTURE_2D); // Enable Texture Mapping GL11.glShadeModel(GL11.GL_SMOOTH); // Enable Smooth Shading GL11.glClearColor(0.0f, 0.0f, 0.0f, 0.0f); // Black Background GL11.glClearDepth(1.0); // Depth Buffer Setup GL11.glEnable(GL11.GL_DEPTH_TEST); // Enables Depth Testing GL11.glDepthFunc(GL11.GL_LEQUAL); // The Type Of Depth Testing To Do GL11.glMatrixMode(GL11.GL_PROJECTION); // Select The Projection Matrix GL11.glLoadIdentity(); // Reset The Projection Matrix // Calculate The Aspect Ratio Of The Window GLU.gluPerspective( 45.0f, (float) this.getWidth() / (float) this.getHeight(), Tutorial: Pedro López Salazar Instituto tecnológico Superior de Zapopan Página 30
  • 31. Tutorial: como ejecutar un proyecto opengl y netbeans 6.9.1 0.1f, 100.0f); GL11.glMatrixMode(GL11.GL_MODELVIEW); // Select The Modelview Matrix // Really Nice Perspective Calculations GL11.glHint(GL11.GL_PERSPECTIVE_CORRECTION_HINT, GL11.GL_NICEST); } /** Override this to do painting */ @Override protected void paintGL() { GL11.glClear(GL11.GL_COLOR_BUFFER_BIT | GL11.GL_DEPTH_BUFFER_BIT); // Clear The Screen And The Depth Buffer GL11.glLoadIdentity(); // Reset The Current Modelview Matrix GL11.glTranslatef(xTras, yTras, zTras); GL11.glRotatef(xRot, 1.0f, 0.0f, 0.0f); GL11.glRotatef(yRot, 0.0f, 1.0f, 0.0f); GL11.glRotatef(zRot, 0.0f, 0.0f, 1.0f); ejes(); triangulo(); cubo(); try { this.swapBuffers(); } catch (org.lwjgl.LWJGLException e){ Tutorial: Pedro López Salazar Instituto tecnológico Superior de Zapopan Página 31
  • 32. Tutorial: como ejecutar un proyecto opengl y netbeans 6.9.1 e.printStackTrace(); } } public void start() { thread = new Thread(this); thread.setPriority(Thread.MIN_PRIORITY); thread.start(); } public void stop() { if (thread != null) { thread.interrupt(); } thread = null; } public void run() { Thread me = Thread.currentThread(); while (thread == me) { repaint(); } thread = null; } } Tutorial: Pedro López Salazar Instituto tecnológico Superior de Zapopan Página 32
  • 33. Tutorial: como ejecutar un proyecto opengl y netbeans 6.9.1 Damos clic en new library Tutorial: Pedro López Salazar Instituto tecnológico Superior de Zapopan Página 33
  • 34. Tutorial: como ejecutar un proyecto opengl y netbeans 6.9.1 Y damos clic en ok en mi caso como ya lo tengo agregado por eso me salio de color rojo el mensaje. Lo que tenemos que hacer en seguida es agregar los jar a nuestra librería recién creada llamada lwjgl: Tutorial: Pedro López Salazar Instituto tecnológico Superior de Zapopan Página 34
  • 35. Tutorial: como ejecutar un proyecto opengl y netbeans 6.9.1 Damos clic en add jar Damos doble clic a la carpeta Tutorial: Pedro López Salazar Instituto tecnológico Superior de Zapopan Página 35
  • 36. Tutorial: como ejecutar un proyecto opengl y netbeans 6.9.1 Damos doble clic en jar Seleccionamos los 4 y damos en agreagrar Tutorial: Pedro López Salazar Instituto tecnológico Superior de Zapopan Página 36
  • 37. Tutorial: como ejecutar un proyecto opengl y netbeans 6.9.1 Y asi aparecerán Nos vamos en sourse y agregaremos otra librería Tutorial: Pedro López Salazar Instituto tecnológico Superior de Zapopan Página 37
  • 38. Tutorial: como ejecutar un proyecto opengl y netbeans 6.9.1 Nos vamos a nuestro documentos y damos clic en agregar En javadoc hacemos lo mismo Tutorial: Pedro López Salazar Instituto tecnológico Superior de Zapopan Página 38
  • 39. Tutorial: como ejecutar un proyecto opengl y netbeans 6.9.1 Y así agregamos las librerías. Tutorial: Pedro López Salazar Instituto tecnológico Superior de Zapopan Página 39
  • 40. Tutorial: como ejecutar un proyecto opengl y netbeans 6.9.1 Damos clic derecho a nuestro proyecto elegimos en el menú contextual la opción propiedades Tutorial: Pedro López Salazar Instituto tecnológico Superior de Zapopan Página 40
  • 41. Tutorial: como ejecutar un proyecto opengl y netbeans 6.9.1 Damos clic en agregar librerías y lo agregamos: Tutorial: Pedro López Salazar Instituto tecnológico Superior de Zapopan Página 41
  • 42. Tutorial: como ejecutar un proyecto opengl y netbeans 6.9.1 En run agregamos también esta misma librería: Tutorial: Pedro López Salazar Instituto tecnológico Superior de Zapopan Página 42
  • 43. Tutorial: como ejecutar un proyecto opengl y netbeans 6.9.1 Copiamos este código del archivo readme y lo pegamos Tutorial: Pedro López Salazar Instituto tecnológico Superior de Zapopan Página 43
  • 44. Tutorial: como ejecutar un proyecto opengl y netbeans 6.9.1 -Djava.library.path= Enseguida tenemos que pegar la extensión donde se encuentran los .ddl Accesamos a nuestros documentos y damos clic a la carpeta Tutorial: Pedro López Salazar Instituto tecnológico Superior de Zapopan Página 44
  • 45. Tutorial: como ejecutar un proyecto opengl y netbeans 6.9.1 Damos clic en native Damos clic en la carpeta Windows Tutorial: Pedro López Salazar Instituto tecnológico Superior de Zapopan Página 45
  • 46. Tutorial: como ejecutar un proyecto opengl y netbeans 6.9.1 Seleccionamos la dirección que se encuantra en la parte de arriba Tutorial: Pedro López Salazar Instituto tecnológico Superior de Zapopan Página 46
  • 47. Tutorial: como ejecutar un proyecto opengl y netbeans 6.9.1 Damos cli en ok y nuestro programa estará funcionando al 100 % -Djava.library.path=C:UserspedroDocumentslwjglnativewindows Tutorial: Pedro López Salazar Instituto tecnológico Superior de Zapopan Página 47
  • 48. Tutorial: como ejecutar un proyecto opengl y netbeans 6.9.1 Shift + F6 Tutorial: Pedro López Salazar Instituto tecnológico Superior de Zapopan Página 48
  • 49. Tutorial: como ejecutar un proyecto opengl y netbeans 6.9.1 Si damos clic en animar las imagine s se moverán. Código de la ventana: /* * To change this template, choose Tools | Templates * and open the template in the editor. */ /* * Ventana.java * * Created on 8/06/2011, 12:51:12 PM */ package miopengl; Tutorial: Pedro López Salazar Instituto tecnológico Superior de Zapopan Página 49
  • 50. Tutorial: como ejecutar un proyecto opengl y netbeans 6.9.1 /** * * @author pedro */ public class Ventana extends javax.swing.JFrame { private Claseopengl pnLog1; /** Creates new form Ventana */ public Ventana() { initComponents(); try{ pnLog1= new Claseopengl(); } catch (org.lwjgl.LWJGLException e){ System.out.println(e.getMessage()); } add (pnLog1 , java.awt.BorderLayout.CENTER); this.setSize(680,450); } /** This method is called from within the constructor to * initialize the form. * WARNING: Do NOT modify this code. The content of this method is Tutorial: Pedro López Salazar Instituto tecnológico Superior de Zapopan Página 50
  • 51. Tutorial: como ejecutar un proyecto opengl y netbeans 6.9.1 * always regenerated by the Form Editor. */ @SuppressWarnings("unchecked") // <editor-fold defaultstate="collapsed" desc="Generated Code"> private void initComponents() { pnHerramientas = new javax.swing.JPanel(); btnAnimar = new javax.swing.JToggleButton(); setDefaultCloseOperation(javax.swing.WindowConstants.EXIT_ON_CLOSE); btnAnimar.setText("Animar"); btnAnimar.addActionListener(new java.awt.event.ActionListener() { public void actionPerformed(java.awt.event.ActionEvent evt) { btnAnimarActionPerformed(evt); } }); javax.swing.GroupLayout pnHerramientasLayout = new javax.swing.GroupLayout(pnHerramientas); pnHerramientas.setLayout(pnHerramientasLayout); pnHerramientasLayout.setHorizontalGroup( pnHerramientasLayout.createParallelGroup(javax.swing.GroupLayout.Alignment.LEADI NG) .addGroup(javax.swing.GroupLayout.Alignment.TRAILING, pnHerramientasLayout.createSequentialGroup() .addContainerGap(javax.swing.GroupLayout.DEFAULT_SIZE, Short.MAX_VALUE) .addComponent(btnAnimar)) ); Tutorial: Pedro López Salazar Instituto tecnológico Superior de Zapopan Página 51
  • 52. Tutorial: como ejecutar un proyecto opengl y netbeans 6.9.1 pnHerramientasLayout.setVerticalGroup( pnHerramientasLayout.createParallelGroup(javax.swing.GroupLayout.Alignment.LEADI NG) .addGroup(pnHerramientasLayout.createSequentialGroup() .addGap(52, 52, 52) .addComponent(btnAnimar) .addContainerGap(225, Short.MAX_VALUE)) ); getContentPane().add(pnHerramientas, java.awt.BorderLayout.LINE_START); pack(); }// </editor-fold> private void btnAnimarActionPerformed(java.awt.event.ActionEvent evt) { pnLog1.start(); } /** * @param args the command line arguments */ public static void main(String args[]) { java.awt.EventQueue.invokeLater(new Runnable() { public void run() { new Ventana().setVisible(true); } }); } Tutorial: Pedro López Salazar Instituto tecnológico Superior de Zapopan Página 52
  • 53. Tutorial: como ejecutar un proyecto opengl y netbeans 6.9.1 // Variables declaration - do not modify private javax.swing.JToggleButton btnAnimar; private javax.swing.JPanel pnHerramientas; // End of variables declaration } Código de la clase package miopengl; /** * * @author pedro */ import org.lwjgl.opengl.GL11; import org.lwjgl.util.glu.GLU; public class Claseopengl extends org.lwjgl.opengl.AWTGLCanvas implements Runnable { private Thread thread; public float rtri; // Angle For The Triangle ( NEW ) public float rquad; // Angle For The Quad ( NEW ) Tutorial: Pedro López Salazar Instituto tecnológico Superior de Zapopan Página 53
  • 54. Tutorial: como ejecutar un proyecto opengl y netbeans 6.9.1 public float xTras; public float yTras; public float zTras; public float xRot; public float yRot; public float zRot; public Claseopengl() throws org.lwjgl.LWJGLException { super(); } private void ejes() { GL11.glBegin(GL11.GL_LINES); GL11.glColor3f(1.0f, 0.0f, 0.0f); GL11.glVertex3f(0.0f, 0.0f, 0.0f); GL11.glVertex3f(10.0f, 0.0f, 0.0f); GL11.glColor3f(0.0f, 1.0f, 0.0f); GL11.glVertex3f(0.0f, 0.0f, 0.0f); GL11.glVertex3f(0.0f, 10.0f, 0.0f); GL11.glColor3f(0.0f, 0.0f, 1.0f); GL11.glVertex3f(0.0f, 0.0f, 0.0f); GL11.glVertex3f(0.0f, 0.0f, 10.0f); GL11.glEnd(); Tutorial: Pedro López Salazar Instituto tecnológico Superior de Zapopan Página 54
  • 55. Tutorial: como ejecutar un proyecto opengl y netbeans 6.9.1 } private void triangulo() { GL11.glPushMatrix(); //GL11.glLoadIdentity(); GL11.glTranslatef(-1.5f,0.0f,-6.0f); // Move Left 1.5 Units And Into The Screen 6.0 GL11.glRotatef(rtri,0.0f,1.0f,0.0f); // Rotate The Triangle On The Y axis ( NEW ) GL11.glBegin(GL11.GL_TRIANGLES); // Drawing Using Triangles GL11.glColor3f(1.0f,0.0f,0.0f); // Red GL11.glVertex3f( 0.0f, 1.0f, 0.0f); // Top Of Triangle (Front) GL11.glColor3f(0.0f,1.0f,0.0f); // Green GL11.glVertex3f(-1.0f,-1.0f, 1.0f); // Left Of Triangle (Front) GL11.glColor3f(0.0f,0.0f,1.0f); // Blue GL11.glVertex3f( 1.0f,-1.0f, 1.0f); // Right Of Triangle (Front) GL11.glColor3f(1.0f,0.0f,0.0f); // Red GL11.glVertex3f( 0.0f, 1.0f, 0.0f); // Top Of Triangle (Right) GL11.glColor3f(0.0f,0.0f,1.0f); // Blue GL11.glVertex3f( 1.0f,-1.0f, 1.0f); // Left Of Triangle (Right) GL11.glColor3f(0.0f,1.0f,0.0f); // Green GL11.glVertex3f( 1.0f,-1.0f, -1.0f); // Right Of Triangle (Right) GL11.glColor3f(1.0f,0.0f,0.0f); // Red GL11.glVertex3f( 0.0f, 1.0f, 0.0f); // Top Of Triangle (Back) GL11.glColor3f(0.0f,1.0f,0.0f); // Green GL11.glVertex3f( 1.0f,-1.0f, -1.0f); // Left Of Triangle (Back) GL11.glColor3f(0.0f,0.0f,1.0f); // Blue GL11.glVertex3f(-1.0f,-1.0f, -1.0f); // Right Of Triangle (Back) GL11.glColor3f(1.0f,0.0f,0.0f); // Red Tutorial: Pedro López Salazar Instituto tecnológico Superior de Zapopan Página 55
  • 56. Tutorial: como ejecutar un proyecto opengl y netbeans 6.9.1 GL11.glVertex3f( 0.0f, 1.0f, 0.0f); // Top Of Triangle (Left) GL11.glColor3f(0.0f,0.0f,1.0f); // Blue GL11.glVertex3f(-1.0f,-1.0f,-1.0f); // Left Of Triangle (Left) GL11.glColor3f(0.0f,1.0f,0.0f); // Green GL11.glVertex3f(-1.0f,-1.0f, 1.0f); // Right Of Triangle (Left) GL11.glEnd(); // Finished Drawing The Triangle GL11.glPopMatrix(); rtri+=0.5f; // Increase The Rotation Variable For The Triangle ( NEW ) } private void cubo() { GL11.glPushMatrix(); GL11.glTranslatef(1.5f,0.0f,-7.0f); // Move Right 1.5 Units And Into The Screen 6.0 GL11.glRotatef(rquad,1.0f,1.0f,1.0f); // Rotate The Quad On The X axis ( NEW ) GL11.glColor3f(0.5f,0.5f,1.0f); // Set The Color To Blue One Time Only GL11.glBegin(GL11.GL_QUADS); // Draw A Quad GL11.glColor3f(0.0f,1.0f,0.0f); // Set The Color To Green GL11.glVertex3f( 1.0f, 1.0f,-1.0f); // Top Right Of The Quad (Top) GL11.glVertex3f(-1.0f, 1.0f,-1.0f); // Top Left Of The Quad (Top) GL11.glVertex3f(-1.0f, 1.0f, 1.0f); // Bottom Left Of The Quad (Top) GL11.glVertex3f( 1.0f, 1.0f, 1.0f); // Bottom Right Of The Quad (Top) GL11.glColor3f(1.0f,0.5f,0.0f); // Set The Color To Orange GL11.glVertex3f( 1.0f,-1.0f, 1.0f); // Top Right Of The Quad (Bottom) GL11.glVertex3f(-1.0f,-1.0f, 1.0f); // Top Left Of The Quad (Bottom) GL11.glVertex3f(-1.0f,-1.0f,-1.0f); // Bottom Left Of The Quad (Bottom) GL11.glVertex3f( 1.0f,-1.0f,-1.0f); // Bottom Right Of The Quad (Bottom) GL11.glColor3f(1.0f,0.0f,0.0f); // Set The Color To Red Tutorial: Pedro López Salazar Instituto tecnológico Superior de Zapopan Página 56
  • 57. Tutorial: como ejecutar un proyecto opengl y netbeans 6.9.1 GL11.glVertex3f( 1.0f, 1.0f, 1.0f); // Top Right Of The Quad (Front) GL11.glVertex3f(-1.0f, 1.0f, 1.0f); // Top Left Of The Quad (Front) GL11.glVertex3f(-1.0f,-1.0f, 1.0f); // Bottom Left Of The Quad (Front) GL11.glVertex3f( 1.0f,-1.0f, 1.0f); // Bottom Right Of The Quad (Front) GL11.glColor3f(1.0f,1.0f,0.0f); // Set The Color To Yellow GL11.glVertex3f( 1.0f,-1.0f,-1.0f); // Bottom Left Of The Quad (Back) GL11.glVertex3f(-1.0f,-1.0f,-1.0f); // Bottom Right Of The Quad (Back) GL11.glVertex3f(-1.0f, 1.0f,-1.0f); // Top Right Of The Quad (Back) GL11.glVertex3f( 1.0f, 1.0f,-1.0f); // Top Left Of The Quad (Back) GL11.glColor3f(0.0f,0.0f,1.0f); // Set The Color To Blue GL11.glVertex3f(-1.0f, 1.0f, 1.0f); // Top Right Of The Quad (Left) GL11.glVertex3f(-1.0f, 1.0f,-1.0f); // Top Left Of The Quad (Left) GL11.glVertex3f(-1.0f,-1.0f,-1.0f); // Bottom Left Of The Quad (Left) GL11.glVertex3f(-1.0f,-1.0f, 1.0f); // Bottom Right Of The Quad (Left) GL11.glColor3f(1.0f,0.0f,1.0f); // Set The Color To Violet GL11.glVertex3f( 1.0f, 1.0f,-1.0f); // Top Right Of The Quad (Right) GL11.glVertex3f( 1.0f, 1.0f, 1.0f); // Top Left Of The Quad (Right) GL11.glVertex3f( 1.0f,-1.0f, 1.0f); // Bottom Left Of The Quad (Right) GL11.glVertex3f( 1.0f,-1.0f,-1.0f); // Bottom Right Of The Quad (Right) GL11.glEnd(); // Done Drawing The Quad GL11.glPopMatrix(); rquad-=0.5f; // Decrease The Rotation Variable For The Quad ( NEW ) } /** * Override this to do initialising of the context. * It will be called once from paint(), immediately after Tutorial: Pedro López Salazar Instituto tecnológico Superior de Zapopan Página 57
  • 58. Tutorial: como ejecutar un proyecto opengl y netbeans 6.9.1 * the context is created and made current. */ @Override protected void initGL() { GL11.glEnable(GL11.GL_TEXTURE_2D); // Enable Texture Mapping GL11.glShadeModel(GL11.GL_SMOOTH); // Enable Smooth Shading GL11.glClearColor(0.0f, 0.0f, 0.0f, 0.0f); // Black Background GL11.glClearDepth(1.0); // Depth Buffer Setup GL11.glEnable(GL11.GL_DEPTH_TEST); // Enables Depth Testing GL11.glDepthFunc(GL11.GL_LEQUAL); // The Type Of Depth Testing To Do GL11.glMatrixMode(GL11.GL_PROJECTION); // Select The Projection Matrix GL11.glLoadIdentity(); // Reset The Projection Matrix // Calculate The Aspect Ratio Of The Window GLU.gluPerspective( 45.0f, (float) this.getWidth() / (float) this.getHeight(), 0.1f, 100.0f); GL11.glMatrixMode(GL11.GL_MODELVIEW); // Select The Modelview Matrix // Really Nice Perspective Calculations GL11.glHint(GL11.GL_PERSPECTIVE_CORRECTION_HINT, GL11.GL_NICEST); } /** Override this to do painting */ Tutorial: Pedro López Salazar Instituto tecnológico Superior de Zapopan Página 58
  • 59. Tutorial: como ejecutar un proyecto opengl y netbeans 6.9.1 @Override protected void paintGL() { GL11.glClear(GL11.GL_COLOR_BUFFER_BIT | GL11.GL_DEPTH_BUFFER_BIT); // Clear The Screen And The Depth Buffer GL11.glLoadIdentity(); // Reset The Current Modelview Matrix GL11.glTranslatef(xTras, yTras, zTras); GL11.glRotatef(xRot, 1.0f, 0.0f, 0.0f); GL11.glRotatef(yRot, 0.0f, 1.0f, 0.0f); GL11.glRotatef(zRot, 0.0f, 0.0f, 1.0f); ejes(); triangulo(); cubo(); try { this.swapBuffers(); } catch (org.lwjgl.LWJGLException e){ e.printStackTrace(); } } public void start() { thread = new Thread(this); thread.setPriority(Thread.MIN_PRIORITY); thread.start(); Tutorial: Pedro López Salazar Instituto tecnológico Superior de Zapopan Página 59
  • 60. Tutorial: como ejecutar un proyecto opengl y netbeans 6.9.1 } public void stop() { if (thread != null) { thread.interrupt(); } thread = null; } public void run() { Thread me = Thread.currentThread(); while (thread == me) { repaint(); } thread = null; } } Tutorial: Pedro López Salazar Instituto tecnológico Superior de Zapopan Página 60