SlideShare una empresa de Scribd logo
1 de 16
Descargar para leer sin conexión
REMANUFACTURADO DEL CARTUCHO DE TONER
                                                                            HP P1006           ®


                                                                                      IMPRESORA HP ® P1006


                                                                                      CARTUCHO DE TONER


  3232 West El Segundo Blvd., Hawthorne, California 90250 USA • Ph +1 424 675 3300 • Fx +1 424 675 3400 • techsupport@uninetimaging.com • www.uninetimaging.com
© 2009 UniNet Imaging Inc. All trademark names and artwork are property of their respective owners. Product brand names mentioned are intended to show compatibility only. UniNet Imaging does not warrant downloaded information.
UNINET IMAGING INC. • • BROTHERCARTUCHO DE TONERDISASSEMBLINGTHE P1006 CARTRIDGE
                          UNINET IMAGING INC.
                                     REMANUFACTURADO DEL 1240/1650 • • HP LASERJET SERIE TONER CARTRIDGE
                                                   BROTHER 1240/1650      ASSEMBLING THE TONER

                      REMANUFACTURADO DEL CARTUCHO DE TONER
                      HP LASERJET SERIE P1006 (REFERENCIA CB435A)
                                                                                                   Por Mike Josiah


      La impresora HP1006 fue lanzada al mercado en noviembre de 2007 por Hewlett Packard. Esta serie de impresoras están
      construidas adoptando el motor Canon de 17 páginas por minuto y 600 dpi reales. Su cartucho referencia CB435A está
      especificado para 1500 páginas utilizando chip para controlar las funciones de tóner y físicamente tiene la apariencia de un
      Q2612A (1012) pequeño, pero con substanciales diferencias.

      La impresora en sí ocupa un pequeño espacio de mesa que la hace atractiva para oficina y hogar. Imprime su primera página en
      8,5 segundos a partir del estado de espera en la modalidad de Ahorro de Energía y posee una memoria fija y no expandible de
      8Mb. El volumen de impresiones recomendable de este modelo es de 250-1500 pero el ciclo máximo de trabajo es de 5.000
      páginas mensuales. Contrario a otros diseños de impresoras pequeñas, este modelo posee un detalle agradable al utilizar una
      bandeja de papel de 150 hojas.

      El sistema de unión de las dos secciones de este cartucho es completamente nuevo. La buena noticia es que no es necesario
      agujerear el cartucho para acceder a los pernos de desmontaje. El tóner que utiliza es también nuevo. HP indica que el tóner
      ahora posee “partículas de forma esférica”. Uninet está actualmente investigando si el tóner es en realidad químico o es
      convencional pero térmicamente reformado. La percepción es que se trata de un tóner redondeado térmicamente pero hasta
      que hayan concluido los trabajos de investigación no lo sabremos con seguridad.

      Además de la novedad del tóner, el chip posee “inteligencia adicional” para ayudar en el pedido de reemplazo cuando el
      cartucho se encuentra bajo de tóner. Nuevamente, estamos investigando este aspecto en estos momentos pero cabe indicar que
      durante las pruebas de rendimiento se efectuaron 5 recargas de un mismo cartucho sin que indique falta de tóner quedando
      demostrado que el chip no interrumpe la operación de la impresora. Esto es indicativo que las funciones de tóner bajo no
      funcionan.

      La impresora se entrega nueva con un cartucho “Estárter” de 700 páginas a 5% de cobertura. Significa esto que los clientes
      estarán rápidamente en la búsqueda de soluciones. El cartucho estárter y el reemplazo 35A (1500 páginas) son similares
      excepto que dimensionalmente las cavidad de carga y desperdicio del cartucho de alto rendimiento son algo mayores. Es
      posible entonces no tener la capacidad necesaria en el estárter para convertirlo en un cartucho de alto rendimiento y esto puede
      ser crítico particularmente en lo referente al desperdicio si el tóner compatible no llega a poseer una eficiencia óptima.

      El localizador de defectos de cartucho como también las instrucciones para generar una página de prueba y de limpieza junto a
      algunos datos de impresora serán explicados al final de este artículo.


      SUMINISTROS REQUERIDOS                                                                                        HERRAMIENTAS
      1. Tóner para HP P1005/1006                                                                                   1. Destornillador Phillips mediano
      2. Nuevo cilindro OPC                                                                                         2. Destornillador plano pequeño
      3. Lámina de Limpieza (única para esta serie)                                                                 3. Pinzas de puntas
      4. Lámina dosificadora (única para esta serie)                                                                4. Juego de destornilladores de relojero
      5. Rodillo Magnético (único para esta serie)
      6. Sello (único para esta serie)
      7. Q-tips o copitos de algodón
      8. Alcohol Isopropílico
      9. Polvo lubrificante Methuselah
      10. Grasa Conductiva


  3232 West El Segundo Blvd., Hawthorne, California 90250 USA • Ph +1 424 675 3300 • Fx +1 424 675 3400 • techsupport@uninetimaging.com • www.uninetimaging.com
© 2009 UniNet Imaging Inc. All trademark names and artwork are property of their respective owners. Product brand names mentioned are intended to show compatibility only. UniNet Imaging does not warrant downloaded information.
UNINET IMAGING INC. • • BROTHERCARTUCHO DE TONERDISASSEMBLINGTHE P1006 CARTRIDGE
                          UNINET IMAGING INC.
                                     REMANUFACTURADO DEL 1240/1650 • • HP LASERJET SERIE TONER CARTRIDGE
                                                   BROTHER 1240/1650      ASSEMBLING THE TONER
      Existe una gran similitud entre este cartucho CB435A y el CB436A utilizado en el modelo P1505 pero en principio no son
      intercambiables. Cabe sí considerar que estas instrucciones podrán ser utilizadas para desmontar también el cartucho del
      modelo mencionado.


      A                                                                                                                 B

      Las comparaciones de las fotos tomadas de ambos cartuchos muestran con las flechas las diferencias básicas de construcción,
      particularmente en sus laterales donde aparecen los puntos críticos de calce en la cavidad de las respectivas impresoras. Las
      figuras A y B muestran la parte inferior de los cartuchos 35A y 36A respectivamente.


                                                 C                                                                                                                D

                                     Las figuras C y D muestran la parte superior de los cartuchos 35A y 36A respectivamente.


  3232 West El Segundo Blvd., Hawthorne, California 90250 USA • Ph +1 424 675 3300 • Fx +1 424 675 3400 • techsupport@uninetimaging.com • www.uninetimaging.com
© 2009 UniNet Imaging Inc. All trademark names and artwork are property of their respective owners. Product brand names mentioned are intended to show compatibility only. UniNet Imaging does not warrant downloaded information.
UNINET IMAGING INC. • • BROTHERCARTUCHO DE TONERDISASSEMBLINGTHE P1006 CARTRIDGE
                          UNINET IMAGING INC.
                                     REMANUFACTURADO DEL 1240/1650 • • HP LASERJET SERIE TONER CARTRIDGE
                                                   BROTHER 1240/1650      ASSEMBLING THE TONER


                                                 E                                                                                                                F

                                     Las figuras E y F muestran la parte izquierda de los cartuchos 35A y 36A respectivamente.


                                                 G                                                                                                                H

                                     Las figuras G y H muestran la parte derecha de los cartuchos 35A y 36A respectivamente.


  3232 West El Segundo Blvd., Hawthorne, California 90250 USA • Ph +1 424 675 3300 • Fx +1 424 675 3400 • techsupport@uninetimaging.com • www.uninetimaging.com
© 2009 UniNet Imaging Inc. All trademark names and artwork are property of their respective owners. Product brand names mentioned are intended to show compatibility only. UniNet Imaging does not warrant downloaded information.
UNINET IMAGING INC. • • BROTHERCARTUCHO DE TONERDISASSEMBLINGTHE P1006 CARTRIDGE
                          UNINET IMAGING INC.
                                     REMANUFACTURADO DEL 1240/1650 • • HP LASERJET SERIE TONER CARTRIDGE
                                                   BROTHER 1240/1650      ASSEMBLING THE TONER


                                           1. Con la manija orientada hacia Ud. sacar el tornillo y la tapa lateral de la derecha.

                                       Tenga cuidado con el resorte del obturador del cilindro. Sacarlo junto con la tapa lateral.


                                               2. Con la pinza de puntas desmontar ambos resortes de tensión de la cavidad.


  3232 West El Segundo Blvd., Hawthorne, California 90250 USA • Ph +1 424 675 3300 • Fx +1 424 675 3400 • techsupport@uninetimaging.com • www.uninetimaging.com
© 2009 UniNet Imaging Inc. All trademark names and artwork are property of their respective owners. Product brand names mentioned are intended to show compatibility only. UniNet Imaging does not warrant downloaded information.
UNINET IMAGING INC. • • BROTHERCARTUCHO DE TONERDISASSEMBLINGTHE P1006 CARTRIDGE
                          UNINET IMAGING INC.
                                     REMANUFACTURADO DEL 1240/1650 • • HP LASERJET SERIE TONER CARTRIDGE
                                                   BROTHER 1240/1650      ASSEMBLING THE TONER


                              3. Deslizar la sección de cavidad de desperdicios/OPC hacia la izquierda. Separar las dos mitades.


      4. En la sección cavidad de desperdicios/OPC, levantar el OPC                                                 5. Extraer el PCR y limpiarlo con su limpiador estándar de PCR.
      desde el lado engranaje. Girar levemente y retirar de la
      cavidad.


  3232 West El Segundo Blvd., Hawthorne, California 90250 USA • Ph +1 424 675 3300 • Fx +1 424 675 3400 • techsupport@uninetimaging.com • www.uninetimaging.com
© 2009 UniNet Imaging Inc. All trademark names and artwork are property of their respective owners. Product brand names mentioned are intended to show compatibility only. UniNet Imaging does not warrant downloaded information.
UNINET IMAGING INC. • • BROTHERCARTUCHO DE TONERDISASSEMBLINGTHE P1006 CARTRIDGE
                          UNINET IMAGING INC.
                                     REMANUFACTURADO DEL 1240/1650 • • HP LASERJET SERIE TONER CARTRIDGE
                                                   BROTHER 1240/1650      ASSEMBLING THE TONER


      6. Retirar los dos tornillos y la Cuchilla de Limpieza.


      7. Limpiar todo vestigio de tóner usado de la cavidad teniendo sumo cuidado en no dañar la lámina de recuperación ubicada en
      proximidad de la cuchilla de limpieza. Si la lámina es doblada o marcada de cualquier manera, el cartucho sufrirá pérdidas.
      Asegurarse que los sellos de espuma de la lámina de limpieza están limpios.


  3232 West El Segundo Blvd., Hawthorne, California 90250 USA • Ph +1 424 675 3300 • Fx +1 424 675 3400 • techsupport@uninetimaging.com • www.uninetimaging.com
© 2009 UniNet Imaging Inc. All trademark names and artwork are property of their respective owners. Product brand names mentioned are intended to show compatibility only. UniNet Imaging does not warrant downloaded information.
UNINET IMAGING INC. • • BROTHERCARTUCHO DE TONERDISASSEMBLINGTHE P1006 CARTRIDGE
                          UNINET IMAGING INC.
                                     REMANUFACTURADO DEL 1240/1650 • • HP LASERJET SERIE TONER CARTRIDGE
                                                   BROTHER 1240/1650      ASSEMBLING THE TONER


      8. Aplicar a la cuchilla de limpieza nueva o reciclada polvo                                                  9. Instalar el PCR limpio. Aplicar una leve cantidad de grasa
      lubricante Methuselah. Instalar la cuchilla con sus dos                                                       lubricante en el lado de asiento negro del eje. Sólo una muy
      tornillos.                                                                                                    pequeña cantidad es suficiente.


      10. Aplicar también una pequeña cantidad de grasa                                                             11. Instalar el OPC nuevo o el original limpio lado maza
      conductiva al eje metálico del OPC.                                                                           primero.

                                                                                                                    Colocar aparte la sección cavidad de desperdicio/OPC.


  3232 West El Segundo Blvd., Hawthorne, California 90250 USA • Ph +1 424 675 3300 • Fx +1 424 675 3400 • techsupport@uninetimaging.com • www.uninetimaging.com
© 2009 UniNet Imaging Inc. All trademark names and artwork are property of their respective owners. Product brand names mentioned are intended to show compatibility only. UniNet Imaging does not warrant downloaded information.
UNINET IMAGING INC. • • BROTHERCARTUCHO DE TONERDISASSEMBLINGTHE P1006 CARTRIDGE
                          UNINET IMAGING INC.
                                     REMANUFACTURADO DEL 1240/1650 • • HP LASERJET SERIE TONER CARTRIDGE
                                                   BROTHER 1240/1650      ASSEMBLING THE TONER


                                         12. Tomando ahora la cavidad de tóner lado derecho, sacar los dos tornillos y lateral.

                                                                Notar que ambos tornillos poseen arandelas de seguridad.


                             13. Retirar los engranajes de la cavidad como se nuestra, dejando el engranaje barreno en su lugar.


  3232 West El Segundo Blvd., Hawthorne, California 90250 USA • Ph +1 424 675 3300 • Fx +1 424 675 3400 • techsupport@uninetimaging.com • www.uninetimaging.com
© 2009 UniNet Imaging Inc. All trademark names and artwork are property of their respective owners. Product brand names mentioned are intended to show compatibility only. UniNet Imaging does not warrant downloaded information.
UNINET IMAGING INC. • • BROTHERCARTUCHO DE TONERDISASSEMBLINGTHE P1006 CARTRIDGE
                          UNINET IMAGING INC.
                                     REMANUFACTURADO DEL 1240/1650 • • HP LASERJET SERIE TONER CARTRIDGE
                                                   BROTHER 1240/1650      ASSEMBLING THE TONER


      14. Retirar el tornillo único y final del lado opuesto.


                                     15. Retirar el conjunto de rodillo magnético. Ser precavido con los bujes pues son frágiles.


  3232 West El Segundo Blvd., Hawthorne, California 90250 USA • Ph +1 424 675 3300 • Fx +1 424 675 3400 • techsupport@uninetimaging.com • www.uninetimaging.com
© 2009 UniNet Imaging Inc. All trademark names and artwork are property of their respective owners. Product brand names mentioned are intended to show compatibility only. UniNet Imaging does not warrant downloaded information.
UNINET IMAGING INC. • • BROTHERCARTUCHO DE TONERDISASSEMBLINGTHE P1006 CARTRIDGE
                          UNINET IMAGING INC.
                                     REMANUFACTURADO DEL 1240/1650 • • HP LASERJET SERIE TONER CARTRIDGE
                                                   BROTHER 1240/1650      ASSEMBLING THE TONER


      16. Retirar la cuchilla dosificadora y sus dos tornillos.                                                     17. Aspirar o limpiar con aire comprimido cualquier resto de
                                                                                                                    tóner que haya quedado en la cavidad. Asegurarse que el
                                                                                                                    rodillo magnético y los sellos de la cuchilla dosificadora están
                                                                                                                    también limpios.


      18. Llenar la cavidad con tóner P1005/P1006.


  3232 West El Segundo Blvd., Hawthorne, California 90250 USA • Ph +1 424 675 3300 • Fx +1 424 675 3400 • techsupport@uninetimaging.com • www.uninetimaging.com
© 2009 UniNet Imaging Inc. All trademark names and artwork are property of their respective owners. Product brand names mentioned are intended to show compatibility only. UniNet Imaging does not warrant downloaded information.
UNINET IMAGING INC. • • BROTHERCARTUCHO DE TONERDISASSEMBLINGTHE P1006 CARTRIDGE
                          UNINET IMAGING INC.
                                     REMANUFACTURADO DEL 1240/1650 • • HP LASERJET SERIE TONER CARTRIDGE
                                                   BROTHER 1240/1650      ASSEMBLING THE TONER


                                   19. Cuando se disponga del sello autoadhesivo, retirar el tapón del sello e instalar el mismo.

                                                               Traer la cola del sello a través del orificio. Instalar el tapón.


                    20. Instalar el lateral izquierdo con sus tornillos. Poner cuidado en el correcto montaje del contacto de la tapa.


  3232 West El Segundo Blvd., Hawthorne, California 90250 USA • Ph +1 424 675 3300 • Fx +1 424 675 3400 • techsupport@uninetimaging.com • www.uninetimaging.com
© 2009 UniNet Imaging Inc. All trademark names and artwork are property of their respective owners. Product brand names mentioned are intended to show compatibility only. UniNet Imaging does not warrant downloaded information.
UNINET IMAGING INC. • • BROTHERCARTUCHO DE TONERDISASSEMBLINGTHE P1006 CARTRIDGE
                          UNINET IMAGING INC.
                                     REMANUFACTURADO DEL 1240/1650 • • HP LASERJET SERIE TONER CARTRIDGE
                                                   BROTHER 1240/1650      ASSEMBLING THE TONER


      21. Montar la cuchilla dosificadora con sus dos tornillos.                                                    22. Montar el rodillo magnético lado buje negro primero.

                                                                                                                    Girar el rodillo hasta que calce el chanfleado del eje en su
                                                                                                                    lugar.


      23. A continuación montar los engranajes como se muestra.                                                     24. Montar la tapa lateral y tornillos.


  3232 West El Segundo Blvd., Hawthorne, California 90250 USA • Ph +1 424 675 3300 • Fx +1 424 675 3400 • techsupport@uninetimaging.com • www.uninetimaging.com
© 2009 UniNet Imaging Inc. All trademark names and artwork are property of their respective owners. Product brand names mentioned are intended to show compatibility only. UniNet Imaging does not warrant downloaded information.
UNINET IMAGING INC. • • BROTHERCARTUCHO DE TONERDISASSEMBLINGTHE P1006 CARTRIDGE
                          UNINET IMAGING INC.
                                     REMANUFACTURADO DEL 1240/1650 • • HP LASERJET SERIE TONER CARTRIDGE
                                                   BROTHER 1240/1650      ASSEMBLING THE TONER


                                                      25. Ubicar la cavidad de desperdicios y OPC sobre la cavidad de tóner.

                              Deslizar sobre la misma para que los pernos de la articulación entren en sus respectivos agujeros.


                                                         26. Fijar los resortes de tensión de la cavidad de tóner en su lugar.


  3232 West El Segundo Blvd., Hawthorne, California 90250 USA • Ph +1 424 675 3300 • Fx +1 424 675 3400 • techsupport@uninetimaging.com • www.uninetimaging.com
© 2009 UniNet Imaging Inc. All trademark names and artwork are property of their respective owners. Product brand names mentioned are intended to show compatibility only. UniNet Imaging does not warrant downloaded information.
UNINET IMAGING INC. • • BROTHERCARTUCHO DE TONERDISASSEMBLINGTHE P1006 CARTRIDGE
                          UNINET IMAGING INC.
                                     REMANUFACTURADO DEL 1240/1650 • • HP LASERJET SERIE TONER CARTRIDGE
                                                   BROTHER 1240/1650      ASSEMBLING THE TONER


                                                 27. Con el resorte de la tapa del OPC tal como se muestra montar el lateral.

                                                                  Levantar el extremo del resorte para fijarlo a la cavidad.


                       28. Levantar el extremo del resorte para fijarlo a la tapa de OPC como se muestra. Fijar el tornillo a la tapa.


  3232 West El Segundo Blvd., Hawthorne, California 90250 USA • Ph +1 424 675 3300 • Fx +1 424 675 3400 • techsupport@uninetimaging.com • www.uninetimaging.com
© 2009 UniNet Imaging Inc. All trademark names and artwork are property of their respective owners. Product brand names mentioned are intended to show compatibility only. UniNet Imaging does not warrant downloaded information.
UNINET IMAGING INC. • • BROTHERCARTUCHO DE TONERDISASSEMBLINGTHE P1006 CARTRIDGE
                          UNINET IMAGING INC.
                                     REMANUFACTURADO DEL 1240/1650 • • HP LASERJET SERIE TONER CARTRIDGE
                                                   BROTHER 1240/1650      ASSEMBLING THE TONER


      29. Reemplazar el chip.


      DATOS DE DEFECTOS REPETITIVOS
      OPC                 75mm
      Rodillo Magnético   31mm
      PCR                 27mm

      IMPRIMIR PAGINA DE PRUEBA
      1. Se efectúan a través del menú de la P1006.
      2. Acceder al Menú de Preferencias de Impresión, luego Servicio y finalmente Páginas de Información.
      3. Muestra tres páginas que se pueden seleccionar: la Demo, la de Configuraciones y la de Estado de Suministros.

      PASANDO LA PÁGINA DE LIMPIEZA
      Las hojas de limpieza para estos modelos sólo pueden ser comandadas desde el menú de la impresora. HP recomienda que para
      obtener mejores resultados se utilice transparencias. Si una transparencia no está disponible, usar entonces papel para
      copiadora con superficie suave.

      1. Para efectuar la limpieza acceder a Preferencias.
      2. Pulsar en Valores de Dispositivo.
      3. Presionar Inicio.
      4. El ciclo de limpieza demora cerca de 2 minutos con la hoja arrancando y parando en forma programada.
      5. No apagar la impresora hasta que el trabajo haya concluido y la hoja haya pasado.

      LOCALIZACIÓN DE DEFECTOS EN LA IMPRESORA
      Tal como se observa en muchos modelos de bajo costo que aparecen en el mercado, esta serie de impresoras no poseen
      pantalla de LCD. Todos los códigos de error consisten en diferentes secuencias de dos luces de tablero. La información disponible
      de fábrica sobre interpretación de las secuencias es muy pobre y el manual de servicio es terrible.

      Luz Superior Intermitente:                               Tapa del cartucho abierta, No hay cartucho o existe una traba de papel.

      Ambas Luces Encendidas:                                  Error fatal, desconectar la impresora y desenchufar durante 30 minutos.
                                                               Si el error persiste significa que la impresora tiene un problema mayúsculo.
                                                               No hay información aún sobre cuales esos problemas podrán ser (el manual de servicio
                                                               completo no ha sido aún publicado por HP).

      Ambas Luces Intermitentes:                               La inicialización de la impresora está en progreso.


  3232 West El Segundo Blvd., Hawthorne, California 90250 USA • Ph +1 424 675 3300 • Fx +1 424 675 3400 • techsupport@uninetimaging.com • www.uninetimaging.com
© 2009 UniNet Imaging Inc. All trademark names and artwork are property of their respective owners. Product brand names mentioned are intended to show compatibility only. UniNet Imaging does not warrant downloaded information.

Más contenido relacionado

Destacado

ตยเค้าโครง
ตยเค้าโครงตยเค้าโครง
ตยเค้าโครงunyaparnss
 
Helbling Young Readers - The Mackay School
Helbling Young Readers  - The Mackay SchoolHelbling Young Readers  - The Mackay School
Helbling Young Readers - The Mackay SchoolMaría Yeomans
 
การสูญเสียดินแดงของไทย
การสูญเสียดินแดงของไทยการสูญเสียดินแดงของไทย
การสูญเสียดินแดงของไทยKamonchanok VrTen Poppy
 
ฉันเหมือนใคร
ฉันเหมือนใครฉันเหมือนใคร
ฉันเหมือนใครI-Gno Ice
 
HPAPI Capable CMOs & CRAMS in Emerging Regions
HPAPI Capable CMOs & CRAMS  in Emerging RegionsHPAPI Capable CMOs & CRAMS  in Emerging Regions
HPAPI Capable CMOs & CRAMS in Emerging RegionsDharamvir Singh
 
ใบงานที่ 7 เรื่อง โครงงานประเภท
ใบงานที่ 7 เรื่อง โครงงานประเภทใบงานที่ 7 เรื่อง โครงงานประเภท
ใบงานที่ 7 เรื่อง โครงงานประเภทSorpor 'eiei
 
เก็บคะแนนจำนวนตรรกยะอตรรกยะ
เก็บคะแนนจำนวนตรรกยะอตรรกยะเก็บคะแนนจำนวนตรรกยะอตรรกยะ
เก็บคะแนนจำนวนตรรกยะอตรรกยะLumyai Pirum
 
ใบงานสำรวจตัวเอง
ใบงานสำรวจตัวเองใบงานสำรวจตัวเอง
ใบงานสำรวจตัวเองFluofern
 

Destacado (17)

ตยเค้าโครง
ตยเค้าโครงตยเค้าโครง
ตยเค้าโครง
 
Helbling Young Readers - The Mackay School
Helbling Young Readers  - The Mackay SchoolHelbling Young Readers  - The Mackay School
Helbling Young Readers - The Mackay School
 
การสูญเสียดินแดงของไทย
การสูญเสียดินแดงของไทยการสูญเสียดินแดงของไทย
การสูญเสียดินแดงของไทย
 
Social o-net-m6-48
Social o-net-m6-48Social o-net-m6-48
Social o-net-m6-48
 
Tipsumon5 2 23
Tipsumon5 2 23Tipsumon5 2 23
Tipsumon5 2 23
 
ฉันในอดีตและปัจจุบัน 2
ฉันในอดีตและปัจจุบัน 2ฉันในอดีตและปัจจุบัน 2
ฉันในอดีตและปัจจุบัน 2
 
ฉันเหมือนใคร
ฉันเหมือนใครฉันเหมือนใคร
ฉันเหมือนใคร
 
Plano de aula blog
Plano de aula blogPlano de aula blog
Plano de aula blog
 
HPAPI Capable CMOs & CRAMS in Emerging Regions
HPAPI Capable CMOs & CRAMS  in Emerging RegionsHPAPI Capable CMOs & CRAMS  in Emerging Regions
HPAPI Capable CMOs & CRAMS in Emerging Regions
 
คณิต
คณิตคณิต
คณิต
 
ใบงานที่ 7 เรื่อง โครงงานประเภท
ใบงานที่ 7 เรื่อง โครงงานประเภทใบงานที่ 7 เรื่อง โครงงานประเภท
ใบงานที่ 7 เรื่อง โครงงานประเภท
 
K14
K14K14
K14
 
เก็บคะแนนจำนวนตรรกยะอตรรกยะ
เก็บคะแนนจำนวนตรรกยะอตรรกยะเก็บคะแนนจำนวนตรรกยะอตรรกยะ
เก็บคะแนนจำนวนตรรกยะอตรรกยะ
 
วาระเขต2
วาระเขต2วาระเขต2
วาระเขต2
 
ใบงานสำรวจตัวเอง
ใบงานสำรวจตัวเองใบงานสำรวจตัวเอง
ใบงานสำรวจตัวเอง
 
TRABAJO WORD
TRABAJO WORDTRABAJO WORD
TRABAJO WORD
 
Mt102 lekts5
Mt102 lekts5Mt102 lekts5
Mt102 lekts5
 

Similar a Manual de Recarga HP CB435A Espanhol.

Hp 1160 1320 espanhol
Hp 1160 1320 espanholHp 1160 1320 espanhol
Hp 1160 1320 espanholValejet
 
Manual de Recarga HP P2015 Espanhol.
Manual de Recarga HP P2015 Espanhol.Manual de Recarga HP P2015 Espanhol.
Manual de Recarga HP P2015 Espanhol.Valejet
 
Manual de Recarga HP CP1215 | 1518 Espanhol.
Manual de Recarga HP CP1215 | 1518 Espanhol.Manual de Recarga HP CP1215 | 1518 Espanhol.
Manual de Recarga HP CP1215 | 1518 Espanhol.Valejet
 
Manual de Recarga HP P3005 | M3027 | M3035 Espanhol.
Manual de Recarga HP P3005 | M3027 | M3035 Espanhol.Manual de Recarga HP P3005 | M3027 | M3035 Espanhol.
Manual de Recarga HP P3005 | M3027 | M3035 Espanhol.Valejet
 
Manual de Recarga Lexmark E120 Espanhol.
Manual de Recarga Lexmark E120 Espanhol.Manual de Recarga Lexmark E120 Espanhol.
Manual de Recarga Lexmark E120 Espanhol.Valejet
 
Manual de Recarga HP CP6015 Espanhol.
Manual de Recarga HP CP6015 Espanhol.Manual de Recarga HP CP6015 Espanhol.
Manual de Recarga HP CP6015 Espanhol.Valejet
 
Hp 3800 3600
Hp 3800 3600Hp 3800 3600
Hp 3800 3600Valejet
 
Brother tn 550 tn-580 espanhol
Brother tn 550 tn-580 espanholBrother tn 550 tn-580 espanhol
Brother tn 550 tn-580 espanholValejet
 
Manual de Recarga HP CP3525 Espanhol.
Manual de Recarga HP CP3525 Espanhol.Manual de Recarga HP CP3525 Espanhol.
Manual de Recarga HP CP3525 Espanhol.Valejet
 
Brother hl5300 series tn 650 espanhol
Brother hl5300 series tn 650 espanholBrother hl5300 series tn 650 espanhol
Brother hl5300 series tn 650 espanholValejet
 
Manual de Recarga HP P4015 | CC364 Espanhol.
Manual de Recarga HP P4015 | CC364 Espanhol.Manual de Recarga HP P4015 | CC364 Espanhol.
Manual de Recarga HP P4015 | CC364 Espanhol.Valejet
 
Brother hl2030 tn 350 espanhol
Brother hl2030 tn 350 espanholBrother hl2030 tn 350 espanhol
Brother hl2030 tn 350 espanholValejet
 
Hp 4600 espanhol
Hp 4600 espanholHp 4600 espanhol
Hp 4600 espanholValejet
 
Manual de Recarga Okidata C5500 | 6100 Espanhol
Manual de Recarga Okidata C5500 | 6100 EspanholManual de Recarga Okidata C5500 | 6100 Espanhol
Manual de Recarga Okidata C5500 | 6100 EspanholValejet
 
Manual de Recarga Lexmark E230 | E232 | X340 Espanhol
Manual de Recarga Lexmark E230 | E232 | X340 EspanholManual de Recarga Lexmark E230 | E232 | X340 Espanhol
Manual de Recarga Lexmark E230 | E232 | X340 EspanholValejet
 
Manual de Recarga Samsung CLP 610N | CLP 660N | CLP 610 CLP 660 Espanhol
Manual de Recarga Samsung CLP 610N | CLP 660N | CLP 610 CLP 660 EspanholManual de Recarga Samsung CLP 610N | CLP 660N | CLP 610 CLP 660 Espanhol
Manual de Recarga Samsung CLP 610N | CLP 660N | CLP 610 CLP 660 EspanholValejet
 

Similar a Manual de Recarga HP CB435A Espanhol. (20)

Hp 1160 1320 espanhol
Hp 1160 1320 espanholHp 1160 1320 espanhol
Hp 1160 1320 espanhol
 
Manual de Recarga HP P2015 Espanhol.
Manual de Recarga HP P2015 Espanhol.Manual de Recarga HP P2015 Espanhol.
Manual de Recarga HP P2015 Espanhol.
 
Manual de Recarga HP CP1215 | 1518 Espanhol.
Manual de Recarga HP CP1215 | 1518 Espanhol.Manual de Recarga HP CP1215 | 1518 Espanhol.
Manual de Recarga HP CP1215 | 1518 Espanhol.
 
Manual de Recarga HP P3005 | M3027 | M3035 Espanhol.
Manual de Recarga HP P3005 | M3027 | M3035 Espanhol.Manual de Recarga HP P3005 | M3027 | M3035 Espanhol.
Manual de Recarga HP P3005 | M3027 | M3035 Espanhol.
 
Manual de Recarga Lexmark E120 Espanhol.
Manual de Recarga Lexmark E120 Espanhol.Manual de Recarga Lexmark E120 Espanhol.
Manual de Recarga Lexmark E120 Espanhol.
 
Manual de Recarga HP CP6015 Espanhol.
Manual de Recarga HP CP6015 Espanhol.Manual de Recarga HP CP6015 Espanhol.
Manual de Recarga HP CP6015 Espanhol.
 
Hp 3800 3600
Hp 3800 3600Hp 3800 3600
Hp 3800 3600
 
Brother tn 550 tn-580 espanhol
Brother tn 550 tn-580 espanholBrother tn 550 tn-580 espanhol
Brother tn 550 tn-580 espanhol
 
Manual de Recarga HP CP3525 Espanhol.
Manual de Recarga HP CP3525 Espanhol.Manual de Recarga HP CP3525 Espanhol.
Manual de Recarga HP CP3525 Espanhol.
 
Brother hl5300 series tn 650 espanhol
Brother hl5300 series tn 650 espanholBrother hl5300 series tn 650 espanhol
Brother hl5300 series tn 650 espanhol
 
Manual de Recarga HP P4015 | CC364 Espanhol.
Manual de Recarga HP P4015 | CC364 Espanhol.Manual de Recarga HP P4015 | CC364 Espanhol.
Manual de Recarga HP P4015 | CC364 Espanhol.
 
Brother hl2030 tn 350 espanhol
Brother hl2030 tn 350 espanholBrother hl2030 tn 350 espanhol
Brother hl2030 tn 350 espanhol
 
Hp 4600 espanhol
Hp 4600 espanholHp 4600 espanhol
Hp 4600 espanhol
 
Manual de Recarga Okidata C5500 | 6100 Espanhol
Manual de Recarga Okidata C5500 | 6100 EspanholManual de Recarga Okidata C5500 | 6100 Espanhol
Manual de Recarga Okidata C5500 | 6100 Espanhol
 
Manual de Recarga Lexmark E230 | E232 | X340 Espanhol
Manual de Recarga Lexmark E230 | E232 | X340 EspanholManual de Recarga Lexmark E230 | E232 | X340 Espanhol
Manual de Recarga Lexmark E230 | E232 | X340 Espanhol
 
Manual de Recarga Samsung CLP 610N | CLP 660N | CLP 610 CLP 660 Espanhol
Manual de Recarga Samsung CLP 610N | CLP 660N | CLP 610 CLP 660 EspanholManual de Recarga Samsung CLP 610N | CLP 660N | CLP 610 CLP 660 Espanhol
Manual de Recarga Samsung CLP 610N | CLP 660N | CLP 610 CLP 660 Espanhol
 
Xerox dc212- 214
Xerox dc212- 214Xerox dc212- 214
Xerox dc212- 214
 
Blog impresoras
Blog impresorasBlog impresoras
Blog impresoras
 
Impresoras Laser.
 Impresoras Laser. Impresoras Laser.
Impresoras Laser.
 
Catalogo plumas 2013
Catalogo plumas 2013Catalogo plumas 2013
Catalogo plumas 2013
 

Más de Valejet

Manual de Recarga Xerox Phaser 6130 1320 106R01278
Manual de Recarga Xerox Phaser 6130 1320 106R01278Manual de Recarga Xerox Phaser 6130 1320 106R01278
Manual de Recarga Xerox Phaser 6130 1320 106R01278Valejet
 
Manual de Recarga Xerox Phaser 5400 13R495
Manual de Recarga Xerox Phaser 5400 13R495Manual de Recarga Xerox Phaser 5400 13R495
Manual de Recarga Xerox Phaser 5400 13R495Valejet
 
Manual de Recarga Xerox N24 N32 N40 113R173
Manual de Recarga Xerox N24 N32 N40 113R173Manual de Recarga Xerox N24 N32 N40 113R173
Manual de Recarga Xerox N24 N32 N40 113R173Valejet
 
Manual de Recarga Xerox 4118 6R1278
Manual de Recarga Xerox 4118 6R1278Manual de Recarga Xerox 4118 6R1278
Manual de Recarga Xerox 4118 6R1278Valejet
 
Manual de Recarga Sharp 1010 | 1020 | 1041 | 1200 | 1220 | 1250 | AL1000
Manual de Recarga Sharp  1010 | 1020 | 1041 | 1200 | 1220 | 1250 | AL1000Manual de Recarga Sharp  1010 | 1020 | 1041 | 1200 | 1220 | 1250 | AL1000
Manual de Recarga Sharp 1010 | 1020 | 1041 | 1200 | 1220 | 1250 | AL1000Valejet
 
Manual de Recarga Samsung 4725ELS | 4725F | 4725FN | SCX-4725
Manual de Recarga Samsung 4725ELS | 4725F | 4725FN | SCX-4725Manual de Recarga Samsung 4725ELS | 4725F | 4725FN | SCX-4725
Manual de Recarga Samsung 4725ELS | 4725F | 4725FN | SCX-4725Valejet
 
Manual de Recarga Samsung ML 1440 | ML 1450 | ML 1451 | ML 6040 | ML6060D6
Manual de Recarga Samsung ML 1440 | ML 1450 | ML 1451 | ML 6040 | ML6060D6Manual de Recarga Samsung ML 1440 | ML 1450 | ML 1451 | ML 6040 | ML6060D6
Manual de Recarga Samsung ML 1440 | ML 1450 | ML 1451 | ML 6040 | ML6060D6Valejet
 
Manual de Recarga Samsung 5050 | 5100 | 5500 | ML 5000
Manual de Recarga Samsung 5050 | 5100 | 5500 | ML 5000Manual de Recarga Samsung 5050 | 5100 | 5500 | ML 5000
Manual de Recarga Samsung 5050 | 5100 | 5500 | ML 5000Valejet
 
Manual de Recarga Samsung ML 1710 | SCX 4216 | SCX 4200 | SCX 4100
Manual de Recarga Samsung ML 1710 | SCX 4216 | SCX 4200 | SCX 4100Manual de Recarga Samsung ML 1710 | SCX 4216 | SCX 4200 | SCX 4100
Manual de Recarga Samsung ML 1710 | SCX 4216 | SCX 4200 | SCX 4100Valejet
 
Manual de Recarga Samsung ML 1650 | ML 1651N | ML1650D8
Manual de Recarga Samsung ML 1650 | ML 1651N | ML1650D8Manual de Recarga Samsung ML 1650 | ML 1651N | ML1650D8
Manual de Recarga Samsung ML 1650 | ML 1651N | ML1650D8Valejet
 
Manual de Recarga Samsung ML 1630 | SCX 4500
Manual de Recarga Samsung ML 1630 | SCX 4500Manual de Recarga Samsung ML 1630 | SCX 4500
Manual de Recarga Samsung ML 1630 | SCX 4500Valejet
 
Manual de Recarga Samsung ML 1210 | ML 1510 | ML 1610 | ML 1710 | ML 2010
Manual de Recarga Samsung ML 1210 | ML 1510 | ML 1610 | ML 1710 | ML 2010Manual de Recarga Samsung ML 1210 | ML 1510 | ML 1610 | ML 1710 | ML 2010
Manual de Recarga Samsung ML 1210 | ML 1510 | ML 1610 | ML 1710 | ML 2010Valejet
 
Manual de Recarga Samsung ML 2251N | ML 2251NP | ML 2251W | ML 2250
Manual de Recarga Samsung ML 2251N | ML 2251NP | ML 2251W | ML 2250Manual de Recarga Samsung ML 2251N | ML 2251NP | ML 2251W | ML 2250
Manual de Recarga Samsung ML 2251N | ML 2251NP | ML 2251W | ML 2250Valejet
 
Manual de Recarga Samsung CLP 600
Manual de Recarga Samsung CLP 600Manual de Recarga Samsung CLP 600
Manual de Recarga Samsung CLP 600Valejet
 
Manual de Recarga Samsung CLP 600 CLP 650
Manual de Recarga Samsung CLP 600 CLP 650Manual de Recarga Samsung CLP 600 CLP 650
Manual de Recarga Samsung CLP 600 CLP 650Valejet
 
Manual de Recarga Samsung CLP 500 CLP 550
Manual de Recarga Samsung CLP 500 CLP 550Manual de Recarga Samsung CLP 500 CLP 550
Manual de Recarga Samsung CLP 500 CLP 550Valejet
 
Manual de Recarga Ricoh Type 1135
Manual de Recarga Ricoh Type 1135Manual de Recarga Ricoh Type 1135
Manual de Recarga Ricoh Type 1135Valejet
 
Manual de Recarga Okidata C7000 | C7100 Espanhol
Manual de Recarga Okidata C7000 | C7100 EspanholManual de Recarga Okidata C7000 | C7100 Espanhol
Manual de Recarga Okidata C7000 | C7100 EspanholValejet
 
Manual de Recarga Okidata C5100 Espanhol
Manual de Recarga Okidata C5100 EspanholManual de Recarga Okidata C5100 Espanhol
Manual de Recarga Okidata C5100 EspanholValejet
 
Manual de Recarga Okidata C3400
Manual de Recarga Okidata C3400Manual de Recarga Okidata C3400
Manual de Recarga Okidata C3400Valejet
 

Más de Valejet (20)

Manual de Recarga Xerox Phaser 6130 1320 106R01278
Manual de Recarga Xerox Phaser 6130 1320 106R01278Manual de Recarga Xerox Phaser 6130 1320 106R01278
Manual de Recarga Xerox Phaser 6130 1320 106R01278
 
Manual de Recarga Xerox Phaser 5400 13R495
Manual de Recarga Xerox Phaser 5400 13R495Manual de Recarga Xerox Phaser 5400 13R495
Manual de Recarga Xerox Phaser 5400 13R495
 
Manual de Recarga Xerox N24 N32 N40 113R173
Manual de Recarga Xerox N24 N32 N40 113R173Manual de Recarga Xerox N24 N32 N40 113R173
Manual de Recarga Xerox N24 N32 N40 113R173
 
Manual de Recarga Xerox 4118 6R1278
Manual de Recarga Xerox 4118 6R1278Manual de Recarga Xerox 4118 6R1278
Manual de Recarga Xerox 4118 6R1278
 
Manual de Recarga Sharp 1010 | 1020 | 1041 | 1200 | 1220 | 1250 | AL1000
Manual de Recarga Sharp  1010 | 1020 | 1041 | 1200 | 1220 | 1250 | AL1000Manual de Recarga Sharp  1010 | 1020 | 1041 | 1200 | 1220 | 1250 | AL1000
Manual de Recarga Sharp 1010 | 1020 | 1041 | 1200 | 1220 | 1250 | AL1000
 
Manual de Recarga Samsung 4725ELS | 4725F | 4725FN | SCX-4725
Manual de Recarga Samsung 4725ELS | 4725F | 4725FN | SCX-4725Manual de Recarga Samsung 4725ELS | 4725F | 4725FN | SCX-4725
Manual de Recarga Samsung 4725ELS | 4725F | 4725FN | SCX-4725
 
Manual de Recarga Samsung ML 1440 | ML 1450 | ML 1451 | ML 6040 | ML6060D6
Manual de Recarga Samsung ML 1440 | ML 1450 | ML 1451 | ML 6040 | ML6060D6Manual de Recarga Samsung ML 1440 | ML 1450 | ML 1451 | ML 6040 | ML6060D6
Manual de Recarga Samsung ML 1440 | ML 1450 | ML 1451 | ML 6040 | ML6060D6
 
Manual de Recarga Samsung 5050 | 5100 | 5500 | ML 5000
Manual de Recarga Samsung 5050 | 5100 | 5500 | ML 5000Manual de Recarga Samsung 5050 | 5100 | 5500 | ML 5000
Manual de Recarga Samsung 5050 | 5100 | 5500 | ML 5000
 
Manual de Recarga Samsung ML 1710 | SCX 4216 | SCX 4200 | SCX 4100
Manual de Recarga Samsung ML 1710 | SCX 4216 | SCX 4200 | SCX 4100Manual de Recarga Samsung ML 1710 | SCX 4216 | SCX 4200 | SCX 4100
Manual de Recarga Samsung ML 1710 | SCX 4216 | SCX 4200 | SCX 4100
 
Manual de Recarga Samsung ML 1650 | ML 1651N | ML1650D8
Manual de Recarga Samsung ML 1650 | ML 1651N | ML1650D8Manual de Recarga Samsung ML 1650 | ML 1651N | ML1650D8
Manual de Recarga Samsung ML 1650 | ML 1651N | ML1650D8
 
Manual de Recarga Samsung ML 1630 | SCX 4500
Manual de Recarga Samsung ML 1630 | SCX 4500Manual de Recarga Samsung ML 1630 | SCX 4500
Manual de Recarga Samsung ML 1630 | SCX 4500
 
Manual de Recarga Samsung ML 1210 | ML 1510 | ML 1610 | ML 1710 | ML 2010
Manual de Recarga Samsung ML 1210 | ML 1510 | ML 1610 | ML 1710 | ML 2010Manual de Recarga Samsung ML 1210 | ML 1510 | ML 1610 | ML 1710 | ML 2010
Manual de Recarga Samsung ML 1210 | ML 1510 | ML 1610 | ML 1710 | ML 2010
 
Manual de Recarga Samsung ML 2251N | ML 2251NP | ML 2251W | ML 2250
Manual de Recarga Samsung ML 2251N | ML 2251NP | ML 2251W | ML 2250Manual de Recarga Samsung ML 2251N | ML 2251NP | ML 2251W | ML 2250
Manual de Recarga Samsung ML 2251N | ML 2251NP | ML 2251W | ML 2250
 
Manual de Recarga Samsung CLP 600
Manual de Recarga Samsung CLP 600Manual de Recarga Samsung CLP 600
Manual de Recarga Samsung CLP 600
 
Manual de Recarga Samsung CLP 600 CLP 650
Manual de Recarga Samsung CLP 600 CLP 650Manual de Recarga Samsung CLP 600 CLP 650
Manual de Recarga Samsung CLP 600 CLP 650
 
Manual de Recarga Samsung CLP 500 CLP 550
Manual de Recarga Samsung CLP 500 CLP 550Manual de Recarga Samsung CLP 500 CLP 550
Manual de Recarga Samsung CLP 500 CLP 550
 
Manual de Recarga Ricoh Type 1135
Manual de Recarga Ricoh Type 1135Manual de Recarga Ricoh Type 1135
Manual de Recarga Ricoh Type 1135
 
Manual de Recarga Okidata C7000 | C7100 Espanhol
Manual de Recarga Okidata C7000 | C7100 EspanholManual de Recarga Okidata C7000 | C7100 Espanhol
Manual de Recarga Okidata C7000 | C7100 Espanhol
 
Manual de Recarga Okidata C5100 Espanhol
Manual de Recarga Okidata C5100 EspanholManual de Recarga Okidata C5100 Espanhol
Manual de Recarga Okidata C5100 Espanhol
 
Manual de Recarga Okidata C3400
Manual de Recarga Okidata C3400Manual de Recarga Okidata C3400
Manual de Recarga Okidata C3400
 

Último

Trabajo Mas Completo De Excel en clase tecnología
Trabajo Mas Completo De Excel en clase tecnologíaTrabajo Mas Completo De Excel en clase tecnología
Trabajo Mas Completo De Excel en clase tecnologíassuserf18419
 
La era de la educación digital y sus desafios
La era de la educación digital y sus desafiosLa era de la educación digital y sus desafios
La era de la educación digital y sus desafiosFundación YOD YOD
 
Global Azure Lima 2024 - Integración de Datos con Microsoft Fabric
Global Azure Lima 2024 - Integración de Datos con Microsoft FabricGlobal Azure Lima 2024 - Integración de Datos con Microsoft Fabric
Global Azure Lima 2024 - Integración de Datos con Microsoft FabricKeyla Dolores Méndez
 
Redes direccionamiento y subredes ipv4 2024 .pdf
Redes direccionamiento y subredes ipv4 2024 .pdfRedes direccionamiento y subredes ipv4 2024 .pdf
Redes direccionamiento y subredes ipv4 2024 .pdfsoporteupcology
 
POWER POINT YUCRAElabore una PRESENTACIÓN CORTA sobre el video película: La C...
POWER POINT YUCRAElabore una PRESENTACIÓN CORTA sobre el video película: La C...POWER POINT YUCRAElabore una PRESENTACIÓN CORTA sobre el video película: La C...
POWER POINT YUCRAElabore una PRESENTACIÓN CORTA sobre el video película: La C...silviayucra2
 
PARTES DE UN OSCILOSCOPIO ANALOGICO .pdf
PARTES DE UN OSCILOSCOPIO ANALOGICO .pdfPARTES DE UN OSCILOSCOPIO ANALOGICO .pdf
PARTES DE UN OSCILOSCOPIO ANALOGICO .pdfSergioMendoza354770
 
KELA Presentacion Costa Rica 2024 - evento Protégeles
KELA Presentacion Costa Rica 2024 - evento ProtégelesKELA Presentacion Costa Rica 2024 - evento Protégeles
KELA Presentacion Costa Rica 2024 - evento ProtégelesFundación YOD YOD
 
Hernandez_Hernandez_Practica web de la sesion 12.pptx
Hernandez_Hernandez_Practica web de la sesion 12.pptxHernandez_Hernandez_Practica web de la sesion 12.pptx
Hernandez_Hernandez_Practica web de la sesion 12.pptxJOSEMANUELHERNANDEZH11
 
Instrumentación Hoy_ INTERPRETAR EL DIAGRAMA UNIFILAR GENERAL DE UNA PLANTA I...
Instrumentación Hoy_ INTERPRETAR EL DIAGRAMA UNIFILAR GENERAL DE UNA PLANTA I...Instrumentación Hoy_ INTERPRETAR EL DIAGRAMA UNIFILAR GENERAL DE UNA PLANTA I...
Instrumentación Hoy_ INTERPRETAR EL DIAGRAMA UNIFILAR GENERAL DE UNA PLANTA I...AlanCedillo9
 
CLASE DE TECNOLOGIA E INFORMATICA PRIMARIA
CLASE  DE TECNOLOGIA E INFORMATICA PRIMARIACLASE  DE TECNOLOGIA E INFORMATICA PRIMARIA
CLASE DE TECNOLOGIA E INFORMATICA PRIMARIAWilbisVega
 
trabajotecologiaisabella-240424003133-8f126965.pdf
trabajotecologiaisabella-240424003133-8f126965.pdftrabajotecologiaisabella-240424003133-8f126965.pdf
trabajotecologiaisabella-240424003133-8f126965.pdfIsabellaMontaomurill
 
SalmorejoTech 2024 - Spring Boot <3 Testcontainers
SalmorejoTech 2024 - Spring Boot <3 TestcontainersSalmorejoTech 2024 - Spring Boot <3 Testcontainers
SalmorejoTech 2024 - Spring Boot <3 TestcontainersIván López Martín
 
Plan de aula informatica segundo periodo.docx
Plan de aula informatica segundo periodo.docxPlan de aula informatica segundo periodo.docx
Plan de aula informatica segundo periodo.docxpabonheidy28
 
guía de registro de slideshare por Brayan Joseph
guía de registro de slideshare por Brayan Josephguía de registro de slideshare por Brayan Joseph
guía de registro de slideshare por Brayan JosephBRAYANJOSEPHPEREZGOM
 
ATAJOS DE WINDOWS. Los diferentes atajos para utilizar en windows y ser más e...
ATAJOS DE WINDOWS. Los diferentes atajos para utilizar en windows y ser más e...ATAJOS DE WINDOWS. Los diferentes atajos para utilizar en windows y ser más e...
ATAJOS DE WINDOWS. Los diferentes atajos para utilizar en windows y ser más e...FacuMeza2
 
EPA-pdf resultado da prova presencial Uninove
EPA-pdf resultado da prova presencial UninoveEPA-pdf resultado da prova presencial Uninove
EPA-pdf resultado da prova presencial UninoveFagnerLisboa3
 
Proyecto integrador. Las TIC en la sociedad S4.pptx
Proyecto integrador. Las TIC en la sociedad S4.pptxProyecto integrador. Las TIC en la sociedad S4.pptx
Proyecto integrador. Las TIC en la sociedad S4.pptx241521559
 
Cortes-24-de-abril-Tungurahua-3 año 2024
Cortes-24-de-abril-Tungurahua-3 año 2024Cortes-24-de-abril-Tungurahua-3 año 2024
Cortes-24-de-abril-Tungurahua-3 año 2024GiovanniJavierHidalg
 
International Women's Day Sucre 2024 (IWD)
International Women's Day Sucre 2024 (IWD)International Women's Day Sucre 2024 (IWD)
International Women's Day Sucre 2024 (IWD)GDGSucre
 

Último (19)

Trabajo Mas Completo De Excel en clase tecnología
Trabajo Mas Completo De Excel en clase tecnologíaTrabajo Mas Completo De Excel en clase tecnología
Trabajo Mas Completo De Excel en clase tecnología
 
La era de la educación digital y sus desafios
La era de la educación digital y sus desafiosLa era de la educación digital y sus desafios
La era de la educación digital y sus desafios
 
Global Azure Lima 2024 - Integración de Datos con Microsoft Fabric
Global Azure Lima 2024 - Integración de Datos con Microsoft FabricGlobal Azure Lima 2024 - Integración de Datos con Microsoft Fabric
Global Azure Lima 2024 - Integración de Datos con Microsoft Fabric
 
Redes direccionamiento y subredes ipv4 2024 .pdf
Redes direccionamiento y subredes ipv4 2024 .pdfRedes direccionamiento y subredes ipv4 2024 .pdf
Redes direccionamiento y subredes ipv4 2024 .pdf
 
POWER POINT YUCRAElabore una PRESENTACIÓN CORTA sobre el video película: La C...
POWER POINT YUCRAElabore una PRESENTACIÓN CORTA sobre el video película: La C...POWER POINT YUCRAElabore una PRESENTACIÓN CORTA sobre el video película: La C...
POWER POINT YUCRAElabore una PRESENTACIÓN CORTA sobre el video película: La C...
 
PARTES DE UN OSCILOSCOPIO ANALOGICO .pdf
PARTES DE UN OSCILOSCOPIO ANALOGICO .pdfPARTES DE UN OSCILOSCOPIO ANALOGICO .pdf
PARTES DE UN OSCILOSCOPIO ANALOGICO .pdf
 
KELA Presentacion Costa Rica 2024 - evento Protégeles
KELA Presentacion Costa Rica 2024 - evento ProtégelesKELA Presentacion Costa Rica 2024 - evento Protégeles
KELA Presentacion Costa Rica 2024 - evento Protégeles
 
Hernandez_Hernandez_Practica web de la sesion 12.pptx
Hernandez_Hernandez_Practica web de la sesion 12.pptxHernandez_Hernandez_Practica web de la sesion 12.pptx
Hernandez_Hernandez_Practica web de la sesion 12.pptx
 
Instrumentación Hoy_ INTERPRETAR EL DIAGRAMA UNIFILAR GENERAL DE UNA PLANTA I...
Instrumentación Hoy_ INTERPRETAR EL DIAGRAMA UNIFILAR GENERAL DE UNA PLANTA I...Instrumentación Hoy_ INTERPRETAR EL DIAGRAMA UNIFILAR GENERAL DE UNA PLANTA I...
Instrumentación Hoy_ INTERPRETAR EL DIAGRAMA UNIFILAR GENERAL DE UNA PLANTA I...
 
CLASE DE TECNOLOGIA E INFORMATICA PRIMARIA
CLASE  DE TECNOLOGIA E INFORMATICA PRIMARIACLASE  DE TECNOLOGIA E INFORMATICA PRIMARIA
CLASE DE TECNOLOGIA E INFORMATICA PRIMARIA
 
trabajotecologiaisabella-240424003133-8f126965.pdf
trabajotecologiaisabella-240424003133-8f126965.pdftrabajotecologiaisabella-240424003133-8f126965.pdf
trabajotecologiaisabella-240424003133-8f126965.pdf
 
SalmorejoTech 2024 - Spring Boot <3 Testcontainers
SalmorejoTech 2024 - Spring Boot <3 TestcontainersSalmorejoTech 2024 - Spring Boot <3 Testcontainers
SalmorejoTech 2024 - Spring Boot <3 Testcontainers
 
Plan de aula informatica segundo periodo.docx
Plan de aula informatica segundo periodo.docxPlan de aula informatica segundo periodo.docx
Plan de aula informatica segundo periodo.docx
 
guía de registro de slideshare por Brayan Joseph
guía de registro de slideshare por Brayan Josephguía de registro de slideshare por Brayan Joseph
guía de registro de slideshare por Brayan Joseph
 
ATAJOS DE WINDOWS. Los diferentes atajos para utilizar en windows y ser más e...
ATAJOS DE WINDOWS. Los diferentes atajos para utilizar en windows y ser más e...ATAJOS DE WINDOWS. Los diferentes atajos para utilizar en windows y ser más e...
ATAJOS DE WINDOWS. Los diferentes atajos para utilizar en windows y ser más e...
 
EPA-pdf resultado da prova presencial Uninove
EPA-pdf resultado da prova presencial UninoveEPA-pdf resultado da prova presencial Uninove
EPA-pdf resultado da prova presencial Uninove
 
Proyecto integrador. Las TIC en la sociedad S4.pptx
Proyecto integrador. Las TIC en la sociedad S4.pptxProyecto integrador. Las TIC en la sociedad S4.pptx
Proyecto integrador. Las TIC en la sociedad S4.pptx
 
Cortes-24-de-abril-Tungurahua-3 año 2024
Cortes-24-de-abril-Tungurahua-3 año 2024Cortes-24-de-abril-Tungurahua-3 año 2024
Cortes-24-de-abril-Tungurahua-3 año 2024
 
International Women's Day Sucre 2024 (IWD)
International Women's Day Sucre 2024 (IWD)International Women's Day Sucre 2024 (IWD)
International Women's Day Sucre 2024 (IWD)
 

Manual de Recarga HP CB435A Espanhol.

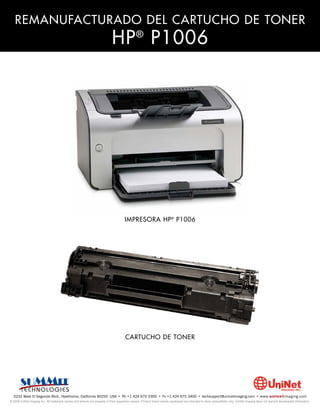
  • 1. REMANUFACTURADO DEL CARTUCHO DE TONER HP P1006 ® IMPRESORA HP ® P1006 CARTUCHO DE TONER 3232 West El Segundo Blvd., Hawthorne, California 90250 USA • Ph +1 424 675 3300 • Fx +1 424 675 3400 • techsupport@uninetimaging.com • www.uninetimaging.com © 2009 UniNet Imaging Inc. All trademark names and artwork are property of their respective owners. Product brand names mentioned are intended to show compatibility only. UniNet Imaging does not warrant downloaded information.
  • 2. UNINET IMAGING INC. • • BROTHERCARTUCHO DE TONERDISASSEMBLINGTHE P1006 CARTRIDGE UNINET IMAGING INC. REMANUFACTURADO DEL 1240/1650 • • HP LASERJET SERIE TONER CARTRIDGE BROTHER 1240/1650 ASSEMBLING THE TONER REMANUFACTURADO DEL CARTUCHO DE TONER HP LASERJET SERIE P1006 (REFERENCIA CB435A) Por Mike Josiah La impresora HP1006 fue lanzada al mercado en noviembre de 2007 por Hewlett Packard. Esta serie de impresoras están construidas adoptando el motor Canon de 17 páginas por minuto y 600 dpi reales. Su cartucho referencia CB435A está especificado para 1500 páginas utilizando chip para controlar las funciones de tóner y físicamente tiene la apariencia de un Q2612A (1012) pequeño, pero con substanciales diferencias. La impresora en sí ocupa un pequeño espacio de mesa que la hace atractiva para oficina y hogar. Imprime su primera página en 8,5 segundos a partir del estado de espera en la modalidad de Ahorro de Energía y posee una memoria fija y no expandible de 8Mb. El volumen de impresiones recomendable de este modelo es de 250-1500 pero el ciclo máximo de trabajo es de 5.000 páginas mensuales. Contrario a otros diseños de impresoras pequeñas, este modelo posee un detalle agradable al utilizar una bandeja de papel de 150 hojas. El sistema de unión de las dos secciones de este cartucho es completamente nuevo. La buena noticia es que no es necesario agujerear el cartucho para acceder a los pernos de desmontaje. El tóner que utiliza es también nuevo. HP indica que el tóner ahora posee “partículas de forma esférica”. Uninet está actualmente investigando si el tóner es en realidad químico o es convencional pero térmicamente reformado. La percepción es que se trata de un tóner redondeado térmicamente pero hasta que hayan concluido los trabajos de investigación no lo sabremos con seguridad. Además de la novedad del tóner, el chip posee “inteligencia adicional” para ayudar en el pedido de reemplazo cuando el cartucho se encuentra bajo de tóner. Nuevamente, estamos investigando este aspecto en estos momentos pero cabe indicar que durante las pruebas de rendimiento se efectuaron 5 recargas de un mismo cartucho sin que indique falta de tóner quedando demostrado que el chip no interrumpe la operación de la impresora. Esto es indicativo que las funciones de tóner bajo no funcionan. La impresora se entrega nueva con un cartucho “Estárter” de 700 páginas a 5% de cobertura. Significa esto que los clientes estarán rápidamente en la búsqueda de soluciones. El cartucho estárter y el reemplazo 35A (1500 páginas) son similares excepto que dimensionalmente las cavidad de carga y desperdicio del cartucho de alto rendimiento son algo mayores. Es posible entonces no tener la capacidad necesaria en el estárter para convertirlo en un cartucho de alto rendimiento y esto puede ser crítico particularmente en lo referente al desperdicio si el tóner compatible no llega a poseer una eficiencia óptima. El localizador de defectos de cartucho como también las instrucciones para generar una página de prueba y de limpieza junto a algunos datos de impresora serán explicados al final de este artículo. SUMINISTROS REQUERIDOS HERRAMIENTAS 1. Tóner para HP P1005/1006 1. Destornillador Phillips mediano 2. Nuevo cilindro OPC 2. Destornillador plano pequeño 3. Lámina de Limpieza (única para esta serie) 3. Pinzas de puntas 4. Lámina dosificadora (única para esta serie) 4. Juego de destornilladores de relojero 5. Rodillo Magnético (único para esta serie) 6. Sello (único para esta serie) 7. Q-tips o copitos de algodón 8. Alcohol Isopropílico 9. Polvo lubrificante Methuselah 10. Grasa Conductiva 3232 West El Segundo Blvd., Hawthorne, California 90250 USA • Ph +1 424 675 3300 • Fx +1 424 675 3400 • techsupport@uninetimaging.com • www.uninetimaging.com © 2009 UniNet Imaging Inc. All trademark names and artwork are property of their respective owners. Product brand names mentioned are intended to show compatibility only. UniNet Imaging does not warrant downloaded information.
  • 3. UNINET IMAGING INC. • • BROTHERCARTUCHO DE TONERDISASSEMBLINGTHE P1006 CARTRIDGE UNINET IMAGING INC. REMANUFACTURADO DEL 1240/1650 • • HP LASERJET SERIE TONER CARTRIDGE BROTHER 1240/1650 ASSEMBLING THE TONER Existe una gran similitud entre este cartucho CB435A y el CB436A utilizado en el modelo P1505 pero en principio no son intercambiables. Cabe sí considerar que estas instrucciones podrán ser utilizadas para desmontar también el cartucho del modelo mencionado. A B Las comparaciones de las fotos tomadas de ambos cartuchos muestran con las flechas las diferencias básicas de construcción, particularmente en sus laterales donde aparecen los puntos críticos de calce en la cavidad de las respectivas impresoras. Las figuras A y B muestran la parte inferior de los cartuchos 35A y 36A respectivamente. C D Las figuras C y D muestran la parte superior de los cartuchos 35A y 36A respectivamente. 3232 West El Segundo Blvd., Hawthorne, California 90250 USA • Ph +1 424 675 3300 • Fx +1 424 675 3400 • techsupport@uninetimaging.com • www.uninetimaging.com © 2009 UniNet Imaging Inc. All trademark names and artwork are property of their respective owners. Product brand names mentioned are intended to show compatibility only. UniNet Imaging does not warrant downloaded information.
  • 4. UNINET IMAGING INC. • • BROTHERCARTUCHO DE TONERDISASSEMBLINGTHE P1006 CARTRIDGE UNINET IMAGING INC. REMANUFACTURADO DEL 1240/1650 • • HP LASERJET SERIE TONER CARTRIDGE BROTHER 1240/1650 ASSEMBLING THE TONER E F Las figuras E y F muestran la parte izquierda de los cartuchos 35A y 36A respectivamente. G H Las figuras G y H muestran la parte derecha de los cartuchos 35A y 36A respectivamente. 3232 West El Segundo Blvd., Hawthorne, California 90250 USA • Ph +1 424 675 3300 • Fx +1 424 675 3400 • techsupport@uninetimaging.com • www.uninetimaging.com © 2009 UniNet Imaging Inc. All trademark names and artwork are property of their respective owners. Product brand names mentioned are intended to show compatibility only. UniNet Imaging does not warrant downloaded information.
  • 5. UNINET IMAGING INC. • • BROTHERCARTUCHO DE TONERDISASSEMBLINGTHE P1006 CARTRIDGE UNINET IMAGING INC. REMANUFACTURADO DEL 1240/1650 • • HP LASERJET SERIE TONER CARTRIDGE BROTHER 1240/1650 ASSEMBLING THE TONER 1. Con la manija orientada hacia Ud. sacar el tornillo y la tapa lateral de la derecha. Tenga cuidado con el resorte del obturador del cilindro. Sacarlo junto con la tapa lateral. 2. Con la pinza de puntas desmontar ambos resortes de tensión de la cavidad. 3232 West El Segundo Blvd., Hawthorne, California 90250 USA • Ph +1 424 675 3300 • Fx +1 424 675 3400 • techsupport@uninetimaging.com • www.uninetimaging.com © 2009 UniNet Imaging Inc. All trademark names and artwork are property of their respective owners. Product brand names mentioned are intended to show compatibility only. UniNet Imaging does not warrant downloaded information.
  • 6. UNINET IMAGING INC. • • BROTHERCARTUCHO DE TONERDISASSEMBLINGTHE P1006 CARTRIDGE UNINET IMAGING INC. REMANUFACTURADO DEL 1240/1650 • • HP LASERJET SERIE TONER CARTRIDGE BROTHER 1240/1650 ASSEMBLING THE TONER 3. Deslizar la sección de cavidad de desperdicios/OPC hacia la izquierda. Separar las dos mitades. 4. En la sección cavidad de desperdicios/OPC, levantar el OPC 5. Extraer el PCR y limpiarlo con su limpiador estándar de PCR. desde el lado engranaje. Girar levemente y retirar de la cavidad. 3232 West El Segundo Blvd., Hawthorne, California 90250 USA • Ph +1 424 675 3300 • Fx +1 424 675 3400 • techsupport@uninetimaging.com • www.uninetimaging.com © 2009 UniNet Imaging Inc. All trademark names and artwork are property of their respective owners. Product brand names mentioned are intended to show compatibility only. UniNet Imaging does not warrant downloaded information.
  • 7. UNINET IMAGING INC. • • BROTHERCARTUCHO DE TONERDISASSEMBLINGTHE P1006 CARTRIDGE UNINET IMAGING INC. REMANUFACTURADO DEL 1240/1650 • • HP LASERJET SERIE TONER CARTRIDGE BROTHER 1240/1650 ASSEMBLING THE TONER 6. Retirar los dos tornillos y la Cuchilla de Limpieza. 7. Limpiar todo vestigio de tóner usado de la cavidad teniendo sumo cuidado en no dañar la lámina de recuperación ubicada en proximidad de la cuchilla de limpieza. Si la lámina es doblada o marcada de cualquier manera, el cartucho sufrirá pérdidas. Asegurarse que los sellos de espuma de la lámina de limpieza están limpios. 3232 West El Segundo Blvd., Hawthorne, California 90250 USA • Ph +1 424 675 3300 • Fx +1 424 675 3400 • techsupport@uninetimaging.com • www.uninetimaging.com © 2009 UniNet Imaging Inc. All trademark names and artwork are property of their respective owners. Product brand names mentioned are intended to show compatibility only. UniNet Imaging does not warrant downloaded information.
  • 8. UNINET IMAGING INC. • • BROTHERCARTUCHO DE TONERDISASSEMBLINGTHE P1006 CARTRIDGE UNINET IMAGING INC. REMANUFACTURADO DEL 1240/1650 • • HP LASERJET SERIE TONER CARTRIDGE BROTHER 1240/1650 ASSEMBLING THE TONER 8. Aplicar a la cuchilla de limpieza nueva o reciclada polvo 9. Instalar el PCR limpio. Aplicar una leve cantidad de grasa lubricante Methuselah. Instalar la cuchilla con sus dos lubricante en el lado de asiento negro del eje. Sólo una muy tornillos. pequeña cantidad es suficiente. 10. Aplicar también una pequeña cantidad de grasa 11. Instalar el OPC nuevo o el original limpio lado maza conductiva al eje metálico del OPC. primero. Colocar aparte la sección cavidad de desperdicio/OPC. 3232 West El Segundo Blvd., Hawthorne, California 90250 USA • Ph +1 424 675 3300 • Fx +1 424 675 3400 • techsupport@uninetimaging.com • www.uninetimaging.com © 2009 UniNet Imaging Inc. All trademark names and artwork are property of their respective owners. Product brand names mentioned are intended to show compatibility only. UniNet Imaging does not warrant downloaded information.
  • 9. UNINET IMAGING INC. • • BROTHERCARTUCHO DE TONERDISASSEMBLINGTHE P1006 CARTRIDGE UNINET IMAGING INC. REMANUFACTURADO DEL 1240/1650 • • HP LASERJET SERIE TONER CARTRIDGE BROTHER 1240/1650 ASSEMBLING THE TONER 12. Tomando ahora la cavidad de tóner lado derecho, sacar los dos tornillos y lateral. Notar que ambos tornillos poseen arandelas de seguridad. 13. Retirar los engranajes de la cavidad como se nuestra, dejando el engranaje barreno en su lugar. 3232 West El Segundo Blvd., Hawthorne, California 90250 USA • Ph +1 424 675 3300 • Fx +1 424 675 3400 • techsupport@uninetimaging.com • www.uninetimaging.com © 2009 UniNet Imaging Inc. All trademark names and artwork are property of their respective owners. Product brand names mentioned are intended to show compatibility only. UniNet Imaging does not warrant downloaded information.
  • 10. UNINET IMAGING INC. • • BROTHERCARTUCHO DE TONERDISASSEMBLINGTHE P1006 CARTRIDGE UNINET IMAGING INC. REMANUFACTURADO DEL 1240/1650 • • HP LASERJET SERIE TONER CARTRIDGE BROTHER 1240/1650 ASSEMBLING THE TONER 14. Retirar el tornillo único y final del lado opuesto. 15. Retirar el conjunto de rodillo magnético. Ser precavido con los bujes pues son frágiles. 3232 West El Segundo Blvd., Hawthorne, California 90250 USA • Ph +1 424 675 3300 • Fx +1 424 675 3400 • techsupport@uninetimaging.com • www.uninetimaging.com © 2009 UniNet Imaging Inc. All trademark names and artwork are property of their respective owners. Product brand names mentioned are intended to show compatibility only. UniNet Imaging does not warrant downloaded information.
  • 11. UNINET IMAGING INC. • • BROTHERCARTUCHO DE TONERDISASSEMBLINGTHE P1006 CARTRIDGE UNINET IMAGING INC. REMANUFACTURADO DEL 1240/1650 • • HP LASERJET SERIE TONER CARTRIDGE BROTHER 1240/1650 ASSEMBLING THE TONER 16. Retirar la cuchilla dosificadora y sus dos tornillos. 17. Aspirar o limpiar con aire comprimido cualquier resto de tóner que haya quedado en la cavidad. Asegurarse que el rodillo magnético y los sellos de la cuchilla dosificadora están también limpios. 18. Llenar la cavidad con tóner P1005/P1006. 3232 West El Segundo Blvd., Hawthorne, California 90250 USA • Ph +1 424 675 3300 • Fx +1 424 675 3400 • techsupport@uninetimaging.com • www.uninetimaging.com © 2009 UniNet Imaging Inc. All trademark names and artwork are property of their respective owners. Product brand names mentioned are intended to show compatibility only. UniNet Imaging does not warrant downloaded information.
  • 12. UNINET IMAGING INC. • • BROTHERCARTUCHO DE TONERDISASSEMBLINGTHE P1006 CARTRIDGE UNINET IMAGING INC. REMANUFACTURADO DEL 1240/1650 • • HP LASERJET SERIE TONER CARTRIDGE BROTHER 1240/1650 ASSEMBLING THE TONER 19. Cuando se disponga del sello autoadhesivo, retirar el tapón del sello e instalar el mismo. Traer la cola del sello a través del orificio. Instalar el tapón. 20. Instalar el lateral izquierdo con sus tornillos. Poner cuidado en el correcto montaje del contacto de la tapa. 3232 West El Segundo Blvd., Hawthorne, California 90250 USA • Ph +1 424 675 3300 • Fx +1 424 675 3400 • techsupport@uninetimaging.com • www.uninetimaging.com © 2009 UniNet Imaging Inc. All trademark names and artwork are property of their respective owners. Product brand names mentioned are intended to show compatibility only. UniNet Imaging does not warrant downloaded information.
  • 13. UNINET IMAGING INC. • • BROTHERCARTUCHO DE TONERDISASSEMBLINGTHE P1006 CARTRIDGE UNINET IMAGING INC. REMANUFACTURADO DEL 1240/1650 • • HP LASERJET SERIE TONER CARTRIDGE BROTHER 1240/1650 ASSEMBLING THE TONER 21. Montar la cuchilla dosificadora con sus dos tornillos. 22. Montar el rodillo magnético lado buje negro primero. Girar el rodillo hasta que calce el chanfleado del eje en su lugar. 23. A continuación montar los engranajes como se muestra. 24. Montar la tapa lateral y tornillos. 3232 West El Segundo Blvd., Hawthorne, California 90250 USA • Ph +1 424 675 3300 • Fx +1 424 675 3400 • techsupport@uninetimaging.com • www.uninetimaging.com © 2009 UniNet Imaging Inc. All trademark names and artwork are property of their respective owners. Product brand names mentioned are intended to show compatibility only. UniNet Imaging does not warrant downloaded information.
  • 14. UNINET IMAGING INC. • • BROTHERCARTUCHO DE TONERDISASSEMBLINGTHE P1006 CARTRIDGE UNINET IMAGING INC. REMANUFACTURADO DEL 1240/1650 • • HP LASERJET SERIE TONER CARTRIDGE BROTHER 1240/1650 ASSEMBLING THE TONER 25. Ubicar la cavidad de desperdicios y OPC sobre la cavidad de tóner. Deslizar sobre la misma para que los pernos de la articulación entren en sus respectivos agujeros. 26. Fijar los resortes de tensión de la cavidad de tóner en su lugar. 3232 West El Segundo Blvd., Hawthorne, California 90250 USA • Ph +1 424 675 3300 • Fx +1 424 675 3400 • techsupport@uninetimaging.com • www.uninetimaging.com © 2009 UniNet Imaging Inc. All trademark names and artwork are property of their respective owners. Product brand names mentioned are intended to show compatibility only. UniNet Imaging does not warrant downloaded information.
  • 15. UNINET IMAGING INC. • • BROTHERCARTUCHO DE TONERDISASSEMBLINGTHE P1006 CARTRIDGE UNINET IMAGING INC. REMANUFACTURADO DEL 1240/1650 • • HP LASERJET SERIE TONER CARTRIDGE BROTHER 1240/1650 ASSEMBLING THE TONER 27. Con el resorte de la tapa del OPC tal como se muestra montar el lateral. Levantar el extremo del resorte para fijarlo a la cavidad. 28. Levantar el extremo del resorte para fijarlo a la tapa de OPC como se muestra. Fijar el tornillo a la tapa. 3232 West El Segundo Blvd., Hawthorne, California 90250 USA • Ph +1 424 675 3300 • Fx +1 424 675 3400 • techsupport@uninetimaging.com • www.uninetimaging.com © 2009 UniNet Imaging Inc. All trademark names and artwork are property of their respective owners. Product brand names mentioned are intended to show compatibility only. UniNet Imaging does not warrant downloaded information.
  • 16. UNINET IMAGING INC. • • BROTHERCARTUCHO DE TONERDISASSEMBLINGTHE P1006 CARTRIDGE UNINET IMAGING INC. REMANUFACTURADO DEL 1240/1650 • • HP LASERJET SERIE TONER CARTRIDGE BROTHER 1240/1650 ASSEMBLING THE TONER 29. Reemplazar el chip. DATOS DE DEFECTOS REPETITIVOS OPC 75mm Rodillo Magnético 31mm PCR 27mm IMPRIMIR PAGINA DE PRUEBA 1. Se efectúan a través del menú de la P1006. 2. Acceder al Menú de Preferencias de Impresión, luego Servicio y finalmente Páginas de Información. 3. Muestra tres páginas que se pueden seleccionar: la Demo, la de Configuraciones y la de Estado de Suministros. PASANDO LA PÁGINA DE LIMPIEZA Las hojas de limpieza para estos modelos sólo pueden ser comandadas desde el menú de la impresora. HP recomienda que para obtener mejores resultados se utilice transparencias. Si una transparencia no está disponible, usar entonces papel para copiadora con superficie suave. 1. Para efectuar la limpieza acceder a Preferencias. 2. Pulsar en Valores de Dispositivo. 3. Presionar Inicio. 4. El ciclo de limpieza demora cerca de 2 minutos con la hoja arrancando y parando en forma programada. 5. No apagar la impresora hasta que el trabajo haya concluido y la hoja haya pasado. LOCALIZACIÓN DE DEFECTOS EN LA IMPRESORA Tal como se observa en muchos modelos de bajo costo que aparecen en el mercado, esta serie de impresoras no poseen pantalla de LCD. Todos los códigos de error consisten en diferentes secuencias de dos luces de tablero. La información disponible de fábrica sobre interpretación de las secuencias es muy pobre y el manual de servicio es terrible. Luz Superior Intermitente: Tapa del cartucho abierta, No hay cartucho o existe una traba de papel. Ambas Luces Encendidas: Error fatal, desconectar la impresora y desenchufar durante 30 minutos. Si el error persiste significa que la impresora tiene un problema mayúsculo. No hay información aún sobre cuales esos problemas podrán ser (el manual de servicio completo no ha sido aún publicado por HP). Ambas Luces Intermitentes: La inicialización de la impresora está en progreso. 3232 West El Segundo Blvd., Hawthorne, California 90250 USA • Ph +1 424 675 3300 • Fx +1 424 675 3400 • techsupport@uninetimaging.com • www.uninetimaging.com © 2009 UniNet Imaging Inc. All trademark names and artwork are property of their respective owners. Product brand names mentioned are intended to show compatibility only. UniNet Imaging does not warrant downloaded information.