SlideShare una empresa de Scribd logo
1 de 5
Descargar para leer sin conexión
Acceso desde navegador web vía P2P a un DVR/NVR Dahua
1 www.imporseguridad.com
La función P2P (Peer to Peer) permite acceder a un DVR/NVR de modo remoto sin la necesidad de configurar
el reenvío de puertos en el router de la red local. Al reenvío o forward de puertos se lo conoce habitualmente
como “abrir puertos”, aunque esta denominación es incorrecta.
Laconfiguración essencillayseresume enlossiguientes pasos:
1) Conectar el DVR/NVR a internet.
2) El DVR/NVR se registra de modo automático en el servidor P2P de Dahua Technology.
3) Elusuario genera una cuenta en www.easy4ip.com y la relaciona conel DVR/NVR a través del número de
serie delequipo.
4) Listo.Yaesposiblemonitorearlascámaras!Atravésdelacuentageneradaenwww.easy4ip.comsepuede
acceder de manera remota al DVR/NVR para monitoreoen vivo, ver grabaciones y realizarconfiguraciones.
Importante!
Para comenzar a configurar conecte un monitor y un mouse alDVR/NVR eingrese almenú principal del
sistema utilizando cualquiera de los siguientes usuarios y contraseñas:
usuario:admin‐contraseña:admin
usuario: 888888 ‐ contraseña: 888888
1) ¿Cómo conectar el DVR/NVR a internet?
1.b) ActivarlafunciónDHCPenelDVR/NVRaccediendoaNetwork>TCIP>TildarDHCP(Imágenes1y2)
1.c) ElDVR/NVRrecibe unadirección IPporpartedel routery yaseencuentralistoparaconectarse ainternet
(Imagen 3).
Acceso desde navegador web vía P2P a un DVR/NVR Dahua
2 www.imporseguridad.com
Imagen 2: Tildar la opción DHCP.
Imagen 3: El DVR/NVR recibe una dirección IP por parte del Router.
Acceso desde navegador web vía P2P a un DVR/NVR Dahua
3 www.imporseguridad.com
2) Habilitar la función P2P
Medianteestafunción, yhaciendo usodelaconexión ainternet, elDVR/NVRseregistraautomáticamente en
el servidor P2P de Dahua Technology.
ParahabilitarelservicioP2PdebeingresaralasecciónNetwork‐>P2Pytildarlaopción“Enable”(Imagen4).
El indicador de Status deberá pasar de “Offline” a“Online” al cabo de unos segundos.
Imagen 4: P2P activado y registrado en el servidor de Dahua Technology.
3) Alta de cuenta en Easy4IP y registro de un nuevo DVR/NVR
A través de la página web www.easy4ip.com es posible acceder a todos los DVR/NVR que el usuario tenga
registrados en el servidor P2P.
Basta con crear una cuenta de usuario y relacionar los equipos a la misma a través del número de serie.
Para generar una cuenta se deben seguir los siguientes pasos:
3.a) Ingresar a www.easy4ip.com desde un navegador web como Internet Explorer.
3.b) Clicken“SignUpNow”ycompletarelformularioparacrearunacuentadeusuario.(Imágenes5y6)
Elsistemaenviaráune‐mailconunlinkdeconfirmaciónaladirección decorreoingresada. Esnecesariohacer
click en éste link para activar la cuenta.
3.c) Ingresarnuevamenteawww.easy4ip.comyentraralacuentautilizandoelusuarioycontraseña
registrados al crear la cuenta. Hacer click en “Log In” para ingresar.
3.d) Unavez dentrodelacuenta hacerclicken “Add”ycompletar elformulario para darde alta un nuevo
DVR/NVR.
3.e) El nuevo DVR/NVR debe aparecer en el listado de dispositivos (Imagen9).
¿Cómo obtener el número de serie del DVR/NVR?
Tomando comoreferencia la Imagen 1 de este instructivo hagaclickenSystem yluegoen Version.
El número de serie está identificado como N° de Serie o Serial Number.
Acceso desde navegador web vía P2P a un DVR/NVR Dahua
4 www.imporseguridad.com
Contraseña
Correo electrónico
Copiar el código de seguridad
Imagen 5: Click en “Sign Up Now” para crear una nueva cuenta de usuario.
Imagen 6: Completar el formulario de alta de cuenta.
Imagen 7: Click en “Add” y completar el formulario de alta de equipo.
Nombre a elección
Número de serie del DVR/NVR
Contraseña en el DVR/NVR
Acceso desde navegador web vía P2P a un DVR/NVR Dahua
5 www.imporseguridad.com
Imagen 8: El nuevo DVR/NVR se ha dado de alta correctamente.
4) Listo!Yaesposiblemonitorearlascámarasatravésdeinternetdesdeunnavegadorweb.
4.a) Ingresaralacuentacómoseexplicaenelpunto3.c)yhacerclickenelsímbolode“play”(Imagen9)
4.b) Enunanuevaventanaopestaña se abrirálainterfazde accesoremotoal DVR/NVR(Imagen10)
Imagen9: Click en el símbolo “play” para acceder al video en vivo y grabaciones.
Imagen 10: La interfaz de acceso remoto del DVR/NVR permite acceder al video y a las grabaciones.
Para más información sobre este tema puede comunicarse a soporte@dahua.com.ar

Más contenido relacionado

La actualidad más candente

U boot porting guide for SoC
U boot porting guide for SoCU boot porting guide for SoC
U boot porting guide for SoCMacpaul Lin
 
List of usernames and passwords for Huawei routers
List of usernames and passwords for Huawei routersList of usernames and passwords for Huawei routers
List of usernames and passwords for Huawei routersHuanetwork
 
マイコンでマルチタスク
マイコンでマルチタスクマイコンでマルチタスク
マイコンでマルチタスクKatsuhiko Terawaki
 
1628502836912_CAN_TP,DCM&AutosarCAN.pptx
1628502836912_CAN_TP,DCM&AutosarCAN.pptx1628502836912_CAN_TP,DCM&AutosarCAN.pptx
1628502836912_CAN_TP,DCM&AutosarCAN.pptxYamini454
 
Hosting Your Own OTA Update Service
Hosting Your Own OTA Update ServiceHosting Your Own OTA Update Service
Hosting Your Own OTA Update ServiceQuinlan Jung
 
LCU13: An Introduction to ARM Trusted Firmware
LCU13: An Introduction to ARM Trusted FirmwareLCU13: An Introduction to ARM Trusted Firmware
LCU13: An Introduction to ARM Trusted FirmwareLinaro
 
Travaux pratiques configuration du routage entre réseaux locaux virtuels
Travaux pratiques   configuration du routage entre réseaux locaux virtuelsTravaux pratiques   configuration du routage entre réseaux locaux virtuels
Travaux pratiques configuration du routage entre réseaux locaux virtuelsMohamed Keita
 
U-Boot presentation 2013
U-Boot presentation  2013U-Boot presentation  2013
U-Boot presentation 2013Wave Digitech
 
강좌 05 통신용 PC 프로그래밍
강좌 05 통신용 PC 프로그래밍강좌 05 통신용 PC 프로그래밍
강좌 05 통신용 PC 프로그래밍chcbaram
 
강좌 개요
강좌 개요강좌 개요
강좌 개요chcbaram
 
IIT-RTC 2017 Qt WebRTC Tutorial (Qt Janus Client)
IIT-RTC 2017 Qt WebRTC Tutorial (Qt Janus Client)IIT-RTC 2017 Qt WebRTC Tutorial (Qt Janus Client)
IIT-RTC 2017 Qt WebRTC Tutorial (Qt Janus Client)Alexandre Gouaillard
 
QEMU and Raspberry Pi. Instant Embedded Development
QEMU and Raspberry Pi. Instant Embedded DevelopmentQEMU and Raspberry Pi. Instant Embedded Development
QEMU and Raspberry Pi. Instant Embedded DevelopmentGlobalLogic Ukraine
 
CCIE Service Provider Techtorial
CCIE Service Provider Techtorial CCIE Service Provider Techtorial
CCIE Service Provider Techtorial Cisco Canada
 
강좌 03 개발환경 구축
강좌 03 개발환경 구축강좌 03 개발환경 구축
강좌 03 개발환경 구축chcbaram
 
Huawei switch configuration commands
Huawei switch configuration commandsHuawei switch configuration commands
Huawei switch configuration commandsHuanetwork
 

La actualidad más candente (20)

U boot porting guide for SoC
U boot porting guide for SoCU boot porting guide for SoC
U boot porting guide for SoC
 
List of usernames and passwords for Huawei routers
List of usernames and passwords for Huawei routersList of usernames and passwords for Huawei routers
List of usernames and passwords for Huawei routers
 
マイコンでマルチタスク
マイコンでマルチタスクマイコンでマルチタスク
マイコンでマルチタスク
 
1628502836912_CAN_TP,DCM&AutosarCAN.pptx
1628502836912_CAN_TP,DCM&AutosarCAN.pptx1628502836912_CAN_TP,DCM&AutosarCAN.pptx
1628502836912_CAN_TP,DCM&AutosarCAN.pptx
 
Hosting Your Own OTA Update Service
Hosting Your Own OTA Update ServiceHosting Your Own OTA Update Service
Hosting Your Own OTA Update Service
 
LCU13: An Introduction to ARM Trusted Firmware
LCU13: An Introduction to ARM Trusted FirmwareLCU13: An Introduction to ARM Trusted Firmware
LCU13: An Introduction to ARM Trusted Firmware
 
Embedded Linux on ARM
Embedded Linux on ARMEmbedded Linux on ARM
Embedded Linux on ARM
 
Travaux pratiques configuration du routage entre réseaux locaux virtuels
Travaux pratiques   configuration du routage entre réseaux locaux virtuelsTravaux pratiques   configuration du routage entre réseaux locaux virtuels
Travaux pratiques configuration du routage entre réseaux locaux virtuels
 
Protocole OSPF
Protocole OSPFProtocole OSPF
Protocole OSPF
 
U-Boot presentation 2013
U-Boot presentation  2013U-Boot presentation  2013
U-Boot presentation 2013
 
Linux IO
Linux IOLinux IO
Linux IO
 
강좌 05 통신용 PC 프로그래밍
강좌 05 통신용 PC 프로그래밍강좌 05 통신용 PC 프로그래밍
강좌 05 통신용 PC 프로그래밍
 
강좌 개요
강좌 개요강좌 개요
강좌 개요
 
IIT-RTC 2017 Qt WebRTC Tutorial (Qt Janus Client)
IIT-RTC 2017 Qt WebRTC Tutorial (Qt Janus Client)IIT-RTC 2017 Qt WebRTC Tutorial (Qt Janus Client)
IIT-RTC 2017 Qt WebRTC Tutorial (Qt Janus Client)
 
QEMU and Raspberry Pi. Instant Embedded Development
QEMU and Raspberry Pi. Instant Embedded DevelopmentQEMU and Raspberry Pi. Instant Embedded Development
QEMU and Raspberry Pi. Instant Embedded Development
 
Linux systems - Getting started with setting up and embedded platform
Linux systems - Getting started with setting up and embedded platformLinux systems - Getting started with setting up and embedded platform
Linux systems - Getting started with setting up and embedded platform
 
CCIE Service Provider Techtorial
CCIE Service Provider Techtorial CCIE Service Provider Techtorial
CCIE Service Provider Techtorial
 
Embedded Operating System - Linux
Embedded Operating System - LinuxEmbedded Operating System - Linux
Embedded Operating System - Linux
 
강좌 03 개발환경 구축
강좌 03 개발환경 구축강좌 03 개발환경 구축
강좌 03 개발환경 구축
 
Huawei switch configuration commands
Huawei switch configuration commandsHuawei switch configuration commands
Huawei switch configuration commands
 

Similar a Configurar acceso remoto P2P DVR Dahua

Manual de configuracion DVR para verlo en Internet
Manual de configuracion DVR para verlo en InternetManual de configuracion DVR para verlo en Internet
Manual de configuracion DVR para verlo en InternetCesar Bande
 
Proyecto 6 lucas vieira
Proyecto 6 lucas vieiraProyecto 6 lucas vieira
Proyecto 6 lucas vieiraLukinhaLA
 
Guia Del Usuario BeAnywhere Support Express
Guia Del Usuario BeAnywhere Support ExpressGuia Del Usuario BeAnywhere Support Express
Guia Del Usuario BeAnywhere Support ExpressBeAnywhere
 
Team viewer1
Team viewer1Team viewer1
Team viewer1ANSWERSPT
 
Teamviewer documentación
Teamviewer documentación Teamviewer documentación
Teamviewer documentación David
 
Manual Tecnico Acceso Remoto
Manual Tecnico Acceso RemotoManual Tecnico Acceso Remoto
Manual Tecnico Acceso RemotoAlex Jo
 
Primeros pasos dvr p2p smart pss v2
Primeros pasos dvr p2p smart pss v2Primeros pasos dvr p2p smart pss v2
Primeros pasos dvr p2p smart pss v2Xcorp Seguridad Spa.
 
Team viewer (Diego M.)
Team viewer (Diego M.)Team viewer (Diego M.)
Team viewer (Diego M.)INTEC3113
 
Como usar mi DVR Camtec / Dahua en Windows Xcorp Seguridad
Como usar mi DVR Camtec / Dahua en Windows Xcorp SeguridadComo usar mi DVR Camtec / Dahua en Windows Xcorp Seguridad
Como usar mi DVR Camtec / Dahua en Windows Xcorp SeguridadXcorp Seguridad Spa.
 
Cómo crear un dns dinámico utilizando NO-IP
Cómo crear un dns dinámico utilizando NO-IPCómo crear un dns dinámico utilizando NO-IP
Cómo crear un dns dinámico utilizando NO-IPZureoSoftware
 
Manual-para-acceso-VPN.1.PDF
Manual-para-acceso-VPN.1.PDFManual-para-acceso-VPN.1.PDF
Manual-para-acceso-VPN.1.PDFRoberth78
 

Similar a Configurar acceso remoto P2P DVR Dahua (20)

Manual de configuracion DVR para verlo en Internet
Manual de configuracion DVR para verlo en InternetManual de configuracion DVR para verlo en Internet
Manual de configuracion DVR para verlo en Internet
 
Conexión remota
Conexión remotaConexión remota
Conexión remota
 
Acceso remoto vnc
Acceso remoto vncAcceso remoto vnc
Acceso remoto vnc
 
Teamviewer
TeamviewerTeamviewer
Teamviewer
 
Proyecto 6 lucas vieira
Proyecto 6 lucas vieiraProyecto 6 lucas vieira
Proyecto 6 lucas vieira
 
Guia Del Usuario BeAnywhere Support Express
Guia Del Usuario BeAnywhere Support ExpressGuia Del Usuario BeAnywhere Support Express
Guia Del Usuario BeAnywhere Support Express
 
Marco A Exponer
Marco A ExponerMarco A Exponer
Marco A Exponer
 
Configuracion dvr hikvision
Configuracion dvr hikvisionConfiguracion dvr hikvision
Configuracion dvr hikvision
 
Team viewer1
Team viewer1Team viewer1
Team viewer1
 
Teamviewer documentación
Teamviewer documentación Teamviewer documentación
Teamviewer documentación
 
Manual Tecnico Acceso Remoto
Manual Tecnico Acceso RemotoManual Tecnico Acceso Remoto
Manual Tecnico Acceso Remoto
 
Primeros pasos dvr p2p smart pss v2
Primeros pasos dvr p2p smart pss v2Primeros pasos dvr p2p smart pss v2
Primeros pasos dvr p2p smart pss v2
 
Instructivo
InstructivoInstructivo
Instructivo
 
Instructivo
InstructivoInstructivo
Instructivo
 
Team viewer (Diego M.)
Team viewer (Diego M.)Team viewer (Diego M.)
Team viewer (Diego M.)
 
Como usar mi DVR Camtec / Dahua en Windows Xcorp Seguridad
Como usar mi DVR Camtec / Dahua en Windows Xcorp SeguridadComo usar mi DVR Camtec / Dahua en Windows Xcorp Seguridad
Como usar mi DVR Camtec / Dahua en Windows Xcorp Seguridad
 
Cómo crear un dns dinámico utilizando NO-IP
Cómo crear un dns dinámico utilizando NO-IPCómo crear un dns dinámico utilizando NO-IP
Cómo crear un dns dinámico utilizando NO-IP
 
Manual-para-acceso-VPN.1.PDF
Manual-para-acceso-VPN.1.PDFManual-para-acceso-VPN.1.PDF
Manual-para-acceso-VPN.1.PDF
 
SupRemo.pdf
SupRemo.pdfSupRemo.pdf
SupRemo.pdf
 
Manual de usuario cctv.v4
Manual de usuario cctv.v4Manual de usuario cctv.v4
Manual de usuario cctv.v4
 

Último

Presentación Materiales para la Construcción.ppt
Presentación Materiales para la Construcción.pptPresentación Materiales para la Construcción.ppt
Presentación Materiales para la Construcción.pptCARLOSAXELVENTURAVID
 
9-Sociales-Colombia siglo XX.pdf sociales
9-Sociales-Colombia siglo XX.pdf sociales9-Sociales-Colombia siglo XX.pdf sociales
9-Sociales-Colombia siglo XX.pdf socialesJhonathanRodriguez10
 
PERFIL SECRETARIAL - SECRETARIADO EJECUTIVO
PERFIL SECRETARIAL - SECRETARIADO EJECUTIVOPERFIL SECRETARIAL - SECRETARIADO EJECUTIVO
PERFIL SECRETARIAL - SECRETARIADO EJECUTIVOAdrianaBernal82
 
TALLER SOBRE METODOLOGÍAS DE DESARROLLO DE SOFTWARE..pdf
TALLER SOBRE METODOLOGÍAS DE DESARROLLO DE SOFTWARE..pdfTALLER SOBRE METODOLOGÍAS DE DESARROLLO DE SOFTWARE..pdf
TALLER SOBRE METODOLOGÍAS DE DESARROLLO DE SOFTWARE..pdfMiguelGomez900779
 
644400074-LA-CONSOLIDACION-DE-LA-REPUBLICA-OLIGARQUICA-pdf.pptx
644400074-LA-CONSOLIDACION-DE-LA-REPUBLICA-OLIGARQUICA-pdf.pptx644400074-LA-CONSOLIDACION-DE-LA-REPUBLICA-OLIGARQUICA-pdf.pptx
644400074-LA-CONSOLIDACION-DE-LA-REPUBLICA-OLIGARQUICA-pdf.pptxRosiClaros
 
Home Assistant - Un Hub para controlarlos a todos
Home Assistant - Un Hub para controlarlos a todosHome Assistant - Un Hub para controlarlos a todos
Home Assistant - Un Hub para controlarlos a todosDebora Gomez Bertoli
 
linea de tiempo television y su avance en los años
linea de tiempo television y su avance en los añoslinea de tiempo television y su avance en los años
linea de tiempo television y su avance en los añosMaraPazCrdenas
 
PLANIFICACION ANUAL , año 2024. nivel primaria
PLANIFICACION ANUAL , año 2024. nivel primariaPLANIFICACION ANUAL , año 2024. nivel primaria
PLANIFICACION ANUAL , año 2024. nivel primariajosevilla696981
 

Último (8)

Presentación Materiales para la Construcción.ppt
Presentación Materiales para la Construcción.pptPresentación Materiales para la Construcción.ppt
Presentación Materiales para la Construcción.ppt
 
9-Sociales-Colombia siglo XX.pdf sociales
9-Sociales-Colombia siglo XX.pdf sociales9-Sociales-Colombia siglo XX.pdf sociales
9-Sociales-Colombia siglo XX.pdf sociales
 
PERFIL SECRETARIAL - SECRETARIADO EJECUTIVO
PERFIL SECRETARIAL - SECRETARIADO EJECUTIVOPERFIL SECRETARIAL - SECRETARIADO EJECUTIVO
PERFIL SECRETARIAL - SECRETARIADO EJECUTIVO
 
TALLER SOBRE METODOLOGÍAS DE DESARROLLO DE SOFTWARE..pdf
TALLER SOBRE METODOLOGÍAS DE DESARROLLO DE SOFTWARE..pdfTALLER SOBRE METODOLOGÍAS DE DESARROLLO DE SOFTWARE..pdf
TALLER SOBRE METODOLOGÍAS DE DESARROLLO DE SOFTWARE..pdf
 
644400074-LA-CONSOLIDACION-DE-LA-REPUBLICA-OLIGARQUICA-pdf.pptx
644400074-LA-CONSOLIDACION-DE-LA-REPUBLICA-OLIGARQUICA-pdf.pptx644400074-LA-CONSOLIDACION-DE-LA-REPUBLICA-OLIGARQUICA-pdf.pptx
644400074-LA-CONSOLIDACION-DE-LA-REPUBLICA-OLIGARQUICA-pdf.pptx
 
Home Assistant - Un Hub para controlarlos a todos
Home Assistant - Un Hub para controlarlos a todosHome Assistant - Un Hub para controlarlos a todos
Home Assistant - Un Hub para controlarlos a todos
 
linea de tiempo television y su avance en los años
linea de tiempo television y su avance en los añoslinea de tiempo television y su avance en los años
linea de tiempo television y su avance en los años
 
PLANIFICACION ANUAL , año 2024. nivel primaria
PLANIFICACION ANUAL , año 2024. nivel primariaPLANIFICACION ANUAL , año 2024. nivel primaria
PLANIFICACION ANUAL , año 2024. nivel primaria
 

Configurar acceso remoto P2P DVR Dahua

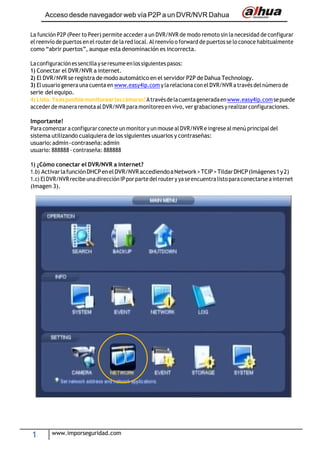
  • 1. Acceso desde navegador web vía P2P a un DVR/NVR Dahua 1 www.imporseguridad.com La función P2P (Peer to Peer) permite acceder a un DVR/NVR de modo remoto sin la necesidad de configurar el reenvío de puertos en el router de la red local. Al reenvío o forward de puertos se lo conoce habitualmente como “abrir puertos”, aunque esta denominación es incorrecta. Laconfiguración essencillayseresume enlossiguientes pasos: 1) Conectar el DVR/NVR a internet. 2) El DVR/NVR se registra de modo automático en el servidor P2P de Dahua Technology. 3) Elusuario genera una cuenta en www.easy4ip.com y la relaciona conel DVR/NVR a través del número de serie delequipo. 4) Listo.Yaesposiblemonitorearlascámaras!Atravésdelacuentageneradaenwww.easy4ip.comsepuede acceder de manera remota al DVR/NVR para monitoreoen vivo, ver grabaciones y realizarconfiguraciones. Importante! Para comenzar a configurar conecte un monitor y un mouse alDVR/NVR eingrese almenú principal del sistema utilizando cualquiera de los siguientes usuarios y contraseñas: usuario:admin‐contraseña:admin usuario: 888888 ‐ contraseña: 888888 1) ¿Cómo conectar el DVR/NVR a internet? 1.b) ActivarlafunciónDHCPenelDVR/NVRaccediendoaNetwork>TCIP>TildarDHCP(Imágenes1y2) 1.c) ElDVR/NVRrecibe unadirección IPporpartedel routery yaseencuentralistoparaconectarse ainternet (Imagen 3).
  • 2. Acceso desde navegador web vía P2P a un DVR/NVR Dahua 2 www.imporseguridad.com Imagen 2: Tildar la opción DHCP. Imagen 3: El DVR/NVR recibe una dirección IP por parte del Router.
  • 3. Acceso desde navegador web vía P2P a un DVR/NVR Dahua 3 www.imporseguridad.com 2) Habilitar la función P2P Medianteestafunción, yhaciendo usodelaconexión ainternet, elDVR/NVRseregistraautomáticamente en el servidor P2P de Dahua Technology. ParahabilitarelservicioP2PdebeingresaralasecciónNetwork‐>P2Pytildarlaopción“Enable”(Imagen4). El indicador de Status deberá pasar de “Offline” a“Online” al cabo de unos segundos. Imagen 4: P2P activado y registrado en el servidor de Dahua Technology. 3) Alta de cuenta en Easy4IP y registro de un nuevo DVR/NVR A través de la página web www.easy4ip.com es posible acceder a todos los DVR/NVR que el usuario tenga registrados en el servidor P2P. Basta con crear una cuenta de usuario y relacionar los equipos a la misma a través del número de serie. Para generar una cuenta se deben seguir los siguientes pasos: 3.a) Ingresar a www.easy4ip.com desde un navegador web como Internet Explorer. 3.b) Clicken“SignUpNow”ycompletarelformularioparacrearunacuentadeusuario.(Imágenes5y6) Elsistemaenviaráune‐mailconunlinkdeconfirmaciónaladirección decorreoingresada. Esnecesariohacer click en éste link para activar la cuenta. 3.c) Ingresarnuevamenteawww.easy4ip.comyentraralacuentautilizandoelusuarioycontraseña registrados al crear la cuenta. Hacer click en “Log In” para ingresar. 3.d) Unavez dentrodelacuenta hacerclicken “Add”ycompletar elformulario para darde alta un nuevo DVR/NVR. 3.e) El nuevo DVR/NVR debe aparecer en el listado de dispositivos (Imagen9). ¿Cómo obtener el número de serie del DVR/NVR? Tomando comoreferencia la Imagen 1 de este instructivo hagaclickenSystem yluegoen Version. El número de serie está identificado como N° de Serie o Serial Number.
  • 4. Acceso desde navegador web vía P2P a un DVR/NVR Dahua 4 www.imporseguridad.com Contraseña Correo electrónico Copiar el código de seguridad Imagen 5: Click en “Sign Up Now” para crear una nueva cuenta de usuario. Imagen 6: Completar el formulario de alta de cuenta. Imagen 7: Click en “Add” y completar el formulario de alta de equipo. Nombre a elección Número de serie del DVR/NVR Contraseña en el DVR/NVR
  • 5. Acceso desde navegador web vía P2P a un DVR/NVR Dahua 5 www.imporseguridad.com Imagen 8: El nuevo DVR/NVR se ha dado de alta correctamente. 4) Listo!Yaesposiblemonitorearlascámarasatravésdeinternetdesdeunnavegadorweb. 4.a) Ingresaralacuentacómoseexplicaenelpunto3.c)yhacerclickenelsímbolode“play”(Imagen9) 4.b) Enunanuevaventanaopestaña se abrirálainterfazde accesoremotoal DVR/NVR(Imagen10) Imagen9: Click en el símbolo “play” para acceder al video en vivo y grabaciones. Imagen 10: La interfaz de acceso remoto del DVR/NVR permite acceder al video y a las grabaciones. Para más información sobre este tema puede comunicarse a soporte@dahua.com.ar