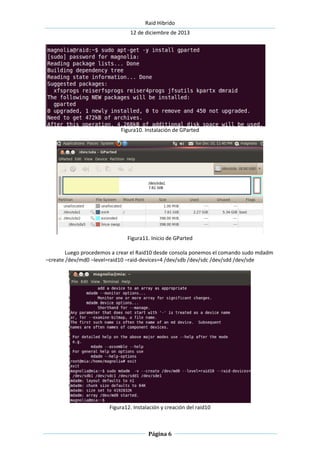
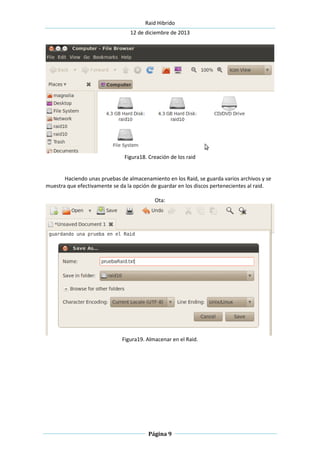
Este documento describe una práctica de simulación de un RAID híbrido 10 utilizando una máquina virtual con Ubuntu. Se crean 4 discos virtuales de 4GB cada uno para simular el RAID. Se instala mdadm para crear y configurar la opción RAID, y se crea el RAID10 con los 4 discos. Luego se crea una partición ext4 en el disco RAID para probar el almacenamiento en él.
Course 102: Lecture 26: FileSystems in Linux (Part 1) Ahmed El-Arabawy
This lecture introduces some concepts about FileSystems in Linux.
Video for this lecture on youtube:
http://www.youtube.com/watch?v=9jj1QOokACo
Check the other Lectures and courses in
http://Linux4EnbeddedSystems.com
or Follow our Facebook Group at
- Facebook: @LinuxforEmbeddedSystems
Lecturer Profile:
Ahmed ElArabawy
- https://www.linkedin.com/in/ahmedelarabawy
Kernel Recipes 2017 - An introduction to the Linux DRM subsystem - Maxime RipardAnne Nicolas
Every modern multimedia-oriented ARM SoC usually has a number of display controllers, to drive a screen or an LCD panel, and a GPU, to provide 3D acceleration. The Linux kernel framework of choice to support these controllers is the DRM subsystem.
This talk will walk through the DRM stack, the architecture of a DRM/KMS driver and the interaction between the display and GPU drivers. The presentation is based on the work we have done to develop a DRM driver for the Allwinner SoCs display controller with multiple outputs, such as parallel display interfaces, HDMI or MIPI-DSI. The work done to make the ARM Mali OpenGL driver work on top of a mainline DRM/KMS driver will also be detailed, as well as the more traditional, Mesa-based, solution used in a variety of other platforms.
Maxime Ripard, Free Electrons
This is the presentation I gave on Linux kernel modules at the Linux Meetup in Austin, TX, on 2/5/2015.
http://www.meetup.com/linux-85/events/185946802/
Code referred to in the presentation: https://github.com/ereyes01/kernel-mod-prez
Linux directory structure by jitu mistryJITU MISTRY
in this ppt there are talkin about the Linux directory structure. special focus on the why we have such type of directory and that is explain slide by slide
This presentation is about verified boot and its role in keeping devices and personal data safe. There are examples of chain of trust in boot on various SoCs (particularly, those with Android BSP), a role of AVB 2.0 and TEE, and AVB 2.0 integration with U-boot.
The talk was delivered by Igor Opaniuk (Senior Software Engineer, Consultant, GlobalLogic) at GlobalLogic Embedded Career Day #2 on February 10, 2018.
More about GlobalLogic Embedded Career Day #2: https://www.globallogic.com/ua/events/globallogic-kyiv-embedded-career-day-2-materials
Embedded Recipes 2017 - Introduction to Yocto Project/OpenEmbedded - Mylène J...Anne Nicolas
The Yocto Project provides an integrated environment to develop and debug custom embedded Linux systems, similar to commercial embedded Linux development environments.
In this talk, we will introduce the different parts and lexicon of the Yocto Project: poky, OpenEmbedded-core, bitbake, layers, recipes, machine, distro, etc. Different “How to” will be detailed: how to configure it, build an image from layers, create recipes and add a custom machine.
Throughout the talk, many good practices will be detailed. Thanks to that, the audience will have a good overview of Yocto Project and will know how to start using it in an effective way.
This talk is intended for developers or technical people who want to work/start with Yocto/Openembedded. Good practices are important when working with Yocto Project and will be detailed in this presentation.
No particular knowledge is required to attend this talk.
Mylène Josserand, Free Electrons
Angelo Compagnucci - Upgrading buildroot based devices with swupdatelinuxlab_conf
This talk will guide you through the perils of building a resilient software stack for embedded system using buildroot as a base, stuff your software in between and adding swupdate as cherry on top! The talk will be composed by three main areas:
How to use buildroot as a base system for your stack
An introduction to swupdate and it’s fields of use
An example of using buildroot + swupdate to update your stack.
In the first we will talk about using buildroot as base for your software and how to add your software around. Buildroot make really easy to build a complete firmware image when using the standard configurations provided by the software but it could be cumbersome if you want to add your software in simple, easy and automated way. So we will show you how to write a simple makefile to add your software as an external component and how to automate the process of compiling everything to produce your binary artifacts.
The second part will discuss about swupdate and it’s field of use. Swupdate provides several ways of use: it can be used in a simple way, it could be integrated to do A/B updates, it could be used via network or locally using a medium. We will discuss about the possibility of approaches of system updates and how swupdate can satisfy each one of the use cases.
The third phase will show you a real approach adopted to solve a specific use cause with the hope it can be used a reference for auditor specific needs.
It describes the MMC storage device driver functionality in Linux Kernel and it's role. It explains different type of storage devices available and how they are handled from MMC driver point of view. It describes eMMC (internal storage) device and SD (external storage) devices in details and SD protocol used for communicating with these devices in Linux.
Introduction to Linux Kernel by Quontra SolutionsQUONTRASOLUTIONS
Course Duration: 30-35 hours Training + Assignments + Actual Project Based Case Studies
Training Materials: All attendees will receive,
Assignment after each module, Video recording of every session
Notes and study material for examples covered.
Access to the Training Blog & Repository of Materials
Pre-requisites:
Basic Computer Skills and knowledge of IT.
Training Highlights
* Focus on Hands on training.
* 30 hours of Assignments, Live Case Studies.
* Video Recordings of sessions provided.
* One Problem Statement discussed across the whole training program.
* Resume prep, Interview Questions provided.
WEBSITE: www.QuontraSolutions.com
Contact Info: Phone +1 404-900-9988(or) Email - info@quontrasolutions.com
Un libro sin recetas, para la maestra y el maestro Fase 3.pdfsandradianelly
Un libro sin recetas, para la maestra y el maestro Fase 3Un libro sin recetas, para la maestra y el maestro Fase 3Un libro sin recetas, para la maestra y el maestro Fase 3Un libro sin recetas, para la maestra y el maestro Fase 3Un libro sin recetas, para la maestra y el maestro Fase 3Un libro sin recetas, para la maestra y el maestro Fase 3Un libro sin recetas, para la maestra y el maestro Fase 3Un libro sin recetas, para la maestra y el maestro Fase 3Un libro sin recetas, para la maestra y el maestro Fase 3Un libro sin recetas, para la maestra y el maestro Fase 3Un libro sin recetas, para la maestra y el maestro Fase 3Un libro sin recetas, para la maestra y el maestro Fase 3Un libro sin recetas, para la maestra y el maestro Fase 3Un libro sin recetas, para la maestra y el maestro Fase 3Un libro sin recetas, para la maestra y el maestro Fase 3Un libro sin recetas, para la maestra y el maestro Fase 3Un libro sin recetas, para la maestra y el maestro Fase 3Un libro sin recetas, para la maestra y el maestro Fase 3Un libro sin recetas, para la maestra y el maestro Fase 3Un libro sin recetas, para la maestra y el maestro Fase 3Un libro sin recetas, para la maestra y el maestro Fase 3Un libro sin recetas, para la maestra y el maestro Fase 3Un libro sin recetas, para la maestra y el maestro Fase 3Un libro sin recetas, para la maestra y el maestro Fase 3Un libro sin recetas, para la maestra y el maestro Fase 3Un libro sin recetas, para la maestra y el maestro Fase 3Un libro sin recetas, para la maestra y el maestro Fase 3Un libro sin recetas, para la maestra y el maestro Fase 3Un libro sin recetas, para la maestra y el maestro Fase 3Un libro sin recetas, para la maestra y el maestro Fase 3Un libro sin recetas, para la maestra y el maestro Fase 3Un libro sin recetas, para la maestra y el maestro Fase 3Un libro sin recetas, para la maestra y el maestro Fase 3Un libro sin recetas, para la maestra y el maestro Fase 3Un libro sin recetas, para la maestra y el maestro Fase 3Un libro sin recetas, para la maestra y el maestro Fase 3Un libro sin recetas, para la maestra y el maestro Fase 3Un libro sin recetas, para la maestra y el maestro Fase 3Un libro sin recetas, para la maestra y el maestro Fase 3Un libro sin recetas, para la maestra y el maestro Fase 3Un libro sin recetas, para la maestra y el maestro Fase 3Un libro sin recetas, para la maestra y el maestro Fase 3Un libro sin recetas, para la maestra y el maestro Fase 3Un libro sin recetas, para la maestra y el maestro Fase 3Un libro sin recetas, para la maestra y el maestro Fase 3Un libro sin recetas, para la maestra y el maestro Fase 3Un libro sin recetas, para la maestra y el maestro Fase 3Un libro sin recetas, para la maestra y el maestro Fase 3Un libro sin recetas, para la maestra y el maestro Fase 3Un libro sin recetas, para la maestra y el maestro Fase 3Un libro sin recetas, para la maestra y el maestro Fase 3Un libro sin recetas, para la maestra y el maestro Fase 3Un libro sin recetas, para la maestr
ROMPECABEZAS DE ECUACIONES DE PRIMER GRADO OLIMPIADA DE PARÍS 2024. Por JAVIE...JAVIER SOLIS NOYOLA
El Mtro. JAVIER SOLIS NOYOLA crea y desarrolla el “ROMPECABEZAS DE ECUACIONES DE 1ER. GRADO OLIMPIADA DE PARÍS 2024”. Esta actividad de aprendizaje propone retos de cálculo algebraico mediante ecuaciones de 1er. grado, y viso-espacialidad, lo cual dará la oportunidad de formar un rompecabezas. La intención didáctica de esta actividad de aprendizaje es, promover los pensamientos lógicos (convergente) y creativo (divergente o lateral), mediante modelos mentales de: atención, memoria, imaginación, percepción (Geométrica y conceptual), perspicacia, inferencia, viso-espacialidad. Esta actividad de aprendizaje es de enfoques lúdico y transversal, ya que integra diversas áreas del conocimiento, entre ellas: matemático, artístico, lenguaje, historia, y las neurociencias.
2. Raid Hibrido
12 de diciembre de 2013
Página 1
Introduccion:
Se utiliza un software de virtualización para realizar una simulación por software de un
RAID Hibrido, sobre una maquina virtual. En la practica se simula un RAID10, utilizando como
base el sistema Operativo Linux. Y como una nota extra también
Caracteristicas:
Se utiliza la distribución Ubuntu 10.10 de 32 bits.
Software de virtualización Virtual Box.
Se usan 4 discos para simular el Raid..
Los discos virtuales se configuran dinámicos.
La memoria RAM establecida para la maquina virtual es un minimo de 512MB.
Inicio:
Previamente se instala Virtual Box y posterior a eso se procede a crear la maquina
virtual usando una distribución Linux Ubuntu como se menciono anteriomente.
Figura1. Inicio de maquina virtual.
Tanto el sistema RAID puede estar montado en una Distribucion Linux MInt como
Ubuntu para la practica se Ubuntu. Ya creados los disco se carga la imagen iso o el CD donde se
encuentra el sistema de Operativo.
3. Raid Hibrido
12 de diciembre de 2013
Página 2
figura2. Asignacion del Disco Principal
Figura3. Instalacion de Ubuntu 10.04
Se crean los disco virtuales en los cuales se asignara el RAID10 en la maquina virtual,
en VirtualBox le damos click derecho a la maquina virtual le damos configuración y nos vamos
a almacenamiento y creamos los disco de un tamaño sugerido de 4GB. Aparece un cuadro de
dialogo y le damos crear nuevo disco para que cree uno nuevo de tamaño dinamico.
Y se repite el proceso de crear un nuevo disco según los discos que se vayan a usar en
el RAID.
Luego podemos ingresar a nuestro sistema operativo y nos dirigiemos a sistema,
preferencia, Utilidad de disco y podemos visualizar que están creados los 4 discos duros
virtuales.
4. Raid Hibrido
12 de diciembre de 2013
Página 3
Figura4. Opción de almacenamiento
Figura5. Crear nuevo disco
Figura6. Asignación de tamaño y nombre del disco, Creacion
5. Raid Hibrido
12 de diciembre de 2013
Página 4
Figura20. Discos virtuales creados.
Figura7. Disco Creados en Ubuntu.
Luego ya que tenemos configurado y credos los disco procedemos a usar una terminal
y colocamos el comando sudo apt-get install mdadm el cual nos permite crear y configurar la
Opcion de RAID.
Descarga todos los paquetes y nos pregunta si deseamos continuar a lo que le decimos
que si.
Luego nos aparece un cuadro de dialogo el cual es una serie de opciones le damos Ok y
elegimos la opción sin configuración.
6. Raid Hibrido
12 de diciembre de 2013
Página 5
Figura8. Instalando el comando en consola.
Figura9. Configuración de paquetes.
Instalamos la herramienta GParted con el comando sudo apr-get –y install gparted.
Para iniciar la aplicación nos vamos a system -> Adminsitracion y siempre nos pide nuestra
contraseña de usuario.
7. Raid Hibrido
12 de diciembre de 2013
Página 6
Figura10. Instalación de GParted
Figura11. Inicio de GParted
Luego procedemos a crear el Raid10 desde consola ponemos el comando sudo mdadm
–create /dev/md0 –level=raid10 –raid-devices=4 /dev/sdb /dev/sdc /dev/sdd /dev/sde
Figura12. Instalación y creación del raid10
8. Raid Hibrido
12 de diciembre de 2013
Página 7
Ahora vereificamos como esta el estado del Rais, mientras se crea con el comando
watch cat /proc/mdstat. Ya instalado verificamos en las utilidades de disco si se creo el raid.
Figura13. Estado de creación del raid.
Figura14. Proceso terminado en la creación del RAID10
Figura15. Verificación del raid.
9. Raid Hibrido
12 de diciembre de 2013
Página 8
Luego procedemos a dirigirnos a la aplicación GParted y seleccionamos el disco
/dev/md0; y en el menú devices seleccionamos crear una nueva talba de particiones y luego
En el menú Particion seleccionamos nueva, se muestra un cuadro de dialogo en el cual
seleccionamos el tipo de partición exitente en uestro caso elegimos ext4 y una sola partición
de tipo primaria y luego se realiza el proceso de creación.
Figura16. Selección y creación de particiones.
Figura17. Proceso de creación.
Al finalizar el proceso el disco /dev/md0 ya no aparece en discos para crear particiones
y si se dirige al carpeta Computer se puede visualizar la creación de los dos discos que
componen los discos preicnipales del Raid.
Si en dado caso no aparece de inmediato se recomienda reiniciar la maquina virtual.
10. Raid Hibrido
12 de diciembre de 2013
Página 9
Figura18. Creación de los raid
Haciendo unas pruebas de almacenamiento en los Raid, se guarda varios archivos y se
muestra que efectivamente se da la opción de guardar en los discos pertenecientes al raid.
Ota:
Figura19. Almacenar en el Raid.