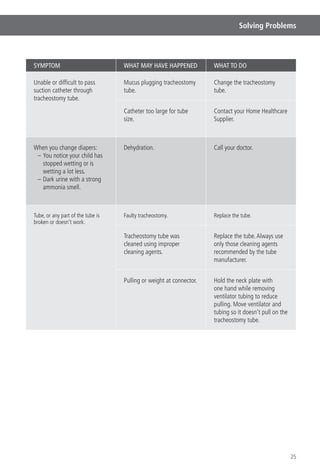
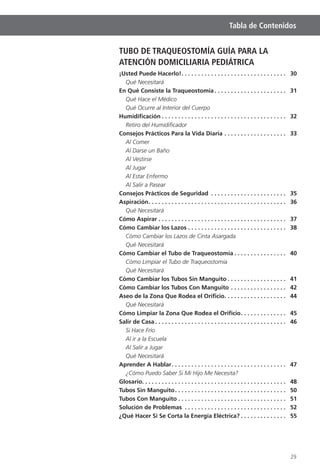
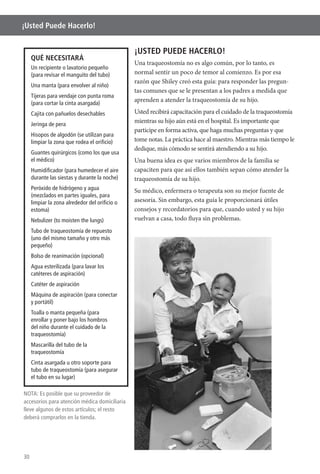
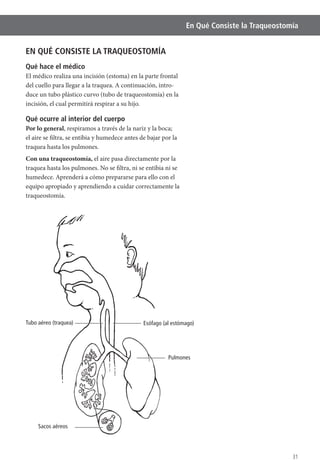
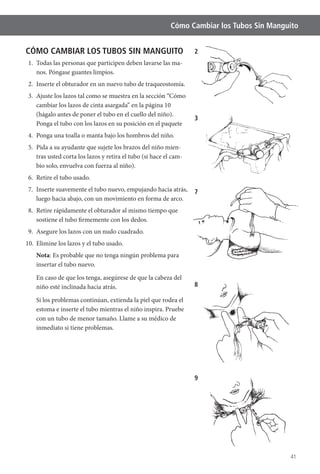
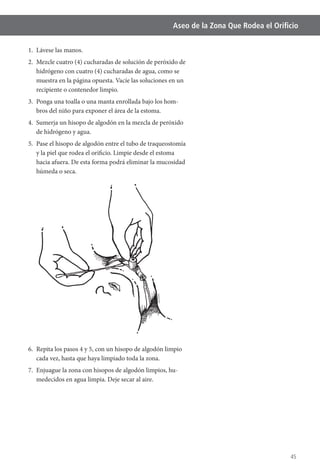
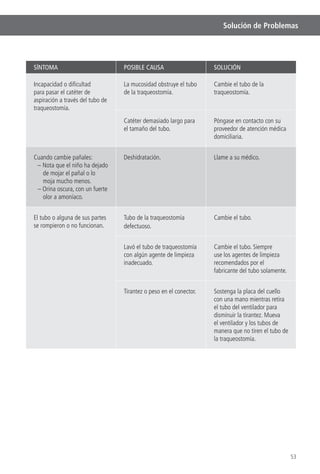
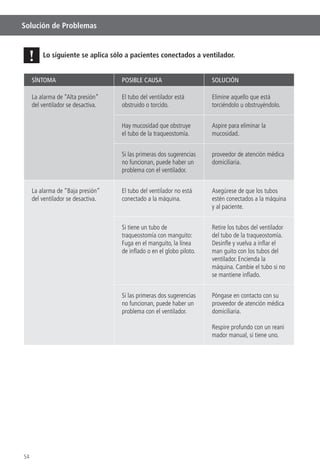
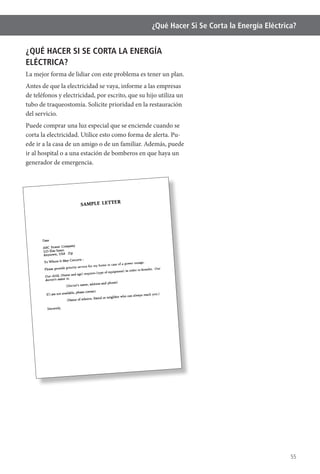
SlideShare una empresa de Scribd logo
1 de 58
Descargar para leer sin conexión
Shiley™
Tracheostomy Tube
Pediatric Homecare Guide
ENGLISH . . . . . . . . . . . . . . . 1
ESPAÑOL. . . . . . . . . . . . . . 29
WHAT’S INSIDE
This booklet provides information on how to care for your
tracheostomy tube. You will find tips on how to suction,
change ties, change tubes and care for the skin around the
opening in your neck. Also included are basic safety tips, a
problem-solving guide and an easy-to-understand glossary
of the technical terms you may hear.
Review Safety Tips & Notes
On page 7, and throughout this guide, are a number of safety
tips and notes designed to warn about conditions that could
adversely affect you. There are others that caution about situ-
ations that could damage your Shiley™ tracheostomy tube.
Take a moment to review these tips and notes before you
begin your tracheostomy tube homecare.
READ BEFORE USING THIS
HOMECARE GUIDE
This manual is intended as a guide only
and should not replace institutional
policies or physicians’ orders.
This guide and the product usage
directions are intended for use with
Shiley tracheostomy products from
Covidien only. Use of these guidelines
with other tracheostomy products is
not recommended. Always follow your
doctor’s or hospital’s directions if they
differ from those found here.
Warning: Shiley tracheostomy tubes
are sterile if not opened, damaged or
broken.
DO NOT RESTERILIZE Shiley
tracheostomy tubes.
Note: Federal law restricts Shiley
tracheostomy tubes to sale by, or on the
order of, a physician.
!
Important Phone Numbers
Doctor__________________________________________________________________________________________
Homecare Provider______________________________________________________________________________
Homecare Supplier______________________________________________________________________________
Emergency______________________________________________________________________________________
1
Table of Contents
TRACHEOSTOMY TUBE PEDIATRIC HOMECARE GUIDE
You Can Do It! . . . . . . . . . . . . . . . . . . . . . . . . . . . . . . . . . . . . . . . 2
What You Will Need
How the Tracheostomy Works . . . . . . . . . . . . . . . . . . . . . . . . . . 3
What the Doctor Does
What’s Happening Inside
Humidification . . . . . . . . . . . . . . . . . . . . . . . . . . . . . . . . . . . . . . . 4
Weaning from the Humidifier
Tips for Daily Living. . . . . . . . . . . . . . . . . . . . . . . . . . . . . . . . . . . 5
Mealtime
Bath Time
Getting Dressed
Playtime
Illness
Getting Away
Safety Tips . . . . . . . . . . . . . . . . . . . . . . . . . . . . . . . . . . . . . . . . . . 7
Suctioning. . . . . . . . . . . . . . . . . . . . . . . . . . . . . . . . . . . . . . . . . . . 8
What You Will Need
How to Suction . . . . . . . . . . . . . . . . . . . . . . . . . . . . . . . . . . . . . . 9
Changing the Ties . . . . . . . . . . . . . . . . . . . . . . . . . . . . . . . . . . . 10
How to Change Twill Tape Ties
What You Will Need
Changing the Tracheostomy Tube . . . . . . . . . . . . . . . . . . . . . . 12
Cleaning the Tracheostomy Tube
What You Will Need
How to Change an Uncuffed Tube . . . . . . . . . . . . . . . . . . . . . . 13
How to Change a Cuffed Tube . . . . . . . . . . . . . . . . . . . . . . . . . 14
Cleaning Around the Opening . . . . . . . . . . . . . . . . . . . . . . . . . 16
What You Will Need
How to Clean Around the Opening . . . . . . . . . . . . . . . . . . . . . 17
Leaving Home . . . . . . . . . . . . . . . . . . . . . . . . . . . . . . . . . . . . . . 18
If It’s Cold Out
Going to School
Going Out to Play
What You Will Need
Learning to Speak . . . . . . . . . . . . . . . . . . . . . . . . . . . . . . . . . . . 19
How Do I Know If My Infant Needs Me?
Glossary . . . . . . . . . . . . . . . . . . . . . . . . . . . . . . . . . . . . . . . . . . . 20
Uncuffed Tubes . . . . . . . . . . . . . . . . . . . . . . . . . . . . . . . . . . . . . 22
Cuffed Tubes. . . . . . . . . . . . . . . . . . . . . . . . . . . . . . . . . . . . . . . . 23
Solving Problems . . . . . . . . . . . . . . . . . . . . . . . . . . . . . . . . . . . . 24
What If the Power Goes Out?. . . . . . . . . . . . . . . . . . . . . . . . . . 27
Tubo de Traqueostomía Guía Para la Atención
Domiciliaria Pediátrica. . . . . . . . . . . . . . . . . . . . . . . . . . . . . . . . 29
2
You Can Do it!
YOU CAN DO IT
A tracheostomy is not a common occurrence, so it’s normal
to feel a little frightened at first. That’s why Shiley created
this guide: to answer parents’ common questions as they
learn how to care for their child’s tracheostomy.
You will receive training for tracheostomy care while your
child is still in the hospital. It is important to participate
actively, ask lots of questions and take notes. Practice makes
perfect. The more time you spend, the more comfortable
you’ll be caring for your child.
It is a good idea for several family members to take the
training so that they also know how to care for your
child’s tracheostomy.
Your doctor, nurse or therapist are your best sources
for advice. But this guide will provide helpful tips and
reminders so that things go smoothly once you and your
child return home.
WHAT YOU WILL NEED
Basin (to check cuff on tube)
Blanket (to swaddle child)
Blunt-nose bandage scissors (to cut the
twill tape)
Box of facial tissues
Bulb syringe
Cotton swabs (used to clean around
the opening)
Gloves (like your doctor uses)
Humidifier (to moisten the air during
naps and at night)
Hydrogen Peroxide and water (mixed
half and half, for cleaning around
the opening)
Nebulizer (to moisten the lungs)
Replacement tracheostomy tube (same
size and one smaller)
Resuscitation bag (optional)
Sterile water (for rinsing suction cath)
Suction catheter
Suction machine (plug in and portable)
Towel or small blanket (to roll up and
place under your child’s shoulders
during tracheostomy care)
Tracheostomy tube mask
Twill tape or other tracheostomy tube
holder (to hold the tube in place)
Water-based lubricant
NOTE: Some items come from your home
healthcare supplier, some you must buy at
the store.
How the Tracheostomy Works
3
HOW THE TRACHEOSTOMY WORKS
What the Doctor Does
The doctor makes an opening (stoma) in the front of the
neck into the wind pipe (trachea). He or she then places a
curved plastic tube (tracheostomy tube) into this opening
through which your child will breathe.
What’s Happening Inside
Normally, we breathe through the nose and mouth so that
air is filtered, warmed and moistened before it goes down the
windpipe to the lungs.
With a tracheostomy, air goes directly into the windpipe to
the lungs. There’s no filtering, warming or moistening. You
will learn how to make up for this by using the proper equip-
ment and by learning the proper tracheostomy care.
Esophagus (to stomach)Windpipe (trachea)
Lungs
Air Sacs
4
Humidification
HUMIDIFICATION
Normally air goes through the nose and mouth where it is
filtered, warmed and moistened. This protects the lining of
the lungs and keeps the mucus from drying.
A tracheostomy bypasses the nose and mouth. So, we need
to add moisture, even in damp climates, or mucus will dry
and block the tracheostomy tube. This is why a humidifica-
tion system with flex tube and tracheostomy mask is often
used. Another way to humidify is to use an “artificial nose.”
This device traps warmth and moisture when the child
breathes out and then puts that moisture back in the air
when she breathes in.
Be sure to use a humidifier during naps and at night to
reduce the chance of mucus plugging the tracheostomy tube,
even if your child wears an artificial nose while awake.
Weaning From The Humidifier
During the day (and only during the day) you can let your
child go without humidity for longer periods of time. Do
this gradually. Start with one hour. Watch for thick mucus,
or mucus with traces of blood in it. If you find either, then
give her plenty of liquids to keep the mucus thin. Notify
your doctor.
If the tracheostomy tube plugs up, suction it to remove the
mucus plug (see page 9). If you can’t remove the mucus plug,
change the tube.
5
Tips for Daily Living
TIPS FOR DAILY LIVING
Mealtime
Your child will eat just like other children. You just need to
be careful so foods and fluids “don’t go down the wrong way.”
When bottle feeding an infant, don’t prop the bottle or oth-
erwise feed the child while she is lying down. Liquid can get
into the lungs this way. Hold the infant in a nearly upright
position during feeding. Lay the infant on her side after eat-
ing. This way if vomiting occurs, there is less risk of the child
getting it in his lungs and choking.
Watch toddlers during meals so they don’t get food in the
tracheostomy tube. You may wish to loosely cover the tra-
cheostomy tube opening with the mask of the humidification
system or with an artificial nose for extra safety.
Bath Time
Children love to take baths. Your child will too, with you
watching over him.
Always prepare a shallow bath. Use care to prevent bath
water from getting in the tracheostomy tube because it goes
directly to the lungs. For extra safety, attach a trach mask or
an artificial nose.
When it’s time to shampoo, do it with the child lying on his
back, with his head over the sink.
Getting Dressed
You can dress up your child almost anyway you wish. Just be
careful the clothing does not block the tracheostomy tube.
Avoid: Crew necks, turtlenecks, buttons in back, necklaces,
shoulder straps and clothes that shed fibers or lint.
Use: V-neck tops and clothing that buttons in the front. Cot-
ton bibs are preferred over plastic ones.
Playtime
Toddlers can enjoy most normal kinds of play, but they must
be supervised. Also, you will want to select toys carefully.
Avoid: Small toys or toy parts that could fit into the
tracheostomy tube. Also stay away from sandboxes and
contact sports.
In cold or dusty weather, use a loose scarf, mask or artifi-
cial nose to warm the air and keep dust out of the tracheos-
tomy tube.
6
Tips For Daily Living
TIPS FOR DAILY LIVING (CONTINUED)
Illness
While no one likes to be ill, it can be especially challenging
for tracheostomy patients. Preventing illness is best, so make
sure your child eats healthy foods. Also keep your child up-
to-date on all shots and vaccines and keep him away from
others who are sick.
If illness occurs, keep a close eye on your child. If your
child is vomiting, has diarrhea or a fever, you may have
to suction more frequently and give the child more fluids.
Also, if vomiting occurs, loosely cover the tracheostomy
tube with an artificial nose, bib or scarf to keep vomit out.
If you think vomit may have entered the tracheostomy
tube, suction immediately. If you see bits of food, call your
doctor immediately.
Getting Away
Taking care of a child with a tracheostomy can require much
of your time. Be sure to plan extra time for yourself, your
spouse and your other children.
If you are going out, you must use a babysitter trained in
tracheostomy care. It is a good idea to train a grandparent
or other family member or a neighbor. Some parents swap
babysitting with other parents whose children have tracheos-
tomy tubes.
7
Safety Tips
SAFETY TIPS
care. If instructions in this guide are different
from your training, follow your training.
-
care professional should perform tracheostomy
care.
for an emergency (same size and one smaller).
where the temperature is over 120°F.
This can injure your child’s windpipe.
-
cian if you discover:
– Red, inflamed skin at stoma
– Foul-smelling mucus
– Bright red blood in mucus
break before you suction again.
– Use shallow water
– Use the trach mask
during feeding.
-
ostomy tube.
they vomit.
around your child.
tube, except for a protective scarf.
– Sandboxes
– Tiny toys
children.
– You will be taught CPR in the hospital
– All caregivers must know CPR
IF YOUR CHILD USES A VENTILATOR
Routinely check the ventilator safety and auditory alarms to be sure they are working properly.
Be sure the ventilator tubes are properly placed so that they don’t pull on the tracheostomy tube.
Don’t twist or pull on the tracheostomy connector any more than you must. This may cause discomfort to your
child or disconnect the ventilator tubes.
Grasp the tracheostomy tube to hold it in place when connecting or disconnecting the ventilator or
humidification tubing.
!
8
Suctioning
SUCTIONING
The lungs and windpipe are meant to produce mucus.
The mucus cleans the air as we breathe by trapping small
particles. It then moves up the windpipe until it can be
swallowed.
Mucus can collect in and around the tracheostomy tube.
It must be removed so it doesn’t dry and block the tube.
Suctioning should be done only as needed, usually upon
waking, before meals (if needed), at naptime and before
bed. Do not suction too frequently. The more you suction,
the more secretions can be produced.
As your child grows older, you may need to suction
less often. But, you will still want to assess the need for
suctioning at least twice a day.
The following signs are indications that your child may
need immediate suctioning:
color
Discuss with your physician anytime your child experi-
ences signs that require immediate suctioning.
Note: Always follow your doctor’s or
hospital’s directions if they differ from
the directions in this guide.
!
WHAT YOU WILL NEED
Suction machine
Collection jar for secretions
Suction catheter
Sterile water
Resuscitation bag (optional)
Gloves
9
How to Suction
HOW TO SUCTION
1. Wash hands.
2. Put on a glove. Use the gloved hand when touching
suction end of catheter.
3. Attach catheter to machine.
4. Rinse catheter by suctioning sterile water.
5. Gently insert catheter into tracheostomy tube until
it reaches the end of tube. (You will be taught in the
hospital about tracheostomy tube length.)
6. Cover the thumb hole on the catheter to suction.
7. Gently remove the catheter as you roll it between your
thumb and forefinger. (Start to finish should take no
longer than 5 to 10 seconds.)
8. If you need to suction again, rinse the catheter first.
9. Look at the mucus:
Normal: Clear with no odor.
Infection: Yellow or green color with a foul-smelling
odor.
Blood:
bright red or old dark blood, there could be a problem.
10. If you see signs of infection, or bright red blood, call
your doctor.
Follow the instructions of your hospital or home health
provider for storage or disposal of catheters.
according to the home health supplier’s instructions.
4
7
10
Changing the Ties
CHANGING THE TIES
It is important to keep the area around the opening in
the neck clean to help prevent infection. So, change ties
whenever they become wet or soiled, but change ties at
least daily.
You will be using scissors close to the face. So, you’ll
need to hold your child still. This job is easier with two
people. But it can be done by one, if need be.
How To Change Twill Tape Ties
1. Wash hands. (Both people, if two are involved.)
2. Cut two lengths of twill tape, each long enough to fold
in half and still reach around the child’s neck. Set
these nearby.
3. One person holds the child, the other changes the ties. If
you are doing this alone, swaddle the child securely in a
blanket to restrain the hands.
4. Place a rolled towel or blanket under the child’s shoulders.
WHAT YOU WILL NEED
Tracheostomy twill tape or other
tracheostomy tube holder
Blunt-nose bandage scissors
Towel or small blanket, rolled and
placed under the child’s shoulders
Clean gloves (optional) depending on
institution or physician preference
11
Changing the Ties
5. Leave the old ties in place. Thread the folded end of one
of the new ties through one of the holes on the tracheos-
tomy tube, going from the skin side, out toward you.
6. Pull the tie through, until it forms a loop. Draw the
other ends through the loop until the tie is secured to
the tracheostomy tube.
7. Repeat steps 5 and 6 for the other tie.
8. Bring the loose ends of both ties around to the back
of the neck and tie them together using a square knot.
(Don’t use a bow.)
Note: Change the location of the knot from side to
side and in the back of the neck to prevent skin irrita-
tion.
9. Cut the ends of the ties leaving only 1” to 2.”
10. Carefully cut and remove soiled ties.
Note: You know the ties are pulled tight enough when
you can fit the tip of your little finger snugly between the
neck and the tie.
8
9
10
7
5
12
Changing the Tracheostomy Tube
CHANGING THE TRACHEOSTOMY TUBE
Frequent and routine changes of the tracheostomy tube and
accessories are recommended. This helps to prevent gradual
mucus build-up, which can clog or block the tube. Your
doctor will advise you how often to change the tube. (If your
doctor instructs you to clean and reuse the tracheostomy
tube, Covidien recommends that Shiley™ tracheostomy tubes
be discarded after 29 days of use.)
Note: Changing the tube may upset the child and cause
coughing, which can lead to vomiting following insertion.
That’s why it is best to change a tube before a meal or at least
1-1/2 hours after eating.
Cleaning The Tracheostomy Tube
If you have been instructed by your healthcare professional
to clean the tracheostomy tube, follow these instructions and
warnings:
Both the tube and obturator may be cleaned using either
hydrogen peroxide (half strength), household vinegar (half
strength), sterile normal saline, or water and mild detergent.
After cleaning, rinse thoroughly with sterile saline to remove
all the cleaning solution residues. Allow to air dry.
If using a cuffed tracheostomy tube, the cuff should be
rinsed gently in sterile saline and not come in contact with
any cleaning detergents or chemicals.
WARNINGS:
Do not use solutions other than those mentioned above to
clean any part of the tube or obturator.
Do not expose the tube or obturator to any chemical agents
other than those recommended, as this may result in damage.
Do not soak the tube or obturator in peroxide.
CAUTION:
Shiley tracheostomy tubes are designed for single-patient
use only.
Note: Always follow your doctor’s or hospital’s directions if
they differ from the directions in this guide.
WHAT YOU WILL NEED
Replacement tube (with ties already
attached)
Blunt-nose bandage scissors
Towel or blanket to roll under the
child’s shoulders
Water-based lubricant
A helper or a blanket to swaddle the
child in
NOTE: You probably won’t have trouble
inserting the new tube. But if you do,
be sure the child’s head is tilted back.
If you are still having difficulty, spread
the skin around the stoma and insert
the tube while the child is breathing
in. Try a smaller size. Call your doctor
immediately if you have any problems.
!
13
Changing the Tracheostomy Tube
HOW TO CHANGE AN UNCUFFED TUBE
1. Be sure all involved wash their hands. Put on clean
gloves.
2. Insert obturator into new tracheostomy tube.
3. Attach ties as shown in “How To Change Twill Tape
Ties” on page 10. (Do this before putting the tube in your
child’s neck.) Place tube with ties attached in the opened
package nearby.
4. Place rolled towel or blanket under the child’s shoulders.
5. Have your partner restrain the child’s arms while you cut
the ties and remove the tube. (If no partner, swaddle the
child securely.)
6. Remove the old tube.
7. Gently insert the new tube, pushing back, then down, in
an arcing motion.
8. Immediately remove the obturator as you hold the tube
in place with your finger.
9. Fasten the ties using a square knot.
10. Throw away the old tube and ties.
2
3
7
8
9
14
Changing the Tracheostomy Tube
HOW TO CHANGE A CUFFED TUBE
1. Be sure all involved wash their hands.
2. Remove the new tube from the package. Take care to
avoid damaging the cuff, inflation line or pilot balloon in
any way.
3. Use a syringe to inflate the cuff to the proper leak test
volume. The markings on the syringe show air volume.
Shiley™
Tube Size Test Volume
4.0 PDC 8.0 cc
4.5 PDC 8.0 cc
5.0 PDC or PLC 9.0 cc
5.5 PDC or PLC 9.0 cc
6.0 PLC 11.0 cc
6.5 PLC 11.0 cc
4. Place entire tube, including inflation line, in a basin with
enough sterile water to cover it and watch for bubbles
indicating an air leak. Note: If you see any leaks, DO
NOT use the tube.
5. Deflate the cuff completely using a syringe. As you are
doing this, gently push the cuff away from the end of the
tube. Be sure to remove all air. This makes it easier to
insert the tube.
6. Attach ties as shown in “How To Change Twill Tape
Ties,” on page 10, and insert the obturator. (Do this
before inserting the tube.)
7. Then place the tube with ties attached in the opened
package nearby.
8. Place a rolled towel or blanket under the child’s
shoulders.
9. Have your partner restrain the child’s arms while you cut
the ties and remove the old tube. If no partner, swaddle
the child securely. If necessary, suction accumulated
secretions above the cuff prior to deflating.
5
4
3
7
9
15
Changing the Tracheostomy Tube
10. Gently insert the new tube, pushing back, then down in
an arcing motion.
11. Immediately remove the obturator, as you hold the tube
in place with your fingers.
12. Continue to hold the new tube in place while your part-
ner fastens the ties using a square knot.
13. Inflate the cuff to the proper volume using a syringe.
(Your doctor will tell you what volume to use.)
Note: Care must be taken to place the air line and pilot
balloon so that they do not become damaged during the
child’s normal activities.
14. Throw away the old tube and ties.
NOTE: You probably won’t have trouble inserting the
new tube. But if you do, be sure the child’s head is
tilted back. If you are still having difficulty, spread the
skin on the stoma and insert the tube while the child
is breathing in. Call your doctor immediately if you
have any problems.
NOTE: Always follow your doctor’s or hospital’s
directions if they differ from the directions in this guide.
!
10
11
16
Cleaning Around the Opening
CLEANING AROUND THE OPENING
Skin care should be done at least twice a day: once in the
morning and once at night. If you smell an odor around the
neck or opening, clean the area every 8 hours until the odor
is gone.
In between skin care time, keep the neck and area around
the opening clean and dry. Do not use powders or lotions.
The child could breathe them into the lungs. Watch for red,
irritated areas. If excessive redness or pimples occur around
the opening, call your doctor, reduce humidity and use only
sterile water for cleaning. If your doctor orders an ointment,
spread it on according to his instructions.
WHAT YOU WILL NEED
Water and hydrogen peroxide, mixed
half and half
Cotton swabs
Towel or small blanket, rolled up
WATER HYDROGEN PEROXIDE
17
How to Clean Around the Opening
HOW TO CLEAN AROUND THE OPENING
1. Wash your hands.
2. Mix four (4) tablespoons of hydrogen peroxide
solution with four (4) tablespoons of water as
clean basin or container.
3. Place rolled up towel or blanket under your child’s
shoulders to expose the stoma area.
4. Dip a cotton swab into the hydrogen peroxide and
water mixture.
5. Roll the cotton swab between the tracheostomy tube
and the skin around the opening. Clean from the
stoma outward. This removes wet or dried mucus.
6. Repeat steps 4 and 5, using a fresh cotton swab each
time, until entire area around opening is clean.
7. Rinse the area using clean cotton swabs, dipped in
clean water only. Then let it air dry.
18
Leaving Home
LEAVING HOME
Your child doesn’t have to be stuck in the house. You may take
him with you shopping, to the park or on visits to friends and
family. Whenever you go out, prepare a travel kit.
If It’s Cold Out
If it’s below freezing outside, don’t let your child breathe cold
air directly through the tracheostomy tube. This can be bad
for his windpipe and cause problems.
Use a scarf, kerchief or single layer of gauze tied loosely
around the neck. If you have an artificial nose, use that.
These things warm the air as the child breathes in. They
also are good ways to keep dust and dirt out on dusty or
windy days.
Going To School
If your child is school age, he may attend. But it’s important
to contact the school nurse to make special arrangements
ahead of time, so that the school can provide the proper care.
Going Out To Play
Your child can play with other children. But you should
supervise the play. Contact sports or rough games are not a
good idea for children with tracheostomies. Do not let your
child play in pools, sandboxes or areas where small particles
could get inside the tracheostomy tube.
WHAT YOU WILL NEED
Spare tracheostomy tubes (with
obturators and ties, same size and
one smaller)
Scissors
Portable suctioning device with suction
catheter
Sterile water
Tissues
Bulb syringe
Breathing medications (if child uses)
Manual resuscitation bag (if ordered)
19
Leaving Home
LEARNING TO SPEAK
At first your child may not be able to make a sound. Don’t
worry. As swelling decreases, she may begin to make sounds.
In the meantime, watch her face. She can tell you a lot with
her looks.
How much sound your child is able to make depends on
her age, the tracheostomy tube, her breathing patterns, etc.
Some children can produce sound around the tube. Others
may use things called speaking valves that help control the
airflow so they can speak.
Your child will need special care so that she will be able to
speak properly as she grows. Be sure to show her things. Say
their names. Read to her. Point to pictures and say what they
are. Talk to her. Tell her what you are doing.
At nine months, children can learn sign language. If you sign
to your child, always say the words out loud while you sign.
For additional information about your child’s speech, consult
your doctor or speech pathologist.
How Do I Know If My Infant Needs Me?
Any non-speaking child, especially if he is less than a year
old, should be closely monitored. If you are worried that you
won’t know when your infant needs you, let your baby sleep
in the same room with you. Better yet, put an intercom in
your child’s room. Always check on your child frequently
during the day.
20
Glossary
Artificial Airway (ar-teh-fish-all air-way) Another word for
tracheostomy tube.
Artificial Nose (ar-teh-fish-all noz)
and moisture exchanger). A device that warms and moistens
the air your child breathes in.
Bacteria (back-teh-ree-ah) Germs.
CPR Cardiopulmonary Resuscitation A method for getting
someone to breath again once they have stopped breathing
or to get the heart to pump again if it has become ineffective.
Cannula (can-you-la) The tube part of the tracheostomy
tube .
Cartilage (car-till-age) The tough tissue rings the windpipe
is made of.
Cuff The inflatable balloon on some tracheostomy tubes.
Diaphragm (die-ah-fram) The big muscle below the lungs
that controls breathing.
Encrustation (in-cruss-ta-shun) Hard, crusty, dried mucus.
Exhale (x-hale) Breathe out.
Expiration (x-pire-a-shun) Breathe out.
Health Care Provider Nurses, nurse practitioners, doctors,
respiratory therapists, speech pathologists or others that visit
your home.
Health Care Supplier The company where you get special
medical equipment.
Inhale (in-hale) Breathe in.
Inspiration (in-pire-a-shun) Breathe in.
Lumen (loo-men) Inside part of the tube, where the air goes
in and out.
Mucus (mu-kuss) Slippery fluid that’s produced in the lungs
and windpipe. This dries and sticks to any surface and forms
a crust.
Nebulizer (neb-you’ll-eyes-er) A machine that puts mois-
ture and/or medicine directly into the lungs.
Obturator (ob-tur-a-tor) The semi-rigid stick you put into
the tracheostomy tube to help guide it into the opening in
the neck.
Phonation (fo-nay-shun) Talking or making sounds with the
vocal cords.
21
Glossary
Pliable (ply-ah-bull) Soft, flexible.
Saline (say-leen) Solution similar to water found in the
body.
Secretions (see-kree-shuns) Another word for mucus.
Speaking Valve (spee-king valv) A one-way valve that lets
air come in through the tracheostomy tube, but then sends it
out past the vocal cords and mouth to make talking possible.
Speech Pathologist (speech path-ol-o-gist) A person
trained to help people with speaking and swallowing
problems.
Stoma (sto-ma) The actual opening in your neck where you
insert the tracheostomy tube.
Sterile (steer-ill) Free from germs.
Suctioning (suck-shun-ing) Vacuuming up mucus in the
tracheostomy tube.
Swaddle (swah-del) To wrap a baby like a mummy with
only his head sticking out.
Syringe (seer-enj) The plastic device with a plunger that you
use to inflate the cuff.
Trachea (tray-key-ah) The windpipe.
Tracheostomy (tray-key-oss-tuh-mee) The opening in
your neck where your tracheostomy tube goes, to make
breathing easier.
Tracheotomy (tray-key-ot-o-mee) The operation where a
doctor makes an opening in your neck for a tracheostomy
tube to make breathing easier.
Trach Mask (trake mask) A device that fits on the end of the
trach tube to provide moisture.
Trach Tube (trake toob) Short for tracheostomy tube. This is
the tube the doctor puts in the opening in your child’s neck.
Ventilator (vin-till-a-tor) A machine that helps a person
breathe through a trach tube by mechanically inflating
the lungs.
Vocal Cords (vo-cal cords) Two strips of tissue in the voice
box in the neck that vibrate to make sounds when we talk.
22
Shiley Uncuffed Tubes
SHILEY™
UNCUFFED TUBES
1. Connector: The part of the tube that sticks out of
the neck.
2. Cannula: Another name for the tube part of the trache-
ostomy tube.
3. Neck Plate: This is where the ties are attached to hold the
tracheostomy tube in place.
4. Size and style of the tracheostomy tube.
5. Size of the opening on the tracheostomy tube.
6. Size of the outside of the tracheostomy tube.
7. Obturator: This is used to help guide the tube during
insertion.
1
3
4
2
NEO PED PDL
6
5
7
23
Shiley Cuffed Tubes
SHILEY™
CUFFED TUBES
1. Connector: The part of the tube that sticks out of
the neck.
2. Cannula: Another name for the tube part of the
tracheostomy tube.
3. Neck Plate: This is where the ties are attached to hold
the tracheostomy tube in place.
4. Size and style of the tracheostomy tube.
5. Size of the opening on the tracheostomy tube.
6. Size of the outside of the tracheostomy tube.
7. Cuff: Once the tracheostomy tube is in the neck, this is
filled with air. It helps keep food, water or vomit from
getting into the lungs.
8. Inflation Line: Carries air to and from the cuff.
9. Pilot Balloon: If there is air in the cuff, this will be puffed
up. If you have sucked all the air out of the cuff this will
be flat.
10. Luer Valve: This is where you insert the tip of the syringe
to put air in, or take air out, of the cuff.
1
3
4
2
PDC/PDL
6
5
7
8
9
24
Solving Problems
SOLVING PROBLEMS
SYMPTOM WHAT MAY HAVE HAPPENED WHAT TO DO
Your Child:
– Is restless
– Is crying
– Has a scared look on his
face
– Is making a bubbling or
wheezing sound
– Can’t cough out mucus
– Has a pale color or blue,
dusky color around mouth
and nose
– Is flaring his nostrils
– Is having trouble eating
– Looks hollow in the neck
– Has the skin on his chest
sucked in
Build-up of mucus. Suction. If symptoms remain
after suctioning, call your
doctor.
Yellow or green mucus, bad
smelling mucus or bright red
blood comes out when you
suction.
Infection. Call your doctor.
Tube comes out of the opening
in the neck.
Pulling or weight at connector. Hold the neck plate with one
hand while removing ventilator
tubing to reduce pulling.
Move ventilator (if used) and
tubing so it doesn’t pull on the
tracheostomy tube.
Tracheostomy ties too loose or
tied the wrong way.
Put the tube back into
the opening and retie the
tracheostomy ties (refer to
pages 10 and 11).
25
Solving Problems
SYMPTOM WHAT MAY HAVE HAPPENED WHAT TO DO
Unable or difficult to pass
suction catheter through
tracheostomy tube.
Mucus plugging tracheostomy
tube.
Change the tracheostomy
tube.
Catheter too large for tube
size.
Contact your Home Healthcare
Supplier.
When you change diapers:
– You notice your child has
stopped wetting or is
wetting a lot less.
– Dark urine with a strong
ammonia smell.
Dehydration. Call your doctor.
Tube, or any part of the tube is
broken or doesn’t work.
Faulty tracheostomy. Replace the tube.
Tracheostomy tube was
cleaned using improper
cleaning agents.
Replace the tube.Always use
only those cleaning agents
recommended by the tube
manufacturer.
Pulling or weight at connector. Hold the neck plate with
one hand while removing
ventilator tubing to reduce
pulling. Move ventilator and
tubing so it doesn’t pull on the
tracheostomy tube.
26
Solving Problems
SYMPTOM WHAT MAY HAVE HAPPENED WHAT TO DO
Ventilator’s “High Pressure” alarm
goes off.
Ventilator tubing is blocked or
kinked.
Clear tubing of kink or
blockage.
Mucus is plugging the
tracheostomy tube.
Suction to clear mucus.
If the first two suggestions
don’t work, there may be a
ventilator problem.
Contact Home Healthcare
Supplier.
Ventilator “Low Pressure”
alarm goes off.
Ventilator tubing is not
connected at machine.
Make sure all tubing to
machine and patient is
connected.
If you have a cuffed
tracheostomy tube: Leak
in cuff, inflation line or pilot
balloon.
Remove ventilator tubing from
tracheostomy tube. Deflate
and reinflate cuff with proper
volume.Attach ventilator
tubing.Turn on machine.
Replace the tube if it will not
remain inflated.
If the first two suggestions
don’t work, there may be a
ventilator problem.
Contact Home Healthcare
Supplier.
Deliver breaths with a manual
resuscitation bag, if available.
The following applies only to patients on ventilators.!
27
What if the Power Goes Out?
WHAT IF THE POWER GOES OUT?
The best way to deal with this is to have a plan.
Before the power goes out, notify the power and phone com-
panies, in writing, that your child uses a tracheostomy tube.
Ask for priority in restoring service.
You may purchase a special light that goes on if the power
goes off. Use this to alert you.
You may go to a friend’s or family member’s home. Also, you
might go to a hospital or fire house where there will be an
emergency generator.
28
29
Tabla de Contenidos
TUBO DE TRAQUEOSTOMÍA GUÍA PARA LA
ATENCIÓN DOMICILIARIA PEDIÁTRICA
¡Usted Puede Hacerlo!. . . . . . . . . . . . . . . . . . . . . . . . . . . . . . . . 30
Qué Necesitará
En Qué Consiste la Traqueostomía . . . . . . . . . . . . . . . . . . . . . . 31
Qué Hace el Médico
Qué Ocurre al Interior del Cuerpo
Humidificación . . . . . . . . . . . . . . . . . . . . . . . . . . . . . . . . . . . . . . 32
Retiro del Humidificador
Consejos Prácticos Para la Vida Diaria . . . . . . . . . . . . . . . . . . . 33
Al Comer
Al Darse un Baño
Al Vestirse
Al Jugar
Al Estar Enfermo
Al Salir a Pasear
Consejos Prácticos de Seguridad . . . . . . . . . . . . . . . . . . . . . . . 35
Aspiración. . . . . . . . . . . . . . . . . . . . . . . . . . . . . . . . . . . . . . . . . . 36
Qué Necesitará
Cómo Aspirar . . . . . . . . . . . . . . . . . . . . . . . . . . . . . . . . . . . . . . . 37
Cómo Cambiar los Lazos . . . . . . . . . . . . . . . . . . . . . . . . . . . . . . 38
Cómo Cambiar los Lazos de Cinta Asargada
Qué Necesitará
Cómo Cambiar el Tubo de Traqueostomía . . . . . . . . . . . . . . . . 40
Cómo Limpiar el Tubo de Traqueostomía
Qué Necesitará
Cómo Cambiar los Tubos Sin Manguito . . . . . . . . . . . . . . . . . . 41
Cómo Cambiar los Tubos Con Manguito . . . . . . . . . . . . . . . . . 42
Aseo de la Zona Que Rodea el Orificio. . . . . . . . . . . . . . . . . . . 44
Qué Necesitará
Cómo Limpiar la Zona Que Rodea el Orificio. . . . . . . . . . . . . . 45
Salir de Casa . . . . . . . . . . . . . . . . . . . . . . . . . . . . . . . . . . . . . . . . 46
Si Hace Frío
Al ir a la Escuela
Al Salir a Jugar
Qué Necesitará
Aprender A Hablar. . . . . . . . . . . . . . . . . . . . . . . . . . . . . . . . . . . 47
¿Cómo Puedo Saber Si Mi Hijo Me Necesita?
Glosario. . . . . . . . . . . . . . . . . . . . . . . . . . . . . . . . . . . . . . . . . . . . 48
Tubos Sin Manguito. . . . . . . . . . . . . . . . . . . . . . . . . . . . . . . . . . 50
Tubos Con Manguito . . . . . . . . . . . . . . . . . . . . . . . . . . . . . . . . . 51
Solución de Problemas . . . . . . . . . . . . . . . . . . . . . . . . . . . . . . . 52
¿Qué Hacer Si Se Corta la Energía Eléctrica? . . . . . . . . . . . . . . 55
30
¡Usted Puede Hacerlo!
¡USTED PUEDE HACERLO!
Una traqueostomía no es algo común, por lo tanto, es
razón que Shiley creó esta guía: para responder las pregun-
tas comunes que se le presentan a los padres a medida que
aprenden a atender la traqueostomía de su hijo.
Usted recibirá capacitación para el cuidado de la traqueostomía
participe en forma activa, que haga muchas preguntas y que
tome notas. La práctica hace al maestro. Mientras más tiempo le
dedique, más cómodo se sentirá atendiendo a su hijo.
Una buena idea es que varios miembros de la familia se
capaciten para que así ellos también sepan cómo atender la
traqueostomía de su hijo.
Su médico, enfermera o terapeuta son su mejor fuente de
asesoría. Sin embargo, esta guía le proporcionará útiles
consejos y recordatorios para que, cuando usted y su hijo
vuelvan a casa, todo fluya sin problemas.
QUÉ NECESITARÁ
Un recipiente o lavatorio pequeño
(para revisar el manguito del tubo)
Una manta (para envolver al niño)
Tijeras para vendaje con punta roma
(para cortar la cinta asargada)
Cajita con pañuelos desechables
Jeringa de pera
Hisopos de algodón (se utilizan para
limpiar la zona que rodea el orificio)
Guantes quirúrgicos (como los que usa
el médico)
Humidificador (para humedecer el aire
durante las siestas y durante la noche)
Peróxido de hidrógeno y agua
(mezclados en partes iguales, para
limpiar la zona alrededor del orificio o
estoma)
Nebulizer (to moisten the lungs)
Tubo de traqueostomía de repuesto
(uno del mismo tamaño y otro más
pequeño)
Bolso de reanimación (opcional)
Agua esterilizada (para lavar los
catéteres de aspiración)
Catéter de aspiración
Máquina de aspiración (para conectar
y portátil)
Toalla o manta pequeña (para
enrollar y poner bajo los hombros
del niño durante el cuidado de la
traqueostomía)
Mascarilla del tubo de la
traqueostomía
Cinta asargada u otro soporte para
tubo de traqueostomía (para asegurar
el tubo en su lugar)
NOTA: Es posible que su proveedor de
accesorios para atención médica domiciliaria
lleve algunos de estos artículos; el resto
deberá comprarlos en la tienda.
En Qué Consiste la Traqueostomía
31
Esófago (al estómago)Tubo aéreo (traquea)
Pulmones
Sacos aéreos
EN QUÉ CONSISTE LA TRAQUEOSTOMÍA
Qué hace el médico
del cuello para llegar a la traquea. A continuación, intro-
duce un tubo plástico curvo (tubo de traqueostomía) en la
incisión, el cual permitirá respirar a su hijo.
Qué ocurre al interior del cuerpo
Por lo general, respiramos a través de la nariz y la boca;
el aire se filtra, se entibia y humedece antes de bajar por la
traquea hasta los pulmones.
Con una traqueostomía, el aire pasa directamente por la
traquea hasta los pulmones. No se filtra, ni se entibia ni se
humedece. Aprenderá a cómo prepararse para ello con el
equipo apropiado y aprendiendo a cuidar correctamente la
traqueostomía.
32
Humidificación
HUMIDIFICACIÓN
protege el revestimiento de los pulmones y evita que la
mucosidad se seque.
Una traqueostomía pasa por alto la nariz y la boca. Por lo
tanto, necesitamos agregar humedad, aún en climas húm-
edos, o la mucosidad se secará y bloqueará el tubo de la
un sistema de humidificación con un tubo flexible y una
mascarilla para traqueostomía. Otra forma de humidificar es
y la humedad cuando el niño exhala y luego devuelve dicha
humedad al aire cuando el niño inhala.
Asegúrese de utilizar un humidificador durante las siestas y
durante la noche para disminuir la posibilidad de que la mu-
cosidad obstruya el tubo de la traqueostomía, aun cuando su
hijo use una nariz artificial mientras esté despierto.
Retiro del humidificador
Durante el día (y sólo durante el día) puede dejar que su hijo
permanezca sin humedad durante períodos más prolonga-
atento a la formación de mucosidad gruesa o mucosidad con
restos de sangre. Si detecta algunas de estas características,
dé al niño mucho líquido para mantener la mucosidad del-
gada. Informe de la situación a su médico.
Si el tubo de la traqueostomía se tapa, aspírelo para retirar
el tapón de mucosidad (consulte la página 9). Si no puede
retirar el tapón de mucosidad, cambie el tubo.
33
Consejos Prácticos Para la Vida Diaria
CONSEJOS PRÁCTICOS PARA LA VIDA DIARIA
Al comer
Su hijo comerá tal como lo haría cualquier niño. Sólo debe
tener cuidado de que las comidas y los líquidos no se vayan
“por el camino equivocado”.
Cuando alimente a un bebé con biberón, no levante el bib-
erón ni tampoco, lo alimente cuando esté acostado. Puede
entrar líquido a los pulmones. Sostenga al niño en posición
casi vertical mientras lo alimenta. Cuando termine de
comer, ponga al niño de lado. De esta manera, si vomita,
hay menor riesgo de que el vómito llegue a los pulmones y
que el niño se ahogue.
Durante las comidas, vigile a los niños que empiezan a
caminar, para evitar que entre comida al tubo de la traque-
ostomía. Tal vez le parezca conveniente cubrir levemente la
abertura del tubo de la traqueostomía con la mascarilla del
sistema de humidificación o con una nariz artificial para
mayor seguridad.
Al bañarlo
A los niños les encanta bañarse. Su hijo también lo disfru-
tará, con usted cuidándolo.
Prepare siempre un baño con poca agua. Tenga cuidado y
evite que el agua entre al tubo de la traqueostomía, porque
se irá directamente a los pulmones. Para mayor seguridad,
utilice una mascarilla traqueal o una nariz artificial.
Cuando llegue el momento de aplicar el shampoo, ponga al
niño de espalda, apoyando su cabeza en el lavabo.
Al vestirse
Puede vestir a su hijo prácticamente de la forma que desee.
Sólo tenga cuidado y evite que la ropa bloquee el tubo de la
traqueostomía.
Evite: Cuellos redondos, cuellos altos tipo tortuga, botones
en la espalda, gargantillas, correas de hombro y ropa que
desprenden pelusas o fibras.
Use: Camisetas con cuello en forma de V y ropa con botones
al frente. Los baberos de algodón son más recomendables
que los de plástico.
34
Consejos Prácticos Para la Vida Diaria
Al jugar
Los niños que empiezan a caminar disfrutan la mayoría de
los juegos normales, pero se les debe supervisar. Además,
deberá seleccionar sus juguetes con cuidado.
Evite: Juguetes o piezas de juguetes de tamaño muy pequeño
que pudieran entrar en el tubo de la traqueostomía. Además,
evite las cajas de arena y los deportes de contacto.
suelta, una mascarilla o una nariz artificial para entibiar el
aire y evitar que ingrese polvo al tubo.
Al estar enfermo
Si bien a nadie le gusta estar enfermo, esto puede resultar
un desafío especial para los pacientes con traqueostomía. Lo
mejor es evitar la enfermedad, por tanto, asegúrese de que su
hijo ingiera alimentos saludables. Además, mantenga al día
todas sus vacunas e inyecciones y evite que esté en contacto
con otros niños que estén enfermos.
Si su hijo se enferma, vigílelo atentamente. Si el niño vomita,
tiene diarrea o fiebre, tal vez sea necesario que lo aspire
con mayor frecuencia y que le dé más líquidos. Además, si
vomita, cubra levemente el tubo de la traqueostomía con
una nariz artificial, un babero o una bufanda para evitar que
ingrese vómito. Si cree que es posible que haya ingresado
vómito al tubo, aspírelo de inmediato. Si observa restos de
comida, llame cuanto antes a su médico.
Al salir a pasear
Cuidar a un niño que tiene una traqueostomía puede
demandar mucho tiempo. Asegúrese de planificar tiempo
adicional para usted, su cónyuge y el resto de sus hijos.
Si va a salir, debe contratar a una niñera capacitada para
atender traqueostomías. Una buena idea es capacitar a uno
de los abuelos o a otro miembro de la familia o a un vecino.
Algunos padres intercambian niñera con otros padres de
niños que tienen tubos de traqueostomía.
35
Consejos de Seguridad
CONSEJOS DE SEGURIDAD
Siga las instrucciones de su médico o del hos-
pital respecto al cuidado de la traqueostomía.
Si las instrucciones que aparecen en esta guía
difieren de las que reciba en su capacitación,
siga las instrucciones de su capacitación.
-
ación de parte de un profesional de salud pu-
eden efectuar el cuidado de la traqueostomía.
-
les a mano para usarlos en caso de emergencia
(uno del mismo tamaño y otro más pequeño).
sitio donde la temperatura sea superior a 48°C
(120°F).
de su pequeño.
-
ción. Informe a su médico si descubre:
– la piel que rodea el estoma está roja e in-
flamada
– Mucosidad maloliente
– Mucosidad con sangre de color rojo brillante
una pequeña pausa antes de volver a aspirar.
– Use poca agua.
– Utilice la mascarilla traqueal.
-
mente cubierto mientras alimenta al niño.
entre comida al tubo de la traqueostomía.
después que hayan comido, en caso de que
vomiten.
del niño.
y moho.
de la traqueostomía. Sin embargo, puede utilizar
una bufanda holgada.
– Cajas de arena
– Juguetes muy pequeños
-
mente si juega con otros niños.
– Se le enseñará RCP en el hospital.
– Todas las personas que atiendan a su hijo
deben saber RCP.
la cama.
del teléfono.
SI SU HIJO UTILIZA UN VENTILADOR MECÁNICO
Revise periódicamente las alarmas de seguridad y auditivas del ventilador para confirmar que funcionen
correctamente.
Asegúrese de que los tubos del ventilador estén colocados correctamente de modo que no tiren el tubo de
traqueostomía.
No tuerza ni tire del conector de traqueostomía más de lo que debe. Esto podría causar incomodidad a su hijo o
desconectar los tubos del ventilador.
Sujete el tubo de traqueostomía para mantenerlo en su lugar cuando conecte o desconecte los conductos del
humidificador o del ventilador mecánico.
!
36
Aspiración
NOTA: Siempre siga las indicaciones
de su médico o del hospital si difieren
de las instrucciones que aparecen en
esta guía.
!
QUÉ NECESITARÁ
Máquina de aspiración
Recipiente para recolectar las
secreciones
Catéter de aspiración
Agua esterilizada
Bolso de reanimación (opcional)
Guantes
ASPIRACIÓN
Los pulmones y el tubo aéreo o traquea deben producir
mucosidad. Ésta limpia el aire a medida que respiramos
al atrapar partículas pequeñas. Luego se desplaza hacia
arriba de la tráquea hasta que se puede tragar.
La mucosidad puede acumularse en el tubo de traque-
ostomía y en el área que lo rodea. Debe eliminarse para
que no se seque y obstruya el tubo.
La aspiración sólo debería hacerse cuando sea necesario,
generalmente al despertar, antes de las comidas (si es
necesario), cuando el niño tome una siesta y antes de
que se vaya a dormir. No aspire con demasiada frecuen-
cia. Mientras más aspire, más secreciones se pueden
producir.
A medida que su hijo crezca, tendrá que realizar las aspi-
raciones con menor frecuencia. Sin embargo, tal vez aún
será necesario que evalúe la necesidad de aspirar al niño
al menos dos veces al día.
Las siguientes señales son indicaciones que su hijo puede
necesitar que se le aspire en forma inmediata.
gorjeo o de tos
pálido
Hable con su médico cada vez que su hijo presente se-
ñales que de que requiere aspiración inmediata.
37
Cómo Aspirar
CÓMO ASPIRAR
1. Lávese las manos.
2. Colóquese los guantes. Toque el extremo de aspiración
del catéter sólo con la mano con guante.
3. Ajuste el catéter a la máquina.
4. Lave el catéter aspirando agua esterilizada.
5. Inserte suavemente el catéter en el tubo de la traqueos-
tomía hasta que llegue al final del tubo (en el hospital
le enseñarán respecto a la longitud del tubo de la
traqueostomía).
6. Cubra el orificio para el pulgar que hay en el catéter para
aspirar.
7. Retire suavemente el catéter, haciéndolo girar entre
su pulgar y el índice (en total, el proceso completo no
debería tomarle más de 5 a 10 segundos).
8. Si necesita volver a aspirar, lave antes el catéter.
9. Revise la mucosidad:
Normal: transparente sin olor.
Infección: color amarillo o verde con mal olor.
Sangre: es normal que haya algunas vetas de sangre. Sin
embargo, si hay una mayor canti dad de sangre de color
rojo brillante u oscuro, podría haber un problema.
10. Si observa alguna señal de infección o sangre de color
rojo brillante, llame a su médico.
Siga las instrucciones del hospital o del proveedor de aten-
ción domiciliaria para guardar o desechar los catéteres.
Mantenga la máquina de aspiración, sus tubos y el
recipiente para las secreciones limpios según las instruc-
ciones de su proveedor de atención médica domiciliaria.
4
7
38
Cómo Cambiar los Lazos
CÓMO CAMBIAR LOS LAZOS
cuello se mantenga limpia para evitar infecciones. Por lo
tanto, cambie los lazos cuando se humedezcan o cuando
estén evidentemente sucios, al menos una vez al día.
Utilizará tijeras cerca de la cara. Por lo tanto, será
necesario que sostenga al niño con fuerza, para que no
Pero de ser necesario, puede hacerlo sólo una persona.
Cómo cambiar los lazos de cinta asargada Lazos
de cinta
1. Lávese las manos (ambos, si le ayuda otra persona).
2. Corte dos trozos de cinta de asargada, cada uno del largo
suficiente como para doblarlos por la mitad y aún así
alcanzar alrededor del cuello del niño. Déjelas cerca.
3. Una persona sostiene al niño, la otra cambia los lazos.
Si está haciendo el cambio solo, envuelva fuertemente al
niño en una manta para evitar que mueva las manos.
4. Ponga una toalla o manta bajo los hombros delniño.
QUÉ NECESITARÁ
Cinta asargada para traqueostomía
u otro soporte para tubo de
traqueostomía
Tijeras para vendaje con punta roma
Toalla o manta pequeña, enrollada y
puesta bajo los hombros del niño
Guantes limpios (opcional),
dependiendo de las preferencias del
médico o la institución
39
Cómo Cambiar los Lazos
5. Deje los lazos usados en su lugar. Pase el extremo
doblado de uno de los lazos nuevos a través de uno de
los orificios del tubo de la traqueostomía, yendo desde el
lado de la piel hacia usted.
6. Tire todo el lazo, hasta que se forme un bucle. Tire los
otros extremos a través del bucle hasta que el lazo quede
firmemente ajustado al tubo de la traqueostomía.
7. Repita los pasos 5 y 6 con el otro lazo.
8. Junte los extremos sueltos de ambos lazos atrás del
cuello y átelos con un nudo cuadrado (no use un moño).
Nota: Cambie la ubicación del nudo de un lado a otro
y en la parte posterior del cuello para evitar que la piel
se irrite.
9. Corte los extremos de los lazos 1 ó 2 pulgadas
(2,5 ó 5 cm).
10. Corte con cuidado los lazos sucios y deséchelos.
Nota: Las cintas tienen la tensión adecuada cuando se
puede pasar la punta del dedo meñique fácilmente entre
el cuello y la cinta.
8
9
10
7
5
40
Cómo Cambiar el Tubo de Traqueostomía
CÓMO CAMBIAR EL TUBO DE
TRAQUEOSTOMÍA
Se recomienda cambiar los tubos de traqueostomía y los ac-
la formación gradual de mucosidad, lo que puede tapar o
bloquear el tubo. Su médico le indicará con qué frecuencia
debe cambiar el tubo (si su médico le indica que puede lim-
piar y volver a utilizar el tubo de la traqueostomía, Covidien
recomienda eliminar los tubos de traqueostomía Shiley™ tras
29 días de uso).
Nota
por esta razón que lo mejor es cambiar un tubo antes de una
comida o al menos 1 a 1/2 hora después de una comida.
Cómo limpiar el tubo de traqueostomía
Si su profesional de salud le ha instruido para limpiar el tubo
de la traqueostomía, siga estas instrucciones y advertencias:
de hidrógeno (diluido a la mitad), vinagre casero (diluido a
la mitad), solución salina normal esterilizada o agua y deter-
gente suave. Después de limpiar, enjuague bien con solución
salina esterilizada para eliminar los residuos de solución de
limpieza. Deje secar al aire.
Si utiliza un tubo de traqueostomía con manguito, este se
debería lavarse bien con solución salina esterilizada y no de-
bería entrar en contacto con ningún químico ni detergente
de limpieza.
ADVERTENCIAS:
Utilice sólo las soluciones antes mencionadas para limpiar
cualquier parte del tubo o del obturador.
No exponga el tubo ni el obturador a agentes químicos dis-
tintos diferentes a los recomendados, ya que podría causar
daños a estos elementos.
No deje remojando el tubo ni el obturador en peróxido
Asegúreese de que el lubricante no ingrese a ni bloquee la
luz del tubo, ya que esto puede impedir la ventilatión.
QUÉ NECESITARÁ
Un tubo de reemplazo (con lazos listos)
Tijeras para vendaje con punta roma
Toalla o manta para enrollar y poner
bajo los hombros del niño
Un portabebé o una manta para
envolver al niño
PRECAUCIÓN:
Los tubos de traqueostomía de Shiley
están diseñados sólo para ser utilizados
en un solo paciente.
NOTA: Siempre siga las indicaciones
de su médico o del hospital si difieren
de las instrucciones que aparecen en
esta guía.
!
41
Cómo Cambiar los Tubos Sin Manguito
CÓMO CAMBIAR LOS TUBOS SIN MANGUITO
1. Todas las personas que participen deben lavarse las ma-
nos. Póngase guantes limpios.
2. Inserte el obturador en un nuevo tubo de traqueostomía.
3. Ajuste los lazos tal como se muestra en la sección “Cómo
cambiar los lazos de cinta asargada” en la página 10
(hágalo antes de poner el tubo en el cuello del niño).
Ponga el tubo con los lazos en su posición en el paquete
4. Ponga una toalla o manta bajo los hombros del niño.
5. Pida a su ayudante que sujete los brazos del niño mien-
tras usted corta los lazos y retira el tubo (si hace el cam-
bio solo, envuelva con fuerza al niño).
6. Retire el tubo usado.
7. Inserte suavemente el tubo nuevo, empujando hacia atrás,
luego hacia abajo, con un movimiento en forma de arco.
8. Retire rápidamente el obturador al mismo tiempo que
sostiene el tubo firmemente con los dedos.
9. Asegure los lazos con un nudo cuadrado.
Nota
insertar el tubo nuevo.
niño esté inclinada hacia atrás.
Si los problemas continúan, extienda la piel que rodea el
estoma e inserte el tubo mientras el niño inspira. Pruebe
con un tubo de menor tamaño. Llame a su médico de
inmediato si tiene problemas.
2
3
7
8
9
42
Cómo Cambiar los Tubos Con Manguito
CÓMO CAMBIAR LOS TUBOS CON
MANGUITO
1. Todas las personas que participen deben lavarse las
manos.
2. Saque el tubo nuevo del paquete. Tenga cuidado de no
dañar el manguito, la línea de inflado ni el globo piloto.
3. Use una jeringa para inflar el manguito hasta el volu-
men correcto a prueba de fugas. Las marcas de la jeringa
indican el volumen de aire.
Tamaño del tubo Shiley™
Volumen de prueba
4.0 PDC 8.0 cc
4.5 PDC 8.0 cc
5.0 PDC or PLC 9.0 cc
5.5 PDC or PLC 9.0 cc
6.0 PLC 11.0 cc
6.5 PLC 11.0 cc
4. Sumerja el tubo completo, incluida la línea de inflado,
en un recipiente o lavatorio pequeño con suficiente agua
esterilizada hasta cubrirlo y observe si hay burbujas
que indiquen la presencia de una fuga de aire. Nota: Si
5. Desinfle el manguito por completo con una jeringa. A
medida que lo hace, empuje suavemente el manguito
para sacarlo del extremo del tubo. Asegúrese de eliminar
todo el aire. De esta forma podrá insertar el tubo con
más facilidad.
6. Ajuste los lazos tal como se muestra en la sección “Cómo
cambiar los lazos de cinta asargada”, en la página 10, e
inserte el obturador. (Hágalo antes de insertar el tubo).
7. Lubrique el tubo con una capa delgada de lubricante a
base de aqua.
8. A continuación, ponga el tubo con los lazos en su
posición en el paquete abierto que tiene cerca.
9. Ponga una toalla o manta bajo los hombros del niño.
10. Pida a su ayudante que sujete los brazos del niño mien-
tras usted corta los lazos y retira el tubo usado. Si hace el
cambio solo, envuelva con fuerza al niño. De ser necesa-
rio, aspire las secreciones acumuladas sobre el manguito
antes de desinflar.
5
4
3
8
10
43
Cómo Cambiar los Tubos Con Manguito
11. Inserte suavemente el tubo nuevo, empujando hacia
atrás, luego hacia abajo, con un movimiento en forma de
arco.
12. Retire rápidamente el obturador al mismo tiempo que
sostiene el tubo firmemente con los dedos.
13. Siga sosteniendo el tubo nuevo en su lugar mientras su
ayudante abrocha los lazos con un nudo cuadrado.
14. Infle el manguito hasta el volumen adecuado con una je-
Nota
el globo piloto de manera tal que no se dañen durante las
actividades normales del niño.
NOTA: Es probable que no tenga ningún problema para insertar
el tubo nuevo. En caso de que los tenga, asegúrese de que la
cabeza del niño esté inclinada hacia atrás. Si los problemas
continúan, extienda la piel que rodea el estoma e inserte el tubo
mientras el niño inspira. Si tiene algún problema, llame cuanto
antes a su médico.
Nota: Siempre siga las indicaciones de su médico o del hospital
si difieren de las instrucciones que aparecen en esta guía.
!
11
12
44
Aseo de la Zona Que Rodea el Orificio
ASEO DE LA ZONA QUE RODEA EL ORIFICIO
La limpieza de la piel se debería realizar al menos dos veces
al día: una vez en la mañana y otra en la noche. Si percibe un
olor desagradable alrededor del cuello o del orificio, limpie la
zona cada 8 horas hasta que elimine el olor.
Cuando realice la limpieza de la piel, mantenga limpios y
secos el cuello y el área que rodea el estoma. No utilice pol-
-
nes. Observe si hay zonas enrojecidas o irritadas. Si aparece
enrojecimiento excesivo o pústulas alrededor del orificio,
llame a su médico, disminuya la humedad y limpie sólo
con agua esterilizada. Si su médico le receta un ungüento,
aplíquelo como se lo indique.
QUÉ NECESITARÁ
Agua y peróxido de hidrógeno,
mezclados en partes iguales
Hisopos de algodón
Toalla o manta pequeña, enrollada
AQUA PERÓXIDO DE HIDRÓGENO
45
Aseo de la Zona Que Rodea el Orificio
1. Lávese las manos.
2. Mezcle cuatro (4) cucharadas de solución de peróxido de
hidrógeno con cuatro (4) cucharadas de agua, como se
muestra en la página opuesta. Vacíe las soluciones en un
recipiente o contenedor limpio.
3. Ponga una toalla o una manta enrollada bajo los hom-
bros del niño para exponer el área de la estoma.
4. Sumerja un hisopo de algodón en la mezcla de peróxido
de hidrógeno y agua.
5. Pase el hisopo de algodón entre el tubo de traqueostomía
y la piel que rodea el orificio. Limpie desde el estoma
hacia afuera. De esta forma podrá eliminar la mucosidad
húmeda o seca.
6. Repita los pasos 4 y 5, con un hisopo de algodón limpio
cada vez, hasta que haya limpiado toda la zona.
-
medecidos en agua limpia. Deje secar al aire.
46
Salir de Casa
SALIR DE CASA
Su hijo no tiene por qué quedarse sólo en casa. Puede
llevarlo cuando salga de compras, al parque o a visitar a sus
amigos o familiares. Sin importar a dónde salga, prepare un
kit de viaje.
Si hace frío
Si al salir la temperatura es bajo cero, no permita que su
hijo respire aire frío directamente a través del tubo de la
provocar problemas.
Utilice una bufanda, un pañuelo o una gasa que cubra ligera-
elementos entibian el aire cuando el niño inspira. Además,
evitan que ingrese polvo o suciedad en días en que hay
mucho viento o polvo.
Al ir a la escuela
Si su hijo está en edad escolar, puede asistir a la escuela. Sin
embargo, es importante ponerse en contacto con la enfer-
mera de la escuela para hacer arreglos especiales de antema-
no, de manera que la escuela pueda dar al niño la atención
adecuada.
Al salir a jugar
Su hijo puede jugar con otros niños. Pero usted debería
supervisar el juego. Los deportes de contacto y los juegos
bruscos no son buenos para niños que tienen una traqueos-
tomía. No permita que su hijo juegue en piscinas, cajas de
arena ni en área donde hay partículas pequeñas que pudi-
eran ingresar al tubo de la traqueostomía.
QUÉ NECESITARÁ
Tubos de traqueostomía de repuesto
(con obturadores y lazos, del mismo
tamaño y otro más pequeño)
Tijeras
Aspirador portátil con catéter de
aspiración
Agua esterilizada
Pañuelos desechables
Jeringa de pera
Medicamentos para facilitar la
respiración (si el niño los utiliza)
Bolso de reanimación manual
(si se solicitó)
47
Aprender a Hablar
APRENDER A HABLAR
Al principio, su hijo no podrá emitir sonidos. No se preo-
cupe. A medida que la hinchazón disminuya, es probable
que empiece a emitir sonidos. Mientras, preste atención a su
rostro. Las miradas de su hijo pueden decir mucho.
La cantidad de sonido que su hijo puede hacer va a depender
de su edad, del tubo de traqueostomía, de sus patrones de
respiración, etc. Algunos niños pueden emitir sonidos alre-
dedor del tubo. Otros, en cambio, pueden utilizar elementos
denominados válvulas fonatorias que ayudan a controlar el
flujo de aire y les permiten hablar.
A medida que vaya creciendo, su hijo necesitará atención es-
pecial para que pueda hablar en forma adecuada. Asegúrese
de mostrarle cosas. Decirle sus nombres. Leerle. Señale imá-
genes y diga qué son. Háblele. Dígale qué está haciendo.
A los nueve meses, los niños pueden aprender lenguaje de
señas. Si le hace señas al niño, diga siempre las palabras en
voz alta mientras hace la seña.
Para obtener información adicional acerca del habla de su
hijo, consulte a su médico o al logopeda.
¿Cómo puedo saber si mi hijo me necesita?
Todo niño que no habla, especialmente si tiene menos de un
año, debería ser supervisado atentamente. Si le preocupa no
saber cuando su hijo lo necesita, deje que el bebé duerma en
la misma habitación que usted. Mejor aún, ponga un
intercomunicador en la habitación del niño.
Controle siempre a su hijo en forma frecuente durante el día.
48
Glosario
Aspiración Aspiración de la mucosidad acumulada en el
tubo de traqueostomía.
Bacterias Gérmenes.
Cánula Parte del tubo de traqueostomía.
Cartílago Aros de tejido duro conforman el tubo aéreo o
traquea.
CPR Reanimación cardiopulmonar Método que se emplea
para hacer que una persona que ha dejado de respirar vuelva
a hacerlo o para hacer que el corazón empiece a bombear
otra vez si ha dejado de hacerlo.
Cuerdas vocales Dos franjas de tejido que se encuentran
en la caja de resonancia en el cuello, que vibran para emitir
sonidos al hablar.
Diafragma Músculo grande ubicado bajo los pulmones que
controla la respiración.
Envolver
su cabeza libre.
Estéril Libre de gérmenes.
Estoma Orificio real en el cuello donde se inserta el tubo de
traqueostomía.
Exhalar Botar aire.
Expiración Acción de botar el aire.
Fonación Hablar o emitir sonidos con las cuerdas vocales.
Incrustación Mucosidad seca, endurecida como costra.
Inhalar Tomar aire.
Inspiración Acción de tomar aire.
Jeringa Dispositivo plástico con un émbolo que se usa para
inflar el manguito.
Logopeda Persona entrenada para ayudar a los pacientes
que tienen dificultades de lenguaje y deglución.
Luz Parte interna del tubo, por donde entra y sale el aire.
Maleable Suave, flexible.
Manguito Globo inflable que tienen algunos tubos de
traqueostomía.
Máscara traqueal Dispositivo que se inserta en el extremo
del tubo traqueal para proporcionar humedad.
49
Glosario
Mucosidad Fluido resbaloso que se produce en los pulmo-
nes y la tráquea. Se seca y se pega a cualquier superficie y
forma una costra.
Nariz artificial También llamada “intercambiador de hume-
que entibia y humedece el aire que su hijo inspira.
Nebulizador Máquina que entrega humedad y/o medica-
mento directamente a los pulmones.
Obturador Varilla semi rígida que se pone al interior del
tubo de traqueostomía para ayudar a guiarlo hacia el interior
del orificio que hay en el cuello.
Proveedor de productos médicos -
tiene el equipo médico especial.
Proveedores de atención médica
practicantes, médicos, terapeutas respiratorios, logopedas u
otros que visiten su hogar.
Secreciones Sinónimo de mucosidad.
Solución salina Solución similar al agua que se encuentra en
el organismo.
Tráquea Parte de las vías respiratorias que va desde la laringe
a los bronquios.
Traqueostomía Orificio en el cuello donde se introduce
el tubo de traqueostomía para ayudarle a respirar más
fácilmente.
Traqueostomía Procedimiento quirúrgico en el cual el
médico hace una abertura en el cuello para que el paciente
pueda respirar mejor con un tubo de traqueostomía.
Tubo traqueal Nombre abreviado del tubo de traqueos-
cuello del niño.
Válvula fonatoria Válvula de una sola vía que deja entrar
el aire por el tubo de traqueostomía y luego lo hace pasar a
través de las cuerdas vocales y la boca para que la persona
pueda hablar.
Ventilador Máquina que ayuda a una persona a respirar
por un tubo de traqueostomía al inflar mecánicamente los
pulmones.
Vía aérea artificial Sinónimo de “tubo de traqueostomía”.
50
Tubos Shiley Sin Manguito
TUBOS SHILEY™
SIN MANGUITO
1. Conector: Parte del tubo que sobresale del cuello.
2. Cánula: Otro nombre para la parte del tubo del tubo de
traqueostomía.
3. Placa del cuello: Punto donde se ponen los lazos para
mantener el tubo de la traqueostomía en su lugar.
4. Tamaño y estilo del tubo de traqueostomía.
5. Tamaño del orificio del tubo de traqueostomía.
6. Tamaño de la parte exterior del tubo de traqueostomía.
7. Obturador: Se utiliza para guiar la inserción del tubo.
1
3
4
2
NEO PED PDL
6
5
7
51
Tubos Shiley Con Manguito
TUBOS SHILEY™
CON MANGUITO
1. Conector: Parte del tubo que sobresale del cuello.
2. Cánula: Otro nombre para la parte del tubo del tubo de
traqueostomía.
3. Placa del cuello: Punto donde se ponen los lazos para
mantener el tubo de la traqueostomía en su lugar.
4. Tamaño y estilo del tubo de traqueostomía.
5. Tamaño del orificio del tubo de traqueostomía.
6. Tamaño de la parte exterior del tubo de traqueostomía.
7. Manguito: Una vez que el tubo de traqueostomía está en
el cuello, el manguito se llena con aire. Ayuda a evitar
que ingrese a los pulmones comida, agua o vómito.
8. Línea de inflado: Lleva aire hacia y desde el manguito.
9. Globo piloto: Si hay aire en el manguito, este globo
estará inflado. Si sacó todo el aire del manguito,
estará plano.
10. Válvula Luer: Punto donde se inserta la punta de la
jeringa para agregar o sacar aire del manguito.
1
3
4
2
PDC/PDL
6
5
7
8
9
52
Solución de Problemas
SOLUCIÓN DE PROBLEMAS
SÍNTOMA POSIBLE CAUSA SOLUCIÓN
Su hijo:
– Está inquieto
– Está llorando
– Tiene una mirada de
miedo.
– Hace ruido de burbujas o
de silbido
– No puede expulsar las
secreciones tosiendo
– Tiene un color pálido o
azul, oscuro alrededor de
la boca y la nariz
– Sus orificios nasales están
dilatados
– Tiene problemas para
comer
– Se le ve un hundimiento en
el cuello
– La piel de su tórax está
hundida
Acumulación de mucosidad. Aspirar. Si los síntomas
persisten tras la aspiración,
llame a su médico.
Si al aspirar sale mucosidad
amarilla o verde, mucosidad
de mal olor o sangre roja
brillante.
Infección. Llame a su médico.
El tubo se sale por el orificio
en placa del cuello con el
cuello.
Tirantez o peso en el conector. Sostenga la placa del cuello
con una mano mientras retira
el tubo del ventilador para
disminuir la tirantez. Mueva el
ventilador (si lo utiliza) y los
tubos de manera que no tiren
el tubo de la traque ostomía.
Los lazos de la traqueostomía
están demasiado sueltos o
ajustados en forma incorrecta.
Vuelva a poner el tubo en la
abertura y amarrar los lazos de
la traqueostomía (consulte las
páginas
10 y 11).
53
Solución de Problemas
SÍNTOMA POSIBLE CAUSA SOLUCIÓN
Incapacidad o dificultad
para pasar el catéter de
aspiración a través del tubo de
traqueostomía.
La mucosidad obstruye el tubo
de la traqueostomía.
Cambie el tubo de la
traqueostomía.
Catéter demasiado largo para
el tamaño del tubo.
Póngase en contacto con su
proveedor de atención médica
domiciliaria.
Cuando cambie pañales:
– Nota que el niño ha dejado
de mojar el pañal o lo
moja mucho menos.
– Orina oscura, con un fuerte
olor a amoníaco.
Deshidratación. Llame a su médico.
El tubo o alguna de sus partes
se rompieron o no funcionan.
Tubo de la traqueostomía
defectuoso.
Cambie el tubo.
Lavó el tubo de traqueostomía
con algún agente de limpieza
inadecuado.
Cambie el tubo. Siempre
use los agentes de limpieza
recomendados por el
fabricante del tubo solamente.
Tirantez o peso en el conector. Sostenga la placa del cuello
con una mano mientras retira
el tubo del ventilador para
disminuir la tirantez. Mueva
el ventilador y los tubos de
manera que no tiren el tubo de
la traqueostomía.
54
Solución de Problemas
SÍNTOMA POSIBLE CAUSA SOLUCIÓN
La alarma de “Alta presión”
del ventilador se desactiva.
El tubo del ventilador está
obstruido o torcido.
Elimine aquello que está
torciéndolo u obstruyéndolo.
Hay mucosidad que obstruye
el tubo de la traqueostomía.
Aspire para eliminar la
mucosidad.
Si las primeras dos sugerencias
no funcionan, puede haber un
problema con el ventilador.
proveedor de atención médica
domiciliaria.
La alarma de “Baja presión”
del ventilador se desactiva.
El tubo del ventilador no está
conectado a la máquina.
Asegúrese de que los tubos
estén conectados a la máquina
y al paciente.
Si tiene un tubo de
traqueostomía con manguito:
Fuga en el manguito, la línea
de inflado o en el globo piloto.
Retire los tubos del ventilador
del tubo de la traqueostomía.
Desinfle y vuelva a inflar el
man guito con los tubos del
ventilador. Encienda la
máquina. Cambie el tubo si no
se mantiene inflado.
Si las primeras dos sugerencias
no funcionan, puede haber un
problema con el ventilador.
Póngase en contacto con su
proveedor de atención médica
domiciliaria.
Respire profundo con un reani
mador manual, si tiene uno.
Lo siguiente se aplica sólo a pacientes conectados a ventilador.!
55
¿Qué Hacer Si Se Corta la Energía Eléctrica?
¿QUÉ HACER SI SE CORTA LA ENERGÍA
ELÉCTRICA?
La mejor forma de lidiar con este problema es tener un plan.
Antes de que la electricidad se vaya, informe a las empresas
de teléfonos y electricidad, por escrito, que su hijo utiliza un
tubo de traqueostomía. Solicite prioridad en la restauración
del servicio.
Puede comprar una luz especial que se enciende cuando se
corta la electricidad. Utilice esto como forma de alerta. Pu-
ede ir a la casa de un amigo o de un familiar. Además, puede
ir al hospital o a una estación de bomberos en que haya un
generador de emergencia.
COVIDIEN, COVIDIEN with logo, Covidien logo and positive results for life are U.S. and internationally
registered trademarks of Covidien AG. Other brands are trademarks of a Covidien company.
™* and ®* are trademarks of their respective owners. ©2011 Covidien.All rights reserved.
11-AW-0210 TR00798
6135 Gunbarrel Avenue
Boulder, CO
80301
800-635-5267 www.covidien.com

Más contenido relacionado

La actualidad más candente

Cuidadosdeenfermeriaenpacientestraqueostomizados 140902121618-phpapp01
Cuidadosdeenfermeriaenpacientestraqueostomizados 140902121618-phpapp01Cuidadosdeenfermeriaenpacientestraqueostomizados 140902121618-phpapp01
Cuidadosdeenfermeriaenpacientestraqueostomizados 140902121618-phpapp01Pamela Alarcôn Scotti
 
Traqueostomia Percutanea UCI HNAAA CHICLAYO
Traqueostomia Percutanea UCI HNAAA CHICLAYOTraqueostomia Percutanea UCI HNAAA CHICLAYO
Traqueostomia Percutanea UCI HNAAA CHICLAYOhospital
 
Toma de muestra sanguinea
Toma de muestra sanguinea Toma de muestra sanguinea
Toma de muestra sanguinea Cristian Peña
 
Equipos y procedimientos qx diin orah
Equipos y procedimientos qx diin orahEquipos y procedimientos qx diin orah
Equipos y procedimientos qx diin orahDinorah Mendez
 
Aspiracion de secreciones
Aspiracion de secrecionesAspiracion de secreciones
Aspiracion de secrecionesalbaconepcion
 
Toma de muestras pediatricas
Toma de muestras pediatricasToma de muestras pediatricas
Toma de muestras pediatricasJMiguelCS
 
Fundamentacion sondaje vesical
Fundamentacion sondaje vesicalFundamentacion sondaje vesical
Fundamentacion sondaje vesicalinformaticacra
 
Cuidados de una traqueostomia.
Cuidados de una traqueostomia.Cuidados de una traqueostomia.
Cuidados de una traqueostomia.prometeo39
 
Clase 1 Introduccion A La Atencion De Enfermeria
Clase 1   Introduccion A La Atencion De EnfermeriaClase 1   Introduccion A La Atencion De Enfermeria
Clase 1 Introduccion A La Atencion De EnfermeriaLuis Miguel Miranda Piña
 
Procedimientos de enfermeria video delia
Procedimientos de enfermeria video deliaProcedimientos de enfermeria video delia
Procedimientos de enfermeria video deliaDelita Vera
 
TéCnica De Aspirado De Secreciones
TéCnica De Aspirado De SecrecionesTéCnica De Aspirado De Secreciones
TéCnica De Aspirado De Secrecionesjanetac
 
Cuidados de enfermeria a pacientes con dispositivos invasivos
Cuidados de enfermeria a pacientes con dispositivos invasivosCuidados de enfermeria a pacientes con dispositivos invasivos
Cuidados de enfermeria a pacientes con dispositivos invasivosLuis Enrique Meza Alvarez
 

La actualidad más candente (20)

Cuidadosdeenfermeriaenpacientestraqueostomizados 140902121618-phpapp01
Cuidadosdeenfermeriaenpacientestraqueostomizados 140902121618-phpapp01Cuidadosdeenfermeriaenpacientestraqueostomizados 140902121618-phpapp01
Cuidadosdeenfermeriaenpacientestraqueostomizados 140902121618-phpapp01
 
SONDAJE RECTAL
SONDAJE RECTALSONDAJE RECTAL
SONDAJE RECTAL
 
Cuidados de Traqueostomía Pediátrica
Cuidados de Traqueostomía PediátricaCuidados de Traqueostomía Pediátrica
Cuidados de Traqueostomía Pediátrica
 
Traqueostomia Percutanea UCI HNAAA CHICLAYO
Traqueostomia Percutanea UCI HNAAA CHICLAYOTraqueostomia Percutanea UCI HNAAA CHICLAYO
Traqueostomia Percutanea UCI HNAAA CHICLAYO
 
2 tipos de sondas (naso gastrica y sonda vesical)
2 tipos de sondas (naso gastrica y sonda vesical)2 tipos de sondas (naso gastrica y sonda vesical)
2 tipos de sondas (naso gastrica y sonda vesical)
 
Toma de muestra sanguinea
Toma de muestra sanguinea Toma de muestra sanguinea
Toma de muestra sanguinea
 
Equipos y procedimientos qx diin orah
Equipos y procedimientos qx diin orahEquipos y procedimientos qx diin orah
Equipos y procedimientos qx diin orah
 
Aspiracion de secreciones
Aspiracion de secrecionesAspiracion de secreciones
Aspiracion de secreciones
 
Toma de muestras pediatricas
Toma de muestras pediatricasToma de muestras pediatricas
Toma de muestras pediatricas
 
Fundamentacion sondaje vesical
Fundamentacion sondaje vesicalFundamentacion sondaje vesical
Fundamentacion sondaje vesical
 
Cuidados de una traqueostomia.
Cuidados de una traqueostomia.Cuidados de una traqueostomia.
Cuidados de una traqueostomia.
 
Clase 1 Introduccion A La Atencion De Enfermeria
Clase 1   Introduccion A La Atencion De EnfermeriaClase 1   Introduccion A La Atencion De Enfermeria
Clase 1 Introduccion A La Atencion De Enfermeria
 
Procedimientos de enfermeria video delia
Procedimientos de enfermeria video deliaProcedimientos de enfermeria video delia
Procedimientos de enfermeria video delia
 
Enf. Quirurgica, FEyO
Enf. Quirurgica, FEyOEnf. Quirurgica, FEyO
Enf. Quirurgica, FEyO
 
Sonda nasogastrica
Sonda nasogastricaSonda nasogastrica
Sonda nasogastrica
 
TéCnica De Aspirado De Secreciones
TéCnica De Aspirado De SecrecionesTéCnica De Aspirado De Secreciones
TéCnica De Aspirado De Secreciones
 
Cuidados de enfermeria a pacientes con dispositivos invasivos
Cuidados de enfermeria a pacientes con dispositivos invasivosCuidados de enfermeria a pacientes con dispositivos invasivos
Cuidados de enfermeria a pacientes con dispositivos invasivos
 
Punciones venosas
Punciones venosasPunciones venosas
Punciones venosas
 
Punción venosa
Punción venosaPunción venosa
Punción venosa
 
toma de muestras
 toma de  muestras toma de  muestras
toma de muestras
 

Destacado

Salon 1 15 kasim 09.30 10.30 vedran dumbovi̇c
Salon 1 15 kasim 09.30 10.30 vedran dumbovi̇cSalon 1 15 kasim 09.30 10.30 vedran dumbovi̇c
Salon 1 15 kasim 09.30 10.30 vedran dumbovi̇ctyfngnc
 
Mechanical ventilation in neonates
Mechanical ventilation in neonatesMechanical ventilation in neonates
Mechanical ventilation in neonatespalpeds
 
Mechanical ventilation in neonates
Mechanical ventilation in neonatesMechanical ventilation in neonates
Mechanical ventilation in neonatespalpeds
 
NON INVASIVE VENTILATION IN NEONATE
NON INVASIVE VENTILATION IN NEONATENON INVASIVE VENTILATION IN NEONATE
NON INVASIVE VENTILATION IN NEONATEDr. Anshuman Paria
 
Complication of long term ventilation
Complication of long term ventilationComplication of long term ventilation
Complication of long term ventilationsaman priyantha
 
E.N.T.Tracheostomy.(dr.usif chalabe)
E.N.T.Tracheostomy.(dr.usif chalabe)E.N.T.Tracheostomy.(dr.usif chalabe)
E.N.T.Tracheostomy.(dr.usif chalabe)student
 
Neuromuscular disorder
Neuromuscular disorderNeuromuscular disorder
Neuromuscular disorderNanda Perdana
 
Via area dificil y traqueotomía
Via area dificil y traqueotomíaVia area dificil y traqueotomía
Via area dificil y traqueotomíaDr. Alan Burgos
 
Tracheostomy ppt
Tracheostomy pptTracheostomy ppt
Tracheostomy pptNeemu Hage
 
Asistencia ventilatoria mecánica
Asistencia ventilatoria mecánicaAsistencia ventilatoria mecánica
Asistencia ventilatoria mecánicasaralmercado
 

Destacado (20)

Traqueotomia
TraqueotomiaTraqueotomia
Traqueotomia
 
Traqueotomía en niños
Traqueotomía en niñosTraqueotomía en niños
Traqueotomía en niños
 
Salon 1 15 kasim 09.30 10.30 vedran dumbovi̇c
Salon 1 15 kasim 09.30 10.30 vedran dumbovi̇cSalon 1 15 kasim 09.30 10.30 vedran dumbovi̇c
Salon 1 15 kasim 09.30 10.30 vedran dumbovi̇c
 
Neuromuscular Disease
Neuromuscular DiseaseNeuromuscular Disease
Neuromuscular Disease
 
Mechanical ventilation in neonates
Mechanical ventilation in neonatesMechanical ventilation in neonates
Mechanical ventilation in neonates
 
Mechanical ventilation in neonates
Mechanical ventilation in neonatesMechanical ventilation in neonates
Mechanical ventilation in neonates
 
NON INVASIVE VENTILATION IN NEONATE
NON INVASIVE VENTILATION IN NEONATENON INVASIVE VENTILATION IN NEONATE
NON INVASIVE VENTILATION IN NEONATE
 
Traqueostomía
TraqueostomíaTraqueostomía
Traqueostomía
 
PC pacientes neurologicos mujeres G5
PC pacientes neurologicos mujeres G5PC pacientes neurologicos mujeres G5
PC pacientes neurologicos mujeres G5
 
Complication of long term ventilation
Complication of long term ventilationComplication of long term ventilation
Complication of long term ventilation
 
E.N.T.Tracheostomy.(dr.usif chalabe)
E.N.T.Tracheostomy.(dr.usif chalabe)E.N.T.Tracheostomy.(dr.usif chalabe)
E.N.T.Tracheostomy.(dr.usif chalabe)
 
Neuromuscular disorder
Neuromuscular disorderNeuromuscular disorder
Neuromuscular disorder
 
Tracheostomy
TracheostomyTracheostomy
Tracheostomy
 
Colostomia
ColostomiaColostomia
Colostomia
 
Basics of pediatric ventilation
Basics of pediatric ventilationBasics of pediatric ventilation
Basics of pediatric ventilation
 
013
013013
013
 
Via area dificil y traqueotomía
Via area dificil y traqueotomíaVia area dificil y traqueotomía
Via area dificil y traqueotomía
 
Colostomía
ColostomíaColostomía
Colostomía
 
Tracheostomy ppt
Tracheostomy pptTracheostomy ppt
Tracheostomy ppt
 
Asistencia ventilatoria mecánica
Asistencia ventilatoria mecánicaAsistencia ventilatoria mecánica
Asistencia ventilatoria mecánica
 

Similar a Guia de traqueotomía niños

3ro textil tarea 4_ruiz broli
3ro textil tarea 4_ruiz broli3ro textil tarea 4_ruiz broli
3ro textil tarea 4_ruiz broliNoe Ruiz
 
Cuidados de niños traqueostomizados
Cuidados de niños traqueostomizadosCuidados de niños traqueostomizados
Cuidados de niños traqueostomizadosmetadonaplus
 
Cuaderno de estudio ayudando a respirar al bebe (ABR)
Cuaderno de estudio ayudando a respirar al bebe (ABR)Cuaderno de estudio ayudando a respirar al bebe (ABR)
Cuaderno de estudio ayudando a respirar al bebe (ABR)Carlos Henrriquez
 
Guía de Consenso De Cuidados del RN
Guía de Consenso De Cuidados del RNGuía de Consenso De Cuidados del RN
Guía de Consenso De Cuidados del RNSupaycito Qellaqanra
 
Tratamiento casero para tratar las hemorroides de forma natural
Tratamiento casero para tratar las hemorroides de forma naturalTratamiento casero para tratar las hemorroides de forma natural
Tratamiento casero para tratar las hemorroides de forma naturalJonh Triana
 
Protocolo sedacion 2014 (1)
Protocolo sedacion 2014 (1)Protocolo sedacion 2014 (1)
Protocolo sedacion 2014 (1)Aran Nja
 
Guía para realizar mascarillas caseras
Guía para realizar mascarillas caserasGuía para realizar mascarillas caseras
Guía para realizar mascarillas caserasFelipeVzquezFernndez1
 
Libro prematuros
Libro prematurosLibro prematuros
Libro prematurosposepuis
 
Monografía obstetricia
Monografía obstetriciaMonografía obstetricia
Monografía obstetriciaWzakY
 
Cómo tomar una muestra de heces
Cómo tomar una muestra de hecesCómo tomar una muestra de heces
Cómo tomar una muestra de hecesLisley Peña
 
Beber agua de mar primeros capitulos
Beber agua de mar primeros capitulosBeber agua de mar primeros capitulos
Beber agua de mar primeros capitulosPrema Perez
 
Mastectomia
MastectomiaMastectomia
Mastectomiamechasvr
 

Similar a Guia de traqueotomía niños (20)

3ro textil tarea 4_ruiz broli
3ro textil tarea 4_ruiz broli3ro textil tarea 4_ruiz broli
3ro textil tarea 4_ruiz broli
 
Producto.pdf
Producto.pdfProducto.pdf
Producto.pdf
 
Producto.pdf
Producto.pdfProducto.pdf
Producto.pdf
 
Libro epoc 2017
Libro epoc 2017Libro epoc 2017
Libro epoc 2017
 
Cuidados de niños traqueostomizados
Cuidados de niños traqueostomizadosCuidados de niños traqueostomizados
Cuidados de niños traqueostomizados
 
Anexo 1 mascarilla casera de tela
Anexo 1 mascarilla casera de telaAnexo 1 mascarilla casera de tela
Anexo 1 mascarilla casera de tela
 
Anexo 1 mascarilla casera de tela
Anexo 1 mascarilla casera de telaAnexo 1 mascarilla casera de tela
Anexo 1 mascarilla casera de tela
 
Anexo 1 mascarilla casera de tela
Anexo 1 mascarilla casera de telaAnexo 1 mascarilla casera de tela
Anexo 1 mascarilla casera de tela
 
Cuaderno de estudio ayudando a respirar al bebe (ABR)
Cuaderno de estudio ayudando a respirar al bebe (ABR)Cuaderno de estudio ayudando a respirar al bebe (ABR)
Cuaderno de estudio ayudando a respirar al bebe (ABR)
 
Guía de Consenso De Cuidados del RN
Guía de Consenso De Cuidados del RNGuía de Consenso De Cuidados del RN
Guía de Consenso De Cuidados del RN
 
Tratamiento casero para tratar las hemorroides de forma natural
Tratamiento casero para tratar las hemorroides de forma naturalTratamiento casero para tratar las hemorroides de forma natural
Tratamiento casero para tratar las hemorroides de forma natural
 
Manual para el control de plagas. El Chinche.
Manual para el control de plagas. El Chinche.Manual para el control de plagas. El Chinche.
Manual para el control de plagas. El Chinche.
 
Protocolo sedacion 2014 (1)
Protocolo sedacion 2014 (1)Protocolo sedacion 2014 (1)
Protocolo sedacion 2014 (1)
 
Guía para realizar mascarillas caseras
Guía para realizar mascarillas caserasGuía para realizar mascarillas caseras
Guía para realizar mascarillas caseras
 
Libro prematuros
Libro prematurosLibro prematuros
Libro prematuros
 
Libro prematuros
Libro prematurosLibro prematuros
Libro prematuros
 
Monografía obstetricia
Monografía obstetriciaMonografía obstetricia
Monografía obstetricia
 
Cómo tomar una muestra de heces
Cómo tomar una muestra de hecesCómo tomar una muestra de heces
Cómo tomar una muestra de heces
 
Beber agua de mar primeros capitulos
Beber agua de mar primeros capitulosBeber agua de mar primeros capitulos
Beber agua de mar primeros capitulos
 
Mastectomia
MastectomiaMastectomia
Mastectomia
 

Más de Andrés Dante Podestá

Ventilación mecánica en pediatría pacientes neuromusculares
Ventilación mecánica en pediatría pacientes neuromusculares Ventilación mecánica en pediatría pacientes neuromusculares
Ventilación mecánica en pediatría pacientes neuromusculares Andrés Dante Podestá
 
Percentilos pacientes neurologicos mujeres G3
Percentilos pacientes neurologicos  mujeres G3Percentilos pacientes neurologicos  mujeres G3
Percentilos pacientes neurologicos mujeres G3Andrés Dante Podestá
 
Catalogo canulas de taqueotomia covidien shiley
Catalogo canulas de taqueotomia covidien shileyCatalogo canulas de taqueotomia covidien shiley
Catalogo canulas de taqueotomia covidien shileyAndrés Dante Podestá
 
Catálogo Canulas de traqueotomia RUSCH
Catálogo Canulas de traqueotomia RUSCHCatálogo Canulas de traqueotomia RUSCH
Catálogo Canulas de traqueotomia RUSCHAndrés Dante Podestá
 
Catálogo Circuitos pacientes Mallinckrodt dar
Catálogo Circuitos pacientes Mallinckrodt darCatálogo Circuitos pacientes Mallinckrodt dar
Catálogo Circuitos pacientes Mallinckrodt darAndrés Dante Podestá
 

Más de Andrés Dante Podestá (20)

Ventilación mecánica en pediatría pacientes neuromusculares
Ventilación mecánica en pediatría pacientes neuromusculares Ventilación mecánica en pediatría pacientes neuromusculares
Ventilación mecánica en pediatría pacientes neuromusculares
 
PC pacientes neurologicos mujeres G4
PC pacientes neurologicos mujeres G4PC pacientes neurologicos mujeres G4
PC pacientes neurologicos mujeres G4
 
Percentilos pacientes neurologicos mujeres G3
Percentilos pacientes neurologicos  mujeres G3Percentilos pacientes neurologicos  mujeres G3
Percentilos pacientes neurologicos mujeres G3
 
PC pacientes neurologicos mujeres G2
PC pacientes neurologicos mujeres G2PC pacientes neurologicos mujeres G2
PC pacientes neurologicos mujeres G2
 
PC pacientes neurologicos mujeres G1
PC pacientes neurologicos mujeres G1PC pacientes neurologicos mujeres G1
PC pacientes neurologicos mujeres G1
 
PC pacientes neurologicos Varones B5
PC pacientes neurologicos Varones B5PC pacientes neurologicos Varones B5
PC pacientes neurologicos Varones B5
 
PC pacientes neurologicos Varones B4
PC pacientes neurologicos Varones B4PC pacientes neurologicos Varones B4
PC pacientes neurologicos Varones B4
 
PC pacientes neurologicos Varones B3
PC pacientes neurologicos Varones B3PC pacientes neurologicos Varones B3
PC pacientes neurologicos Varones B3
 
PC pacientes neurologicos Varones B1
PC pacientes neurologicos Varones B1PC pacientes neurologicos Varones B1
PC pacientes neurologicos Varones B1
 
PC pacientes neurologicos Varones B2
PC pacientes neurologicos Varones B2PC pacientes neurologicos Varones B2
PC pacientes neurologicos Varones B2
 
Estenosis de traquea Stening catalogo
Estenosis de traquea Stening catalogoEstenosis de traquea Stening catalogo
Estenosis de traquea Stening catalogo
 
Ventilador Puritan bennett lp 10
Ventilador Puritan bennett lp 10Ventilador Puritan bennett lp 10
Ventilador Puritan bennett lp 10
 
HME y Filters
HME y Filters HME y Filters
HME y Filters
 
HME y Filtros humid vent de Hudson
HME y Filtros  humid vent de HudsonHME y Filtros  humid vent de Hudson
HME y Filtros humid vent de Hudson
 
Ventilador Plv 100 manual completo
Ventilador Plv 100 manual completoVentilador Plv 100 manual completo
Ventilador Plv 100 manual completo
 
Bear 33 ventilador portátil
Bear 33 ventilador portátilBear 33 ventilador portátil
Bear 33 ventilador portátil
 
Respirador Achieva manual clinico
Respirador Achieva manual clinicoRespirador Achieva manual clinico
Respirador Achieva manual clinico
 
Catalogo canulas de taqueotomia covidien shiley
Catalogo canulas de taqueotomia covidien shileyCatalogo canulas de taqueotomia covidien shiley
Catalogo canulas de taqueotomia covidien shiley
 
Catálogo Canulas de traqueotomia RUSCH
Catálogo Canulas de traqueotomia RUSCHCatálogo Canulas de traqueotomia RUSCH
Catálogo Canulas de traqueotomia RUSCH
 
Catálogo Circuitos pacientes Mallinckrodt dar
Catálogo Circuitos pacientes Mallinckrodt darCatálogo Circuitos pacientes Mallinckrodt dar
Catálogo Circuitos pacientes Mallinckrodt dar
 

Último

equipos e insumos para la administracion de biologicos
equipos e insumos para la administracion de biologicosequipos e insumos para la administracion de biologicos
equipos e insumos para la administracion de biologicosmafaldoachonga
 
(2024-04-17) PATOLOGIAVASCULARENEXTREMIDADINFERIOR (doc).pdf
(2024-04-17) PATOLOGIAVASCULARENEXTREMIDADINFERIOR (doc).pdf(2024-04-17) PATOLOGIAVASCULARENEXTREMIDADINFERIOR (doc).pdf
(2024-04-17) PATOLOGIAVASCULARENEXTREMIDADINFERIOR (doc).pdfUDMAFyC SECTOR ZARAGOZA II
 
Edema agudo de pulmón. fisiopatología, clínica, diagnóstico,
Edema agudo de pulmón. fisiopatología, clínica, diagnóstico,Edema agudo de pulmón. fisiopatología, clínica, diagnóstico,
Edema agudo de pulmón. fisiopatología, clínica, diagnóstico,ssuseref6ae6
 
Mapa-conceptual-del-Sistema-Circulatorio-2.pptx
Mapa-conceptual-del-Sistema-Circulatorio-2.pptxMapa-conceptual-del-Sistema-Circulatorio-2.pptx
Mapa-conceptual-del-Sistema-Circulatorio-2.pptxJhonDarwinSnchezVsqu1
 
(2024-04-17) PATOLOGIAVASCULARENEXTREMIDADINFERIOR (ppt).pdf
(2024-04-17) PATOLOGIAVASCULARENEXTREMIDADINFERIOR (ppt).pdf(2024-04-17) PATOLOGIAVASCULARENEXTREMIDADINFERIOR (ppt).pdf
(2024-04-17) PATOLOGIAVASCULARENEXTREMIDADINFERIOR (ppt).pdfUDMAFyC SECTOR ZARAGOZA II
 
PPT HIS PROMSA - PANAS-MINSA DEL 2024.pptx
PPT HIS PROMSA - PANAS-MINSA DEL 2024.pptxPPT HIS PROMSA - PANAS-MINSA DEL 2024.pptx
PPT HIS PROMSA - PANAS-MINSA DEL 2024.pptxOrlandoApazagomez1
 
HERENCIA LIGADA A LOS CROMOSOMAS SEXUALES....pptx
HERENCIA LIGADA A LOS CROMOSOMAS SEXUALES....pptxHERENCIA LIGADA A LOS CROMOSOMAS SEXUALES....pptx
HERENCIA LIGADA A LOS CROMOSOMAS SEXUALES....pptxAndreaSoto281274
 
PUNTOS CRANEOMÉTRICOS PARA PLANEACIÓN QUIRÚRGICA
PUNTOS CRANEOMÉTRICOS  PARA PLANEACIÓN QUIRÚRGICAPUNTOS CRANEOMÉTRICOS  PARA PLANEACIÓN QUIRÚRGICA
PUNTOS CRANEOMÉTRICOS PARA PLANEACIÓN QUIRÚRGICAVeronica Martínez Zerón
 
Lesiones en el pie--Traumatología...pptx
Lesiones en el pie--Traumatología...pptxLesiones en el pie--Traumatología...pptx
Lesiones en el pie--Traumatología...pptx Estefa RM9
 
Plan de Desparasitacion 27.03.2024 minsa.pptx
Plan de Desparasitacion 27.03.2024 minsa.pptxPlan de Desparasitacion 27.03.2024 minsa.pptx
Plan de Desparasitacion 27.03.2024 minsa.pptxOrlandoApazagomez1
 
alimentacion en mujer embarazada y lactante
alimentacion en mujer embarazada y lactantealimentacion en mujer embarazada y lactante
alimentacion en mujer embarazada y lactantealejandra674717
 
Enferemedades reproductivas de Yeguas.pdf
Enferemedades reproductivas  de Yeguas.pdfEnferemedades reproductivas  de Yeguas.pdf
Enferemedades reproductivas de Yeguas.pdftaniacgcclassroom
 
NERVIO OLFATORIO. PARES CRANEALES. SISTEMA NERVIOSO
NERVIO OLFATORIO. PARES CRANEALES. SISTEMA NERVIOSONERVIO OLFATORIO. PARES CRANEALES. SISTEMA NERVIOSO
NERVIO OLFATORIO. PARES CRANEALES. SISTEMA NERVIOSOEPICRISISHQN1
 
Nutrición y Valoración Nutricional en Pediatria.pptx
Nutrición y Valoración Nutricional en Pediatria.pptxNutrición y Valoración Nutricional en Pediatria.pptx
Nutrición y Valoración Nutricional en Pediatria.pptx Estefa RM9
 
SEMIOLOGIA CARDIOVASCULAR examen fisico y exploracion
SEMIOLOGIA CARDIOVASCULAR examen fisico y exploracionSEMIOLOGIA CARDIOVASCULAR examen fisico y exploracion
SEMIOLOGIA CARDIOVASCULAR examen fisico y exploracionDrRenEduardoSnchezHe
 
la CELULA. caracteristicas, funciones, i
la CELULA. caracteristicas, funciones, ila CELULA. caracteristicas, funciones, i
la CELULA. caracteristicas, funciones, iBACAURBINAErwinarnol
 
CUADRO- COMPARATIVO DE SALUD COMUNITARIA
CUADRO- COMPARATIVO DE SALUD COMUNITARIACUADRO- COMPARATIVO DE SALUD COMUNITARIA
CUADRO- COMPARATIVO DE SALUD COMUNITARIALeylaSuclupe
 
HERNIA UMBILICAL con o sin signos de complicacion.pdf
HERNIA UMBILICAL con o sin signos de complicacion.pdfHERNIA UMBILICAL con o sin signos de complicacion.pdf
HERNIA UMBILICAL con o sin signos de complicacion.pdfFQCrisp
 

Último (20)

equipos e insumos para la administracion de biologicos
equipos e insumos para la administracion de biologicosequipos e insumos para la administracion de biologicos
equipos e insumos para la administracion de biologicos
 
(2024-04-17) PATOLOGIAVASCULARENEXTREMIDADINFERIOR (doc).pdf
(2024-04-17) PATOLOGIAVASCULARENEXTREMIDADINFERIOR (doc).pdf(2024-04-17) PATOLOGIAVASCULARENEXTREMIDADINFERIOR (doc).pdf
(2024-04-17) PATOLOGIAVASCULARENEXTREMIDADINFERIOR (doc).pdf
 
Edema agudo de pulmón. fisiopatología, clínica, diagnóstico,
Edema agudo de pulmón. fisiopatología, clínica, diagnóstico,Edema agudo de pulmón. fisiopatología, clínica, diagnóstico,
Edema agudo de pulmón. fisiopatología, clínica, diagnóstico,
 
Mapa-conceptual-del-Sistema-Circulatorio-2.pptx
Mapa-conceptual-del-Sistema-Circulatorio-2.pptxMapa-conceptual-del-Sistema-Circulatorio-2.pptx
Mapa-conceptual-del-Sistema-Circulatorio-2.pptx
 
(2024-04-17) PATOLOGIAVASCULARENEXTREMIDADINFERIOR (ppt).pdf
(2024-04-17) PATOLOGIAVASCULARENEXTREMIDADINFERIOR (ppt).pdf(2024-04-17) PATOLOGIAVASCULARENEXTREMIDADINFERIOR (ppt).pdf
(2024-04-17) PATOLOGIAVASCULARENEXTREMIDADINFERIOR (ppt).pdf
 
PPT HIS PROMSA - PANAS-MINSA DEL 2024.pptx
PPT HIS PROMSA - PANAS-MINSA DEL 2024.pptxPPT HIS PROMSA - PANAS-MINSA DEL 2024.pptx
PPT HIS PROMSA - PANAS-MINSA DEL 2024.pptx
 
HERENCIA LIGADA A LOS CROMOSOMAS SEXUALES....pptx
HERENCIA LIGADA A LOS CROMOSOMAS SEXUALES....pptxHERENCIA LIGADA A LOS CROMOSOMAS SEXUALES....pptx
HERENCIA LIGADA A LOS CROMOSOMAS SEXUALES....pptx
 
PUNTOS CRANEOMÉTRICOS PARA PLANEACIÓN QUIRÚRGICA
PUNTOS CRANEOMÉTRICOS  PARA PLANEACIÓN QUIRÚRGICAPUNTOS CRANEOMÉTRICOS  PARA PLANEACIÓN QUIRÚRGICA
PUNTOS CRANEOMÉTRICOS PARA PLANEACIÓN QUIRÚRGICA
 
(2024-04-17) SISTEMASDERETENCIONINFANTIL.pdf
(2024-04-17) SISTEMASDERETENCIONINFANTIL.pdf(2024-04-17) SISTEMASDERETENCIONINFANTIL.pdf
(2024-04-17) SISTEMASDERETENCIONINFANTIL.pdf
 
Lesiones en el pie--Traumatología...pptx
Lesiones en el pie--Traumatología...pptxLesiones en el pie--Traumatología...pptx
Lesiones en el pie--Traumatología...pptx
 
Plan de Desparasitacion 27.03.2024 minsa.pptx
Plan de Desparasitacion 27.03.2024 minsa.pptxPlan de Desparasitacion 27.03.2024 minsa.pptx
Plan de Desparasitacion 27.03.2024 minsa.pptx
 
alimentacion en mujer embarazada y lactante
alimentacion en mujer embarazada y lactantealimentacion en mujer embarazada y lactante
alimentacion en mujer embarazada y lactante
 
(2024-04-17) ULCERADEMARTORELL (ppt).pdf
(2024-04-17) ULCERADEMARTORELL (ppt).pdf(2024-04-17) ULCERADEMARTORELL (ppt).pdf
(2024-04-17) ULCERADEMARTORELL (ppt).pdf
 
Enferemedades reproductivas de Yeguas.pdf
Enferemedades reproductivas  de Yeguas.pdfEnferemedades reproductivas  de Yeguas.pdf
Enferemedades reproductivas de Yeguas.pdf
 
NERVIO OLFATORIO. PARES CRANEALES. SISTEMA NERVIOSO
NERVIO OLFATORIO. PARES CRANEALES. SISTEMA NERVIOSONERVIO OLFATORIO. PARES CRANEALES. SISTEMA NERVIOSO
NERVIO OLFATORIO. PARES CRANEALES. SISTEMA NERVIOSO
 
Nutrición y Valoración Nutricional en Pediatria.pptx
Nutrición y Valoración Nutricional en Pediatria.pptxNutrición y Valoración Nutricional en Pediatria.pptx
Nutrición y Valoración Nutricional en Pediatria.pptx
 
SEMIOLOGIA CARDIOVASCULAR examen fisico y exploracion
SEMIOLOGIA CARDIOVASCULAR examen fisico y exploracionSEMIOLOGIA CARDIOVASCULAR examen fisico y exploracion
SEMIOLOGIA CARDIOVASCULAR examen fisico y exploracion
 
la CELULA. caracteristicas, funciones, i
la CELULA. caracteristicas, funciones, ila CELULA. caracteristicas, funciones, i
la CELULA. caracteristicas, funciones, i
 
CUADRO- COMPARATIVO DE SALUD COMUNITARIA
CUADRO- COMPARATIVO DE SALUD COMUNITARIACUADRO- COMPARATIVO DE SALUD COMUNITARIA
CUADRO- COMPARATIVO DE SALUD COMUNITARIA
 
HERNIA UMBILICAL con o sin signos de complicacion.pdf
HERNIA UMBILICAL con o sin signos de complicacion.pdfHERNIA UMBILICAL con o sin signos de complicacion.pdf
HERNIA UMBILICAL con o sin signos de complicacion.pdf
 

Guia de traqueotomía niños

  • 1. Shiley™ Tracheostomy Tube Pediatric Homecare Guide ENGLISH . . . . . . . . . . . . . . . 1 ESPAÑOL. . . . . . . . . . . . . . 29
  • 2. WHAT’S INSIDE This booklet provides information on how to care for your tracheostomy tube. You will find tips on how to suction, change ties, change tubes and care for the skin around the opening in your neck. Also included are basic safety tips, a problem-solving guide and an easy-to-understand glossary of the technical terms you may hear. Review Safety Tips & Notes On page 7, and throughout this guide, are a number of safety tips and notes designed to warn about conditions that could adversely affect you. There are others that caution about situ- ations that could damage your Shiley™ tracheostomy tube. Take a moment to review these tips and notes before you begin your tracheostomy tube homecare. READ BEFORE USING THIS HOMECARE GUIDE This manual is intended as a guide only and should not replace institutional policies or physicians’ orders. This guide and the product usage directions are intended for use with Shiley tracheostomy products from Covidien only. Use of these guidelines with other tracheostomy products is not recommended. Always follow your doctor’s or hospital’s directions if they differ from those found here. Warning: Shiley tracheostomy tubes are sterile if not opened, damaged or broken. DO NOT RESTERILIZE Shiley tracheostomy tubes. Note: Federal law restricts Shiley tracheostomy tubes to sale by, or on the order of, a physician. ! Important Phone Numbers Doctor__________________________________________________________________________________________ Homecare Provider______________________________________________________________________________ Homecare Supplier______________________________________________________________________________ Emergency______________________________________________________________________________________
  • 3. 1 Table of Contents TRACHEOSTOMY TUBE PEDIATRIC HOMECARE GUIDE You Can Do It! . . . . . . . . . . . . . . . . . . . . . . . . . . . . . . . . . . . . . . . 2 What You Will Need How the Tracheostomy Works . . . . . . . . . . . . . . . . . . . . . . . . . . 3 What the Doctor Does What’s Happening Inside Humidification . . . . . . . . . . . . . . . . . . . . . . . . . . . . . . . . . . . . . . . 4 Weaning from the Humidifier Tips for Daily Living. . . . . . . . . . . . . . . . . . . . . . . . . . . . . . . . . . . 5 Mealtime Bath Time Getting Dressed Playtime Illness Getting Away Safety Tips . . . . . . . . . . . . . . . . . . . . . . . . . . . . . . . . . . . . . . . . . . 7 Suctioning. . . . . . . . . . . . . . . . . . . . . . . . . . . . . . . . . . . . . . . . . . . 8 What You Will Need How to Suction . . . . . . . . . . . . . . . . . . . . . . . . . . . . . . . . . . . . . . 9 Changing the Ties . . . . . . . . . . . . . . . . . . . . . . . . . . . . . . . . . . . 10 How to Change Twill Tape Ties What You Will Need Changing the Tracheostomy Tube . . . . . . . . . . . . . . . . . . . . . . 12 Cleaning the Tracheostomy Tube What You Will Need How to Change an Uncuffed Tube . . . . . . . . . . . . . . . . . . . . . . 13 How to Change a Cuffed Tube . . . . . . . . . . . . . . . . . . . . . . . . . 14 Cleaning Around the Opening . . . . . . . . . . . . . . . . . . . . . . . . . 16 What You Will Need How to Clean Around the Opening . . . . . . . . . . . . . . . . . . . . . 17 Leaving Home . . . . . . . . . . . . . . . . . . . . . . . . . . . . . . . . . . . . . . 18 If It’s Cold Out Going to School Going Out to Play What You Will Need Learning to Speak . . . . . . . . . . . . . . . . . . . . . . . . . . . . . . . . . . . 19 How Do I Know If My Infant Needs Me? Glossary . . . . . . . . . . . . . . . . . . . . . . . . . . . . . . . . . . . . . . . . . . . 20 Uncuffed Tubes . . . . . . . . . . . . . . . . . . . . . . . . . . . . . . . . . . . . . 22 Cuffed Tubes. . . . . . . . . . . . . . . . . . . . . . . . . . . . . . . . . . . . . . . . 23 Solving Problems . . . . . . . . . . . . . . . . . . . . . . . . . . . . . . . . . . . . 24 What If the Power Goes Out?. . . . . . . . . . . . . . . . . . . . . . . . . . 27 Tubo de Traqueostomía Guía Para la Atención Domiciliaria Pediátrica. . . . . . . . . . . . . . . . . . . . . . . . . . . . . . . . 29
  • 4. 2 You Can Do it! YOU CAN DO IT A tracheostomy is not a common occurrence, so it’s normal to feel a little frightened at first. That’s why Shiley created this guide: to answer parents’ common questions as they learn how to care for their child’s tracheostomy. You will receive training for tracheostomy care while your child is still in the hospital. It is important to participate actively, ask lots of questions and take notes. Practice makes perfect. The more time you spend, the more comfortable you’ll be caring for your child. It is a good idea for several family members to take the training so that they also know how to care for your child’s tracheostomy. Your doctor, nurse or therapist are your best sources for advice. But this guide will provide helpful tips and reminders so that things go smoothly once you and your child return home. WHAT YOU WILL NEED Basin (to check cuff on tube) Blanket (to swaddle child) Blunt-nose bandage scissors (to cut the twill tape) Box of facial tissues Bulb syringe Cotton swabs (used to clean around the opening) Gloves (like your doctor uses) Humidifier (to moisten the air during naps and at night) Hydrogen Peroxide and water (mixed half and half, for cleaning around the opening) Nebulizer (to moisten the lungs) Replacement tracheostomy tube (same size and one smaller) Resuscitation bag (optional) Sterile water (for rinsing suction cath) Suction catheter Suction machine (plug in and portable) Towel or small blanket (to roll up and place under your child’s shoulders during tracheostomy care) Tracheostomy tube mask Twill tape or other tracheostomy tube holder (to hold the tube in place) Water-based lubricant NOTE: Some items come from your home healthcare supplier, some you must buy at the store.
  • 5. How the Tracheostomy Works 3 HOW THE TRACHEOSTOMY WORKS What the Doctor Does The doctor makes an opening (stoma) in the front of the neck into the wind pipe (trachea). He or she then places a curved plastic tube (tracheostomy tube) into this opening through which your child will breathe. What’s Happening Inside Normally, we breathe through the nose and mouth so that air is filtered, warmed and moistened before it goes down the windpipe to the lungs. With a tracheostomy, air goes directly into the windpipe to the lungs. There’s no filtering, warming or moistening. You will learn how to make up for this by using the proper equip- ment and by learning the proper tracheostomy care. Esophagus (to stomach)Windpipe (trachea) Lungs Air Sacs
  • 6. 4 Humidification HUMIDIFICATION Normally air goes through the nose and mouth where it is filtered, warmed and moistened. This protects the lining of the lungs and keeps the mucus from drying. A tracheostomy bypasses the nose and mouth. So, we need to add moisture, even in damp climates, or mucus will dry and block the tracheostomy tube. This is why a humidifica- tion system with flex tube and tracheostomy mask is often used. Another way to humidify is to use an “artificial nose.” This device traps warmth and moisture when the child breathes out and then puts that moisture back in the air when she breathes in. Be sure to use a humidifier during naps and at night to reduce the chance of mucus plugging the tracheostomy tube, even if your child wears an artificial nose while awake. Weaning From The Humidifier During the day (and only during the day) you can let your child go without humidity for longer periods of time. Do this gradually. Start with one hour. Watch for thick mucus, or mucus with traces of blood in it. If you find either, then give her plenty of liquids to keep the mucus thin. Notify your doctor. If the tracheostomy tube plugs up, suction it to remove the mucus plug (see page 9). If you can’t remove the mucus plug, change the tube.
  • 7. 5 Tips for Daily Living TIPS FOR DAILY LIVING Mealtime Your child will eat just like other children. You just need to be careful so foods and fluids “don’t go down the wrong way.” When bottle feeding an infant, don’t prop the bottle or oth- erwise feed the child while she is lying down. Liquid can get into the lungs this way. Hold the infant in a nearly upright position during feeding. Lay the infant on her side after eat- ing. This way if vomiting occurs, there is less risk of the child getting it in his lungs and choking. Watch toddlers during meals so they don’t get food in the tracheostomy tube. You may wish to loosely cover the tra- cheostomy tube opening with the mask of the humidification system or with an artificial nose for extra safety. Bath Time Children love to take baths. Your child will too, with you watching over him. Always prepare a shallow bath. Use care to prevent bath water from getting in the tracheostomy tube because it goes directly to the lungs. For extra safety, attach a trach mask or an artificial nose. When it’s time to shampoo, do it with the child lying on his back, with his head over the sink. Getting Dressed You can dress up your child almost anyway you wish. Just be careful the clothing does not block the tracheostomy tube. Avoid: Crew necks, turtlenecks, buttons in back, necklaces, shoulder straps and clothes that shed fibers or lint. Use: V-neck tops and clothing that buttons in the front. Cot- ton bibs are preferred over plastic ones. Playtime Toddlers can enjoy most normal kinds of play, but they must be supervised. Also, you will want to select toys carefully. Avoid: Small toys or toy parts that could fit into the tracheostomy tube. Also stay away from sandboxes and contact sports. In cold or dusty weather, use a loose scarf, mask or artifi- cial nose to warm the air and keep dust out of the tracheos- tomy tube.
  • 8. 6 Tips For Daily Living TIPS FOR DAILY LIVING (CONTINUED) Illness While no one likes to be ill, it can be especially challenging for tracheostomy patients. Preventing illness is best, so make sure your child eats healthy foods. Also keep your child up- to-date on all shots and vaccines and keep him away from others who are sick. If illness occurs, keep a close eye on your child. If your child is vomiting, has diarrhea or a fever, you may have to suction more frequently and give the child more fluids. Also, if vomiting occurs, loosely cover the tracheostomy tube with an artificial nose, bib or scarf to keep vomit out. If you think vomit may have entered the tracheostomy tube, suction immediately. If you see bits of food, call your doctor immediately. Getting Away Taking care of a child with a tracheostomy can require much of your time. Be sure to plan extra time for yourself, your spouse and your other children. If you are going out, you must use a babysitter trained in tracheostomy care. It is a good idea to train a grandparent or other family member or a neighbor. Some parents swap babysitting with other parents whose children have tracheos- tomy tubes.
  • 9. 7 Safety Tips SAFETY TIPS care. If instructions in this guide are different from your training, follow your training. - care professional should perform tracheostomy care. for an emergency (same size and one smaller). where the temperature is over 120°F. This can injure your child’s windpipe. - cian if you discover: – Red, inflamed skin at stoma – Foul-smelling mucus – Bright red blood in mucus break before you suction again. – Use shallow water – Use the trach mask during feeding. - ostomy tube. they vomit. around your child. tube, except for a protective scarf. – Sandboxes – Tiny toys children. – You will be taught CPR in the hospital – All caregivers must know CPR IF YOUR CHILD USES A VENTILATOR Routinely check the ventilator safety and auditory alarms to be sure they are working properly. Be sure the ventilator tubes are properly placed so that they don’t pull on the tracheostomy tube. Don’t twist or pull on the tracheostomy connector any more than you must. This may cause discomfort to your child or disconnect the ventilator tubes. Grasp the tracheostomy tube to hold it in place when connecting or disconnecting the ventilator or humidification tubing. !
  • 10. 8 Suctioning SUCTIONING The lungs and windpipe are meant to produce mucus. The mucus cleans the air as we breathe by trapping small particles. It then moves up the windpipe until it can be swallowed. Mucus can collect in and around the tracheostomy tube. It must be removed so it doesn’t dry and block the tube. Suctioning should be done only as needed, usually upon waking, before meals (if needed), at naptime and before bed. Do not suction too frequently. The more you suction, the more secretions can be produced. As your child grows older, you may need to suction less often. But, you will still want to assess the need for suctioning at least twice a day. The following signs are indications that your child may need immediate suctioning: color Discuss with your physician anytime your child experi- ences signs that require immediate suctioning. Note: Always follow your doctor’s or hospital’s directions if they differ from the directions in this guide. ! WHAT YOU WILL NEED Suction machine Collection jar for secretions Suction catheter Sterile water Resuscitation bag (optional) Gloves
  • 11. 9 How to Suction HOW TO SUCTION 1. Wash hands. 2. Put on a glove. Use the gloved hand when touching suction end of catheter. 3. Attach catheter to machine. 4. Rinse catheter by suctioning sterile water. 5. Gently insert catheter into tracheostomy tube until it reaches the end of tube. (You will be taught in the hospital about tracheostomy tube length.) 6. Cover the thumb hole on the catheter to suction. 7. Gently remove the catheter as you roll it between your thumb and forefinger. (Start to finish should take no longer than 5 to 10 seconds.) 8. If you need to suction again, rinse the catheter first. 9. Look at the mucus: Normal: Clear with no odor. Infection: Yellow or green color with a foul-smelling odor. Blood: bright red or old dark blood, there could be a problem. 10. If you see signs of infection, or bright red blood, call your doctor. Follow the instructions of your hospital or home health provider for storage or disposal of catheters. according to the home health supplier’s instructions. 4 7
  • 12. 10 Changing the Ties CHANGING THE TIES It is important to keep the area around the opening in the neck clean to help prevent infection. So, change ties whenever they become wet or soiled, but change ties at least daily. You will be using scissors close to the face. So, you’ll need to hold your child still. This job is easier with two people. But it can be done by one, if need be. How To Change Twill Tape Ties 1. Wash hands. (Both people, if two are involved.) 2. Cut two lengths of twill tape, each long enough to fold in half and still reach around the child’s neck. Set these nearby. 3. One person holds the child, the other changes the ties. If you are doing this alone, swaddle the child securely in a blanket to restrain the hands. 4. Place a rolled towel or blanket under the child’s shoulders. WHAT YOU WILL NEED Tracheostomy twill tape or other tracheostomy tube holder Blunt-nose bandage scissors Towel or small blanket, rolled and placed under the child’s shoulders Clean gloves (optional) depending on institution or physician preference
  • 13. 11 Changing the Ties 5. Leave the old ties in place. Thread the folded end of one of the new ties through one of the holes on the tracheos- tomy tube, going from the skin side, out toward you. 6. Pull the tie through, until it forms a loop. Draw the other ends through the loop until the tie is secured to the tracheostomy tube. 7. Repeat steps 5 and 6 for the other tie. 8. Bring the loose ends of both ties around to the back of the neck and tie them together using a square knot. (Don’t use a bow.) Note: Change the location of the knot from side to side and in the back of the neck to prevent skin irrita- tion. 9. Cut the ends of the ties leaving only 1” to 2.” 10. Carefully cut and remove soiled ties. Note: You know the ties are pulled tight enough when you can fit the tip of your little finger snugly between the neck and the tie. 8 9 10 7 5
  • 14. 12 Changing the Tracheostomy Tube CHANGING THE TRACHEOSTOMY TUBE Frequent and routine changes of the tracheostomy tube and accessories are recommended. This helps to prevent gradual mucus build-up, which can clog or block the tube. Your doctor will advise you how often to change the tube. (If your doctor instructs you to clean and reuse the tracheostomy tube, Covidien recommends that Shiley™ tracheostomy tubes be discarded after 29 days of use.) Note: Changing the tube may upset the child and cause coughing, which can lead to vomiting following insertion. That’s why it is best to change a tube before a meal or at least 1-1/2 hours after eating. Cleaning The Tracheostomy Tube If you have been instructed by your healthcare professional to clean the tracheostomy tube, follow these instructions and warnings: Both the tube and obturator may be cleaned using either hydrogen peroxide (half strength), household vinegar (half strength), sterile normal saline, or water and mild detergent. After cleaning, rinse thoroughly with sterile saline to remove all the cleaning solution residues. Allow to air dry. If using a cuffed tracheostomy tube, the cuff should be rinsed gently in sterile saline and not come in contact with any cleaning detergents or chemicals. WARNINGS: Do not use solutions other than those mentioned above to clean any part of the tube or obturator. Do not expose the tube or obturator to any chemical agents other than those recommended, as this may result in damage. Do not soak the tube or obturator in peroxide. CAUTION: Shiley tracheostomy tubes are designed for single-patient use only. Note: Always follow your doctor’s or hospital’s directions if they differ from the directions in this guide. WHAT YOU WILL NEED Replacement tube (with ties already attached) Blunt-nose bandage scissors Towel or blanket to roll under the child’s shoulders Water-based lubricant A helper or a blanket to swaddle the child in NOTE: You probably won’t have trouble inserting the new tube. But if you do, be sure the child’s head is tilted back. If you are still having difficulty, spread the skin around the stoma and insert the tube while the child is breathing in. Try a smaller size. Call your doctor immediately if you have any problems. !
  • 15. 13 Changing the Tracheostomy Tube HOW TO CHANGE AN UNCUFFED TUBE 1. Be sure all involved wash their hands. Put on clean gloves. 2. Insert obturator into new tracheostomy tube. 3. Attach ties as shown in “How To Change Twill Tape Ties” on page 10. (Do this before putting the tube in your child’s neck.) Place tube with ties attached in the opened package nearby. 4. Place rolled towel or blanket under the child’s shoulders. 5. Have your partner restrain the child’s arms while you cut the ties and remove the tube. (If no partner, swaddle the child securely.) 6. Remove the old tube. 7. Gently insert the new tube, pushing back, then down, in an arcing motion. 8. Immediately remove the obturator as you hold the tube in place with your finger. 9. Fasten the ties using a square knot. 10. Throw away the old tube and ties. 2 3 7 8 9
  • 16. 14 Changing the Tracheostomy Tube HOW TO CHANGE A CUFFED TUBE 1. Be sure all involved wash their hands. 2. Remove the new tube from the package. Take care to avoid damaging the cuff, inflation line or pilot balloon in any way. 3. Use a syringe to inflate the cuff to the proper leak test volume. The markings on the syringe show air volume. Shiley™ Tube Size Test Volume 4.0 PDC 8.0 cc 4.5 PDC 8.0 cc 5.0 PDC or PLC 9.0 cc 5.5 PDC or PLC 9.0 cc 6.0 PLC 11.0 cc 6.5 PLC 11.0 cc 4. Place entire tube, including inflation line, in a basin with enough sterile water to cover it and watch for bubbles indicating an air leak. Note: If you see any leaks, DO NOT use the tube. 5. Deflate the cuff completely using a syringe. As you are doing this, gently push the cuff away from the end of the tube. Be sure to remove all air. This makes it easier to insert the tube. 6. Attach ties as shown in “How To Change Twill Tape Ties,” on page 10, and insert the obturator. (Do this before inserting the tube.) 7. Then place the tube with ties attached in the opened package nearby. 8. Place a rolled towel or blanket under the child’s shoulders. 9. Have your partner restrain the child’s arms while you cut the ties and remove the old tube. If no partner, swaddle the child securely. If necessary, suction accumulated secretions above the cuff prior to deflating. 5 4 3 7 9
  • 17. 15 Changing the Tracheostomy Tube 10. Gently insert the new tube, pushing back, then down in an arcing motion. 11. Immediately remove the obturator, as you hold the tube in place with your fingers. 12. Continue to hold the new tube in place while your part- ner fastens the ties using a square knot. 13. Inflate the cuff to the proper volume using a syringe. (Your doctor will tell you what volume to use.) Note: Care must be taken to place the air line and pilot balloon so that they do not become damaged during the child’s normal activities. 14. Throw away the old tube and ties. NOTE: You probably won’t have trouble inserting the new tube. But if you do, be sure the child’s head is tilted back. If you are still having difficulty, spread the skin on the stoma and insert the tube while the child is breathing in. Call your doctor immediately if you have any problems. NOTE: Always follow your doctor’s or hospital’s directions if they differ from the directions in this guide. ! 10 11
  • 18. 16 Cleaning Around the Opening CLEANING AROUND THE OPENING Skin care should be done at least twice a day: once in the morning and once at night. If you smell an odor around the neck or opening, clean the area every 8 hours until the odor is gone. In between skin care time, keep the neck and area around the opening clean and dry. Do not use powders or lotions. The child could breathe them into the lungs. Watch for red, irritated areas. If excessive redness or pimples occur around the opening, call your doctor, reduce humidity and use only sterile water for cleaning. If your doctor orders an ointment, spread it on according to his instructions. WHAT YOU WILL NEED Water and hydrogen peroxide, mixed half and half Cotton swabs Towel or small blanket, rolled up WATER HYDROGEN PEROXIDE
  • 19. 17 How to Clean Around the Opening HOW TO CLEAN AROUND THE OPENING 1. Wash your hands. 2. Mix four (4) tablespoons of hydrogen peroxide solution with four (4) tablespoons of water as clean basin or container. 3. Place rolled up towel or blanket under your child’s shoulders to expose the stoma area. 4. Dip a cotton swab into the hydrogen peroxide and water mixture. 5. Roll the cotton swab between the tracheostomy tube and the skin around the opening. Clean from the stoma outward. This removes wet or dried mucus. 6. Repeat steps 4 and 5, using a fresh cotton swab each time, until entire area around opening is clean. 7. Rinse the area using clean cotton swabs, dipped in clean water only. Then let it air dry.
  • 20. 18 Leaving Home LEAVING HOME Your child doesn’t have to be stuck in the house. You may take him with you shopping, to the park or on visits to friends and family. Whenever you go out, prepare a travel kit. If It’s Cold Out If it’s below freezing outside, don’t let your child breathe cold air directly through the tracheostomy tube. This can be bad for his windpipe and cause problems. Use a scarf, kerchief or single layer of gauze tied loosely around the neck. If you have an artificial nose, use that. These things warm the air as the child breathes in. They also are good ways to keep dust and dirt out on dusty or windy days. Going To School If your child is school age, he may attend. But it’s important to contact the school nurse to make special arrangements ahead of time, so that the school can provide the proper care. Going Out To Play Your child can play with other children. But you should supervise the play. Contact sports or rough games are not a good idea for children with tracheostomies. Do not let your child play in pools, sandboxes or areas where small particles could get inside the tracheostomy tube. WHAT YOU WILL NEED Spare tracheostomy tubes (with obturators and ties, same size and one smaller) Scissors Portable suctioning device with suction catheter Sterile water Tissues Bulb syringe Breathing medications (if child uses) Manual resuscitation bag (if ordered)
  • 21. 19 Leaving Home LEARNING TO SPEAK At first your child may not be able to make a sound. Don’t worry. As swelling decreases, she may begin to make sounds. In the meantime, watch her face. She can tell you a lot with her looks. How much sound your child is able to make depends on her age, the tracheostomy tube, her breathing patterns, etc. Some children can produce sound around the tube. Others may use things called speaking valves that help control the airflow so they can speak. Your child will need special care so that she will be able to speak properly as she grows. Be sure to show her things. Say their names. Read to her. Point to pictures and say what they are. Talk to her. Tell her what you are doing. At nine months, children can learn sign language. If you sign to your child, always say the words out loud while you sign. For additional information about your child’s speech, consult your doctor or speech pathologist. How Do I Know If My Infant Needs Me? Any non-speaking child, especially if he is less than a year old, should be closely monitored. If you are worried that you won’t know when your infant needs you, let your baby sleep in the same room with you. Better yet, put an intercom in your child’s room. Always check on your child frequently during the day.
  • 22. 20 Glossary Artificial Airway (ar-teh-fish-all air-way) Another word for tracheostomy tube. Artificial Nose (ar-teh-fish-all noz) and moisture exchanger). A device that warms and moistens the air your child breathes in. Bacteria (back-teh-ree-ah) Germs. CPR Cardiopulmonary Resuscitation A method for getting someone to breath again once they have stopped breathing or to get the heart to pump again if it has become ineffective. Cannula (can-you-la) The tube part of the tracheostomy tube . Cartilage (car-till-age) The tough tissue rings the windpipe is made of. Cuff The inflatable balloon on some tracheostomy tubes. Diaphragm (die-ah-fram) The big muscle below the lungs that controls breathing. Encrustation (in-cruss-ta-shun) Hard, crusty, dried mucus. Exhale (x-hale) Breathe out. Expiration (x-pire-a-shun) Breathe out. Health Care Provider Nurses, nurse practitioners, doctors, respiratory therapists, speech pathologists or others that visit your home. Health Care Supplier The company where you get special medical equipment. Inhale (in-hale) Breathe in. Inspiration (in-pire-a-shun) Breathe in. Lumen (loo-men) Inside part of the tube, where the air goes in and out. Mucus (mu-kuss) Slippery fluid that’s produced in the lungs and windpipe. This dries and sticks to any surface and forms a crust. Nebulizer (neb-you’ll-eyes-er) A machine that puts mois- ture and/or medicine directly into the lungs. Obturator (ob-tur-a-tor) The semi-rigid stick you put into the tracheostomy tube to help guide it into the opening in the neck. Phonation (fo-nay-shun) Talking or making sounds with the vocal cords.
  • 23. 21 Glossary Pliable (ply-ah-bull) Soft, flexible. Saline (say-leen) Solution similar to water found in the body. Secretions (see-kree-shuns) Another word for mucus. Speaking Valve (spee-king valv) A one-way valve that lets air come in through the tracheostomy tube, but then sends it out past the vocal cords and mouth to make talking possible. Speech Pathologist (speech path-ol-o-gist) A person trained to help people with speaking and swallowing problems. Stoma (sto-ma) The actual opening in your neck where you insert the tracheostomy tube. Sterile (steer-ill) Free from germs. Suctioning (suck-shun-ing) Vacuuming up mucus in the tracheostomy tube. Swaddle (swah-del) To wrap a baby like a mummy with only his head sticking out. Syringe (seer-enj) The plastic device with a plunger that you use to inflate the cuff. Trachea (tray-key-ah) The windpipe. Tracheostomy (tray-key-oss-tuh-mee) The opening in your neck where your tracheostomy tube goes, to make breathing easier. Tracheotomy (tray-key-ot-o-mee) The operation where a doctor makes an opening in your neck for a tracheostomy tube to make breathing easier. Trach Mask (trake mask) A device that fits on the end of the trach tube to provide moisture. Trach Tube (trake toob) Short for tracheostomy tube. This is the tube the doctor puts in the opening in your child’s neck. Ventilator (vin-till-a-tor) A machine that helps a person breathe through a trach tube by mechanically inflating the lungs. Vocal Cords (vo-cal cords) Two strips of tissue in the voice box in the neck that vibrate to make sounds when we talk.
  • 24. 22 Shiley Uncuffed Tubes SHILEY™ UNCUFFED TUBES 1. Connector: The part of the tube that sticks out of the neck. 2. Cannula: Another name for the tube part of the trache- ostomy tube. 3. Neck Plate: This is where the ties are attached to hold the tracheostomy tube in place. 4. Size and style of the tracheostomy tube. 5. Size of the opening on the tracheostomy tube. 6. Size of the outside of the tracheostomy tube. 7. Obturator: This is used to help guide the tube during insertion. 1 3 4 2 NEO PED PDL 6 5 7
  • 25. 23 Shiley Cuffed Tubes SHILEY™ CUFFED TUBES 1. Connector: The part of the tube that sticks out of the neck. 2. Cannula: Another name for the tube part of the tracheostomy tube. 3. Neck Plate: This is where the ties are attached to hold the tracheostomy tube in place. 4. Size and style of the tracheostomy tube. 5. Size of the opening on the tracheostomy tube. 6. Size of the outside of the tracheostomy tube. 7. Cuff: Once the tracheostomy tube is in the neck, this is filled with air. It helps keep food, water or vomit from getting into the lungs. 8. Inflation Line: Carries air to and from the cuff. 9. Pilot Balloon: If there is air in the cuff, this will be puffed up. If you have sucked all the air out of the cuff this will be flat. 10. Luer Valve: This is where you insert the tip of the syringe to put air in, or take air out, of the cuff. 1 3 4 2 PDC/PDL 6 5 7 8 9
  • 26. 24 Solving Problems SOLVING PROBLEMS SYMPTOM WHAT MAY HAVE HAPPENED WHAT TO DO Your Child: – Is restless – Is crying – Has a scared look on his face – Is making a bubbling or wheezing sound – Can’t cough out mucus – Has a pale color or blue, dusky color around mouth and nose – Is flaring his nostrils – Is having trouble eating – Looks hollow in the neck – Has the skin on his chest sucked in Build-up of mucus. Suction. If symptoms remain after suctioning, call your doctor. Yellow or green mucus, bad smelling mucus or bright red blood comes out when you suction. Infection. Call your doctor. Tube comes out of the opening in the neck. Pulling or weight at connector. Hold the neck plate with one hand while removing ventilator tubing to reduce pulling. Move ventilator (if used) and tubing so it doesn’t pull on the tracheostomy tube. Tracheostomy ties too loose or tied the wrong way. Put the tube back into the opening and retie the tracheostomy ties (refer to pages 10 and 11).
  • 27. 25 Solving Problems SYMPTOM WHAT MAY HAVE HAPPENED WHAT TO DO Unable or difficult to pass suction catheter through tracheostomy tube. Mucus plugging tracheostomy tube. Change the tracheostomy tube. Catheter too large for tube size. Contact your Home Healthcare Supplier. When you change diapers: – You notice your child has stopped wetting or is wetting a lot less. – Dark urine with a strong ammonia smell. Dehydration. Call your doctor. Tube, or any part of the tube is broken or doesn’t work. Faulty tracheostomy. Replace the tube. Tracheostomy tube was cleaned using improper cleaning agents. Replace the tube.Always use only those cleaning agents recommended by the tube manufacturer. Pulling or weight at connector. Hold the neck plate with one hand while removing ventilator tubing to reduce pulling. Move ventilator and tubing so it doesn’t pull on the tracheostomy tube.
  • 28. 26 Solving Problems SYMPTOM WHAT MAY HAVE HAPPENED WHAT TO DO Ventilator’s “High Pressure” alarm goes off. Ventilator tubing is blocked or kinked. Clear tubing of kink or blockage. Mucus is plugging the tracheostomy tube. Suction to clear mucus. If the first two suggestions don’t work, there may be a ventilator problem. Contact Home Healthcare Supplier. Ventilator “Low Pressure” alarm goes off. Ventilator tubing is not connected at machine. Make sure all tubing to machine and patient is connected. If you have a cuffed tracheostomy tube: Leak in cuff, inflation line or pilot balloon. Remove ventilator tubing from tracheostomy tube. Deflate and reinflate cuff with proper volume.Attach ventilator tubing.Turn on machine. Replace the tube if it will not remain inflated. If the first two suggestions don’t work, there may be a ventilator problem. Contact Home Healthcare Supplier. Deliver breaths with a manual resuscitation bag, if available. The following applies only to patients on ventilators.!
  • 29. 27 What if the Power Goes Out? WHAT IF THE POWER GOES OUT? The best way to deal with this is to have a plan. Before the power goes out, notify the power and phone com- panies, in writing, that your child uses a tracheostomy tube. Ask for priority in restoring service. You may purchase a special light that goes on if the power goes off. Use this to alert you. You may go to a friend’s or family member’s home. Also, you might go to a hospital or fire house where there will be an emergency generator.
  • 30. 28
  • 31. 29 Tabla de Contenidos TUBO DE TRAQUEOSTOMÍA GUÍA PARA LA ATENCIÓN DOMICILIARIA PEDIÁTRICA ¡Usted Puede Hacerlo!. . . . . . . . . . . . . . . . . . . . . . . . . . . . . . . . 30 Qué Necesitará En Qué Consiste la Traqueostomía . . . . . . . . . . . . . . . . . . . . . . 31 Qué Hace el Médico Qué Ocurre al Interior del Cuerpo Humidificación . . . . . . . . . . . . . . . . . . . . . . . . . . . . . . . . . . . . . . 32 Retiro del Humidificador Consejos Prácticos Para la Vida Diaria . . . . . . . . . . . . . . . . . . . 33 Al Comer Al Darse un Baño Al Vestirse Al Jugar Al Estar Enfermo Al Salir a Pasear Consejos Prácticos de Seguridad . . . . . . . . . . . . . . . . . . . . . . . 35 Aspiración. . . . . . . . . . . . . . . . . . . . . . . . . . . . . . . . . . . . . . . . . . 36 Qué Necesitará Cómo Aspirar . . . . . . . . . . . . . . . . . . . . . . . . . . . . . . . . . . . . . . . 37 Cómo Cambiar los Lazos . . . . . . . . . . . . . . . . . . . . . . . . . . . . . . 38 Cómo Cambiar los Lazos de Cinta Asargada Qué Necesitará Cómo Cambiar el Tubo de Traqueostomía . . . . . . . . . . . . . . . . 40 Cómo Limpiar el Tubo de Traqueostomía Qué Necesitará Cómo Cambiar los Tubos Sin Manguito . . . . . . . . . . . . . . . . . . 41 Cómo Cambiar los Tubos Con Manguito . . . . . . . . . . . . . . . . . 42 Aseo de la Zona Que Rodea el Orificio. . . . . . . . . . . . . . . . . . . 44 Qué Necesitará Cómo Limpiar la Zona Que Rodea el Orificio. . . . . . . . . . . . . . 45 Salir de Casa . . . . . . . . . . . . . . . . . . . . . . . . . . . . . . . . . . . . . . . . 46 Si Hace Frío Al ir a la Escuela Al Salir a Jugar Qué Necesitará Aprender A Hablar. . . . . . . . . . . . . . . . . . . . . . . . . . . . . . . . . . . 47 ¿Cómo Puedo Saber Si Mi Hijo Me Necesita? Glosario. . . . . . . . . . . . . . . . . . . . . . . . . . . . . . . . . . . . . . . . . . . . 48 Tubos Sin Manguito. . . . . . . . . . . . . . . . . . . . . . . . . . . . . . . . . . 50 Tubos Con Manguito . . . . . . . . . . . . . . . . . . . . . . . . . . . . . . . . . 51 Solución de Problemas . . . . . . . . . . . . . . . . . . . . . . . . . . . . . . . 52 ¿Qué Hacer Si Se Corta la Energía Eléctrica? . . . . . . . . . . . . . . 55
  • 32. 30 ¡Usted Puede Hacerlo! ¡USTED PUEDE HACERLO! Una traqueostomía no es algo común, por lo tanto, es razón que Shiley creó esta guía: para responder las pregun- tas comunes que se le presentan a los padres a medida que aprenden a atender la traqueostomía de su hijo. Usted recibirá capacitación para el cuidado de la traqueostomía participe en forma activa, que haga muchas preguntas y que tome notas. La práctica hace al maestro. Mientras más tiempo le dedique, más cómodo se sentirá atendiendo a su hijo. Una buena idea es que varios miembros de la familia se capaciten para que así ellos también sepan cómo atender la traqueostomía de su hijo. Su médico, enfermera o terapeuta son su mejor fuente de asesoría. Sin embargo, esta guía le proporcionará útiles consejos y recordatorios para que, cuando usted y su hijo vuelvan a casa, todo fluya sin problemas. QUÉ NECESITARÁ Un recipiente o lavatorio pequeño (para revisar el manguito del tubo) Una manta (para envolver al niño) Tijeras para vendaje con punta roma (para cortar la cinta asargada) Cajita con pañuelos desechables Jeringa de pera Hisopos de algodón (se utilizan para limpiar la zona que rodea el orificio) Guantes quirúrgicos (como los que usa el médico) Humidificador (para humedecer el aire durante las siestas y durante la noche) Peróxido de hidrógeno y agua (mezclados en partes iguales, para limpiar la zona alrededor del orificio o estoma) Nebulizer (to moisten the lungs) Tubo de traqueostomía de repuesto (uno del mismo tamaño y otro más pequeño) Bolso de reanimación (opcional) Agua esterilizada (para lavar los catéteres de aspiración) Catéter de aspiración Máquina de aspiración (para conectar y portátil) Toalla o manta pequeña (para enrollar y poner bajo los hombros del niño durante el cuidado de la traqueostomía) Mascarilla del tubo de la traqueostomía Cinta asargada u otro soporte para tubo de traqueostomía (para asegurar el tubo en su lugar) NOTA: Es posible que su proveedor de accesorios para atención médica domiciliaria lleve algunos de estos artículos; el resto deberá comprarlos en la tienda.
  • 33. En Qué Consiste la Traqueostomía 31 Esófago (al estómago)Tubo aéreo (traquea) Pulmones Sacos aéreos EN QUÉ CONSISTE LA TRAQUEOSTOMÍA Qué hace el médico del cuello para llegar a la traquea. A continuación, intro- duce un tubo plástico curvo (tubo de traqueostomía) en la incisión, el cual permitirá respirar a su hijo. Qué ocurre al interior del cuerpo Por lo general, respiramos a través de la nariz y la boca; el aire se filtra, se entibia y humedece antes de bajar por la traquea hasta los pulmones. Con una traqueostomía, el aire pasa directamente por la traquea hasta los pulmones. No se filtra, ni se entibia ni se humedece. Aprenderá a cómo prepararse para ello con el equipo apropiado y aprendiendo a cuidar correctamente la traqueostomía.
  • 34. 32 Humidificación HUMIDIFICACIÓN protege el revestimiento de los pulmones y evita que la mucosidad se seque. Una traqueostomía pasa por alto la nariz y la boca. Por lo tanto, necesitamos agregar humedad, aún en climas húm- edos, o la mucosidad se secará y bloqueará el tubo de la un sistema de humidificación con un tubo flexible y una mascarilla para traqueostomía. Otra forma de humidificar es y la humedad cuando el niño exhala y luego devuelve dicha humedad al aire cuando el niño inhala. Asegúrese de utilizar un humidificador durante las siestas y durante la noche para disminuir la posibilidad de que la mu- cosidad obstruya el tubo de la traqueostomía, aun cuando su hijo use una nariz artificial mientras esté despierto. Retiro del humidificador Durante el día (y sólo durante el día) puede dejar que su hijo permanezca sin humedad durante períodos más prolonga- atento a la formación de mucosidad gruesa o mucosidad con restos de sangre. Si detecta algunas de estas características, dé al niño mucho líquido para mantener la mucosidad del- gada. Informe de la situación a su médico. Si el tubo de la traqueostomía se tapa, aspírelo para retirar el tapón de mucosidad (consulte la página 9). Si no puede retirar el tapón de mucosidad, cambie el tubo.
  • 35. 33 Consejos Prácticos Para la Vida Diaria CONSEJOS PRÁCTICOS PARA LA VIDA DIARIA Al comer Su hijo comerá tal como lo haría cualquier niño. Sólo debe tener cuidado de que las comidas y los líquidos no se vayan “por el camino equivocado”. Cuando alimente a un bebé con biberón, no levante el bib- erón ni tampoco, lo alimente cuando esté acostado. Puede entrar líquido a los pulmones. Sostenga al niño en posición casi vertical mientras lo alimenta. Cuando termine de comer, ponga al niño de lado. De esta manera, si vomita, hay menor riesgo de que el vómito llegue a los pulmones y que el niño se ahogue. Durante las comidas, vigile a los niños que empiezan a caminar, para evitar que entre comida al tubo de la traque- ostomía. Tal vez le parezca conveniente cubrir levemente la abertura del tubo de la traqueostomía con la mascarilla del sistema de humidificación o con una nariz artificial para mayor seguridad. Al bañarlo A los niños les encanta bañarse. Su hijo también lo disfru- tará, con usted cuidándolo. Prepare siempre un baño con poca agua. Tenga cuidado y evite que el agua entre al tubo de la traqueostomía, porque se irá directamente a los pulmones. Para mayor seguridad, utilice una mascarilla traqueal o una nariz artificial. Cuando llegue el momento de aplicar el shampoo, ponga al niño de espalda, apoyando su cabeza en el lavabo. Al vestirse Puede vestir a su hijo prácticamente de la forma que desee. Sólo tenga cuidado y evite que la ropa bloquee el tubo de la traqueostomía. Evite: Cuellos redondos, cuellos altos tipo tortuga, botones en la espalda, gargantillas, correas de hombro y ropa que desprenden pelusas o fibras. Use: Camisetas con cuello en forma de V y ropa con botones al frente. Los baberos de algodón son más recomendables que los de plástico.
  • 36. 34 Consejos Prácticos Para la Vida Diaria Al jugar Los niños que empiezan a caminar disfrutan la mayoría de los juegos normales, pero se les debe supervisar. Además, deberá seleccionar sus juguetes con cuidado. Evite: Juguetes o piezas de juguetes de tamaño muy pequeño que pudieran entrar en el tubo de la traqueostomía. Además, evite las cajas de arena y los deportes de contacto. suelta, una mascarilla o una nariz artificial para entibiar el aire y evitar que ingrese polvo al tubo. Al estar enfermo Si bien a nadie le gusta estar enfermo, esto puede resultar un desafío especial para los pacientes con traqueostomía. Lo mejor es evitar la enfermedad, por tanto, asegúrese de que su hijo ingiera alimentos saludables. Además, mantenga al día todas sus vacunas e inyecciones y evite que esté en contacto con otros niños que estén enfermos. Si su hijo se enferma, vigílelo atentamente. Si el niño vomita, tiene diarrea o fiebre, tal vez sea necesario que lo aspire con mayor frecuencia y que le dé más líquidos. Además, si vomita, cubra levemente el tubo de la traqueostomía con una nariz artificial, un babero o una bufanda para evitar que ingrese vómito. Si cree que es posible que haya ingresado vómito al tubo, aspírelo de inmediato. Si observa restos de comida, llame cuanto antes a su médico. Al salir a pasear Cuidar a un niño que tiene una traqueostomía puede demandar mucho tiempo. Asegúrese de planificar tiempo adicional para usted, su cónyuge y el resto de sus hijos. Si va a salir, debe contratar a una niñera capacitada para atender traqueostomías. Una buena idea es capacitar a uno de los abuelos o a otro miembro de la familia o a un vecino. Algunos padres intercambian niñera con otros padres de niños que tienen tubos de traqueostomía.
  • 37. 35 Consejos de Seguridad CONSEJOS DE SEGURIDAD Siga las instrucciones de su médico o del hos- pital respecto al cuidado de la traqueostomía. Si las instrucciones que aparecen en esta guía difieren de las que reciba en su capacitación, siga las instrucciones de su capacitación. - ación de parte de un profesional de salud pu- eden efectuar el cuidado de la traqueostomía. - les a mano para usarlos en caso de emergencia (uno del mismo tamaño y otro más pequeño). sitio donde la temperatura sea superior a 48°C (120°F). de su pequeño. - ción. Informe a su médico si descubre: – la piel que rodea el estoma está roja e in- flamada – Mucosidad maloliente – Mucosidad con sangre de color rojo brillante una pequeña pausa antes de volver a aspirar. – Use poca agua. – Utilice la mascarilla traqueal. - mente cubierto mientras alimenta al niño. entre comida al tubo de la traqueostomía. después que hayan comido, en caso de que vomiten. del niño. y moho. de la traqueostomía. Sin embargo, puede utilizar una bufanda holgada. – Cajas de arena – Juguetes muy pequeños - mente si juega con otros niños. – Se le enseñará RCP en el hospital. – Todas las personas que atiendan a su hijo deben saber RCP. la cama. del teléfono. SI SU HIJO UTILIZA UN VENTILADOR MECÁNICO Revise periódicamente las alarmas de seguridad y auditivas del ventilador para confirmar que funcionen correctamente. Asegúrese de que los tubos del ventilador estén colocados correctamente de modo que no tiren el tubo de traqueostomía. No tuerza ni tire del conector de traqueostomía más de lo que debe. Esto podría causar incomodidad a su hijo o desconectar los tubos del ventilador. Sujete el tubo de traqueostomía para mantenerlo en su lugar cuando conecte o desconecte los conductos del humidificador o del ventilador mecánico. !
  • 38. 36 Aspiración NOTA: Siempre siga las indicaciones de su médico o del hospital si difieren de las instrucciones que aparecen en esta guía. ! QUÉ NECESITARÁ Máquina de aspiración Recipiente para recolectar las secreciones Catéter de aspiración Agua esterilizada Bolso de reanimación (opcional) Guantes ASPIRACIÓN Los pulmones y el tubo aéreo o traquea deben producir mucosidad. Ésta limpia el aire a medida que respiramos al atrapar partículas pequeñas. Luego se desplaza hacia arriba de la tráquea hasta que se puede tragar. La mucosidad puede acumularse en el tubo de traque- ostomía y en el área que lo rodea. Debe eliminarse para que no se seque y obstruya el tubo. La aspiración sólo debería hacerse cuando sea necesario, generalmente al despertar, antes de las comidas (si es necesario), cuando el niño tome una siesta y antes de que se vaya a dormir. No aspire con demasiada frecuen- cia. Mientras más aspire, más secreciones se pueden producir. A medida que su hijo crezca, tendrá que realizar las aspi- raciones con menor frecuencia. Sin embargo, tal vez aún será necesario que evalúe la necesidad de aspirar al niño al menos dos veces al día. Las siguientes señales son indicaciones que su hijo puede necesitar que se le aspire en forma inmediata. gorjeo o de tos pálido Hable con su médico cada vez que su hijo presente se- ñales que de que requiere aspiración inmediata.
  • 39. 37 Cómo Aspirar CÓMO ASPIRAR 1. Lávese las manos. 2. Colóquese los guantes. Toque el extremo de aspiración del catéter sólo con la mano con guante. 3. Ajuste el catéter a la máquina. 4. Lave el catéter aspirando agua esterilizada. 5. Inserte suavemente el catéter en el tubo de la traqueos- tomía hasta que llegue al final del tubo (en el hospital le enseñarán respecto a la longitud del tubo de la traqueostomía). 6. Cubra el orificio para el pulgar que hay en el catéter para aspirar. 7. Retire suavemente el catéter, haciéndolo girar entre su pulgar y el índice (en total, el proceso completo no debería tomarle más de 5 a 10 segundos). 8. Si necesita volver a aspirar, lave antes el catéter. 9. Revise la mucosidad: Normal: transparente sin olor. Infección: color amarillo o verde con mal olor. Sangre: es normal que haya algunas vetas de sangre. Sin embargo, si hay una mayor canti dad de sangre de color rojo brillante u oscuro, podría haber un problema. 10. Si observa alguna señal de infección o sangre de color rojo brillante, llame a su médico. Siga las instrucciones del hospital o del proveedor de aten- ción domiciliaria para guardar o desechar los catéteres. Mantenga la máquina de aspiración, sus tubos y el recipiente para las secreciones limpios según las instruc- ciones de su proveedor de atención médica domiciliaria. 4 7
  • 40. 38 Cómo Cambiar los Lazos CÓMO CAMBIAR LOS LAZOS cuello se mantenga limpia para evitar infecciones. Por lo tanto, cambie los lazos cuando se humedezcan o cuando estén evidentemente sucios, al menos una vez al día. Utilizará tijeras cerca de la cara. Por lo tanto, será necesario que sostenga al niño con fuerza, para que no Pero de ser necesario, puede hacerlo sólo una persona. Cómo cambiar los lazos de cinta asargada Lazos de cinta 1. Lávese las manos (ambos, si le ayuda otra persona). 2. Corte dos trozos de cinta de asargada, cada uno del largo suficiente como para doblarlos por la mitad y aún así alcanzar alrededor del cuello del niño. Déjelas cerca. 3. Una persona sostiene al niño, la otra cambia los lazos. Si está haciendo el cambio solo, envuelva fuertemente al niño en una manta para evitar que mueva las manos. 4. Ponga una toalla o manta bajo los hombros delniño. QUÉ NECESITARÁ Cinta asargada para traqueostomía u otro soporte para tubo de traqueostomía Tijeras para vendaje con punta roma Toalla o manta pequeña, enrollada y puesta bajo los hombros del niño Guantes limpios (opcional), dependiendo de las preferencias del médico o la institución
  • 41. 39 Cómo Cambiar los Lazos 5. Deje los lazos usados en su lugar. Pase el extremo doblado de uno de los lazos nuevos a través de uno de los orificios del tubo de la traqueostomía, yendo desde el lado de la piel hacia usted. 6. Tire todo el lazo, hasta que se forme un bucle. Tire los otros extremos a través del bucle hasta que el lazo quede firmemente ajustado al tubo de la traqueostomía. 7. Repita los pasos 5 y 6 con el otro lazo. 8. Junte los extremos sueltos de ambos lazos atrás del cuello y átelos con un nudo cuadrado (no use un moño). Nota: Cambie la ubicación del nudo de un lado a otro y en la parte posterior del cuello para evitar que la piel se irrite. 9. Corte los extremos de los lazos 1 ó 2 pulgadas (2,5 ó 5 cm). 10. Corte con cuidado los lazos sucios y deséchelos. Nota: Las cintas tienen la tensión adecuada cuando se puede pasar la punta del dedo meñique fácilmente entre el cuello y la cinta. 8 9 10 7 5
  • 42. 40 Cómo Cambiar el Tubo de Traqueostomía CÓMO CAMBIAR EL TUBO DE TRAQUEOSTOMÍA Se recomienda cambiar los tubos de traqueostomía y los ac- la formación gradual de mucosidad, lo que puede tapar o bloquear el tubo. Su médico le indicará con qué frecuencia debe cambiar el tubo (si su médico le indica que puede lim- piar y volver a utilizar el tubo de la traqueostomía, Covidien recomienda eliminar los tubos de traqueostomía Shiley™ tras 29 días de uso). Nota por esta razón que lo mejor es cambiar un tubo antes de una comida o al menos 1 a 1/2 hora después de una comida. Cómo limpiar el tubo de traqueostomía Si su profesional de salud le ha instruido para limpiar el tubo de la traqueostomía, siga estas instrucciones y advertencias: de hidrógeno (diluido a la mitad), vinagre casero (diluido a la mitad), solución salina normal esterilizada o agua y deter- gente suave. Después de limpiar, enjuague bien con solución salina esterilizada para eliminar los residuos de solución de limpieza. Deje secar al aire. Si utiliza un tubo de traqueostomía con manguito, este se debería lavarse bien con solución salina esterilizada y no de- bería entrar en contacto con ningún químico ni detergente de limpieza. ADVERTENCIAS: Utilice sólo las soluciones antes mencionadas para limpiar cualquier parte del tubo o del obturador. No exponga el tubo ni el obturador a agentes químicos dis- tintos diferentes a los recomendados, ya que podría causar daños a estos elementos. No deje remojando el tubo ni el obturador en peróxido Asegúreese de que el lubricante no ingrese a ni bloquee la luz del tubo, ya que esto puede impedir la ventilatión. QUÉ NECESITARÁ Un tubo de reemplazo (con lazos listos) Tijeras para vendaje con punta roma Toalla o manta para enrollar y poner bajo los hombros del niño Un portabebé o una manta para envolver al niño PRECAUCIÓN: Los tubos de traqueostomía de Shiley están diseñados sólo para ser utilizados en un solo paciente. NOTA: Siempre siga las indicaciones de su médico o del hospital si difieren de las instrucciones que aparecen en esta guía. !
  • 43. 41 Cómo Cambiar los Tubos Sin Manguito CÓMO CAMBIAR LOS TUBOS SIN MANGUITO 1. Todas las personas que participen deben lavarse las ma- nos. Póngase guantes limpios. 2. Inserte el obturador en un nuevo tubo de traqueostomía. 3. Ajuste los lazos tal como se muestra en la sección “Cómo cambiar los lazos de cinta asargada” en la página 10 (hágalo antes de poner el tubo en el cuello del niño). Ponga el tubo con los lazos en su posición en el paquete 4. Ponga una toalla o manta bajo los hombros del niño. 5. Pida a su ayudante que sujete los brazos del niño mien- tras usted corta los lazos y retira el tubo (si hace el cam- bio solo, envuelva con fuerza al niño). 6. Retire el tubo usado. 7. Inserte suavemente el tubo nuevo, empujando hacia atrás, luego hacia abajo, con un movimiento en forma de arco. 8. Retire rápidamente el obturador al mismo tiempo que sostiene el tubo firmemente con los dedos. 9. Asegure los lazos con un nudo cuadrado. Nota insertar el tubo nuevo. niño esté inclinada hacia atrás. Si los problemas continúan, extienda la piel que rodea el estoma e inserte el tubo mientras el niño inspira. Pruebe con un tubo de menor tamaño. Llame a su médico de inmediato si tiene problemas. 2 3 7 8 9
  • 44. 42 Cómo Cambiar los Tubos Con Manguito CÓMO CAMBIAR LOS TUBOS CON MANGUITO 1. Todas las personas que participen deben lavarse las manos. 2. Saque el tubo nuevo del paquete. Tenga cuidado de no dañar el manguito, la línea de inflado ni el globo piloto. 3. Use una jeringa para inflar el manguito hasta el volu- men correcto a prueba de fugas. Las marcas de la jeringa indican el volumen de aire. Tamaño del tubo Shiley™ Volumen de prueba 4.0 PDC 8.0 cc 4.5 PDC 8.0 cc 5.0 PDC or PLC 9.0 cc 5.5 PDC or PLC 9.0 cc 6.0 PLC 11.0 cc 6.5 PLC 11.0 cc 4. Sumerja el tubo completo, incluida la línea de inflado, en un recipiente o lavatorio pequeño con suficiente agua esterilizada hasta cubrirlo y observe si hay burbujas que indiquen la presencia de una fuga de aire. Nota: Si 5. Desinfle el manguito por completo con una jeringa. A medida que lo hace, empuje suavemente el manguito para sacarlo del extremo del tubo. Asegúrese de eliminar todo el aire. De esta forma podrá insertar el tubo con más facilidad. 6. Ajuste los lazos tal como se muestra en la sección “Cómo cambiar los lazos de cinta asargada”, en la página 10, e inserte el obturador. (Hágalo antes de insertar el tubo). 7. Lubrique el tubo con una capa delgada de lubricante a base de aqua. 8. A continuación, ponga el tubo con los lazos en su posición en el paquete abierto que tiene cerca. 9. Ponga una toalla o manta bajo los hombros del niño. 10. Pida a su ayudante que sujete los brazos del niño mien- tras usted corta los lazos y retira el tubo usado. Si hace el cambio solo, envuelva con fuerza al niño. De ser necesa- rio, aspire las secreciones acumuladas sobre el manguito antes de desinflar. 5 4 3 8 10
  • 45. 43 Cómo Cambiar los Tubos Con Manguito 11. Inserte suavemente el tubo nuevo, empujando hacia atrás, luego hacia abajo, con un movimiento en forma de arco. 12. Retire rápidamente el obturador al mismo tiempo que sostiene el tubo firmemente con los dedos. 13. Siga sosteniendo el tubo nuevo en su lugar mientras su ayudante abrocha los lazos con un nudo cuadrado. 14. Infle el manguito hasta el volumen adecuado con una je- Nota el globo piloto de manera tal que no se dañen durante las actividades normales del niño. NOTA: Es probable que no tenga ningún problema para insertar el tubo nuevo. En caso de que los tenga, asegúrese de que la cabeza del niño esté inclinada hacia atrás. Si los problemas continúan, extienda la piel que rodea el estoma e inserte el tubo mientras el niño inspira. Si tiene algún problema, llame cuanto antes a su médico. Nota: Siempre siga las indicaciones de su médico o del hospital si difieren de las instrucciones que aparecen en esta guía. ! 11 12
  • 46. 44 Aseo de la Zona Que Rodea el Orificio ASEO DE LA ZONA QUE RODEA EL ORIFICIO La limpieza de la piel se debería realizar al menos dos veces al día: una vez en la mañana y otra en la noche. Si percibe un olor desagradable alrededor del cuello o del orificio, limpie la zona cada 8 horas hasta que elimine el olor. Cuando realice la limpieza de la piel, mantenga limpios y secos el cuello y el área que rodea el estoma. No utilice pol- - nes. Observe si hay zonas enrojecidas o irritadas. Si aparece enrojecimiento excesivo o pústulas alrededor del orificio, llame a su médico, disminuya la humedad y limpie sólo con agua esterilizada. Si su médico le receta un ungüento, aplíquelo como se lo indique. QUÉ NECESITARÁ Agua y peróxido de hidrógeno, mezclados en partes iguales Hisopos de algodón Toalla o manta pequeña, enrollada AQUA PERÓXIDO DE HIDRÓGENO
  • 47. 45 Aseo de la Zona Que Rodea el Orificio 1. Lávese las manos. 2. Mezcle cuatro (4) cucharadas de solución de peróxido de hidrógeno con cuatro (4) cucharadas de agua, como se muestra en la página opuesta. Vacíe las soluciones en un recipiente o contenedor limpio. 3. Ponga una toalla o una manta enrollada bajo los hom- bros del niño para exponer el área de la estoma. 4. Sumerja un hisopo de algodón en la mezcla de peróxido de hidrógeno y agua. 5. Pase el hisopo de algodón entre el tubo de traqueostomía y la piel que rodea el orificio. Limpie desde el estoma hacia afuera. De esta forma podrá eliminar la mucosidad húmeda o seca. 6. Repita los pasos 4 y 5, con un hisopo de algodón limpio cada vez, hasta que haya limpiado toda la zona. - medecidos en agua limpia. Deje secar al aire.
  • 48. 46 Salir de Casa SALIR DE CASA Su hijo no tiene por qué quedarse sólo en casa. Puede llevarlo cuando salga de compras, al parque o a visitar a sus amigos o familiares. Sin importar a dónde salga, prepare un kit de viaje. Si hace frío Si al salir la temperatura es bajo cero, no permita que su hijo respire aire frío directamente a través del tubo de la provocar problemas. Utilice una bufanda, un pañuelo o una gasa que cubra ligera- elementos entibian el aire cuando el niño inspira. Además, evitan que ingrese polvo o suciedad en días en que hay mucho viento o polvo. Al ir a la escuela Si su hijo está en edad escolar, puede asistir a la escuela. Sin embargo, es importante ponerse en contacto con la enfer- mera de la escuela para hacer arreglos especiales de antema- no, de manera que la escuela pueda dar al niño la atención adecuada. Al salir a jugar Su hijo puede jugar con otros niños. Pero usted debería supervisar el juego. Los deportes de contacto y los juegos bruscos no son buenos para niños que tienen una traqueos- tomía. No permita que su hijo juegue en piscinas, cajas de arena ni en área donde hay partículas pequeñas que pudi- eran ingresar al tubo de la traqueostomía. QUÉ NECESITARÁ Tubos de traqueostomía de repuesto (con obturadores y lazos, del mismo tamaño y otro más pequeño) Tijeras Aspirador portátil con catéter de aspiración Agua esterilizada Pañuelos desechables Jeringa de pera Medicamentos para facilitar la respiración (si el niño los utiliza) Bolso de reanimación manual (si se solicitó)
  • 49. 47 Aprender a Hablar APRENDER A HABLAR Al principio, su hijo no podrá emitir sonidos. No se preo- cupe. A medida que la hinchazón disminuya, es probable que empiece a emitir sonidos. Mientras, preste atención a su rostro. Las miradas de su hijo pueden decir mucho. La cantidad de sonido que su hijo puede hacer va a depender de su edad, del tubo de traqueostomía, de sus patrones de respiración, etc. Algunos niños pueden emitir sonidos alre- dedor del tubo. Otros, en cambio, pueden utilizar elementos denominados válvulas fonatorias que ayudan a controlar el flujo de aire y les permiten hablar. A medida que vaya creciendo, su hijo necesitará atención es- pecial para que pueda hablar en forma adecuada. Asegúrese de mostrarle cosas. Decirle sus nombres. Leerle. Señale imá- genes y diga qué son. Háblele. Dígale qué está haciendo. A los nueve meses, los niños pueden aprender lenguaje de señas. Si le hace señas al niño, diga siempre las palabras en voz alta mientras hace la seña. Para obtener información adicional acerca del habla de su hijo, consulte a su médico o al logopeda. ¿Cómo puedo saber si mi hijo me necesita? Todo niño que no habla, especialmente si tiene menos de un año, debería ser supervisado atentamente. Si le preocupa no saber cuando su hijo lo necesita, deje que el bebé duerma en la misma habitación que usted. Mejor aún, ponga un intercomunicador en la habitación del niño. Controle siempre a su hijo en forma frecuente durante el día.
  • 50. 48 Glosario Aspiración Aspiración de la mucosidad acumulada en el tubo de traqueostomía. Bacterias Gérmenes. Cánula Parte del tubo de traqueostomía. Cartílago Aros de tejido duro conforman el tubo aéreo o traquea. CPR Reanimación cardiopulmonar Método que se emplea para hacer que una persona que ha dejado de respirar vuelva a hacerlo o para hacer que el corazón empiece a bombear otra vez si ha dejado de hacerlo. Cuerdas vocales Dos franjas de tejido que se encuentran en la caja de resonancia en el cuello, que vibran para emitir sonidos al hablar. Diafragma Músculo grande ubicado bajo los pulmones que controla la respiración. Envolver su cabeza libre. Estéril Libre de gérmenes. Estoma Orificio real en el cuello donde se inserta el tubo de traqueostomía. Exhalar Botar aire. Expiración Acción de botar el aire. Fonación Hablar o emitir sonidos con las cuerdas vocales. Incrustación Mucosidad seca, endurecida como costra. Inhalar Tomar aire. Inspiración Acción de tomar aire. Jeringa Dispositivo plástico con un émbolo que se usa para inflar el manguito. Logopeda Persona entrenada para ayudar a los pacientes que tienen dificultades de lenguaje y deglución. Luz Parte interna del tubo, por donde entra y sale el aire. Maleable Suave, flexible. Manguito Globo inflable que tienen algunos tubos de traqueostomía. Máscara traqueal Dispositivo que se inserta en el extremo del tubo traqueal para proporcionar humedad.
  • 51. 49 Glosario Mucosidad Fluido resbaloso que se produce en los pulmo- nes y la tráquea. Se seca y se pega a cualquier superficie y forma una costra. Nariz artificial También llamada “intercambiador de hume- que entibia y humedece el aire que su hijo inspira. Nebulizador Máquina que entrega humedad y/o medica- mento directamente a los pulmones. Obturador Varilla semi rígida que se pone al interior del tubo de traqueostomía para ayudar a guiarlo hacia el interior del orificio que hay en el cuello. Proveedor de productos médicos - tiene el equipo médico especial. Proveedores de atención médica practicantes, médicos, terapeutas respiratorios, logopedas u otros que visiten su hogar. Secreciones Sinónimo de mucosidad. Solución salina Solución similar al agua que se encuentra en el organismo. Tráquea Parte de las vías respiratorias que va desde la laringe a los bronquios. Traqueostomía Orificio en el cuello donde se introduce el tubo de traqueostomía para ayudarle a respirar más fácilmente. Traqueostomía Procedimiento quirúrgico en el cual el médico hace una abertura en el cuello para que el paciente pueda respirar mejor con un tubo de traqueostomía. Tubo traqueal Nombre abreviado del tubo de traqueos- cuello del niño. Válvula fonatoria Válvula de una sola vía que deja entrar el aire por el tubo de traqueostomía y luego lo hace pasar a través de las cuerdas vocales y la boca para que la persona pueda hablar. Ventilador Máquina que ayuda a una persona a respirar por un tubo de traqueostomía al inflar mecánicamente los pulmones. Vía aérea artificial Sinónimo de “tubo de traqueostomía”.
  • 52. 50 Tubos Shiley Sin Manguito TUBOS SHILEY™ SIN MANGUITO 1. Conector: Parte del tubo que sobresale del cuello. 2. Cánula: Otro nombre para la parte del tubo del tubo de traqueostomía. 3. Placa del cuello: Punto donde se ponen los lazos para mantener el tubo de la traqueostomía en su lugar. 4. Tamaño y estilo del tubo de traqueostomía. 5. Tamaño del orificio del tubo de traqueostomía. 6. Tamaño de la parte exterior del tubo de traqueostomía. 7. Obturador: Se utiliza para guiar la inserción del tubo. 1 3 4 2 NEO PED PDL 6 5 7
  • 53. 51 Tubos Shiley Con Manguito TUBOS SHILEY™ CON MANGUITO 1. Conector: Parte del tubo que sobresale del cuello. 2. Cánula: Otro nombre para la parte del tubo del tubo de traqueostomía. 3. Placa del cuello: Punto donde se ponen los lazos para mantener el tubo de la traqueostomía en su lugar. 4. Tamaño y estilo del tubo de traqueostomía. 5. Tamaño del orificio del tubo de traqueostomía. 6. Tamaño de la parte exterior del tubo de traqueostomía. 7. Manguito: Una vez que el tubo de traqueostomía está en el cuello, el manguito se llena con aire. Ayuda a evitar que ingrese a los pulmones comida, agua o vómito. 8. Línea de inflado: Lleva aire hacia y desde el manguito. 9. Globo piloto: Si hay aire en el manguito, este globo estará inflado. Si sacó todo el aire del manguito, estará plano. 10. Válvula Luer: Punto donde se inserta la punta de la jeringa para agregar o sacar aire del manguito. 1 3 4 2 PDC/PDL 6 5 7 8 9
  • 54. 52 Solución de Problemas SOLUCIÓN DE PROBLEMAS SÍNTOMA POSIBLE CAUSA SOLUCIÓN Su hijo: – Está inquieto – Está llorando – Tiene una mirada de miedo. – Hace ruido de burbujas o de silbido – No puede expulsar las secreciones tosiendo – Tiene un color pálido o azul, oscuro alrededor de la boca y la nariz – Sus orificios nasales están dilatados – Tiene problemas para comer – Se le ve un hundimiento en el cuello – La piel de su tórax está hundida Acumulación de mucosidad. Aspirar. Si los síntomas persisten tras la aspiración, llame a su médico. Si al aspirar sale mucosidad amarilla o verde, mucosidad de mal olor o sangre roja brillante. Infección. Llame a su médico. El tubo se sale por el orificio en placa del cuello con el cuello. Tirantez o peso en el conector. Sostenga la placa del cuello con una mano mientras retira el tubo del ventilador para disminuir la tirantez. Mueva el ventilador (si lo utiliza) y los tubos de manera que no tiren el tubo de la traque ostomía. Los lazos de la traqueostomía están demasiado sueltos o ajustados en forma incorrecta. Vuelva a poner el tubo en la abertura y amarrar los lazos de la traqueostomía (consulte las páginas 10 y 11).
  • 55. 53 Solución de Problemas SÍNTOMA POSIBLE CAUSA SOLUCIÓN Incapacidad o dificultad para pasar el catéter de aspiración a través del tubo de traqueostomía. La mucosidad obstruye el tubo de la traqueostomía. Cambie el tubo de la traqueostomía. Catéter demasiado largo para el tamaño del tubo. Póngase en contacto con su proveedor de atención médica domiciliaria. Cuando cambie pañales: – Nota que el niño ha dejado de mojar el pañal o lo moja mucho menos. – Orina oscura, con un fuerte olor a amoníaco. Deshidratación. Llame a su médico. El tubo o alguna de sus partes se rompieron o no funcionan. Tubo de la traqueostomía defectuoso. Cambie el tubo. Lavó el tubo de traqueostomía con algún agente de limpieza inadecuado. Cambie el tubo. Siempre use los agentes de limpieza recomendados por el fabricante del tubo solamente. Tirantez o peso en el conector. Sostenga la placa del cuello con una mano mientras retira el tubo del ventilador para disminuir la tirantez. Mueva el ventilador y los tubos de manera que no tiren el tubo de la traqueostomía.
  • 56. 54 Solución de Problemas SÍNTOMA POSIBLE CAUSA SOLUCIÓN La alarma de “Alta presión” del ventilador se desactiva. El tubo del ventilador está obstruido o torcido. Elimine aquello que está torciéndolo u obstruyéndolo. Hay mucosidad que obstruye el tubo de la traqueostomía. Aspire para eliminar la mucosidad. Si las primeras dos sugerencias no funcionan, puede haber un problema con el ventilador. proveedor de atención médica domiciliaria. La alarma de “Baja presión” del ventilador se desactiva. El tubo del ventilador no está conectado a la máquina. Asegúrese de que los tubos estén conectados a la máquina y al paciente. Si tiene un tubo de traqueostomía con manguito: Fuga en el manguito, la línea de inflado o en el globo piloto. Retire los tubos del ventilador del tubo de la traqueostomía. Desinfle y vuelva a inflar el man guito con los tubos del ventilador. Encienda la máquina. Cambie el tubo si no se mantiene inflado. Si las primeras dos sugerencias no funcionan, puede haber un problema con el ventilador. Póngase en contacto con su proveedor de atención médica domiciliaria. Respire profundo con un reani mador manual, si tiene uno. Lo siguiente se aplica sólo a pacientes conectados a ventilador.!
  • 57. 55 ¿Qué Hacer Si Se Corta la Energía Eléctrica? ¿QUÉ HACER SI SE CORTA LA ENERGÍA ELÉCTRICA? La mejor forma de lidiar con este problema es tener un plan. Antes de que la electricidad se vaya, informe a las empresas de teléfonos y electricidad, por escrito, que su hijo utiliza un tubo de traqueostomía. Solicite prioridad en la restauración del servicio. Puede comprar una luz especial que se enciende cuando se corta la electricidad. Utilice esto como forma de alerta. Pu- ede ir a la casa de un amigo o de un familiar. Además, puede ir al hospital o a una estación de bomberos en que haya un generador de emergencia.
  • 58. COVIDIEN, COVIDIEN with logo, Covidien logo and positive results for life are U.S. and internationally registered trademarks of Covidien AG. Other brands are trademarks of a Covidien company. ™* and ®* are trademarks of their respective owners. ©2011 Covidien.All rights reserved. 11-AW-0210 TR00798 6135 Gunbarrel Avenue Boulder, CO 80301 800-635-5267 www.covidien.com