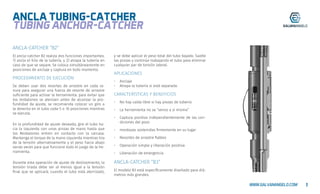
El documento describe el Ancla Tubing-Catcher B2, un dispositivo que cumple dos funciones: 1) ancla la tubería y 2) la atrapa si se separa. Explica cómo instalar y operar el dispositivo, incluidos los procedimientos para su ajuste, liberación, liberación de emergencia y desmontaje. También proporciona detalles sobre los modelos B2 y B3 y sus aplicaciones para diferentes tamaños de tubería.
Minería convencional: datos importantes y conceptos
anchor.pdf
1. 1
WWW.GALVANANGELO.COM
ANCLA TUBING-CATCHER
TUBING ANCHOR-CATCHER
ANCLA-CATCHER “B2“
El ancla-catcher B2 realiza dos funciones importantes:
1) ancla el hilo de la tubería, y 2) atrapa la tubería en
caso de que se separe. Se coloca simultáneamente en
posiciones de anclaje y captura en todo momento.
PROCEDIMIENTO DE EJECUCIÓN
Se deben usar dos resortes de arrastre en cada ra-
nura para asegurar una fuerza de resorte de arrastre
suficiente para activar la herramienta. para evitar que
los resbalones se atenúen antes de alcanzar la pro-
fundidad de ajuste, se recomienda colocar un giro a
la derecha en el tubo cada 5 o 10 posiciones mientras
se ejecuta.
En la profundidad de ajuste deseada, gire el tubo ha-
cia la izquierda con unas pinzas de mano hasta que
los Resbalones entren en contacto con la carcasa.
Mantenga el torque de la mano izquierda mientras tira
de la tensión alternativamente y el peso hacia abajo
varias veces para que funcione todo el juego de la he-
rramienta.
Durante esta operación de ajuste de deslizamiento, la
tensión tirada debe ser al menos igual a la tensión
final que se aplicará; cuando el tubo está aterrizado,
y se debe aplicar el peso total del tubo bajado. Suelte
las pinzas y continúe trabajando el tubo para eliminar
cualquier par de torsión lateral.
APLICACIONES
• Anclaje
• Atrapa la tubería si está separada.
CARACTERÍSTICAS Y BENEFICIOS
• No hay caída libre si hay piezas de tubería
• La herramienta no se “vence a sí misma”
• Captura positiva independientemente de las con-
diciones del pozo
• mordazas sostenidas firmemente en su lugar
• Resortes de arrastre fiables
• Operación simple y liberación positiva
• Liberación de emergencia
ANCLA-CATCHER “B3“
El modelo B3 está específicamente diseñado para diá-
metros más grandes.
2. 2
WWW.GALVANANGELO.COM
ANCLA TUBING-CATCHER
TUBING ANCHOR-CATCHER
“B2” ANCHOR-CATCHER
The Evolution Model B2 Tubing Anchor Catcher per-
forms two important functions: 1) anchors the tubing
string, and 2) catches the tubing if it should part. si-
multaneously set in anchoring and catching positions
at all times.
RUNNING PROCEDURE
Two Drag Springs must be used in each slot to ensure
sufficient Drag Spring force to actuate tool. to prevent
the slips from becoming dulled before reaching setting
depth it isadvisable to put a right-hand turn into the
tubing every 5 or 10 stands while running in.
At the desired setting depth rotate the tubing to the
left with hand tongs until the Slips contact the casing.
Maintain left-hand torque while alternately pulling
strain and setting down weight several times to work
all play out of the tool.
During this slip setting operation the strain pulled
should be at least equal to the final strain that will be
applied; when the tubing is landed, and full tubing set
down weight should be applied. Release the tongs and
continue working the tubing to remove any esidual
torque.
APPLICATIONS
• Anchoring tubing string
• Catches the tubing if it should part
FEATURES & BENEFITS
• No Free Fall If Tubing Parts
• Tool does not “Beat Itself To Death”
• Positive Catching Regardless of Well Conditions
• Slips Held Securely in Place
• Dependable Drag Springs
• Simple Operation and Positive Release
• Emergency Release
“B3 ANCHOR-CATCHER”
The B3 model is specifically designed for larger bore
sizes.
10. 10
WWW.GALVANANGELO.COM
ANCLA TUBING-CATCHER
TUBING ANCHOR-CATCHER
El Ancla Tubing-Catcher B2 del tamaño 28 se ejecuta
debajo de la bomba en pozos bombeados por varillas.
Está diseñado específicamente para atrapar la línea
de tubería si parte de la superficie.
OPERACIÓN
Componga el sujetador de ancla en la línea de tube-
ría justo debajo de la bomba y corra bien. (Durante
la operación de rodaje, los Pasadores se mantienen
en la posición neutral mediante el Pin de Control que
se encuentra en la posición de rodaje de la Ranura
de Control, como se muestra en el dibujo). Después
de alcanzar la profundidad de ajuste, seleccione un
en la cadena de la tubería mientras sostiene torsión
a la izquierda y aplique 1/4 de vuelta de rotación a
la izquierda en la herramienta. (Esto mueve el pin de
control a la posición de configuración de la ranura de
control). La herramienta ahora puede aterrizarse en
tensión o compresión.
LIBERACIÓN
Para recuperar la holgura del sujetador de ancla en la
soga de la tubería mientras se mantiene el torque de
la mano derecha, aplique 1/4 de vuelta de la rotación
de la mano derecha en el peaje y levante. (Esto coloca
al Pin de control en la posición de recuperación de la
Ranura de control). Ahora se puede recuperar la herra-
mienta del pozo.
LIBERACIÓN DE CORTE
Si es imposible liberar el Ancla-Catcher de la manera
anterior, una tensión superior a la resistencia total al
corte de los Pasadores de Corte, más el peso del tubo
cortará los Pasadores de Corte y los liberará.
LIBERACIÓN DE EMERGENCIA
Los procedimientos anteriores deben liberar el An-
chor-Catcher sin dificultad, pero alguna condición ex-
trema puede causar
PARA FALLAR USA LAS SIGUIENTES INSTRUC-
CIONES PARA EL LANZAMIENTO DE EMERGEN-
CIA:
Aplique 2,000 a 5,000 lbs. refuerce hacia arriba y gire
el tubo hacia la derecha aproximadamente 10 vueltas
en la herramienta (esto desenrosca la rosca izquierda
entre el cuerpo inferior y el cuerpo inferior.) A medida
que la herramienta se recupera, el cono inferior y el
cono inferior quedan en el orificio.
INSTRUCCIONES DE MONTAJE
1. Coloque los resbalones debajo de los anillos en el
retenedor de resbalones desde la parte superior e ins-
tale los resortes. Se proporciona un anillo de montaje
para mantener los resbalones en su lugar.
2. Coloque el ensamblaje de deslizamiento en el cuer-
po e inserte el pasador en J a través del orificio en el
retenedor de deslizamiento y haga hasta que toque la
parte inferior de la ranura del cuerpo. Destornille el
pasador en J hasta que los orificios se alineen e ins-
tale el pasador de chaveta. A continuación, accione el
conjunto deslizante.
3. Instale las partes restantes en cada extremo del
cuerpo como se muestra en el dibujo.
NOTA:
El Anchor-Catcher se ensambla con dos pasadores de
cizallamiento de 5,000 lb. para un valor total de ciza-
llamiento de 10,000 lb. Se incluyen dos pines adicio-
nales con cada envío. La herramienta está limitada a
un máximo de 20,000 libras. valor de cizallamiento.
The size 28 model B2 Tubing Anchor-Catcher is run be-
low the pump in rod-pumped wells. It is Specifically
designed to catch the tubing string if it parts at the
surface.
11. 11
WWW.GALVANANGELO.COM
ANCLA TUBING-CATCHER
TUBING ANCHOR-CATCHER
OPERATION:
Make u the Anchor-Catcher in the tubing string just be-
low the pump and run in well. (During the running-in
operation the Slips are held in the neutral position by
the Control Pin which is located in the running-in po-
sition of the Control Slot as shown on drawing.) After
reaching setting depth pick un on the tubing string
while holding left-hand torque and apply 1/4 turn of
left-hand totation at the tool. (This moves the Control
Pin into the setting position of the Control Slot.) The
tool may now be landed in tension or compression.
RELEASE
To retrieve the Anchor-Catcher slack off on the tu-
bing string while holding right-hand torque an apply
1/4 turn of right-hand rotation at the toll and pick up.
(This places the Control Pin the retrieving position of
the Control Slot.) The tool can now be retrieved from
the well.
SHEAR RELEASE
If it is impossible to release the Anchor-Catcher in the
above manner, an upstrain greater thn the total shear
strength of the Shear Pins plus the weight of the tu-
bing will shear the Shear Pins and release it.
EMERGENCY RELEASE
The above procedures should release the Anchor-Cat-
cher whithout difficulty, but some extreme condition
cause it to fail use the following instructions for emer-
gency release:
Apply 2,000 to 5,000 lbs. upstrain and rotate the tubing
to the right about 10 turns at the tool (This unscrews
the left-hand thread between the lower Sub an the
Body.) As the tool is retrieved the Sub, Lower Cone, and
any tailpipe is left in the hole.
ASSEMBLY INSTRUCTIONS
1 Place Slips under rings on Slip Retainer from the top
and install Springs. An Assembly Ring is provided to
hold the Slips in place.
2 Position Slip Assembly onto Body and insert J-Pin
through hole in Slip Retainer and make up until it bo-
ttoms out in the slot on the body. Unscrew J-Pin until
holes line up and install cotter pin. Then actuate Slip
Assembly.
3 Install remaining parts to each end of Body as Shown
on drawing.
NOTE:
The Anchor-Catcher is assembled with two 5,000 lb.
Shear Pins for a total shear-out value of 10,000 lbs.
Two additional pins are included with each shipment.
The tool is limited to a maximum of 20,000 lbs. shear-
out value.