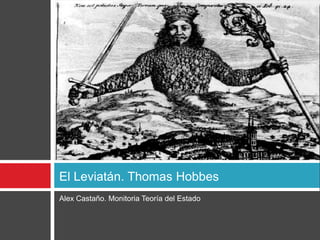
2. Thomas El Estado de El Leviatán
Hobbes naturaleza
3. Thomas Hobbes
Nace el 5 de abril de 1588 en Westport cerca
de Malmesbury, Reino de Inglaterra y muere
el 4 de diciembre de 1679.
Filósofo inglés.
Algunas obras:
ElLeviatán
Elementos del derecho
Tratado sobre el ciudadano
4. ¿Cómo se llega al Leviatán?
Estado de
naturaleza
¿?
Leviatán
5. Estado de naturaleza
Igualdad capacidad
Igualdad esperanza en la
consecución de fines
Desconfianza mutua
Anticipación: dominar
por medio de la fuerza
o astucia
Guerra
6. Estado de naturaleza
Es un modelo, supuesto, hipótesis:
«Acaso puede pensarse que nunca existió un tiempo o
condición en que se diera una guerra semejante, y, en
efecto, yo creo que nunca ocurrió generalmente así»
(Hobbes, p. 103).
7. ¿Por qué hay guerra?
Al hombre no le gusta reunirse con otros. Se
reúne porque alguien o algo lo obliga.
El hombre es egoísta y quiere que los demás lo
valoren de la forma en que se valora a sí mismo.
El hombre es orgulloso. Ante señas de desprecio
busca hacerse respetar.
La discordia se causa por:
Competencia búsqueda de beneficio
Desconfianza búsqueda de seguridad
Gloria búsqueda de reputación
8. ¿Por qué hay guerra?
Al hombre no le gusta reunirse con otros. Se
reúne porque alguien o algo lo obliga.
El hombre es egoísta y quiere que los demás lo
valoren de la forma en que se valora a sí mismo.
El hombre es orgulloso. Ante señas de desprecio
busca hacerse respetar.
La discordia se causa por:
Competencia búsqueda de beneficio
Desconfianza búsqueda de seguridad
Gloria búsqueda de reputación
9. Estado de naturaleza
Es un estado de guerra: todos contra todos.
No debe entenderse como una situación efectiva de
guerra, sino como una situación en la que hay
voluntad de batallar.
En el estado de guerra no hay oportunidad para la
industria.
Existe continuo temor y peligro de muerte violenta.
No hay seguridad para nadie
Vida del hombre:
solitaria, pobre, embrutecida, breve, tosca.
10. Estado de naturaleza
Nada es injusto:
No existe el derecho
No existe la ilegalidad
No existe la injusticia
No existe ley
Virtudes de la guerra: la fuerza y el fraude.
No existe la propiedad ni el dominio.
Es un estado de miseria.
11. Pero el hombre tiene pasiones que lo
inclinan a la paz:
Temor a la muerte (proteger la vida y tener seguridad)
Deseo de las cosas que son necesarias para una vida
confortable
Y el deseo de obtenerlas por medio del trabajo
(proteger la propiedad)
12. Leyes de la naturaleza
Son preceptos de la razón
Son normas de paz
Se puede llegar a ellas por mutuo consenso
Derecho de naturaleza (ius naturale): libertad
de hacer lo que se quiera para proteger la
vida.
Libertad: ausencia de impedimentos externos (definición
negativa de libertad)
Derecho (ius) ≠ ley (lex)
Derecho: libertad de hacer u omitir algo
Ley: obliga a hacer u omitir
13. Ley de la naturaleza: los hombres
tienen prohibido hacer todo aquello
que pueda destruir su vida o privarle
de los medios para conservarla
2. Renunciar al
derecho que se tiene a
1. Buscar la paz. Si no
todas las cosas si
es posible, beneficiarse
todos lo hacen en igual
de la guerra
medida y si eso es
necesario para la paz
14. La renuncia a los derechos
¿Qué es renunciar a un derecho a cierta cosa?
Es despojarse a sí mismo de la libertad de impedir a
otro el beneficio del propio derecho a la cosa en
cuestión.
Es autolimitar la posibilidad que se tiene para impedir
a otro que obtenga beneficio de algo.
Diríamos que renunciar a un derecho es privarse del
derecho que se tiene para impedir que otro se
beneficie de algo.
Renunciar a un derecho no implica dar un derecho:
La otra persona ya tenía el derecho.
Estoy dejándole el camino libre, sin obstáculos
15. La renuncia a los derechos
¿Por qué se renuncia a los derechos?
Por la esperanza de algún bien futuro
¿Qué se puede renunciar?
Todo, siempre que de la renuncia derive algún bien
para quien renuncia.
Hay ciertos derechos inalienables:
Vida
Integridad física
Libertad
16. ¿Cómo se renuncia a un
derecho?
Renunciación • El cedente no se preocupa
simple por el cesionario
• El cedente desea que el
Transferencia beneficio recaiga en
determinados cesionarios
17. Injusticia e injuria
Se obliga a no
Si usted renuncia a impedir que alguien
Si lo impide Si usted no lo impide
un derecho se beneficie de una
cosa
• Usted es injusto y está • Felicitaciones
cometiendo injuria
Injusticia: es “el hecho de omitir
voluntariamente aquello que en un principio
voluntariamente se hubiera hecho”.
18. El contrato
Es la mutua transferencia de derechos.
Los conceptos de pacto o
convenio, observancia de promesa o
fe, violación de la fe, donación liberalidad o
gracia, promesa, merecimiento, juramento, etc
., giran en torno a la idea de contrato.
Pacto o convenio: uno de los contratantes
cumple la obligación, y confía en que el otro
cumplirá la suya después.
19. Leyes de la naturaleza
5. Sociabilidad:
3. Cumplir lo
hacer el
que se pactó.
4. Gratitud esfuerzo por
Incumplir es
acomodarse a
injusto.
los demás
7. Que en las
8. Nadie debe
venganzas se
6. Perdonar a ofender al otro
considere la
quien quiere ser por medio de
grandeza del
perdonado palabras o
bien venidero y
gestos
no el mal pasado
20. Leyes de la naturaleza
10. Al iniciarse
condiciones de 11. Si alguien debe
9. Cada uno debe
paz, nadie debe juzgar a otro
reconocer a los
reservarse algún hombre, debe
demás como
derecho que él proceder con
iguales suyos
mismo no dejaría equidad
que otro se reserve
14. Aquellas cosas
12. Las cosas que 13. El derecho que no pueden ser
no pueden dividirse absoluto de la cosa disfrutadas en
deben disfrutarse indivisible debe común ni
en común o determinarse por divididas, deben
proporcionalmente suerte adjudicarse al
primer poseedor
21. Leyes de la naturaleza
16. Quienes
15. Los hombres
estén en
que sirvan de 17. Nadie es
controversia
mediadores de juez en causa
deben someter
paz deben tener propia
su derecho a un
salvoconducto
árbitro
18. Nadie debe
19. Debe
ser juez cuando
concederse
tenga causa
crédito a los
natural de
testigos
parcialidad
22. Leyes de la naturaleza
No hagas a los otros lo que no querrías que te
hicieran a ti
Las leyes de la naturaleza son como una
dieta: “obligan a un deseo y esfuerzo, a juicio
mío un esfuerzo genuino y constante, [por
eso] resultan fáciles de ser observadas”
(Hobbes, p. 130).
Son leyes inmutables y eternas.
23. De las personas, autores y cosas
personificadas
Persona: “aquel cuyas palabras o acciones;
son consideradas o como suyas propias, o
como representando las palabras o acciones
de otro hombre, o de alguna otra cosa a la
cual son atribuidas, ya sea con verdad o por
ficción” (Hobbes, p. 132).
Persona = actor
Personificar: actuar o representar a sí mismo o
a otro.
24. Persona
Cuando las palabras o acciones se
natural consideran como suyas propias
Persona Cuando las palabras o acciones se
consideran como representación de
artificial las palabras y acciones de otro
25. El Estado
¿Cuál es la causa del Estado?
Es el cuidado de la conservación
Logro de una vida más armónica
SEGURIDAD
¿Cómo se genera el Estado?
Confiriendo todo el poder y fortaleza de las personas a un
hombre o a una asamblea de hombres, todos los cuales, por
pluralidad de votos, puedan reducir sus voluntades a una
voluntad.
No es un consentimiento o concordia.
Es una unidad real
26. El Estado
Definición:
«Una persona de cuyos actos una gran multitud, por
pactos mutuos, realizados entre sí, ha sido instituida
por cada uno como autor, al objeto de que pueda
utilizar la fortaleza y medios de todos, como lo juzgue
oportuno, para asegurar la paz y defensa común»
(Hobbes, p. 141).
Animated color pictures shrink onto slide(Intermediate)Tip: This slide design includes three large, circle-shaped pictures. Each picture has a 12” diameter and is larger than the slide. You will want to use drawing guides to reproduce the effects on this slide.To display and set the drawing guides, do the following:On the Home tab, in the Slides group, click Layout, and then clickBlank. On the View tab, in the Show group, select Ruler. Right-click the slide background and select Grid and Guides.In the Grid and Guides dialog box, under Guidesettings, selectDisplaydrawingguideson screen. (Note: One horizontal and one vertical guide will display on the slide at 0.00, the default position. As you drag the guides, the cursor will display the new position.) On the slide, do the following:Press and hold CTRL, select the vertical guide, and then drag it left to the 2.83 position. Press and hold CTRL, select the vertical guide, and then drag it right to the 2.83 position.Press and hold CTRL, select the horizontal guide, and then drag it upto the 0.83 position.To reproduce the first animated picture effect on this slide, do the following:On the Insert tab, in the Images group, click Picture. In the Insert Picture dialog box, select a picture and then click Insert.On the slide, select the picture. Under Picture Tools, on the Format tab, in the Size group, click the down arrow under Crop, and then click Crop to Shape. Under Basic Shapes, click Oval (first row, first option from the left).Select the oval picture. Under Picture Tools, on the Format tab, in the Size group, click the Size and Position dialog box launcher. In the Format Picture dialog box, on the Size tab, resize or crop the picture as needed so that under Size and rotate, the Height box is set to 12” and the Width box is set to 12”. Resize the picture under Size and rotate by entering values into the Height and Width boxes. Crop the picture under Crop from by entering values into the Left, Right, Top, and Bottom boxes. On the Home tab, in the Drawing group, click Arrange, point to Align, and then do the following:Click Align to Slide.Click AlignCenter.Click AlignMiddle. On the slide, select the picture. On the Animations tab, in theAdvancedAnimation group, click Animation Pane. Add a Fade effect to the picture:In the Advanced Animations group, click Add Animation, and then, under Entrance, click Fade. The Fade effect appears in the Animation Pane.In the Animation Pane, click the arrow on the Fade effect, and then click Effect Options.In the Fade dialog box, in the Timing tab, set the following options:Start: With PreviousDelay: 0 secondsDuration: 2 seconds (Medium)Repeat: (none)Add a Shrink effect to the picture:In the Advanced Animation group, click Add Animation, and then, under Emphasis, click Grow/Shrink. The Grow/Shrink effect appears in the Animation Pane.In the Animation Pane, click the arrow on the Grow/Shrink effect, and then click Effect Options.In the Grow/Shrink dialog box, in the Effect tab, set the Size option to Custom: 20%.In the Grow/Shrink dialog box, in the Timing tab, set the following options:Start: After PreviousDelay: 0 secondsDuration: 2 seconds (Medium)Repeat: (none)Add a Motion Path effect to the picture:In the Advanced Animation group, click Add Animation, and then, under Motion Paths, click Lines. The Lines Motion Path effect appears in the Animation Pane.In the Animation Pane, click the arrow on the Lines Motion Path effect, and then click Effect Options.In the Down dialog box, in the Timing tab, set the following options:Start: After PreviousDelay: 0 secondsDuration: 2 seconds (Medium)Repeat: (none)In the picture, the motion path is visible as a two-headed arrow. Drag the red endpoint of the arrow to the intersection of the drawing guides in the upper left area of the slide (2.83 vertical left and 0.83 horizontal top).To reproduce the second animated picture effect on this slide, do the following:On the Insert tab, in the Images group, click Picture. In the Insert Picture dialog box, select a picture and then click Insert.On the slide, select the picture. Under Picture Tools, on the Format tab, in the Size group, click the down arrow under Crop, and then click Crop to Shape. Under Basic Shapes, click Oval (first row, first option from the left).Select the oval picture. Under Picture Tools, on the Format tab, in the Size group, click the Size and Position dialog box launcher. In the Format Picture dialog box, on the Size tab, resize or crop the picture as needed so that under Size and rotate, the Height box is set to 12” and the Width box is set to 12”. Resize the picture under Size and rotate by entering values into the Height and Width boxes. Crop the picture under Crop from by entering values into the Left, Right, Top, and Bottom boxes. On the Home tab, in the Drawing group, click Arrange, point to Align, and then do the following:Click Align to Slide.Click AlignCenter.Click AlignMiddle. On the slide, select the picture. On the Animations tab, in theAdvancedAnimation group, click Animation Pane. Add a Fade effect to the picture:In the Advanced Animations group, click Add Animation, and then, under Entrance, click Fade. The Fade effect appears in the Animation Pane.In the Animation Pane, click the arrow on the Fade effect, and then click Effect Options.In the Fade dialog box, in the Timing tab, set the following options:Start: With PreviousDelay: 0 secondsDuration: 2 seconds (Medium)Repeat: (none)Add a Shrink effect to the picture:In the Advanced Animation group, click Add Animation, and then, under Emphasis, click Grow/Shrink. The Grow/Shrink effect appears in the Animation Pane.In the Animation Pane, click the arrow on the Grow/Shrink effect, and then click Effect Options.In the Grow/Shrink dialog box, in the Effect tab, set the Size option to Custom: 20%.In the Grow/Shrink dialog box, in the Timing tab, set the following options:Start: After PreviousDelay: 0 secondsDuration: 2 seconds (Medium)Repeat: (none)Add a Motion Path effect to the picture:In the Advanced Animation group, click Add Animation, and then, under Motion Paths, click Lines. The Lines Motion Path effect appears in the Animation Pane.In the Animation Pane, click the arrow on the Lines Motion Path effect, and then click Effect Options.In the Down dialog box, in the Timing tab, set the following options:Start: After PreviousDelay: 0 secondsDuration: 2 seconds (Medium)Repeat: (none)In the picture, the motion path is visible as a two-headed arrow. Drag the red endpoint of the arrow to the intersection of the drawing guides in the upper middle area of the slide (0.00 vertical and 0.83 horizontal top). To reproduce the third animated picture effect on this slide, do the following:On the Insert tab, in the Images group, click Picture. In the Insert Picture dialog box, select a picture and then click Insert.On the slide, select the picture. Under Picture Tools, on the Format tab, in the Size group, click the down arrow under Crop, and then click Crop to Shape. Under Basic Shapes, click Oval (first row, first option from the left).Select the oval picture. Under Picture Tools, on the Format tab, in the Size group, click the Size and Position dialog box launcher. In the Format Picture dialog box, on the Size tab, resize or crop the picture as needed so that under Size and rotate, the Height box is set to 12” and the Width box is set to 12”. Resize the picture under Size and rotate by entering values into the Height and Width boxes. Crop the picture under Crop from by entering values into the Left, Right, Top, and Bottom boxes. On the Home tab, in the Drawing group, click Arrange, point to Align, and then do the following:Click Align to Slide.Click AlignCenter.Click AlignMiddle. On the slide, select the picture. On the Animations tab, in theAdvancedAnimation group, click Animation Pane. Add a Fade effect to the picture:In the Advanced Animations group, click Add Animation, and then, under Entrance, click Fade. The Fade effect appears in the Animation Pane.In the Animation Pane, click the arrow on the Fade effect, and then click Effect Options.In the Fade dialog box, in the Timing tab, set the following options:Start: With PreviousDelay: 0 secondsDuration: 2 seconds (Medium)Repeat: (none)Add a Shrink effect to the picture:In the Advanced Animation group, click Add Animation, and then, under Emphasis, click Grow/Shrink. The Grow/Shrink effect appears in the Animation Pane.In the Animation Pane, click the arrow on the Grow/Shrink effect, and then click Effect Options.In the Grow/Shrink dialog box, in the Effect tab, set the Size option to Custom: 20%.In the Grow/Shrink dialog box, in the Timing tab, set the following options:Start: After PreviousDelay: 0 secondsDuration: 2 seconds (Medium)Repeat: (none)Add a Motion Path effect to the picture:In the Advanced Animation group, click Add Animation, and then, under Motion Paths, click Lines. The Lines Motion Path effect appears in the Animation Pane.In the Animation Pane, click the arrow on the Lines Motion Path effect, and then click Effect Options.In the Down dialog box, in the Timing tab, set the following options:Start: After PreviousDelay: 0 secondsDuration: 2 seconds (Medium)Repeat: (none)In the picture, the motion path is visible as a two-headed arrow. Drag the red endpoint of the arrow to the intersection of the drawing guides in the upper right area of the slide (0.83 horizontal top and 2.83 vertical right).To reproduce the animated text effects on this slide, do the following:On the Insert tab, in the Text group, click TextBox. On the slide, drag to draw a text box.Enter text in the text box, and then select the text. Format the text in the textbox using the following steps:On the Home tab, in the Font group, choose the Candarafont and a font size of24.Click the arrow next to Font Color, and then under Theme Colors click White, Background 1 (first row, first option from the left).In the Paragraph group, click Center.Make three copies of the text box using the following steps:Select the text box.On the Home tab, in the Clipboard group, click the arrow next to Copy, and then click Duplicate. Repeat this step to create a total of three identical text boxes.Position the text boxes using the following steps:Drag a text boxso that it is centered on the left vertical drawing guide at 2.83 and below the horizontal drawing guide at 0.00.Choose a different text box, and then drag it so that it is centered on the vertical drawing guide at 0.00 and below the horizontal drawing guide at 0.00.Choose the remaining text box, and then drag it so that it is centered on the right vertical drawing guide at 2.83 and below the horizontal drawing guide at 0.00.Select the text inside each text box and change it to the caption text you want.Select the first (left)text box, and then do the following:In the Advanced Animation group, click Add Animation, and then click More Entrance Effects.In the Add Entrance Effect dialog box, under Moderate, click Float Down, and then click OK. In the Animation Pane, click the arrow on the Float Down effect, and then click Effect Options.In the Float Down dialog box, in the Timing tab, set the following options:Start: With PreviousDelay: 2 secondsDuration: 1 seconds (Fast)Repeat: (none)Select the second (middle)text box, and then do the following:In the Advanced Animation group, click Add Animation, and then click More Entrance Effects.In the Add Entrance Effect dialog box, under Moderate, click Float Down, and then click OK. In the Animation Pane, click the arrow on the Float Down effect, and then click Effect Options.In the Float Down dialog box, in the Timing tab, set the following options:Start: With PreviousDelay: 3 secondsDuration: 1 seconds (Fast)Repeat: (none)Select the third (right)text box, and then do the following:In the Advanced Animation group, click Add Animation, and then click More Entrance Effects.In the Add Entrance Effect dialog box, under Moderate, click Float Down, and then click OK. In the Animation Pane, click the arrow on the Float Down effect, and then click Effect Options.In the Float Down dialog box, in the Timing tab, set the following options:Start: With PreviousDelay: 4 secondsDuration: 1 seconds (Fast)Repeat: (none)To reproduce the background effects on this slide, do the following:On the Design tab, in the Background group, click the FormatBackground dialog box launcher. In the FormatBackground dialog box, in the left pane, click Fill. In the Fill pane, click Picture or text fill, and then, under InsertFrom, click File. In the Insert Picture dialog box, select a picture and then click Insert.Also the FormatBackground dialog box, in the left pane, click Picture Color. In the Picture Color pane, in the Recolor section, click the button for Presets, and then click Grayscale(second option from the left).