radiografia Aleta y oclusal
•Descargar como PPT, PDF•
2 recomendaciones•3,614 vistas


Recomendados
Más contenido relacionado
La actualidad más candente
La actualidad más candente (20)
Destacado
Destacado (20)
Similar a radiografia Aleta y oclusal
Similar a radiografia Aleta y oclusal (20)
Último
Último (20)
radiografia Aleta y oclusal
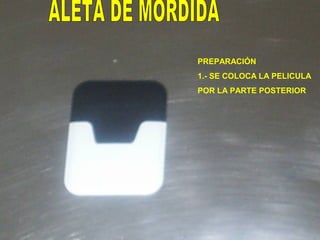
- 1. PREPARACIÓN 1.- SE COLOCA LA PELICULA POR LA PARTE POSTERIOR
- 2. SE CORTA UNA TIRA DE CINTA ADHESIBLE DE 10 Cms.
- 3. 1.- SE ADHIERE EN EL CENTRO 2.- SE BUSCA QUE ESTE PARALELA A LOS BORDES SUPERIOR E INFERIOR
- 4. 1. SE GIRA LA PELÍCULA 2. SE DESPLAZA LA ALETA 1 HACIA EL CENTR 3. SE JUNTA LA ALETA 2 EN EL CENTRO
- 5. 1.- SE JUNTAN LAS 2 ALETAS EN EL CENTRO 2.- SE PEGAN AL CENTRO
- 6. NO DEBE DESPRENDERSE LA CINTA DEL CENTRO
- 7. SE DOBLA LA PELÍCULA PARA METERLA A LA BOCA
- 8. 1.- SE METE LA MITAD INFERIOR POR DETRAS DE LAS MOLARES INFERIORES 2.- SE DESCANZA LA ALETA SOBRE LA CARA OCLUSAL INFERIOR
- 9. 1.- LE PEDIMOS AL PACIENTE QUE CIERRE MUY DESPACIO 2.- RETIRAMOS LOS DEDOS
- 10. 1.- JALAMOS LA PELÍCULA PARA QUE ESTÉ EN CONTACTO CON EL ORGANO DENTARIO 2.- NO VEMOS LA PELÍCULA PERO SABEMOS QUE LA ALETA EST;A EN SU CENTRO
- 11. 1.- SE CENTRA EL RAYO 2.- SE PONE UNA ANGULACIÓN DE + 10
- 12. 10° positioning guide The vertical angulation is always set at +10 degrees (the tubehead is pointing downward). Make sure the patient’s head is positioned properly before attempting PID alignment.
- 13. Bitewing Film Placement Front edge anterior to middle of mandibular canine (approximately centered on 2nd premo Film centered on second molar (if 3rd molars are erupted; otherwise center on contact between 1st and 2nd molar).
- 15. DENTICIÓN MIXTA M.S.P. Rosendo Carrasco G
- 16. DENTICIÓN MIXTA M.S.P. Rosendo Carrasco G
- 18. Oclusal • Se utiliza para analizar toda la arcada
- 19. OCLUSAL • Sirve para observar zonas generales de la arcada, para ayuda en el diagnóstico de quistes, dientes impactados, cálculos en conductos salivales, fracturas, etc. M.S.P. Rosendo Carrasco G
- 23. 1. EL PAQUETE ES DE PAPEL. 2. LA CARA ACTIVA ES TOTALMENTE BLANCA 3. EL PAQUETE DEBE IR CON EL PUNTO HACIA ANTERIOR
- 24. 2 1 2 1. ALETA DESPRENDIBLE 2. SE DESPRENDEN LAS PARTES LATERALES
- 26. 1. SE COLOCA LA PEL Í CULA CON EL PUNTO HACIA ANTERIOR 2. SE COLOCA EL RAYO LO M Á S VERTICAL POSIBLE 3. LA PARTE INFERIOR DEL CONO DEBE COINCIDIR CON EL BORDE ANTERIOR DE LA PEL Í CULA
- 28. 1. SE COLOCA LA PELÍCULA CON EL PUNTO HACIA ANTERIOR 2. SE COLOCA EL RAYO LO MÁS VERTICAL POSIBLE 3. LA PARTE SUPERIOR DEL CONO DEBE COINCIDIR CON EL BORDE ANTERIOR DE LA PELÍCULA 1