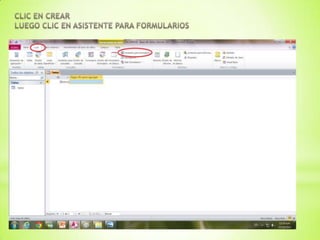
El documento describe cómo crear y configurar una tabla en una base de datos de Access. Se explica que los datos se almacenan en tablas organizadas en registros y columnas. Luego se detalla el proceso de crear una tabla vacía, agregar columnas, asignar tipos de datos a las columnas, y designar una clave principal. Finalmente, se mencionan los formularios y cómo se pueden usar para controlar el acceso a los datos de las tablas.
Working with Tables in MS Word Presentation.pdfFaiyazAhmad88
Working with tables in Microsoft Word allows you to organize and present information in a structured format. Whether you're creating a report, a resume, or a newsletter, tables can help you effectively display data. Here's how to work with tables in MS Word:
Inserting a Table:
Click on the "Insert" tab in the ribbon.
Click on the "Table" button.
Choose the number of rows and columns for your table by hovering over the grid until you reach the desired size, then click to insert.
Formatting Tables:
Click inside the table to activate the "Table Tools" contextual tab in the ribbon.
Use options like "Design" and "Layout" to change the appearance and structure of the table.
You can adjust properties like borders, shading, and alignment to make the table visually appealing.
Entering Data:
Click inside any cell of the table to start entering data.
You can type directly into the cells or paste content from other sources.
Resizing and Adjusting Columns and Rows:
Hover over the border of a column or row until the cursor changes to a double-sided arrow.
Click and drag to resize the column or row.
To adjust the width of all columns evenly, select the entire table, then click and drag the column borders.
Merging and Splitting Cells:
To merge cells, select the cells you want to merge, then right-click and choose "Merge Cells" from the context menu.
To split a merged cell, click inside it, then go to the "Layout" tab, click "Merge Cells," and select "Split Cells" from the dropdown.
Sorting Data:
Click inside the table.
Go to the "Layout" tab in the ribbon.
Click on the "Sort" button.
Choose the sorting options (e.g., sort by column, ascending or descending order).
Adding or Deleting Rows and Columns:
Right-click on a row or column.
Choose "Insert" or "Delete" from the context menu to add or remove rows or columns as needed.
Moving a Table:
Click on the table to select it.
Hover the mouse over the table border until the pointer changes to a four-headed arrow.
Click and drag the table to move it to a new location within the document.
Working with tables in Microsoft Word provides a flexible way to organize and present data, enhancing the visual appeal and readability of your documents.
Este es un programa de sistemas de gestión de base de datos relacional echo y modificado por Microsoft para uso personal de las pequeñas organizaciones. Este programa es componente de la suite Microsoft office aunque no es incluido en el paquete básico de Microsoft office
http://tecnologiaparato2.blogspot.com/
Está presentación explica por medio de un ejemplo la base de datos de un videoclub y los conceptos básicos de una BD.
2. Cuando se usa una base de
datos, los datos se almacenan en
tablas (listas basadas en asuntos
que contienen datos organizados en
registros). Por ejemplo, puede crear
una tabla Contactos para almacenar
una lista de nombres, direcciones
de correo electrónico y números de
teléfono.
3. 1. Crea una base de datos en blanco. Al oprimir en botón de Crear
El botón Tabla abre la Vista Hoja de datos, consiste en introducir
directamente los datos en la tabla y según el valor que introduzcamos
en la columna determinará el tipo de datos que tiene la columna.
2. Clic en ver y se desplegara una opción le damos en vista de diseño
4. Aparecerá la vista de diseño de la tabla Si anteriormente no le dimos
nombre a la tabla, acces le ha
asignado un nombre por
defecto Tabla1. Le ponemos
nombre y aparecerá la vista
de diseño qué esta al lado
izquierdo
A continuación tenemos la rejilla donde definiremos las columnas que componen la
tabla, se utiliza una línea para cada columna, así en la primera línea (fila) de la
rejilla definiremos la primera columna de la tabla y así sucesivamente.
5. En la parte inferior Tenemos dos pestañas
General y Búsqueda para definir las
propiedades del campo
Se escribe el nombre que En Office 2010 se ha
desee colocarle a tu campo escribe el tipo de dato que incluido un nuevo
corresponde al campo tipo de datos que no
se encontraba en
versiones anteriores:
Calculado.
En la primera fila escribir el
Este es un recuadro
de ayuda
nombre del primer campo, al
presionando F1 pulsar la tecla INTRO pasamos
al tipo de datos, por defecto
nos pone Texto como tipo de
dato. Si queremos cambiar de
tipo de datos, hacer clic sobre
la flecha de la lista desplegable
de la derecha y elegir otro tipo
Por ejemplo; si tienes como nombre de
campo “Dirección” el tipo de campo que
corresponde es “Texto”.
6. Antes de guardar la tabla tendremos que asignar una clave principal.
La clave principal proporciona un valor único para cada fila de la tabla y nos
sirve de identificador de registros de forma que con esta clave podamos saber
sin ningún tipo de equivocación el registro al cual identifica. No podemos
definir más de una clave principal, pero podemos tener una clave principal
compuesta por más de un campo.
Para asignar una clave principal a un campo, seguir los siguientes pasos:
Hacer clic sobre el nombre del campo que será clave principal.
En la pestaña Diseño de Herramientas de tabla, hacer clic sobre el
botón Clave principal del grupo Herramientas.
A la izquierda del nombre del
campo aparecerá una llave
indicándonos que dicho campo
es la clave principal de la tabla
7. Es un formato de pantalla que se utiliza para mejorar la
imagen de las tablas
los formularios se pueden usar para controlar el acceso a
todos los datos, como que campos o filas de datos se van a
mostrar
Para crear un formulario tenemos varias opciones. Podemos
acceder a todas ellas desde la pestaña Crear:
consiste en crear un nuevo
formulario sin contenido
contiene todos los datos
de la tabla, consulta o utiliza un asistente que
informe seleccionado en nos va guiando paso por
el Panel de Navegación paso en la creación del
abre un formulario en formulario.
blanco en la Vista Diseño
te permite crear un
formulario dedicado a la
navegación, que simula
la estructura típica de
menús de una página
web. Podrás elegir entre
seis diseños distintos.
8.
9.
10.
11. DONDE DICE TABLAS/CONSULTAS: INDICAREMOS SOBRE DONDE VAMOS
A REALIZAR EL FORMULARIO.
Y EN LA PARTE INFERIOR ESCOGEREMOS LOS DATOS QUE QUERAMOS
TENER EN EL FORMULARIO