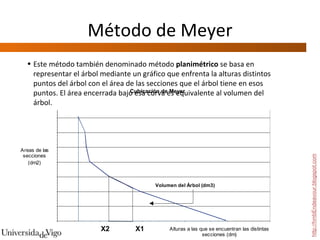
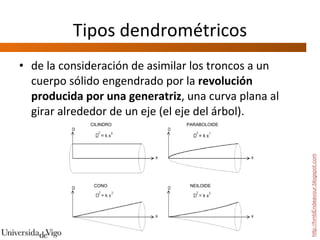
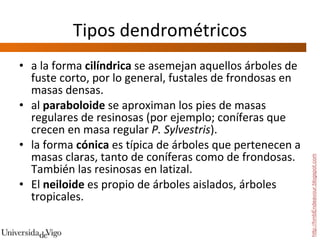
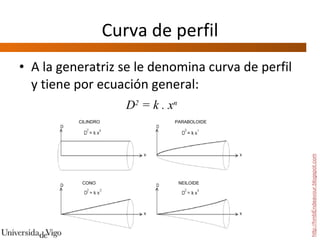
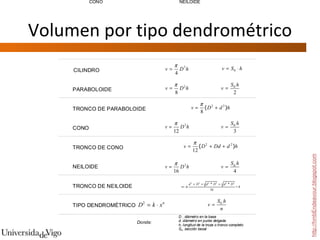
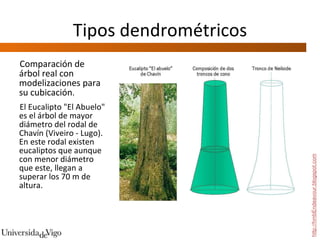
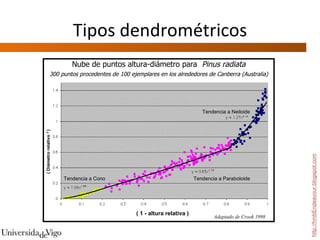
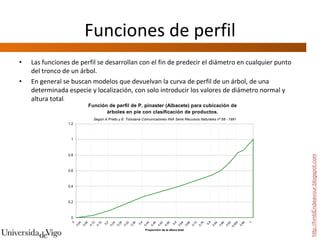
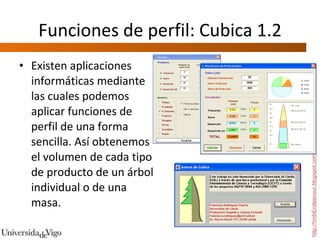
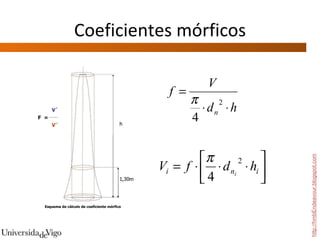
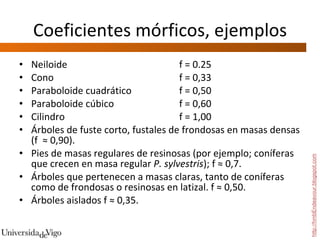
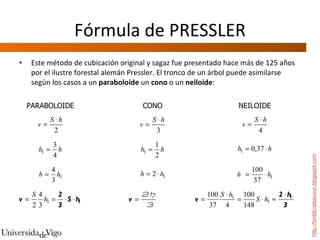
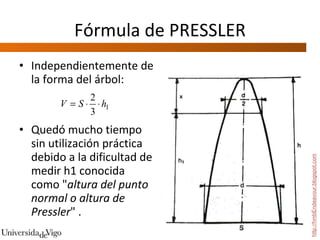
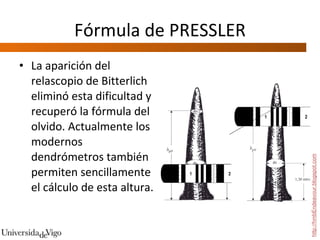
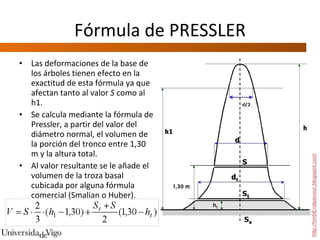
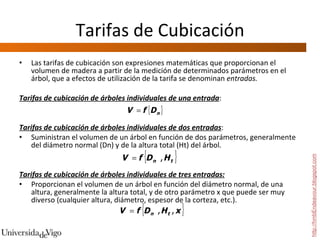
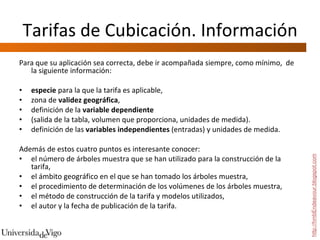
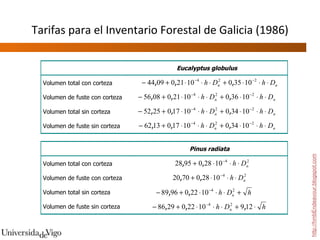
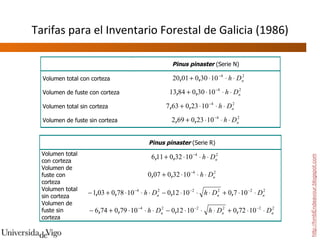
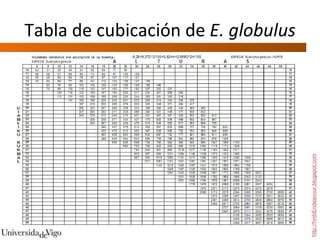
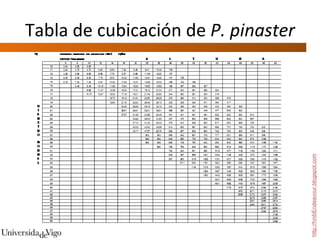
TEMA 3.  CUBICACIÓN DE TRONCOS COMPLETOS DENDROMETRÍA http://hmbEndeavour.blogspot.com Miguel Ángel Cogolludo Agustín Responsable de Suministro de la Fábrica ENCE de Pontevedra Prof. Asociado E.U.E.T. Forestales.
Método de Meyer http://hmbEndeavour.blogspot.com Este método también denominado método  planimétrico  se basa en representar el árbol mediante un gráfico que enfrenta la alturas distintos puntos del árbol con el área de las secciones que el árbol tiene en esos puntos. El área encerrada bajo esa curva es equivalente al volumen del árbol.
Tipos dendrométricos de la consideración de asimilar los troncos a un cuerpo sólido engendrado por la  revolución producida por una generatriz , una curva plana al girar alrededor de un eje (el eje del árbol).  http://hmbEndeavour.blogspot.com CILINDRO PARABOLOIDE CONO NEILOIDE
Tipos dendrométricos a la forma  cilíndrica  se asemejan aquellos árboles de fuste corto, por lo general, fustales de frondosas en masas densas. al  paraboloide  se aproximan los pies de masas regulares de resinosas (por ejemplo; coníferas que crecen en masa regular  P. Sylvestris ). la forma  cónica  es típica de árboles que pertenecen a masas claras, tanto de coníferas como de frondosas.  También las resinosas en latizal.  El  neiloide  es propio de árboles aislados, árboles tropicales. http://hmbEndeavour.blogspot.com
Curva de perfil A la generatriz se le denomina curva de perfil y tiene por ecuación general: http://hmbEndeavour.blogspot.com D 2  = k . x n CILINDRO PARABOLOIDE CONO NEILOIDE
Volumen por tipo dendrométrico http://hmbEndeavour.blogspot.com
Tipos dendrométricos Comparación de árbol real con modelizaciones para su cubicación .  El Eucalipto "El Abuelo" es el árbol de mayor diámetro del rodal de Chavín (Viveiro - Lugo). En este rodal existen eucaliptos que aunque con menor diámetro que este, llegan a  superar los 70 m de altura. http://hmbEndeavour.blogspot.com
Tipos dendrométricos http://hmbEndeavour.blogspot.com
Funciones de perfil Las funciones de perfil se desarrollan con el fin de predecir el diámetro en cualquier punto del tronco de un árbol.  En general se buscan modelos que devuelvan la curva de perfil de un árbol, de una determinada especie y localización, con solo introducir los valores de diámetro normal y altura total.  http://hmbEndeavour.blogspot.com
Funciones de perfil: Cubica 1.2 Existen aplicaciones informáticas mediante las cuales podemos aplicar funciones de perfil de una forma sencilla. Así obtenemos el volumen de cada tipo de producto de un árbol individual o de una masa.  http://hmbEndeavour.blogspot.com
Coeficientes mórficos http://hmbEndeavour.blogspot.com Esquema de cálculo de coeficiente mórfico
Coeficientes mórficos, ejemplos Neiloide f = 0.25 Cono f = 0,33 Paraboloide cuadrático f = 0,50 Paraboloide cúbico f = 0,60 Cilindro f = 1,00 Árboles de fuste corto, fustales de frondosas en masas densas (f  ≈ 0,90). Pies de masas regulares de resinosas (por ejemplo; coníferas que crecen en masa regular  P. sylvestris ); f ≈ 0,7. Árboles que pertenecen a masas claras, tanto de coníferas como de frondosas o resinosas en latizal. f ≈ 0,50. Árboles aislados f ≈ 0,35.  http://hmbEndeavour.blogspot.com
Coeficientes mórficos, ejemplos http://hmbEndeavour.blogspot.com
Fórmula de PRESSLER Este método de cubicación original y sagaz fue presentado hace más de 125 años por el ilustre forestal alemán Pressler. El tronco de un árbol puede asimilarse según los casos a un  paraboloide  un  cono  o un  neiloide : http://hmbEndeavour.blogspot.com
Fórmula de PRESSLER Independientemente de la forma del árbol: Quedó mucho tiempo sin utilización práctica debido a la dificultad de medir h1 conocida como " altura del punto normal o altura de Pressler " . http://hmbEndeavour.blogspot.com
Fórmula de PRESSLER La aparición del relascopio de Bitterlich eliminó esta dificultad y recuperó la fórmula del olvido. Actualmente los modernos dendrómetros también permiten sencillamente el cálculo de esta altura.  http://hmbEndeavour.blogspot.com
Fórmula de PRESSLER Las deformaciones de la base de los árboles tienen efecto en la exactitud de esta fórmula ya que afectan tanto al valor  S  como al h1.  Se calcula mediante la fórmula de Pressler, a partir del valor del diámetro normal, el volumen de la porción del tronco entre 1,30 m y la altura total.  Al valor resultante se le añade el volumen de la troza basal cubicada por alguna fórmula comercial (Smalian o Huber). http://hmbEndeavour.blogspot.com
Tarifas de Cubicación Las tarifas de cubicación son expresiones matemáticas que proporcionan el volumen de madera a partir de la medición de determinados parámetros en el árbol, que a efectos de utilización de la tarifa se denominan  entradas.   Tarifas de cubicación de árboles individuales de una entrada :  Tarifas de cubicación de árboles individuales de dos entradas :  Suministran el volumen de un árbol en función de dos parámetros, generalmente del diámetro normal (Dn) y de la altura total (Ht) del árbol.    Tarifas de cubicación de árboles individuales de tres entradas:   Proporcionan el volumen de un árbol en función del diámetro normal, de una altura, generalmente la altura total, y de otro parámetro x que puede ser muy diverso (cualquier altura, diámetro, espesor de la corteza, etc.).  http://hmbEndeavour.blogspot.com
Tarifas de Cubicación. Información Para que su aplicación sea correcta, debe ir acompañada siempre, como mínimo,  de la siguiente información:  especie  para la que la tarifa es aplicable,  zona de  validez geográfica ,  definición de la  variable dependiente   (salida de la tabla, volumen que proporciona, unidades de medida). definición de las  variables independientes  (entradas) y unidades de medida.  Además de estos cuatro puntos es interesante conocer: el número de árboles muestra que se han utilizado para la construcción de la tarifa, el ámbito geográfico en el que se han tomado los árboles muestra,  el procedimiento de determinación de los volúmenes de los árboles muestra,  el método de construcción de la tarifa y modelos utilizados,  el autor y la fecha de publicación de la tarifa. http://hmbEndeavour.blogspot.com
Tarifas para el Inventario Forestal de Galicia (1986) http://hmbEndeavour.blogspot.com
Tablas de cubicación Las tablas de cubicación no son más que la representación en cuadros numéricos de los valores de volumen obtenidos al aplicar una tarifa de cubicación para unos valores determinados de los parámetros que hay que medir en el árbol. Por tanto, igual que las tarifas, existen tablas de cubicación de  una, dos o tres entradas , aunque normalmente se emplean las tablas de cubicación de dos entradas.  Tiene como ventaja su mayor facilidad de manejo que permite el cálculo de volumen de un árbol de forma inmediata y sin hacer cálculos, por lo que son muy prácticas a la hora de cubicar pequeños lotes de madera en el mismo monte. http://hmbEndeavour.blogspot.com
Tabla de cubicación de  E. globulus http://hmbEndeavour.blogspot.com
Tabla de cubicación de  P. pinaster http://hmbEndeavour.blogspot.com

Cubicación de Troncos Completos

  • 1.
    TEMA 3. CUBICACIÓN DE TRONCOS COMPLETOS DENDROMETRÍA http://hmbEndeavour.blogspot.com Miguel Ángel Cogolludo Agustín Responsable de Suministro de la Fábrica ENCE de Pontevedra Prof. Asociado E.U.E.T. Forestales.
  • 2.
    Método de Meyerhttp://hmbEndeavour.blogspot.com Este método también denominado método planimétrico se basa en representar el árbol mediante un gráfico que enfrenta la alturas distintos puntos del árbol con el área de las secciones que el árbol tiene en esos puntos. El área encerrada bajo esa curva es equivalente al volumen del árbol.
  • 3.
    Tipos dendrométricos dela consideración de asimilar los troncos a un cuerpo sólido engendrado por la revolución producida por una generatriz , una curva plana al girar alrededor de un eje (el eje del árbol). http://hmbEndeavour.blogspot.com CILINDRO PARABOLOIDE CONO NEILOIDE
  • 4.
    Tipos dendrométricos ala forma cilíndrica se asemejan aquellos árboles de fuste corto, por lo general, fustales de frondosas en masas densas. al paraboloide se aproximan los pies de masas regulares de resinosas (por ejemplo; coníferas que crecen en masa regular P. Sylvestris ). la forma cónica es típica de árboles que pertenecen a masas claras, tanto de coníferas como de frondosas. También las resinosas en latizal. El neiloide es propio de árboles aislados, árboles tropicales. http://hmbEndeavour.blogspot.com
  • 5.
    Curva de perfilA la generatriz se le denomina curva de perfil y tiene por ecuación general: http://hmbEndeavour.blogspot.com D 2 = k . x n CILINDRO PARABOLOIDE CONO NEILOIDE
  • 6.
    Volumen por tipodendrométrico http://hmbEndeavour.blogspot.com
  • 7.
    Tipos dendrométricos Comparaciónde árbol real con modelizaciones para su cubicación . El Eucalipto "El Abuelo" es el árbol de mayor diámetro del rodal de Chavín (Viveiro - Lugo). En este rodal existen eucaliptos que aunque con menor diámetro que este, llegan a superar los 70 m de altura. http://hmbEndeavour.blogspot.com
  • 8.
  • 9.
    Funciones de perfilLas funciones de perfil se desarrollan con el fin de predecir el diámetro en cualquier punto del tronco de un árbol. En general se buscan modelos que devuelvan la curva de perfil de un árbol, de una determinada especie y localización, con solo introducir los valores de diámetro normal y altura total. http://hmbEndeavour.blogspot.com
  • 10.
    Funciones de perfil:Cubica 1.2 Existen aplicaciones informáticas mediante las cuales podemos aplicar funciones de perfil de una forma sencilla. Así obtenemos el volumen de cada tipo de producto de un árbol individual o de una masa. http://hmbEndeavour.blogspot.com
  • 11.
    Coeficientes mórficos http://hmbEndeavour.blogspot.comEsquema de cálculo de coeficiente mórfico
  • 12.
    Coeficientes mórficos, ejemplosNeiloide f = 0.25 Cono f = 0,33 Paraboloide cuadrático f = 0,50 Paraboloide cúbico f = 0,60 Cilindro f = 1,00 Árboles de fuste corto, fustales de frondosas en masas densas (f ≈ 0,90). Pies de masas regulares de resinosas (por ejemplo; coníferas que crecen en masa regular P. sylvestris ); f ≈ 0,7. Árboles que pertenecen a masas claras, tanto de coníferas como de frondosas o resinosas en latizal. f ≈ 0,50. Árboles aislados f ≈ 0,35. http://hmbEndeavour.blogspot.com
  • 13.
    Coeficientes mórficos, ejemploshttp://hmbEndeavour.blogspot.com
  • 14.
    Fórmula de PRESSLEREste método de cubicación original y sagaz fue presentado hace más de 125 años por el ilustre forestal alemán Pressler. El tronco de un árbol puede asimilarse según los casos a un paraboloide un cono o un neiloide : http://hmbEndeavour.blogspot.com
  • 15.
    Fórmula de PRESSLERIndependientemente de la forma del árbol: Quedó mucho tiempo sin utilización práctica debido a la dificultad de medir h1 conocida como " altura del punto normal o altura de Pressler " . http://hmbEndeavour.blogspot.com
  • 16.
    Fórmula de PRESSLERLa aparición del relascopio de Bitterlich eliminó esta dificultad y recuperó la fórmula del olvido. Actualmente los modernos dendrómetros también permiten sencillamente el cálculo de esta altura. http://hmbEndeavour.blogspot.com
  • 17.
    Fórmula de PRESSLERLas deformaciones de la base de los árboles tienen efecto en la exactitud de esta fórmula ya que afectan tanto al valor S como al h1. Se calcula mediante la fórmula de Pressler, a partir del valor del diámetro normal, el volumen de la porción del tronco entre 1,30 m y la altura total. Al valor resultante se le añade el volumen de la troza basal cubicada por alguna fórmula comercial (Smalian o Huber). http://hmbEndeavour.blogspot.com
  • 18.
    Tarifas de CubicaciónLas tarifas de cubicación son expresiones matemáticas que proporcionan el volumen de madera a partir de la medición de determinados parámetros en el árbol, que a efectos de utilización de la tarifa se denominan entradas. Tarifas de cubicación de árboles individuales de una entrada : Tarifas de cubicación de árboles individuales de dos entradas : Suministran el volumen de un árbol en función de dos parámetros, generalmente del diámetro normal (Dn) y de la altura total (Ht) del árbol. Tarifas de cubicación de árboles individuales de tres entradas: Proporcionan el volumen de un árbol en función del diámetro normal, de una altura, generalmente la altura total, y de otro parámetro x que puede ser muy diverso (cualquier altura, diámetro, espesor de la corteza, etc.). http://hmbEndeavour.blogspot.com
  • 19.
    Tarifas de Cubicación.Información Para que su aplicación sea correcta, debe ir acompañada siempre, como mínimo, de la siguiente información: especie para la que la tarifa es aplicable, zona de validez geográfica , definición de la variable dependiente (salida de la tabla, volumen que proporciona, unidades de medida). definición de las variables independientes (entradas) y unidades de medida. Además de estos cuatro puntos es interesante conocer: el número de árboles muestra que se han utilizado para la construcción de la tarifa, el ámbito geográfico en el que se han tomado los árboles muestra, el procedimiento de determinación de los volúmenes de los árboles muestra, el método de construcción de la tarifa y modelos utilizados, el autor y la fecha de publicación de la tarifa. http://hmbEndeavour.blogspot.com
  • 20.
    Tarifas para elInventario Forestal de Galicia (1986) http://hmbEndeavour.blogspot.com
  • 21.
    Tarifas para elInventario Forestal de Galicia (1986) http://hmbEndeavour.blogspot.com
  • 22.
    Tablas de cubicaciónLas tablas de cubicación no son más que la representación en cuadros numéricos de los valores de volumen obtenidos al aplicar una tarifa de cubicación para unos valores determinados de los parámetros que hay que medir en el árbol. Por tanto, igual que las tarifas, existen tablas de cubicación de una, dos o tres entradas , aunque normalmente se emplean las tablas de cubicación de dos entradas. Tiene como ventaja su mayor facilidad de manejo que permite el cálculo de volumen de un árbol de forma inmediata y sin hacer cálculos, por lo que son muy prácticas a la hora de cubicar pequeños lotes de madera en el mismo monte. http://hmbEndeavour.blogspot.com
  • 23.
    Tabla de cubicaciónde E. globulus http://hmbEndeavour.blogspot.com
  • 24.
    Tabla de cubicaciónde P. pinaster http://hmbEndeavour.blogspot.com

Notas del editor

  • #2 Animated title moves behind picture (Intermediate) To reproduce the shape effects on this slide, do the following: On the Home tab, in the Slides group, click Layout , and then click Blank . On the Home tab, in the Drawing group, click Shapes , and then under Rectangles click Rectangle (first option from the left). On the slide, drag to draw a rectangle. Select the rectangle. Under Drawing Tools , on the Format tab, in the Size group, do the following: In the Shape Height box, enter 3.17” . In the Shape Width box, enter 9.5” . Drag the rectangle slightly above the middle of the slide. Select the rectangle. On the Home tab, in the Drawing group, click Arrange , point to Align , and then do the following: Click Align to Slide . Click Align Left . Under Drawing Tools , on the Format tab, in the Shape Styles group, click the next to Shape Outline , and then click No Outline . Under Drawing Tools , on the Format tab, in the Shape Styles group, click the Format Shape dialog box launcher. In the Format Shape dialog box, click Fill in the left pane, select Gradient fill in the Fill pane, and then do the following: In the Type list, select Linear . In the Angle box, enter 0 . Under Gradient stops , click Add gradient stops or Remove gradient stops until two stops appear in the slider. Also under Gradient stops , customize the gradient stops as follows: Select the first stop in the slider, and then do the following: In the Position box, enter 0% . Click the button next to Color , and then under Theme Colors click Orange, Accent 6, Darker 50% (fifth row, 10 th option from the left). Select the next stop in the slider, and then do the following: In the Position box, enter 100% . Click the button next to Color , and then under Theme Colors click Orange, Accent 6, Darker 25% (fourth row, 10 th option from the left). To reproduce the “heading” text box on this slide, do the following: On the Insert tab, in the Text group, select Text Box . On the slide, drag to draw a text box. Enter the heading text, and then select text. On the Home tab, in the Font group, do the following: In the Font list, select Calibri . In the Font Size box, enter 38 . Click Bold . Click the arrow next to Font Color , and then under Theme Colors click Orange, Accent 6, Darker 25% (fourth row, 10 th option from the left). On the Home tab, in the Paragraph group, click Align Text Left . Drag the text box just above the rectangle, in the right half of the slide. To reproduce the second text box on this slide, do the following: On the Insert tab, in the Text group, click Text Box . On the slide, drag to draw a text box. Enter three lines of text with paragraph breaks, and then select the text. On the Home tab, in the Font group, do the following: In the Font list, select Calibri . In the Font Size list, select 28 . Click Bold . Click the arrow next to Font Color , and then under Theme Colors click White, Background 1 (first row, first option from the left). On the Home tab, in the Paragraph group, click the Paragraph dialog box launcher. In the Paragraph dialog box, do the following: On the Indents and Spacing tab, under General , select Left in the Alignment box. Under Spacing , select 12 in the After box. Drag the second text box onto the rectangle, below the “heading” text box. To reproduce the full-color picture on this slide, do the following: On the Insert tab, in the Images group, click Picture . In the Insert Picture dialog box, select a picture, and then click Insert . On the slide, select the picture. Under Picture Tools , on the Format tab, in the Size group, click the Size and Position dialog box launcher. In the Format Picture dialog box, resize or crop the image so that the height is set to 5.08” and the width is set to 2.61” . To crop the picture, click Crop in the left pane, and in the right pane, under Crop position , enter values into the Height , Width , Left , and Top boxes. To resize the picture, click Size in the left pane, and in the right pane, under Size and rotate , enter values into the Height and Width boxes. Also in the Format Picture dialog box, click Glow and Soft Edges in the left pane, and then, in the Glow and Soft Edges pane, do the following: Under Glow , click the button next to Presets , and then click Blue, 5 pt glow Accent color 1 (first row, first option from the left). Click the button next to Color , and then under Theme Colors click White, Background 1 (first row, first option from the left). Drag the full-color picture on top of the rectangle, to the left of the text boxes. On the Home tab, in the Drawing group, click Arrange , point to Align , and then do the following: Click Align to Slide . Click Align Top . To reproduce the second picture on this slide, do the following: On the Insert tab, in the Images group, click Picture . In the Insert Picture dialog box, select the same picture, and then click Insert . On the slide, select the picture. On the slide, select the picture. Under Picture Tools , on the Format tab, in the Size group, click the Size and Position dialog box launcher. In the Format Picture dialog box, resize or crop the image so that the height is set to 2.44” and the width is set to 2.61” . To crop the picture, click Crop in the left pane, and in the right pane, under Crop position , enter values into the Height , Width , Left , and Top boxes. To resize the picture, click Size in the left pane, and in the right pane, under Size and rotate , enter values into the Height and Width boxes. On the slide, drag the new picture directly below the first one, and then, in the Format Picture dialog box, in the Crop tab, under Picture Position , adjust the Offset X and Offset Y settings to align the content of the two images so that they appear continuous. Also in the Format Picture dialog box, click Picture Corrections in the left pane, and in the Picture Corrections pane, under Brightness and Contrast , do the following: In the Brightness box, enter 70% . In the Contrast box, enter -70% . Select the smaller picture. On the Home tab, in the Drawing group, click Arrange , point to Align , and then do the following: Click Align to Slide . Click Align Bottom . Press and hold CTRL, and then select both pictures. On the Home tab, in the Drawing group, click Arrange , point to Align , and then do the following: Click Align Selected Objects . Click Align Center . To reproduce the animation effects on this slide, do the following: On the slide, select the “heading” text box. On the Animations tab, in the Advanced Animation group, click Add Animation , and then under Entrance click Fade. On the Animations tab, in the Timing group, in the Start list, select With Previous . On the Animations tab, in the Timing group, in the Duration box, enter 2 . On the Animations tab, in the Timing group, in the Delay box, enter 1.5 . On the slide, select the “heading” text box. On the Animations tab, in the Advanced Animation group, click Add Animation , and then under Motion Paths click Lines. On the Animations tab, in the Timing group, in the Start list, select With Previous . On the Animations tab, in the Timing group, in the Duration box, enter 2 . On the Animations tab, in the Animation group, click Effect Options , and then click Left . On the Animations tab, in the Animation group, click Effect Options , and then click Reverse Path Direction . On the slide, select the motion path for the “heading” text box, point to the starting point (green arrow) of the motion path until the cursor becomes a two-headed arrow. Press and hold SHIFT, and then drag the starting point about 1.5” off the left edge of the slide. ( Note: If your lines of text are longer than in the example above, you may need to further increase the length of the motion path. ) On the slide, select the second text box. On the slide, select the “heading” text box. On the Animations tab, in the Advanced Animation group, click Add Animation , and then under Entrance click Fade. On the Animations tab, in the Animation group, click the Show Additional Effect Options dialog box launcher. In the Fade dialog box, do the following: On the Effect tab, in the Animate text list, select By Letter . In the % delay between letters box, enter 5 . On the Timing tab, in the Start list, select After Previous . In the Duration list, select 0.5 seconds ( Very Fast) . On the Text Animation tab, in the Group text list, select By 1 st Level Paragraphs . To reproduce the background on this slide, do the following: One the Design tab, in the Background group, click Background Styles , and then click Format Background . In the Format Background dialog box, click Fill in the left pane, select Gradient fill in the Fill pane, and then do the following: In the Type list, select Radial . Click the button next to Direction , and then click From Center (third option from the left). Under Gradient stops , click Add gradient stops or Remove gradient stops until three stops appear in the slider. Also under Gradient stops , customize the gradient stops as follows: Select the first stop in the slider, and then do the following: In the Position box, enter 0% . Click the button next to Color , and then under Theme Colors click White, Background 1 (first row, first option from the left). In the Transparency box, enter 0%. Select the next stop in the slider, and then do the following: In the Position box, enter 40% . Click the button next to Color , and then under Theme Colors click White, Background 1 (first row, first option from the left). In the Transparency box, enter 0%. Select the next stop in the slider, and then do the following: In the Position box, enter 100% . Click the button next to Color , click More Colors , and then in the Colors dialog box, on the Custom tab, enter values for Red: 232 , Green: 227 , and Blue: 216 .