SlideShare una empresa de Scribd logo
1 de 143
Descargar para leer sin conexión
UP6 15, UP6 20, UP6 25, UP6 30
60Hz
This manual contains
important safety information
and must be made available
to personnel who operate and
maintain this machine.
C.C.N.: 80445158
REV. A
DATE : OCTOBER 2008
OPERATION AND MAINTENANCE MANUAL
:
Warranty
The Company warrants that the equipment manufactured by it and delivered hereunder will be free of defects in
material and workmanship for a period of twelve months from the date of placing the Equipment in operation or eighteen
months from the date of shipment from the factory,whichever shall first occur.The Purchaser shall be obligated to
promptly report any failure to conform to this warranty,in writing to the Company in said period,whereupon the
Company shall,at its option,correct such nonconformity,by suitable repair to such equipment or,furnish a replacement
part F.O.B.point of shipment,provided the Purchaser has stored,installed,maintained and operated such Equipment
in accordance with good industry practices and has complied with specific recommendations of the Company.
Accessories or equipment furnished by the Company,but manufactured by others,shall carry whatever warranty the
manufacturers have conveyed to the Company and which can be passed on to the Purchaser.The Company shall
not be liable for any repairs,replacements,or adjustments to the Equipment or any costs of labor performed by the
Purchaser or others without Company‘s prior written approval.
The effects of corrosion,erosion and normal wear and tear are specifically excluded.Performance warranties are
limited to those specifically stated within the Company‘s proposal.Unless responsibility for meeting such performance
warranties are limited to specified tests,the Company‘s obligation shall be to correct in the manner and for the period
of time provided above.
THE COMPANY MAKES NO OTHER WARRANTY OR REPRESENTATION OF ANY KIND WHATSOEVER,
EXPRESSED OR IMPLIED,EXCEPT THAT OF TITLE,AND ALL IMPLIED WARRANTIES OF MERCHANTABILITY
AND FITNESS FOR A PARTICULAR PURPOSE,ARE HEREBY DISCLAIMED.
Correction by the Company of nonconformities whether patent or latent,in the manner and for the period of time
provided above,shall constitute fulfillment of all liabilities of the Company for such nonconformities whether based on
contract,warranty negligence,indemnity,strict liability or otherwise with respect to or arising out of such Equipment.
The purchaser shall not operate Equipment which is considered to be defective,without first notifying the Company
in writing of its intention to do so.Any such use of Equipment will be at Purchaser‘s sole risk and liability.
BONDED WARRANTY & REGISTERED START UP
Note that this is Ingersoll Rand standard warranty. Any warranty in force at the time of purchase of the compressor
or negotiated as part of the purchase order may take precedence over this warranty.
CONTENTS & ABBREVIATIONS 1
CONTENTS
1 CONTENTS
2 FOREWORD
3 DECALS
8 SAFETY
10 GENERAL INFORMATION
12 INSTALLATION / HANDLING
21 OPERATING INSTRUCTIONS
25 MAINTENANCE
31 TROUBLE SHOOTING
ABBREVIATIONS & SYMBOLS
#### Contact Ingersoll Rand for serial number
–>#### Up to Serial No.
####–> From Serial No.
* Not illustrated
{ Option
NR Not required
AR As required
SM Sitemaster/Sitepack
HA High ambient machine
WC Watercooled machine
AC Aircooled machine
ERS Energy recovery system
T.E.F.C. Totally enclosed fan cooled motor (IP55)
O.D.P. Open drip proof (motor)
FOREWORD2
The contents of this manual are considered to be proprietary and
confidential to Ingersoll Rand and should not be reproduced without
the prior written permission of Ingersoll Rand.
Nothing contained in this document is intended to extend any
promise, warranty or representation, expressed or implied, regarding
the Ingersoll Rand products described herein. Any such warranties or
other terms and conditions of sale of products shall be in accordance
with the standard terms and conditions of sale for such products, which
are available upon request.
This manual contains instructions and technical data to cover
routine operation and scheduled maintenance tasks by operation and
maintenance staff. Major overhauls are outside the scope of this
manual and should be referred to an authorized Ingersoll Rand service
department.
All components, accessories, pipes and connectors added to the
compressed air system should be:
. of good quality, procured from a reputable manufacturer and,
wherever possible, be of a type approved by Ingersoll Rand.
. clearly rated for a pressure at least equal to the machine maximum
allowable working pressure.
. compatible with the compressor lubricant/coolant.
. accompaniedwith instructions for safe installation, operation and
maintenance.
Details of approved equipment are available from Ingersoll Rand
Service departments.
The use of non–genuine spare repair parts other than those
included within the Ingersoll Rand approved parts list may create
hazardous conditions over which Ingersoll Rand has no control.
Therefore Ingersoll Rand does not accept any liabilitity for losses
caused by equipment in which non–approved repair parts are installed.
Standard warranty conditions may be affected.
Ingersoll Rand reserves the right to make changes and
improvements to products without notice and without incurring any
obligation to make such changes or add such improvements to
products sold previously.
The intended uses of this machine are outlined below and examples
of unapproved usage are also given, however Ingersoll Rand cannot
anticipate every application or work situation that may arise.
IF IN DOUBT CONSULT SUPERVISION.
This machine has been designed and supplied for use only in the
following specified conditions and applications:
. Compression of normal ambient air containing no known or
detectable additional gases, vapors. or particles
. Operation within the ambient temperature range specified in the
GENERAL INFORMATION section of this manual.
The use of the machine in any of the situation types listed in
table 1:–
a) Is not approved by Ingersoll Rand,
b) May impair the safety of users and other persons, and
c) May prejudice any claims made against Ingersoll Rand.
TABLE 1
Use of the machine to produce compressed air for:
a) direct human consumption
b) indirect human consumption, without suitable filtration and purity
checks.
Use of the machine outside the ambient temperature range
specified in the GENERAL INFORMATION SECTION of this manual.
Use of the machine where there is any actual or foreseeable risk of
hazardous levels of flammable gases or vapors.
THIS MACHINE IS NOT INTENDED AND MUST NOT BE
USED IN POTENTIALLY EXPLOSIVE ATMOSPHERES,
INCLUDING SITUATIONS WHERE FLAMMABLE GASES OR
VAPORS MAY BE PRESENT.
Use of the machine fitted with non Ingersoll Rand approved
components.
Use of the machine with safety or control components missing or
disabled.
The company accepts no responsibility for errors in translation of
this manual from the original English version.
COPYRIGHT 2008
INGERSOLL RAND
DECALS 3
ISO SYMBOLS
GRAPHIC FORM AND MEANING OF ISO SYMBOLS
Prohibition / Mandatory Information / Instructions Warning
Use fork lift truck from this side only. RESET Do not use fork lift truck from this side.
Emergency stop. On (power). Off (power).
AUTOMATIC RESTART MAINTENANCE MAINTENANCE PROHIBITED
FRAGILE KEEP DRY THIS WAY UP
USE NO HOOKS NO SIDE CLAMPS HOURS
DECALS4
POWER INSPECT
Every X months, if sooner than required by
operating hours
CHANGE / REPLACE CLEAN
DECALS 5
ANSI SYMBOLS
GRAPHIC FORM AND MEANING OF ANSI SYMBOLS
DANGER
INTAKE AIR. Can contain carbon monoxide or other contaminants. Will cause serious injury or death. Ingersoll Rand
air compressors are not designed, intended or approved for breathing air. Compressed air should not be used for
breathing air applications unless treated in accordance with all applicable codes and regulations.
WARNING
HAZARDOUS VOLTAGE. Can cause serious injury or death. Disconnect power and bleed pressure from tank before
servicing. Lockout/Tagout machine. Compressor must be connected to properly grounded circuit. See Grounding
Instructions in manual. Do not operate compressor in wet conditions. Store indoors.
RISK OF FIRE OR EXPLOSION. Electrical arcing from compressor components can ignite flammable liquids and
vapors which can result in serious injury. Never operate the compressor near flammable liquids or vapors. If used to
spray flammable materials, keep compressor at least 20ft away from the spray area.
HIGH PRESSURE AIR. Rusted tanks can cause explosion and severe injury or death. Receiver under perssure.
Operator should relieve tank pressure before performing maintenance. In addition to automatic drain, operate manual
drain valve weekly. Manual drain valve located at bottom of the tank.
MOVING PARTS. Can cause serious injury. Do not operate with guards removed. Machine may start automatically.
Disconnect power before servicing. Lockout/Tagout machine.
HOT SURFACES. Can cause serious injury. Do not touch. Allow to cool before servicing. Do not touch hot
compressor or tubing.
EXPOSED MOVING BELTS AND SHEAVES.
Can cause severe injury or death.
Do not operate without guard in place. Disconnect power before servicing.
Lockout/Tagout machine.
Air flow exhaust may contain flying debris.
Safety protection should be worn at all times.
DECALS6
VIEW BACK VIEW LEFT
INSIDE PACKAGE
INSIDE STARTER DOOR
VIEW FRONT VIEW RIGHT
60 Hz Units
VIEW TOP
SECTION A–A
Item ccn Qty. Description Item ccn Qty. Description
1 32343519 1 Decal, warning contaminated air
Located near air discharge port of receiver
tank on tank mounted units
2 32343576 1 Decal, air receiver auto–drain
3 93166460 1 Decal, coolant drain
4 32343501 1 Decal, dual voltage (if needed)
5 –
6 23038466 1 Decal, Ingersoll Rand signature
horizontal 20“
7 23353147 1 Decal, maintenance parts
8 30286686 1 Decal, notice rotation
9 32343543 1 Decal, notice air discharge
Located near air discharge port of receiver
tank on tank mounted units
10 93171262 4 Decal, notice lift here
11 32343493 1 Decal, overload setting IEC starter
12 SPEC 1 Specifications, compressor package
13 32342669 1 Decal, starter box
14 32017469 1 Decal, voltage 120/1/60
† Optional position
7DECALS
VIEW BACK VIEW LEFT
INSIDE PACKAGE
INSIDE STARTER DOOR
VIEW FRONT VIEW RIGHT
60 Hz Units
VIEW TOP
SECTION A–A
Item ccn Qty. Description Item ccn Qty. Description
15 32017436 1 Decal, voltage 230/3/60
32018475 1 Decal, voltage 200/3/60
32236481 1 Decal, voltage 380/3/60
32017444 1 Decal, voltage 460/3/60
32177305 1 Decal, voltage 575/3/60
16 32343527 1 Decal, warning high pressure
17 32343535 1 Decal, warning moving belts
18 32343550 3 Decal, warning exposed fan
19 32343568 2 Decal, warning hazardous voltage
20 32343584 1 Decal, warning hot surface
21 32343634 1 Decal, wiring schematic DOL 60Hz
32343642 1 Decal, wiring schematic Star Delta 60Hz
22 32343907 1 Decal, lock and tag out
23 32343899 1 Decal, warning flying debris
24 22115703 1 Tag, rotation 60Hz
25 32344095 2 Tag, shipping bracket
† Optional position
SAFETY8
DANGER!
Hazard that WILL Cause DEATH, SEVERE INJURY or substantial
property damage if ignored. Instructions must be followed precisely to
avoid injury or death.
WARNING!
Hazard that CAN cause DEATH, SEVERE INJURY or substantial
property damage if ignored. Instructions which must be followed
precisely to avoid injury or death.
CAUTIONS!
Cautions call attention to instructions which must be followed
precisely to avoid damaging the product, process or its surroundings.
NOTES
Notes are used for supplementary information.
BREATHING AIR PRECAUTION
Ingersoll Rand air compressors are not designed, intended or
approved for breathing air. Compressed air should not be used for
breathing air applications unless treated in accordance with all
applicable codes and regulations.
General Information
Ensure that the operator reads and understands the decals and
consults the manuals before maintenance or operation.
Ensure that the Operation and Maintenance manual is not removed
permanently from the machine.
Ensure that maintenance personnel are adequately trained,
competent and have read the Maintenance Manuals.
Do not point air nozzles or sprayers toward anyone.
Compressed air and electricity can be dangerous. Before
undertakingany work on the compressor, ensure that the electrical
supply has been isolated and the compressor has been relieved of all
pressure.
Wear eye protection when operating or servicing compressor.
All persons positioned near to operating machinery should be
equippedwith hearing protection and given instructions on its use in
accordance with workplace safety legislation.
Make sure that all protective covers are in place and that the
canopy/doors are closed during operation.
The specification of this machine is such that the machine is not
suitable for use in flammable gas risk areas.
Installation of this compressor must be in accordance with
recognised electrical codes and any local Health and Safety Codes.
The use of plastic bowls on line filters can be hazardous. Their
safety can be affected by either synthetic lubricants, or the additives
used in mineral oils. Ingersoll Rand recommends that only filters with
metal bowls should be used on a pressurized system.
Compressed air
Compressed air can be dangerous if incorrectly handled. Before
doing any work on the unit, ensure that all pressure is vented from the
system and that the machine cannot be started accidentally.
WARNING
Imposinga normal or emergency stop on the compressor will
only relieve pressure upstream of the minimum pressure valve on
top of the separator tank.
If maintenance work is required downstream of this valve, ensure
that all pressure is relieved at the process vent point external to
the compressor.
Ensure that the machine is operating at the rated pressure and that
the rated pressure is known to all relevant personnel.
All air pressure equipment installed in or connected to the machine
must have safe working pressure ratings of at least the machine rated
pressure.
If more than one compressor is connected to one common
downstream plant, effective isolation valves must be fitted and
controlledby work procedures, so that one machine cannot accidentally
be pressurized / over pressurized by another.
Compressed air must not be used for a direct feed to any form of
breathing apparatus or mask.
Thedischarged air contains a very small percentage of compressor
lubricant and care should be taken to ensure that downstream
equipmentis compatible.
If the discharged air is to be ultimately released into a confined
space, adequate ventilation must be provided.
When using compressed air always use appropriate personal
protective equipment.
All pressure containing parts, especially flexible hoses and their
couplings,must be regularly inspected, be free from defects and be
replaced according to the Manual instructions.
Compressed air can be dangerous if incorrectly handled. Before
doing any work on the unit, ensure that all pressure is vented from the
system and that the machine cannot be started accidentally.
Avoid bodily contact with compressed air.
All safety valves located in the separator tank must be checked
periodically for correct operation.
Do not over–pressurize the receiver tank or similar vessels beyond
design limits.
Do not use a receiver tank or similar vessels that fail to meet the
design requirements of the compressor. Contact your distributor for
assistance.
Do not drill into, weld or otherwise alter the receiver tank or similar
vessels.
Materials
The following substances are used in the manufacture of this
machine and may be hazardous to health if used incorrectly:
. preservative grease
. rust preventative
. compressor coolant
AVOID INGESTION, SKIN CONTACT AND INHALATION OF
FUMES
Transport
Whenloading or transporting machines ensure that the specified
liftingand tie down points are used.
Lifting equipment must be properly rated for the weight of the
compressor.
Do not work on or walk under the compressor while it is suspended.
Electrical
Keep all parts of the body and any hand–held tools or other
conductiveobjects, away from exposed live parts of the compressor
electrical system. Maintain dry footing, stand on insulating surfaces
and do not contact any other portion of the compressor when making
adjustments or repairs to exposed live parts of the compressor
electrical system.
WARNING
Any electrical connections or adjustments should only be
madeby a suitably qualified electrician.
Close and lock all access doors when the compressor is left
unattended.
Do not use extinguishers intended for Class A or Class B fires on
electrical fires. Use only extinguishers suitable for class BC or class
ABC fires.
SAFETY 9
Attempt repairs only in clean, dry, well lighted and ventilated areas.
Connect the compressor only to electrical systems that are
compatiblewith its electrical characteristics and that are within it’s rated
capacity.
Condensate disposal
As waste water regulations vary by country and region it is the
responsibility of the user to establish the limitations and regulations in
their particular area. Ingersoll Rand and its associated distributors are
happy to advise and assist in these matters.
For further information, consult the Material Safety Data Sheets.
GENERAL INFORMATION10
SEE TRANSFORMER NAMEPLATE FOR
WIRING CONNECTION REQUIREMENTS.
WYE (STAR) DELTA MOTOR
(OPEN TRANSITION)
“POWER ON”
OFF ON
“STAND BY”
“HI TEMP SHUTDOWN”
RESET
SEE NOTES
1 & 2
LINE
NUMBER
TO SUPPLY
JUMPER
LEGEND
CPT Transformer, control
EDV Valve, electric drain
E–STOP Button, emergency stop
FU Fuse
HM Hourmeter
HATR Relay, high air temperature
HATS Switch, high air temperature
1M Contactor (main)
2M Contactor (delta)
OL Overload, motor starter
PS Switch, pressure
SS Switch, selector
S Contactor
(wye / star)
1SV Valve, solenoid (Load) N.C.
3SV Valve, solenoid (Blowdown) N.O.
TD Relay, Delta starting (10 second)
TR Relay, auto restart time delay (6 min)
VAR Varistor
Terminal points
L1, L2, L3 Light, transformer type
NOTES
1. Approved fused disconnect or circuit breaker per code
requirementsmust be provided by customer.
2. Dashed lines represent wiring by customer.
3. Sizing of electrical components not supplied by Ingersoll Rand is
the responsibility of the customer and should be done in
accordance with the information on the compressor data plate
and local electrical codes.
4. Unit will not restart automaticlly after power outage.
5. Circuit shown in normal position de–energized.
6. All wiring to be in accordance with local codes.
GENERAL INFORMATION 11
SEE TRANSFORMER NAMEPLATE FOR
WIRING CONNECTION REQUIREMENTS.
COMPRESSOR
MOTOR
“POWER ON”
OFF ON
“STAND BY”
“HI TEMP SHUTDOWN”
RESET
SEE NOTES 1 & 2
LINE
NUMBER
TO SUPPLY
JUMPER
JUMPER
LEGEND
CPT Transformer, control
EDV Valve, electric drain
E–STOP Button, emergency stop
FU Fuse
HM Hourmeter
HATR Relay, high air temperature
HATS Switch, high air temperature
M Contactor (main)
OL Overload, motor starter
PS Switch, pressure
SS Switch, selector
1SV Valve, solenoid (Load) N.C.
3SV Valve, solenoid (Blowdown) N.O.
TR Relay, time delay (6 min)
VAR Varistor
Terminal points
L1, L2, L3 Light, transformer type
NOTES
1. Approved fused disconnect or circuit breaker per code
requirementsmust be provided by customer.
2. Dashed lines represent wiring by customer.
3. Sizing of electrical components not supplied by Ingersoll Rand is
the responsibility of the customer and should be done in
accordance with the information on the compressor data plate
and local electrical codes.
4. Unit will not restart automatically after power outage.
5. Circuit shown in normal position de–energized.
6. All wiring to be in accordance with local codes.
INSTALLATION / HANDLING12
ROTATION
VIEW LEFT
VIEW FRONT
VIEW RIGHT
VIEW TOPVIEW BOTTOM
VIEW REAR
BASE MOUNTED UNITS
KEY
A Pre filter
B Compressor and cooling air intake
C Starter box
D Cooling air exhaust
E 1.00” NPT air discharge
F Customer power inlet
G Fork lift openings
(Fork lift hole covers must be installed after unit is in place to
reduce noise and ensure proper cooling of package)
H 4 slots 15 (0.6) x 25 (1.0)
See notes – Page 15
5 6
INSTALLATION / HANDLING 13
ROTATION
VIEW LEFT VIEW FRONT
VIEW RIGHT
VIEW TOP
VIEW BOTTOM
VIEW REAR
TANK MOUNTED (120 GALLON)
60 Hz UNITS
KEY
A Pre filter
B Compressor and cooling air intake
C Starter box
D Cooling air exhaust
E 1.00” NPT air discharge
F Customer power inlet
G Fork lift openings
H Air receiver (120 gallons)
I Automatic drain valve
J 0.25 inch condensate drain
K 4 slots 17 (0.7) x 44 (1.8)
See notes – Page 15
INSTALLATION / HANDLING14
ROTATION
VIEW LEFT VIEW FRONT
VIEW RIGHT
VIEW TOP
VIEW BOTTOM
VIEW REAR
TANK MOUNTED (240 GALLON)
60 Hz UNITS
KEY
A Pre filter
B Compressor and cooling air intake
C Starter box
D Cooling air exhaust
E 1.00” NPT air discharge
F Customer power inlet
G Fork lift openings
H Air receiver (240 gallons)
I Automatic drain valve
J 0.25 inch condensate drain
K 4 slots 17 (0.7) x 44 (1.8)
See notes – Page 15
INSTALLATION / HANDLING 15
NOTES
1. Coolant (lubricant) fill quantity (approximate) 3.4 US gallons (13
liters).
2. Recommendedclearance in front of control panel door 42 inches
(1067 mm) or minimum as required by the latest national electrical
codes (NEC) or applicable local codes.
3. Recommended clearances on left and right sides 36 inches
(914mm).
4. Minimum recommended clearance for the rear of the compressor
is to be 6 inches (152mm).
5. External piping shall not exert any unresolved moments or forces
on the unit. Use pipe size as large or larger at discharge connection.
6. There should be no plastic or pvc piping attached to this unit or used
for any lines downstream.
7. Any field installed ducting to and from the compressor cannot add
more than 1/2” (12.5mm) water gauge total air resistance.
8. Do not pipe into a common header with a reciprocating compressor,
unless the reciprocating compressor utilizes a discharge pulsation
damper.
9. Sizing of electrical components not supplied by Ingersoll Rand is the
responsibility of the customer and should be done in accordance with
the information on the compressor data plate and national and local
electrical codes.
NOTE
All dimensions are in millimeters (inches) unless otherwise stated.
Ensure that the correct fork lift truck slots or marked lifting points are
used whenever the machine is lifted or transported.
UNPACKING
The compressor will normally be delivered with a polythene cover.
If a knife has to be used to remove this cover ensure that the exterior
paintwork of the compressor is not damaged.
Ensure that all transport and packing materials are discarded in a
manner prescribed by local codes.
NOTE
Units are shipped with transit locking bolt in place. Prior to running
the unit the shipping bolt must be removed and the belt tension
checked. Loosen, remove and discard 10mm shipping bolt. For belt
tensioning procedure refer to Maintenance section.
INSTALLATION / HANDLING16
KEY
1. Compressor
2. Air Receiver
3. Air Dryer
4. Compressed air filters
5. System demand points
NOTE
Items [2] to [5] are optional or may be existing items of plant. Refer
to your Ingersoll Rand distributor / representative for specific
recommendations.
LOCATION IN THE PLANT
The compressor can be installed on any level floor capable of
supportingit. A dry, well ventilated area where the atmosphere is clean
is recommended. A minimum of 150mm (6 inches) should be left at the
rear and 1m (3ft) at the sides of the machine for adequate service
access and ventilation.
Adequate clearance needs to be allowed around and above the
machine to permit safe access for specified maintenance tasks.
Ensure that the machine is positioned securely and on a stable
foundation. Any risk of movement should be removed by suitable
means, especially to avoid strain on any rigid discharge piping.
CAUTION
Screw type compressors [1] should not be installed in air
systems with reciprocating compressors without means of
isolation such as a common receiver tank. It is recommended that
both types of compressor be piped to a common receiver using
individual air lines.
CAUTION
The use of plastic bowls on line filters and other plastic air line
components can be hazardous. Their safety can be affected by
either synthetic coolants or the additives used in mineral oils.
Ingersoll Rand recommends that only filters with metal bowls
should be used on any pressurised system.
CAUTION
Before starting machine remove shipping bolt and discard.
CAUTION
The standard compressor unit is not suitable for operation in
temperatures liable to cause freezing as Condensate water is
liable to be produced in the after cooler and receiver where fitted.
Refer to your Ingersoll Rand distributor for further information.
DISCHARGE PIPING
Discharge piping should be at least as large as the discharge
connection of the compressor. All piping and fittings should be suitably
rated for the discharge pressure.
It is essential when installing a new compressor [1], to review the
total air system. This is to ensure a safe and effective total system. One
item which should be considered is liquid carryover. Installation of air
dryers [3] is always good practice since properly selected and installed
they can reduce any liquid carryover to zero.
It is good practice to locate an isolation valve close to the
compressor and to install line filters [4].
INSTALLATION / HANDLING 17
60Hz UP6 15 UP6 20 UP6 25 UP6 30
COMPRESSOR 125 150 125 150 200 125 150 200 125 150 200
Maximum operating pressure
PSIG (bar)
125
(8.62)
150
(10.34)
125
(8.62)
150
(10.34)
200
(13.79)
125
(8.62)
150
(10.34)
200
(13.79)
125
(8.62)
150
(10.34)
200
(13.79)
Factory set reload pressure
PSIG (bar)
115
(7.93)
140
(9.66)
115
(7.93)
140
(9.66)
190
(13.10)
115
(7.93)
140
(9.66)
190
(13.10)
115
(7.93)
140
(9.66)
190
(13.10)
Flow rate
CFM (m3/MIN)
65
(1.84)
58
(1.64)
83
(2.35)
75
(2.12)
58
(1.64)
102
(2.89)
92
(2.61)
75
(2.12)
125
(3.54)
112
(3.17)
92
(2.61)
Airend discharge temperature
trip point
228_F (109_C)
Ambient operating
temperature
min. max.
35_F(+2_C ) 104_F(+40_C)
MOTOR
Motor enclosure ODP TEFC ODP TEFC ODP TEFC ODP TEFC
Nominal power 15HP 20HP 25HP 30HP
Speed 1765 RPM 1770 RPM 1765 RPM 1770 RPM 1765 RPM 1770 RPM 1765 RPM 1770 RPM
Frame 254TZ 160 M 256TZ 160 L 284TZ 180 M 286TZ 180 L
Insulation class F
COOLING SYSTEM
Air cooled
Cooling air flow 1770 ft3/min 1770 ft3/min 2100 ft3/min 2100 ft3/min
Maximum P in air ducts 0.5 inWg (12.7mmH2O)
Compressed air outlet T 13_F (7.2_C) 26_F (14_C) 19_F (10_C) 26_F (14_C)
Cooling air outlet T 24_F (13.5_C) 27_F (15_C) 29_F (16_C) 35_F (20_C)
GENERAL DATA
Residual coolant content 3ppm (3 mg/m3)
Separator vessel capacity 4.5 gallons (17 liters)
Coolant capacity 3.4 gallons (13 liters)
Sound pressure level to
CAGI–PNEUROP
68 dB(A) 68 dB(A) 69 dB(A) 69 dB(A)
Weight – base mount unit 1142lbs (518 kg) 1186 lbs (538 kg) 1206 lbs (547 kg) 1292 lbs (586 kg)
Weight – 120 gallon Receiver
mounted
1466 lbs (665 kg) 1510 lbs (685 kg) 1530 lbs (694 kg) 1616 lbs (733 kg)
Weight – 240 gallon Receiver
mounted
1735 lbs (787 kg) 1779 lbs (807 kg) 1799 lbs (816 kg) 1885 lbs (855 kg)
CAUTION
230/460 Dual voltage machines are fitted with a decal to advise the
correct voltage as connected from the factory.
There is a decal fitted to the starter door describing the procedure
to change the connections for the alternative voltage
Rewiring should only be effected by a competent Electrician.
INSTALLATION / HANDLING18
60Hz UP6 15–HA UP6 20–HA UP6 25–HA
COMPRESSOR 125 150 200 125 150 200 125 150 200
Maximum operating pressure
PSIG (bar)
125
(8.62)
150
(10.34)
200
(13.79)
125
(8.62)
150
(10.34)
200
(13.79)
125
(8.62)
150
(10.34)
200
(13.79)
Factory set reload pressure
PSIG (bar)
115
(7.93)
140
(9.66)
190
(13.10)
115
(7.93)
140
(9.66)
190
(13.10)
115
(7.93)
140
(9.66)
190
(13.10)
Flow rate
CFM (m3/MIN)
65.4
(1.84)
58
(1.64)
45
(1.28)
83
(2.35)
75
(2.12)
58
(1.64)
102
(2.89)
92
(2.61)
75
(2.12)
Airend discharge temperature
trip point
228_F (109_C)
Ambient operating
temperature
min. max.
35_F(+2_C ) 122_F(+50_C)
MOTOR
Motor enclosure ODP TEFC ODP TEFC ODP TEFC
Nominal power 15HP 20HP 25HP
Speed 1765 RPM 1770 RPM 1765 RPM 1770 RPM 1765 RPM 1770 RPM
Frame 256TZ 160 L 284TZ 180 M 286TZ 180 L
Insulation class F
COOLING SYSTEM
Air cooled
Cooling air flow 1770 ft3/min 2100 ft3/min 2100 ft3/min
Maximum P in air ducts 0.5 inWg (12.7mmH2O)
Compressed air outlet T 22_F (12_C) 24_F (13_C) 19_F (10_C)
Cooling air outlet T 21_F (12_C) 26_F (14_C) 29_F (16_C)
GENERAL DATA
Residual coolant content 3ppm (3 mg/m3)
Separator vessel capacity 4.5 gallons (17 liters)
Coolant capacity 3.4 gallons (13 liters)
Sound pressure level to
CAGI–PNEUROP
68 dB(A) 69 dB(A) 69 dB(A)
Weight – base mount unit 1186 lbs (538 kg) 1206 lbs (547 kg) 1292 lbs (586 kg)
Weight – 120 gallon Receiver
mounted
1510 lbs (685 kg) 1530 lbs (694 kg) 1616 lbs (733 kg)
Weight – 240 gallon Receiver
mounted
1779 lbs (807 kg) 1799 lbs (816 kg) 1885 lbs (855 kg)
CAUTION
230/460 Dual voltage machines are fitted with a decal to advise the
correct voltage as connected from the factory.
There is a decal fitted to the starter door describing the procedure
to change the connections for the alternative voltage
Rewiring should only be effected by a competent Electrician.
INSTALLATION / HANDLING 19
ELECTRICAL DATA – ALL UNITS UP6–15
Standard voltage 200V 230V 380V 460V 575V
Drive motor
Motor enclosure ODP TEFC ODP TEFC ODP TEFC ODP TEFC ODP TEFC
Power 20HP
Full load current (max) / HA 47.3A 45.2A 41.2A 39.3A 24.9A 23.8A 20.6A 19.7A 16.4A 15.8A
Starting current DOL (STAR) 258 (151) 224 (132) 136 (114) 112 (66) 90 (53)
Starting time DOL (Star Delta) 3–5 Sec ( 7–10 Sec)
Starts per hour (maximum) 6
ELECTRICAL DATA DOL / Star Delta
Control voltage 120VAC
Minimum fuse rating
See note 1
90A 80A 50A 40A 35A
Minimum wire size AWG
See note 2
4 4 6 10 10
ELECTRICAL DATA – ALL UNITS UP6–20 / UP6 15–HA
Standard voltage 200V 230V 380V 460V 575V
Drive motor
Motor enclosure ODP TEFC ODP TEFC ODP TEFC ODP TEFC ODP TEFC
Power 20HP
Full load current (max) / HA 65/52.2A 63.1/49.8A 56.4/45.4A 54.8/43.3A 34.1/27.5A 33.3/26.3A 28.2/22.7A 27.5/21.7A 22.6/18.2A 22/17.3A
Starting current DOL (STAR) 336 (150) 292 (130) 177 (79) 146 (65) 117 (52)
Starting time DOL (Star Delta) 3–5 Sec ( 7–10 Sec)
Starts per hour (maximum) 6
ELECTRICAL DATA DOL / Star Delta
Control voltage 120VAC
Minimum fuse rating
See note 1
90A 80A 50A 40A 35A
Minimum wire size AWG
See note 2
4 4 6 10 10
ELECTRICAL DATA – ALL UNITS UP6–25 / UP6 20–HA
Standard voltage 200V 230V 380V 460V 575V
Drive motor
Motor enclosure ODP TEFC ODP TEFC ODP TEFC ODP TEFC ODP TEFC
Power 25HP
Full load current (max) / HA 76.6/66.4A 76.5/64.7A 66.6/57.7A 66.5/56.3A 40.3/35.0A 40.3/34.4A 33.3/28.9A 33.3/28.2A 26.6/23.1A 26.6/22.5A
Starting current DOL (STAR) 411.7 (182.2) 358 (158.4) 217 (96) 179 (79.2) 143.2 (63.4)
Starting time DOL (Star Delta) 3–5 Sec ( 7–10 Sec)
Starts per hour (maximum) 6
ELECTRICAL DATA DOL / Star Delta
Control voltage 120VAC
Minimum fuse rating
See note 1
125A 100A 60A 50A 40A
Minimum wire size AWG
See note 2
3 3 4 8 10
INSTALLATION / HANDLING20
ELECTRICAL DATA – ALL UNITS UP6–30 / UP6 25–HA
Standard voltage 200V 230V 380V 460V 575V
Drive motor
Motor enclosure ODP TEFC ODP TEFC ODP TEFC ODP TEFC ODP TEFC
Power 30HP
Full load current (max) / HA 91.3/80.8A 91.9/79.8A 79.3/70.3A 79.9/69.4A 48.1/42.6A 48.4/42.0A 39.7/35.2A 40.0/34.7A 31.7/28.1A 32.0/27.8A
Starting current DOL (STAR) 500 (216.7) 434 (188.4) 263 (114) 217 (94.2) 169 (75.4)
Starting time DOL (Star Delta) 3–5 Sec ( 7–10 Sec)
Starts per hour (maximum) 6
ELECTRICAL DATA DOL / Star Delta
Control voltage 120VAC
Minimum fuse rating
See note 1
150A 125A 80A 60A 50A
Minimum wire size AWG
See note 2
1 2 4 6 8
1. If a circuit breaker is selected it should only be a magnetic trip type,
set above the anticipated starting current of the machine, but below the
maximum prospective fault current for the circuit. The circuit breaker
or fuseable disconnect must be capable of breaking the prospective
fault current at its terminals.
2. PVC/PVC Type Calculated using the following conditions:
i) PVC insulated cable, armoured, copper conductors.
ii) Cable clipped to a wall, in free air.
iii) Ambient temperature of 40_C (104_F) and relative humidity of 40%.
iv) 20m (65ft) cable run.
v) Volt drop limited to –10% during starting, –4% during normal
running.
vi) Protected by the circuit breaker listed above.
If there are any deviations from the above, or special regulations
apply, the installation must be planned by a competent, qualified
engineer.
NOTE
All data applies to standard product only.
ELECTRICAL DATA
An independent electrical isolator or disconnect should be installed
adjacent to the compressor.
Feeder cables/wires should be sized by the customer/electrical
contractor to ensure that the circuit is balanced and not overloaded by
other electrical equipment. The length of wiring from a suitable
electrical feed point is critical as voltage drops may impair the
performance of the compressor.
Feeder cables / wires connections to isolator or disconnect should
be tight and clean.
The applied voltage must be compatible with the motor and
compressor data plate ratings.
The control circuit transformer has different voltage tappings.
Ensure that these are set for the specific applied voltage prior to
starting.
CAUTION
Never test the insulation resistance of any part of the machines
electrical circuits, including the motor without completely
disconnectingthe electronic controller (where fitted).
CAUTION
Ensure that the motor rotates in the correct direction as
indicated by direction arrows, and on drawing.
OPERATING INSTRUCTIONS 21
GENERAL OPERATION
The compressor is an electric motor driven, single stage screw
compressor, complete with accessories piped, wired and baseplate
mounted. It is a totally self contained air compressor package.
The standard compressor is designed to operate in an ambient
range of 35.6_F – 104_F (2_C to 40_C) with a special option package
available to operate in ambient temperatures ranges from 35.6_F up to
124_F (2_C up to 50_C). The maximum temperature is applicable to
either version up to a maximum elevation of 3280ft (1000m) above sea
level. Above this altitude significant reduction in maximum allowable
ambient temperature is required.
Compression in the screw type air compressor is created by the
meshing of two (male & female) helical rotors.
The air/coolant mixture discharges from the compressor into the
separation system. This system removes all but a few PPM of the
coolant from the discharge air. The coolant is returned to the cooling
system and the air passes through the aftercooler and out of the
compressor.
Cooling air is moved through the coolers by the cooling fan and
discharged from the machine.
CAUTION
Cooling air is drawn in at the end of the machine package
passing through the filter and cooler before being discharged
from the top of the machine. Care should be taken to avoid
blocking the airflow, or causing any restriction in excess of the
maximum backpressure allowed for ducting.
Do not direct the airflow at face or eyes.
The power transmission from the drive motor to the airend male
rotor is by pulley and belts. The constant auto tensioning system, using
airend mass torque and gas arm, ensures that the belts are always
under the correct tension, eliminating the need for adjustment and
maximizing the life of the belts.
By cooling the discharge air, much of the water vapor naturally
contained in the air is condensed and may be drained from the
downstream piping and equipment.
The coolant system consists of a sump, cooler, thermostatic valve
and a filter. When the unit is operating, the coolant is pressurized and
forced to the compressor bearings.
The compressor load control system is automatic on–off line. The
compressor will operate to maintain a set discharge line pressure and
is provided with an auto restart system for use in plants where the air
demand varies sufficiently to allow a compressor to shut down and
save power. Significant system volume will assist this and is
recommended.
WARNING
When the unit stops running as the result of low air demand,
normally indicated by auto restart light, it may restart and return
to load at any time.
Safety of operation is provided as the compressor will shut down if
excessive temperatures or electrical overload conditions should occur.
CAUTION
This unit is not designed or intended to operate when
contaminated with silicone. Lubricants, greases or other items
containing silicone should not be used on this unit.
OPERATING INSTRUCTIONS22
ELECTRO–PNEUMATIC CONTROL AND INSTRUMENTATION
KEY
1. Pressure gauge
2. Pressure switch
3. Tee
4. Connector
5. Combination block
6. Elbow
7. Tee, male run
8. Reducer bushing
9. Valve, solenoid (Blowdown)
10.Valve, solenoid (Load)
11.Indicator air filter
12.Nipple
13.Adaptor
14.Intake valve assembly
NOTES:
A. Tubing 3/8 inch
B. Tubing 1/4 inch
1
2
3
4
5
7
8
A
B
6
6
9
6
14 12
6
10
11
13
4
OPERATING INSTRUCTIONS 23
1. PRESSURE GAUGE
Indicates the system pressure.
WARNING
DO NOT operate the compressor at discharge pressures
exceedingthe maximum operating pressure.
2. HOURMETER
Records the total running time of the compressor.
3. EMERGENCY STOP
When depressed will stop the compressor immediately. The ’Power
on’ indicator will remain illuminated. The emergency stop button must
be released before the compressor can be restarted.
4. START/STOP
When switched to the ON position will cause the unit to start and run
in a loaded condition if there is a demand for air. If there is no demand,
the machine will run unloaded before stopping automatically.
When switched to the OFF position, will unload and stop the unit if
it is running. If the unit is in auto restart it will prevent the unit from
re–starting when there is a demand for air.
5. POWER ON (Green)
Indicates the presence of control voltage at the controller.
6. AUTO RESTART (White)
Will illuminate when the machine has shut-down due to low air
demand.The machine will restart and load automatically as soon as the
demand for air returns.
7. FAULT / HIGH AIR TEMPERATURE ALARM (Red)
Turn off electrical Isolator or disconnect. Investigate cause of fault.
8. RESET BUTTON
Press button to reset the control system following compressor trip.
PRIOR TO STARTING
1. Make visual check of the machine, ensure that all guards secure
and that nothing is obstructing the proper ventilation of, or free access
to the machine.
2. Check coolant level. Add if necessary.
3. Make sure main discharge valve is open.
4. Turn on electrical isolator or disconnect. The Power on (5) indicator
will light, indicating that line and control voltages are available.
5. Check direction of rotation at initial start or following interruption in
power supply.
WARNING
Make sure that all protective covers are in place.
Cooling air flow exhaust may contain flying debris. Safety
Protection should be worn at all times to avoid injury.
STARTING
1. Push the RESET button (8). The fault indicator (7) will extinguish.
Switch the ON/OFF switch (4) to the ON position. The compressor will
start and then load automatically.
OPERATING INSTRUCTIONS24
NORMAL/EMERGENCY STOPPING
1. Switch the ON/OFF switch (4) to the OFF position. The compressor
will unload and stop.
2. Press EMERGENCY STOP button (3) and the compressor will stop
immediately.
3. Turn off electrical isolator or disconnect.
CAUTION
After shutdown never allow unit to stand idle with pressure in
receiver/separatorsystem.
MAINTENANCE 25
UP Series Maintenance Schedule
PERIOD MAINTENANCE
Each 24 hours
operation
Check the coolant level and replenish if
necessary.
Visual check of
machine for any
leaks, dust build up
or unusual noise or
vibration
Report immediately, contact Ingersoll R and
authorized distributor for assistance if in
doubt
When compressor is
receiver mounted
Drain air receiver of condensate, or check
that automatic drain is operating
Visual check
condition of package
pre–filter
Blow clean if needed
If the air filter
indicator locks into
the red position
before the 2000
hour/1 year change
out period
Check the Condition of filter. Change the air
filter if needed. Dusty environments require
more frequent replacement or, optional high
dust filter
(The indicator sould be checked with the
unit stopped.)
First 150 hours Change the coolant filter.
Each month or 100
hours
Remove and clean package pre-filter,
replace if needed
Check the cooler(s) for build up of foreign
matter. Clean if necessary by blowing out
with air or by pressure washing.
Each year or
2000 hours
Change the coolant filter.
Check scavenge screen for blockage, clean
if required.
Change the separator cartridge.
Change the Air Filter element.
Take coolant sample for fluid analysis.
Change the package pre–filter.
Check the inlet valve flapper, recondition as
necessary.
Visual Check of Drive Belts and tensioning
gas spring.
Pressure vessel
inspection
frequency may be
otherwise defined by
local or national
legislation.
Separator vessel and air receiver when
fitted.
Fully inspect all external surfaces, and
fittings. Report any excessive corrosion,
mechanical or impact damage, leakage or
other deterioration.
Every two years or
8000 hours
Change drive belt and gas spring.
Replace the Ultra Coolant at whichever
interval occurs first.
Check and replace all items included within
2000 hour service
Fit the following reconditioning parts as
appropriate:
Solenoid valves, Inlet valve kit, Minimum
Pressure valve kit, Thermostatic Valve Kit
Replace all hoses.
Strip, clean and re–Grease motor bearings
of ODP motors.
Strip, clean and re–Grease motor bearings
Replace sealed bearing on motors
Fit replacement electrical contactor tips.
Separator tank .
Remove the cover plate and any necessary
fittings. Clean the interior thoroughly and
inspect all internal surfaces.
ROUTINE MAINTENANCE
This section refers to the various components which require
periodic maintenance and replacement.
It should be noted that the intervals between service requirements
may be significantly reduced as a consequence of poor operating
environment.This would include effects of atmospheric contamination
and extremes of temperature.
The SE RVICE/MAINTENANCE CHA R T indicates the various
components’descriptions and the intervals when maintenance has to
take place. Oil capacities, etc., can be found in the GENERAL
INFORM ATION section of this manual.
Compressed air can be dangerous if incorrectly handled. Before
doing any work on the unit, ensure that all pressure is vented from the
system and that the machine cannot be started accidentally.
CAUTION: Before beginning any work on the compressor, open,
lock and tag the main electrical disconnect and close the isolation
valve on the compressor discharge. Vent pressure from the unit
by slowly unscrewing the coolant fill cap one turn. Unscrewing
the fill cap opens a vent hole, drilled in the cap, allowing pressure
to release to atmosphere. Do not remove the fill cap until all
pressure has vented from the unit. Also vent piping by slightly
opening the drain valve. When opening the drain valve or the
coolant fill cap, stand clear of the valve discharge and wear
appropriate eye protection.
Ensure that maintenance personnel are properly trained,
competent and have read the Maintenance Manuals.
Prior to attempting any maintenance work, ensure that:–
. all air pressure is fully discharged and isolated from the system. If
the automatic blowdown valve is used for this purpose, then allow
enough time for it to complete the operation.
. the machine cannot be started accidently or otherwise.
. all residual electrical power sources (mains and battery) are
isolated.
Prior to opening or removing panels or covers to work inside
a machine, ensure that:–
. anyone entering the machine is aware of the reduced level of
protection and the additional hazards, including hot surfaces and
intermittentlymoving parts.
. the machine cannot be started accidently or otherwise.
Prior to attempting any maintenance work on a running
machine, ensure that:–
DANGER
Only properly trained and competent persons should
undertake any maintanence tasks with the compressor running or
with electrical power connected.
. the work carried out is limited to only those tasks which require the
machine to run.
. the work carried out with safety protection devices disabled or
removed is limited to only those tasks which require the machine to be
running with safety protection devices disabled or removed.
Check motors with grease fittings and
on motors with grease fittings.
without grease fittings.
grease bearings per motor data tag.
UP6 15, UP6 20, UP6 25, UP6 30
Every 4 years or
16000 hours
6 years/16000 hours
or as defined by
local or national
MAINTENANCE26
. all hazards present are known (e.g. pressurised components,
electrically live components, removed panels, covers and guards,
extreme temperatures, inflow and outflow of air, intermittently moving
parts, safety valve discharge etc.).
. appropriate personal protective equipment is worn.
. loose clothing, jewelry, long hair etc. is made safe.
. warning signs indicating that Maintenance Work is in Progress are
posted in a position that can be clearly seen.
Upon completion of maintenance tasks and prior to returning
the machine into service, ensure that:–
. the machine is suitably tested.
. all guards and safety protection devices are refitted and correctly
working.
. all panels are replaced, canopy and doors closed.
. hazardous materials are effectively contained and disposed of in a
manner compliant with local or National environmental protection
codes.
WARNING
Do not under any circumstances open any drain valve or
remove components from the compressor without first ensuring
that the compressor is FULLY SHUT– DOWN, power isolated and
all air pressure relieved from the system.
TOP UP COOLANT PROCEDURE
The reservoir is designed to prevent overfill. With warm unit stopped
in the normal way, the sight tube level should be within 15mm (0.6in)
of the top of the green strip. The level should not drop beyond the
bottom of the sight tube when running with a steady load.
CAUTION
Ensure that ULTRA coolant is used. Failure to do
so will void manufacturers warranty.
COOLANT CHANGE PROCEDURE
It is better to drain the coolant immediately after the compressor has
been operating as the liquid will drain more easily and any contaminant
will still be in suspension.
1. Stop the machine, electrically isolate and vent all trapped pressure.
2. Place a suitable container close to the drain valve.
3. Slowly remove fill/vent cap.
4. Remove plug from drain valve.
5. Open the drain valve and drain coolant into container.
6. Close the drain valve.
7. Replace plug in drain valve.
8. Refill the machine following the ”top up coolant” procedure above.
After initial fill, to purge any airlocks, the machine should be run for a
few minutes cycling between load and no load, before checking that the
level is correct.
9. Replace and tighten oil fill cap.
COOLANT FILTER CHANGE PROCEDURE
1. Stop the machine, electrically isolate and vent all trapped pressure.
2. Loosen filter with the correct tool.
3. Remove the filter from the housing.
4. Place the old filter in a sealed bag and dispose of in a safe way.
5. Clean the mating face of the housing taking care to avoid any
particles entering the machine.
6. Remove the new Ingersoll Rand replacement filter from its
protective package.
7. Apply a small amount of lubricant to the filter seal.
8. Screw the new filter down until the seal makes contact with the
housing, then hand tighten a further half turn.
9. Start the compressor and check for leaks.
AIR FILTER ELEMENT CHANGE PROCEDURE
1. Stop the machine, electrically isolate and vent all trapped pressure.
2. Unscrew the retaining cap and withdraw the old element.
3. Fit the new element.
4. Replace the retaining cap.
MAINTENANCE 27
SEPARATOR CARTRIDGE CHANGE PROCEDURE
1. Stop the machine, electrically isolate and vent all trapped pressure.
2. Loosen separator cartridge with the correct tool.
3. Remove the cartridge from the housing; place it in a sealed bag and
dispose of it safely.
4. Clean the mating face of the housing.
5. Remove the new Ingersoll Rand replacement cartridge from its
protective package.
6. Apply a small amount of lubricant to the cartridge seal.
7. Screw the new cartridge down until the seal makes contact with the
housing, then hand tighten a further half turn.
8. Start the compressor and check for leaks.
CAUTION
This unit is not designed or intended to operate when
contaminated with silicone. Lubricants, greases or other items
containing silicone should not be used on this unit.
COOLER CLEANING PROCEDURE
1. Stop the machine, electrically isolate and vent all trapped pressure.
2. Remove the top cover to obtain access to the cooler.
3. Clean the cooler.
4. Rebuild in reverse order.
MAINTENANCE28
SETTING THE PRESSURE SWITCH (1PS)
TO CHECK THE MAXIMUM DISCHARGE PRESSURE
(Pressure switch upper trip point)
Slowly close the isolation valve located adjacent to the compressor.
Observe the rise in pressure and ensure that the pressure switch
opens (and unloads the compressor) at the correct Maximum
discharge pressure.
The maximum discharge pressure is shown on the machine data plate.
DO NOT exceed these figures.
TO CHECK THE LOWER SET POINT
Observe the line pressure fall and note the point at which the
pressure switch closes (and loads the compressor).
TO ADJUST THE UPPER SET POINT
Remove the cover and turn the adjuster [1]. The
pointer will move. Turn the adjuster anti–clockwise to increase the set
point or clockwise to decrease it.
TO ADJUST THE LOWER SET POINT
Remove the cover and turn the adjuster [2]. The
pointer will move. Turn the adjuster anti–clockwise to increase the set
point or clockwise to decrease it.
22505309
REV. A
1
2
NOTE
The pressure switch scale is a guide only. Use the machine
pressure gauge to verify the upper and lower set points.
MAINTENANCE 29
BELT CHANGE / GAS STRUT CHANGE PROCEDURE
A. Gas strut.
B. Support bracket (part of pivoted assembly).
C. Tension cam.
1. Stop the machine, electrically isolate and vent all trapped pressure.
2. Remove the side cover from the machine.
3. Fit a 1/2” square drive wrench in the tension cam located above the
airend (access from front door). Turn clockwise 1/4 turn to Position II
to release gas strut tension on the belts.
4. Using a small screwdriver under the spring clip, ease the ball ends
off the spherical studs at the ends of the gas strut.
5. Replace the gas strut and the studs at the same time by removing
and replacing the studs then pushing the new gas strut firmly onto the
studs until it clicks into place.
6. Turn the tension cam clockwise 1/4 turn to Position III to raise and
support the airend. Place a block of wood or similar under the separator
tank for support.
7. Replace the belts from the left side of the machine.
8. Turn the tension cam counter–clockwise 1
/2 turn to Position I to
tension the gas strut.
9. Spin the drive to check alignment of the belt ribs on the pulleys
(sheaves).
MAINTENANCE30
ELECTRIC DRAIN VALVE
PRODUCT DESCRIPTION
The Electric Drain Valve removes condensed water and oil from the air
receiver tank. Additional drains may be installed throughout your
compressed air system, including aftercoolers, filters, drip legs and
dryers.
The Electric Drain Valve operates on a timer which can be set to
automatically drain the air receiver tank at operator–determined
intervals.
Key features include:
100% continuous duty
NEMA 4 enclosure
Adjustable time on (0.5 – 10 seconds)
Adjustable time off (0.5 – 45 minutes)
Stainless steel operator
LED to indicate electrical power is on
LED to indicate valve is open
Manual override
OPERATION
1. Open the strainer ball valve.
Strainer Ball Valve.
OPEN CLOSED
2. Set the “time off” and “time on” knobs. See TIMER SETTINGS
(below) for an explanation of the settings.
3. During compressor operation, check for air leaks.
TIMER SETTINGS
The “time off” setting determines the interval between cycles from 30
seconds to 45 minutes. The “time on” setting determines the actual time
the compressor drains condensate.
The timer’s cycle rate and drain opening time should be adjusted to
open just long enough to discharge the condensate. The timer is
properly set when it opens and discharges condensate and then vents
air for approximately one second before closing. Adjustments may be
made depending on mny factors, including humidity and duty cycle.
TROUBLESHOOTING
TROUBLE CAUSE ACTION
Valve will not
close.
1. Debris in solenoid
valve prevents dia-
phragm from seating.
1. Remove solenoid
valve, disassemble,
clean and reassemble.
2. Short in electrical
component.
2. Check and replace
power cord or timer as
needed.
Timer will not
activate
1. No electrical supply. 1. Apply power.
activate
2. Timer malfunction 2. Replace timer.
3. Clogged port. 3. Clean valve.
4 Solenoid valve mal-
function.
4. Replace solenoid
valve.
5. Clogged strainer. 5. Clean strainer.
MAINTENANCE
Periodically clean the screen inside the valve to keep the drain
functioning at maximum capacity. To do this, perform the following
steps:
1. Close the strainer ball valve completely to isolate it from the air
receiver tank.
2. Press the TEST button on the timer to vent the pressure remaining
in the valve. Repeat until all pressure is removed.
CAUTION! High pressure air can cause injury from flying debris.
Ensure the strainer ball valve is completely closed and pressure
is released from the valve prior to cleaning.
3. Remove the plug from the strainer with a suitable wrench. If you hear
air escaping from the cleaning port, STOP IMMEDIATELY and repeat
steps I and 2.
4. Remove the stainless steel filter screen and clean it. Remove any
debris that may be in the strainer body before replacing the filter screen.
5. Replace plug and tighten with wrench.
6. When putting the Electric Drain Valve back into service, press the
TEST button to confirm proper function.
TROUBLE SHOOTING 31
PROBLEM CAUSE REMEDY
Compressor fails to
start
Mains power or Control voltage not available. § Check incoming power supply.
§ Check the control circuit fuse.
§ Check the transformer secondary windings for the
control voltage.
Defective Star / Delta timer. § Change Star / Delta timer.
Machine shutsdown
periodically
High airend temperature. Top up coolant.
periodically
Motor overload. § Set overload to correct value and switch to manual
reset.
Belt stretch protection (when fitted). Change belt.
Line voltage variation. § Ensure voltage does not drop below 10% on start up
and 6% running.
High current draw Compressor operating above rated pressure. Set pressure to correct rating for machine.
Separator cartridge contaminated. Change air filter, and separator cartridge.
Low voltage. § Ensure voltage does not drop below 10% on start up
and 6% running.
Unbalanced voltage. Correct incoming supply voltage.
Damaged airend. † Change Airend.
Low current draw Air filter contaminated. Change air filter.
Compressor operating unloaded. Set pressure to correct rating for machine.
High voltage. Reduce site voltage to correct operating voltage.
Defective inlet valve. † Fit inlet valve service kit.
High discharge
pressure
Defective or incorrect pressure switch setting. Replace or set pressure to correct rating for machine.
pressure
Load solenoid valve defective. † Fit load solenoid service kit.
Blowdown valve defective. † Fit blowdown solenoid service kit.
Inlet valve malfunction. † Fit inlet valve service kit.
Low system air
pressure
Separator cartridge contaminated. Fit new Separator cartridge.
pressure
Incorrect pressure switch setting. Set pressure to correct rating for machine.
Minimum pressure valve malfunction. † Fit Minimum pressure valve service kit.
Load solenoid valve defective. † Fit load solenoid service kit.
Blowdown valve defective. † Fit blowdown solenoid service kit.
Drive belt slipping. Fit new belt and tensioner.
Air system leaks. † Fix leaks.
Inlet valve malfunction. † Fit inlet valve service kit.
System demand exceeds compressor delivery. Reduce demand or install additional compressor.
NOTES:
§ Must be carried out by a competent electrician.
† This work is recommended to be carried out only by an Ingersoll Rand authorized service technician.
TROUBLE SHOOTING32
PROBLEM CAUSE REMEDY
Compressor trips due to
over temperature
Compressor operating above rated pressure. Set pressure to correct rating for machine.
over temperature
Package pre–filter blocked. Clean / replace package pre–filter.
Cooler blocked. Clean cooler.
Missing or incorrectly fitted enclosure panels Ensure that all enclosure panels are correctly fitted
Low coolant level. Top up coolant and check for leaks.
High ambient temperature. Re–site compressor.
Restricted cooling air flow. Ensure correct air flow to compressor.
Excessive coolant
consumption
Separator cartridge leak. Fit new Separator cartridge.
consumption
Blocked separator cartridge drain. † Remove fittings and clean.
Compressor operating below rated pressure. Set pressure to correct rating for machine.
Coolant system leak. † Fix leaks.
Excessive noise level Air system leaks. † Fix leaks.
Airend defective. † Change Airend.
Belts Slipping. Replace belt and tensioner.
Motor defective. † Replace motor.
Loose components. † Retighten loose items.
Shaft seal leaking Defective shaft seal. † Fit Airend shaft seal kit.
Pressure relief valve
opens
Defective switch or incorrect pressure switch setting. Replace or set pressure to correct rating for machine.
opens
Minimum pressure valve malfunction. † Fit Minimum pressure valve service kit.
Load solenoid valve defective. † Fit load solenoid service kit.
Blowdown valve defective. † Fit blowdown solenoid service kit.
Inlet valve malfunction. † Fit inlet valve service kit.
Black residue on belt
guard/cooler box
Drive belt slipping. Replace belt and tensioner.
guard/cooler box
Pulleys misaligned. Re–align pulleys.
Worn pulleys. † Replace pulleys and belt.
Gas strut failed. Replace belt and tensioner.
Safety valve blows when
compressor goes on load
MPV Stuck closed Strip MPV, examine and repair if necessary.
Safety valve faulty Check the setting of the safety valve and the
rated pressure.
NOTES:
§ Must be carried out by a competent electrician.
† This work is recommended to be carried out only by an Ingersoll Rand authorized service technician.
UP6 15, UP6 20, UP6 25, UP6 30
60Hz
Este manual contiene
importante información sobre
seguridad y ha de ponerse a
disposición del personal
encargado del
funcionamiento y
mantenimiento de la
máquina.
C.C.N. : 80445158
REV. : A
es
FECHA : OCTUBRE 2008
MANUAL DE MANEJO Y MANTENIMIENTO
Septiemre
GARANTIA Y ARRANQUEREGISTRADO
Garantía
La Compañía garantiza que el equipo por ella fabricado será y entregado en virtud de la presente estará exento de
defectos de materiales y de mano de obra durante un período de doce meses a partir de la fecha de puesta en
funcionamiento o de dieciocho meses a partir de la fecha de despacho desde la fábrica, si ésta ocurriese primero.
El Comprador estará obligado a informar por escrito y con prontitud cualquier fallo de conformidad de esta garantía
a la Compañía dentro del citado período, con lo cual la Compañía subsanará, a discreción propia, tal disconformidad
mediante la reparación adecuada del equipo o suministrando una pieza de repuesto F.O.B. punto de embarque,
siempre que el Comprador haya almacenado, instalado, mantenido y operado tal Equipo de conformidad con las
nuevas prácticas de la industria y haya cumplido las recomendaciones específicas de la Compañía.
Los accesorios o el equipo suministrado por la Compañía, pero fabricado por otros, se beneficiará de cualquier
garantía que los fabricantes hayan proporcionado a la Compañía y que pueda trasladarse al Comprador. La Compañía
declinará toda responsabilidad acerca de cualesquiera reparaciones, recambios o ajustes realizados en el equipo y
de cualesquiera costos de la mano de obra realizada por el Comprador o por otros, sin previo consentimiento por
escrito de la Compañía.
Se excluyen específicamente los efectos de corrosión y el uso y desgaste normales. Las garantías de rendimiento
se limitan a aquéllos que se indiquen específicamente en la propuesta de la Compañía. A menos que la
responsabilidad de cumplir tales garantías de rendimiento se limite a pruebas específicas, la obligación de la
Compañía será la de subsanar de la forma y durante el período de tiempo que anteriormente se indica.
LA COMPAÑÍA NO CONCEDE GARANTIA O REPRESENTACION ALGUNA DE NINGUN TIPO EN ABSOLUTO,
EXPRESA O IMPLICITA, SALVO LA DEL TITULO, Y POR LA PRESENTE RENUNCIA A TODAS LAS GARANTIAS
DE COMERCIABILIDAD E IDONEIDAD PARA UN PROPOSITO EN PARTICULAR.
La corrección por la Compañía de disconformidades, sean patentes o latentes, de la forma y por el período de tiempo
anteriormente indicados constituirá el cumplimiento de todas las responsabilidades de la Compañía en cuanto a tales
disconformidades bien sean que se basen en un contrato, negligencia de garantía, indemnización, responsabilidad
estricta o de otro modo con respecto a o emanantes de tal Equipo.
El Comprador no operará el Equipo que se considere defectuoso, sin notificar previamente por escrito a la Compañía
su intención de realizar esto. Cualquier utilización tal del Equipo se llevará a cabo bajo el riesgo y responsabilidad
exclusivos del Comprador.
Obsérvese que ésta es la garantía normal de Ingersoll Rand. Toda garantía en vigor en el momento de la compra
del compresor o negociada como parte del pedido de compra puede tener prioridad sobre esta garantía.
Para registrarse en línea, entrar en air.ingersollrand.com
Ingersoll Rand Air Solutions
Customer Solutions Center
800–B Beaty Street
Davidson, NC 28036
air.ingersollrand.com
CONTENIDO & ABREVIATURAS 1
CONTENIDO
1 CONTENIDO
2 PREAMBULO
3 CALCOMANIAS
8 SEGURIDAD
10 INFORMACION GENERAL
12 INSTALACIÓN / MANEJO
22 INSTRUCCIONES DE OPERACION
26 MANTENIMIENTO
32 RESOLUCION DE AVERIAS
ABREVIATURAS Y SIMBOLOS
#### Para el número de derie, sirvanse contactar
con Ingersoll Rand
–>#### Hasta serie nº
####–> Desde serie nº
* No dibujado
{ Opcion
NR No necesario
AR Según se necesite
SM Sitemaster/Sitepack
HA Máquina para ambiente severo
WC Máquina refrigerada por agua
AC Máquina refrigerada por aire
ERS Sistema de recuperación de energía
T.E.F.C. Motor totalmente blindado refrigerado por
aire (IP55)
O.D.P. (motor) Abierto a prueba de goteo
PREAMBULO2
El contenido de este manual es propiedad y material confidencial
de Ingersoll Rand y no puede reproducirse sin el consentimiento
previo por escrito de Ingersoll Rand.
Ninguna parte de lo contenido en este documento puede
entenderse como promesa, garantía o representación, implícita o
explícita, respecto a los productos Ingersoll Rand que en él se
describen. Tales garantías u otros términos y condiciones de venta de
los productos deberán estar deacuerdo con los términos y condiciones
estándar de venta para tales productos, que están a disposición de los
clientes si lo solicitan.
Este manual contiene instrucciones y datos técnicos para todas las
operaciones de empleo normales y de mantenimiento rutinario. Las
reparaciones mayores no están comprendidas en este manual y
deben encomendarse o consultarse a un concesionario de servicio
autorizado Ingersoll Rand.
Todos los componentes, accesorios, tuberías y conectores
incorporados al sistema de aire comprimido, deberán ser:
. de buena calidad, adquiridos a un fabricante de buena reputación
y, en lo posible, de un tipo aprobado por Ingersoll Rand
. claramentede un régimen adecuado para una presión igual, como
mínimo, a la máxima presión de trabajo premisible de la máquina
compatibles con el lubricante/ refrigerante del compresor
. acompañados de instrucciones para que su instalación,
funcionamientoy mantenimiento se lleven a cabo con seguridad.
Los departamentos de Servicio de Ingersoll Rand puede facilitar
detallesde los equipos aprobados.
El empleo de piezas para reparaciones no genuinas y distintas a las
incluidas en las listas de piezas aprobadas por Ingersoll Rand, puede
originar condiciones de riesgo sobre las que Ingersoll Rand no tiene
control alguno. Por consiguiente, Ingersoll Rand declina toda
responsabilidad acerca de equipos en los que no se instalen piezas
aprobadas. Pueden verse afectadas las condiciones generales de
garantía.
Ingersoll Randse reserva el derecho a realizar cambios y mejoras
de los productos sin previo aviso y sin incurrir en ningún tipo de
obligacióna realizar tales cambios o añadir tales mejoras en aquellos
productos que se hayan vendido previamente.
Los usos para lo que esta diseñada esta máquina estan
subrayados abajo y también se dan algunos ejemplos de uso
incorrecto, sin embargo Ingersoll Rand no se ouede anticipar a cada
aplicación o situación de trabajo que pueda ocurrir.
SI TIENE DUDAS CONSULTE AL SUPERVISOR.
Esta máquina se ha concebido y suministrado para su utilización
únicamentebajo las condiciones y en las aplicaciones especificadas
a continuación:
. Compresión de aire de ambiente normal sin gases, vapores o
partículas adicionales conocidos o detectables.
. Funcionamiento dentro de la gama de temperatura ambiente
especificada en la sección INFORMACION GENERAL de este
manual.
Uso de la máquina en cualquiera de las siguientes
situaciones:–
a) No esta aprobado por Ingersoll Rand.
b) Puede perjudicar la seguridad de los usuarios y otras
personas, y
c) Puede perjudicar cualquier reclamacion hacha contra
Ingersoll Rand.
TABLA 1
Uso de la máquina para producir aire comprimido para:
a) consumo humano directo
b) consumo humano indirecto, sin el correspondiente filtrado y
purificado.
Uso de la máquina fuera del rango de temperatura ambiente
especificado en la sección de INFORMACION GENERAL de este
manual.
Uso de la máquina donde haya riesgo real o potencial de niveles
peligrosos de gases o vapores inflamables.
ESTA MÁQUINA NI SE HA DESTINADO NI DEBE UTILIZARSE
EN AMBIENTES POTENCIALMENTE EXPLOSIVOS, INCLUIDAS
LAS SITUACIONES EN LAS QUE SE HALLEN PRESENTAS
GASES O VAPORES INFLAMABLES.
Uso de la máquina con componentes no aprobados por
Ingersoll Rand.
Uso de la máquina con componentes de seguridad o de control
perdidos o averiados.
La compañia no acepta resposabilidades por arrores en la
traducción de la versión original en Inglés.
COPYRIGHT 2008
INGERSOLL RAND
CALCOMANIAS 3
SIMBOLOS ISO
FORMA GRAFICA Y SIGNIFICADO DE LOS SIMBOLOS ISO
Prohibición/Obligatoriedad Información/Instrucciones Advertencia
Utilizar la carretilla elevadora en esta lado. REPOSICIONAR No utilizar la carretilla elevadora en esta lado.
Parada de emergencia. Encendido (energia) Apagado (energia).
REARRANQUE AUTOMATICO MANTENIMIENTO MANUTENZIONE PROIBITA
FRAGIL MANTENER SECO COLOCAR EN ESTA POSICION
NO USAR GANCHOS
NO USAR MORDAZAS DE AGARRE
LATERAL
HORAS
CALCOMANIAS4
ENERGIA ELECTRICA INSPECCIONAR
Cada X meses, si lo requieren más pronto por
las horas de funcionamiento
CAMBIAR / MONTAR DE NUEVO LIMPIAR.
CALCOMANIAS 5
SIMBOLOS ANSI
FORMA GRAFICA Y SIGNIFICADO DE LOS SIMBOLOS ANSI
PELIGRO
AIRE DE ADMISIÓN. Puede contener monóxido de carbono u otros contaminantes. Puede causar lesiones graves o
la muerte. Los compresores de aire Ingersoll Rand no están diseñados, destinados para aire respirable. No se debe
usar el aire comprimido para aplicaciones de aire respirable a menos que se trate de acuerdo con todas las normas y
reglamentos correspondientes.
ADVERTENCIA
VOLTAJE PELIGROSO. Puede causar lesiones graves o la muerte. Desconecte la energía y descargue la presíon
del tanque antes de darle servicio. Bloquear/etiquetar la máquina. El compresor debe estar conectado a un circuito
adecuadamente puesto a tierra. Ver las instruccciones de puesta a tierra en el manual. No haga funcionar el
compresor en ambientes húmedos. Debe almacenarse en el interior.
RIESGO DE INCENDIO O EXPLOSIÓN. El arco eléctrico producido por los componentes del compresor puede
encender los líquidos y vapores inflamables, causando lesiones graves. No haga funcionar nunca el compresor cerca
de líquidos o vapores inflamables. Si se utiliza para aspersión de materiales inflamables, debe mantenerse el
compresor a una distancia mínima de 20 pies (6 metros) del área de aspersión.
AIRE A ALTA PRESÍON. Los tanques oxidados pueden producir una explosión y lesiones graves o la muerte.
Receptor bajo presión. Antes de efectuar el mantenimiento, el operador deberá reducir la presión del tanque. A
demás del drenaje automático, haga funcionar la válvula manual de desagüe una vez por semana. La válvula manual
de drenaje está ubicada en la parte inferior del tanque.
PARTES MÓVILES. Puede causar lesiones graves. No opere la máquina si se ha retirado el protector. La máquina
puede empezar a funcionar automáticamente. Desconecte la energía ante de darle servicio a la máquina.
Bloquear/etiquetar la máquina.
SUPERFICIE CALIENTE. Puede causar lesiones graves. No tocar. Deje que se enfríe antes de dar servicio. No
toque el compresor ni las tuberías calientes.
Correas y poleas expuestas.
Pueden causar heridas severas o muerte.
No opere con las cubiertas fuera de su lugar. Desconecte el suministro electrico, asegure el interruptor y marquelo
antes de dar mantenimiento.
El flujo de escape puede expulsar desechos en suspensión.
Debe usarse protección de seguridad en todo momento.
CALCOMANIAS6
VISTA POSTERIOR VISTA IZQUIERDA
DENTRO DE LA UNIDAD
DENTRO DE LA PUERTA DEL ARRANQUE
VISTA FRONTAL VISTA DERECHA
Unidades de 60 Hz
VISTA SUPERIOR
SECCION A–A
Elemento ccn Cantidad Descripción Elemento ccn Cantidad Descripción
1 32343519 1 Calcomanía, advertencia aire
contaminado
Situado cerca de la puerta de descarga de
aire del depósito de almacenamiento en
unidades con depósito montado
2 32343576 1 Calcomanía,desagüe de aire del depósito
de aire
3 93166460 1 Calcomanía, desagüe de refrigerante
4 32343501 1 Calcomanía, doble tensión (si se
necesita)
5 –
6 23038466 1 Calcomanía, Ingersoll Rand firma
horizontal 20“
7 23353147 1 Calcomanía, piezas de mantenimiento
8 30286686 1 Calcomanía, aviso rotación
9 32343543 1 Calcomanía, aviso descarga de aire
Situado cerca de la puerta de descarga de
aire del depósito de almacenamiento en
unidades con depósito montado
10 93171262 4 Calcomanía, aviso levantar aquí
11 32343493 1 Calcomanía, configuración de
sobrecarga arranque IEC
12 SPEC 1 Especificaciones, unidad de compresor
13 32342669 1 Calcomanía, caja de arranque
14 32017469 1 Calcomanía, tensión 120/1/60
† Posición opcional.
7CALCOMANIAS
VISTA POSTERIOR VISTA IZQUIERDA
DENTRO DE LA UNIDAD
DENTRO DE LA PUERTA DEL ARRANQUE
VISTA FRONTAL VISTA DERECHA
Unidades de 60 Hz
VISTA SUPERIOR
SECCION A–A
Elemento ccn Cantidad Descripción Elemento ccn Cantidad Descripción
15 32017436 1 Calcomanía, tensión 230/3/60
32018475 1 Calcomanía, tensión 200/3/60
32236481 1 Calcomanía, tensión 380/3/60
32017444 1 Calcomanía, tensión 460/3/60
32177305 1 Calcomanía, tensión 575/3/60
16 32343527 1 Calcomanía, advertencia alta presión
17 32343535 1 Calcomanía, advertencia coreas en
movimiento
18 32343550 3 Calcomanía, advertencia ventilador al
descubierto
19 32343568 2 Calcomanía, advertencia tensión
peligrosa
20 32343584 1 Calcomanía, advertencia superficie
caliente
21 32343634 1 Calcomanía,diagrama de cableado DOL
60Hz
32343642 1 Calcomanía, diagrama de cableado
estrella triángulo 60Hz
22 32343907 1 Calcomanía, bloquear y etiquetar
23 32343899 1 Calcomanía, advertencia desechos
volantes
24 22115703 1 Etiqueta, rotación 60Hz
25 32344095 2 Etiqueta, Soporte de expedición
† Posición opcional.
SEGURIDAD8
¡PELIGRO!
El riesgo OCASIONARA la MUERTE, GRAVES LESIONES o
importantesdaños en los bienes si se pasa por alto. Las instrucciones
deberán respetarse con precisión para evitar las lesiones o la muerte.
¡ADVERTENCIA!
El riesgo PUEDE ocasionar la MUERTE, GRAVES LESIONES o
importantesdaños en los bienes si se pasa por alto. Las instrucciones
deberán respetarse con precisión para evitar las lesiones o la muerte.
PRECAUCIONES
Las precauciones llaman la atención sobre las instrucciones que
deben seguirse estrictamente para evitar daños en el equipo, el
proceso o sus alrededores.
AVISOS
Los avisos se utilizan para dar información suplementaria.
PRECAUCION DE AIRE RESPIRABLE
Los compresores de aire Ingersoll Rand no han sido concebidos,
destinados o aprobados para aire respirable. El aire comprimido no
deberá utilizarse para aplicaciones de aire respirable, a menos que sea
tratado de conformidad con todos los códigos y reglamentos
aplicables.
Información general
Asegúrese de que el operador lea y entienda las pegatinas y
consulte el manual antes de realizar mantenimiento u operación de la
unidad.
Asegúrese de que el Manual de Funcionamiento y Mantenimiento
no se retire permanentemente de la máquina.
Asegúerese que el personal de mantenimiento esta entrenado
convenientementey que han leído los Manuales de Mantenimiento.
No apuntar con boquillas de aire o pulverizadores a persona
alguna.
El aire comprimido y la energía eléctrica pueden ser peligrosos.
Antes de comenzar cualquier trabajo sobre el compresor, asegurar
que la alimentación eléctrica ha sido cortada y que el compresor ha
sido despresurizado.
Utilice protección para los ojos cuando funcione el compresor o
realice trabajos de mantenimiento en el mismo.
Todas las personas situadas cerca de maquinaria en
funcionamiento deberán llevar protección para los oídos y recibir
instrucciones sobre su modo de empleo de conformidad con la
legislación sobre seguridad en el lugar de trabajo.
Asegúrese de que todas las cubiertas protectoras estén en su lugar
y que la capota o las puertas estén cerradas durante la operación.
Las especificaciones de esta máquina son tales que no es
adecuada para usarla en áreas donde exista riesgo de gas inflamable.
La instalación de este compresor debe estar de acuerdo con
códigos eléctricos reconocidos y con cualquier código local de
Seguridade Higiene.
El empleo de recipientes de plástico en filtros de conductos puede
resultar peligroso. Su seguridad puede verse afectada bien sea por
lubricantes sintéticos o por aditivos utilizados en aceites minerales.
Ingersoll Rand recomienda utilizar sólo recipientes de metal en
sistemas sometidos a presión.
Aire comprimido
El aire comprimido puede ser peligroso si no se utiliza
correctamente.Antes de realizar ningún tipo de trabajo en la unidad,
asegúrese de que se ha liberado toda la presión del sistema y que la
máquina no puede arrancar accidentalmente.
ASVERTENCIA
Imponiendo en el compresor una parada normal o de
emergenciasólo desahogará la presión aguas arriba de la válvula
de presión mínima encima del tanque separador.
Si se requiere trabajo de mantenimiento aguas abajo de esta
válvula, cerciorarse de que se desahogue toda la presión en el
punto de ventilación del proceso exterior al compresor.
Asegúrese que la máquina trabajando a la presión es conocida por
el personal apropiado.
Todo el equipo de presión de aire instelado o conectado a la
máquinatienen que funcionar a presiones de trabajo de seguridad o al
menos a la presión de tarado de la máquina.
Si se conecta más de un compresor a una planta común aguas
abajo, deberán instalarse y controlarse por procedimientos de trabajo
válvulas de aislamiento eficaces, de forma que una máquina no sea
sometida a presión / sobrepresión accidentalmente por otra.
El aire comprimido no tiene que usarse directamente por ningún
aparato de respiración o máscara.
El aire descargado contiene un porcentaje muy pequeño de aceite
lubricante del compresor y se deberá tener cuidado de que sea
compatibleel equipo situado aguas abajo.
Si el aire de descarga se va a liberar en un espacio reducido, debe
proporcionarseuna ventilación adecuada.
Cuando se emplee aire comprimido, el personal deberá llevar un
equipo de protección adecuado.
Todas las piezas sometidas a presión, especialmente tubos
flexibles y sus acoplamientos, tienen que ser inspeccionados
regularmente, no tener ningún defecto y han de ser sustituídos de
acuerdo al Manual de instrucciones.
El aire comprimido puede ser peligroso si no se utiliza
correctamente.Antes de realizar ningún tipo de trabajo en la unidad,
asegúrese de que se ha liberado toda la presión del sistema y que la
máquina no puede arrancar accidentalmente.
Evite el contacto de cualquier parte del cuerpo con el aire
comprimido.
Deberá comprobarse periódicamente el funcionamiento de todas
las válvulas de seguridad situadas en el tanque separador.
No someter a presión excesiva al tanque colector o a recipientes
similares superando los límites de diseño.
No usar un tanque colector ni recipientes similares que no cumplan
los requisitos de diseño del compresor. Sírvanse contactar con el
distribuidor si se precisa asistencia.
No taladrar, soldar o alterar de otro modo el tanque colector o
recipientes similares.
Productos
Las siguientes substancias han sido utilizadas en la fabricación de
esta máquina y pueden ser peligrosas para la salud si se utilizan
incorrectamente:–
. grasa conservante
. inhibidor de óxido
. refrigerante
EVITE LA INGESTION, EL CONTACTO CON LA PIEL Y LA
INHALACION DE HUMOS
Transporte
Cuando se transporte o carque una máquina, asegurarse que se
usan los puntos específicos de elevación y de remolque.
El equipo de elevación ha de tener capacidad adecuada para el
peso del compresor.
No trabajar ni pasar por debajo del compresor mientras esté
suspendido.
Sistema eléctrico
Mantener alejados del sistema eléctrico del compresor todas las
partes del cuerpo y las herramientas de mano u otros objetos
conductores. Mantener los pies sobre un suelo seco y estar en pie
sobre superficies aislantes y no entrar en contacto con parte alguna del
compresor cuando se realicen ajustes o reparaciones en partes
expuestas con corriente del sistema eléctrico del compresor.
SEGURIDAD 9
ADVERTENCIA
Cualquier conexión eléctrica o ajuste sólo deberá ser
realizado por un electricista cualificado competente.
Cerrar y bloquear con lave todas las puertas de acceso cuando el
compresor quede desatendido.
No utilizar extintores destinados a incendios de la Clase A o Clase
B cuando se trate de incendios eléctricos. Utilizar solamente extintores
idóneos para incendios de la clase AB o de la clase ABC.
Efectuar reparaciones únicamente en zonas limpias, secas, bien
iluminadasy ventiladas.
Conectar el compresor únicamente a sistemas eléctricos que sean
compatibles con sus características eléctricas y que sean de su
capacidad nominal.
Eliminación del condensado
Dado que las normas sobre aguas residuales varían entre países
y regiones, el usuario tiene la responsabilidad de establecer los límites
y respetar las normas de su zona en particular. Ingersoll Rand y sus
distribuidores correspondientes se complacerían en asesorar y
ayudar en estos aspectos.
Para mayor información, consulte las hojas de datos de
seguridad de materiales.
INFORMACION GENERAL10
VER LA CHAPA DEL FABRICANTE DEL TRANSFORMADOR
PARA LOS REQUISITOS DE CONEXIÓN DEL CABLEADO
MOTOR WYE (ESTRELLA) TRIANGULO
(TRANSICION ABIERTA)
“POTENCIA
CONECTADA”APAGADO – ENCENDIDO
“EN ESPERA”
“PARADA POR ALTA
TEMPERATURA”
REPOSICIONAR
LINEA
NUMERO
LINEA
NUMERO
AL SUMINISTRO
PUENTE
LEYENDA
CPT Transformador, control
EDV Válvula de purga eléctrica
E–STOP Botón, parada de emergencia
FU Fusible
HM Contador horario
HATR Relé, alta temperatura del aire
HATS Interruptor, alta temperatura del aire
1M Bobina, arranque del motorContactor (Principal)
2M Bobina, arranque del motorContactor (Triangulo)
OL Sobrecarga, arranque del motor
PS Interruptor de presión
SS Interruptor, selector
S Bobina, arranque del motorContactor
(wye / star)
1SV Válvula de solenoide N.C.
3SV Válvula de solenoide N.O.
TD Relé, arranque triángulo (10 segundos)
TR Relé, retardo de tiempo de rearranque automático (6
minutos)
VAR Varistor
Puntos terminales
L1, L2, L3 Transformador de tipo ligero
NOTAS
1. La desconexión o interruptor de circuitos con fusible y aprobados
según los requisitos del código han de ser proporcionados por el
cliente.
2. Las líneas de trazos representan el cableado del cliente.
3. El tamaño de los componentes eléctricos no suministrados por
Ingersoll Randes responsabilidad del cliente y deberá decidirse
de conformidad con la información facilitada en la chapa de datos
del compresor y en los códigos eléctricos a nivel local.
4. La unidad no arrancará de nuevo automáticamente después de
una interrupción/fallo de potencia.
5. El circuito se muestra en posición normal desactivado.
6. Todo el cableado ha de ser de conformidad con los códigos locales.
UP6 15, UP6 20, UP6 25, UP6 30 http://air.ingersollrand.com
INFORMACION GENERAL 11
VER LA CHAPA DEL FABRICANTE DEL TRANSFORMADOR
PARA LOS REQUISITOS DE CONEXIÓN DEL CABLEADO
COMPRESOR
MOTOR
“POTENCIA CONECTADA”
APAGADO – ENCENDIDO
“EN ESPERA”
“PARADA POR ALTA
TEMPERATURA”
REPOSICIONAR
LINEA
NUMERO
LINEA
NUMERO
AL SUMINISTRO
PUENTE
PUENTE
LEYENDA
CPT Transformador, control
EDV Válvula de purga eléctrica
E–STOP Botón, parada de emergencia
FU Fusible
HM Contador horario
HATR Relé, alta temperatura del aire
HATS Interruptor, alta temperatura del aire
M Bobina, arranque del motorContactor (Principal)
OL Sobrecarga, arranque del motor
PS Interruptor de presión
SS Interruptor, selector
1SV Válvula de solenoide N.C.
3SV Válvula de solenoide N.O.
TR
Relé, retardo de tiempo de rearranque automático (6
minutos)
VAR Varistor
Puntos terminales
L1, L2, L3 Transformador de tipo ligero
NOTAS
1. La desconexión o interruptor de circuitos con fusible y aprobados
según los requisitos del código han de ser proporcionados por el
cliente.
2. Las líneas de trazos representan el cableado del cliente.
3. El tamaño de los componentes eléctricos no suministrados por
Ingersoll Randes responsabilidad del cliente y deberá decidirse
de conformidad con la información facilitada en la chapa de datos
del compresor y en los códigos eléctricos a nivel local.
4. La unidad no arrancará de nuevo automáticamente después de
una interrupción/fallo de potencia.
5. El circuito se muestra en posición normal desactivado.
6. Todo el cableado ha de ser de conformidad con los códigos
locales.
INSTALACIÓN / MANEJO12
ROTACION
VISTA IZQUIERDA
VISTA FRONTAL
VISTA DERECHA
VISTA SUPERIORVISTA INFERIOR
VISTA POSTERIOR
UNIDADES CON BASE MONTADA
CLAVE
A Filtro previo
B Compresor y admisión del aire refrigerante
C Caja del arranque
D Escape del aire refrigerante
E Descarga de aire de 1,00” NPT
F Entrada de potencia del cliente
G Aberturas para carretilla elevadora
Deben instalarse cubiertas en los agujeros de la carretilla
elevadora después de que la unidad está en su sitio, para reducir el
ruido y asegurar un enfriamiento adecuado del conjunto.
H 4 ranuras de 15 (0,6) x 25 (1,0)
Véanse notas – Página15
5 6
INSTALACIÓN / MANEJO 13
ROTACION
VISTA IZQUIERDA VISTA FRONTAL
VISTA DERECHA
VISTA SUPERIOR
VISTA INFERIOR
VISTA POSTERIOR
UNIDADES DE 60 Hz (120 GALONES) CON
DEPOSITO MONTADO
CLAVE
A Filtro previo
B Compresor y admisión del aire refrigerante
C Caja del arranque
D Escape del aire refrigerante
E Descarga de aire de 1,00” BSPT
F Entrada de potencia del cliente
G Aberturas para carretilla elevadora
H Recipiente de almacenamiento del aire (120 galones)
I Válvula de desagüe automática
J Desagüe del condensado de 0,25 pulgadas
K 4 agujeros de 17 (0,7) x 44 (1,8)
Véanse notas – Página 15
INSTALACIÓN / MANEJO14
ROTACION
VISTA IZQUIERDA VISTA FRONTAL
VISTA DERECHA
VISTA SUPERIOR
VISTA INFERIOR
VISTA POSTERIOR
UNIDADES DE 60 Hz (240
GALONES) CON DEPOSITO
MONTADO
CLAVE
A Filtro previo
B Compresor y admisión del aire refrigerante
C Caja del arranque
D Escape del aire refrigerante
E Descarga de aire de 1,00” BSPT
F Entrada de potencia del cliente
G Aberturas para carretilla elevadora
H Recipiente de almacenamiento del aire (240 galones)
I Válvula de desagüe automática
J Desagüe del condensado de 0,25 pulgadas
K 4 agujeros de 17 (0,7) x 44 (1,8)
Véanse notas – Página 15
INSTALACIÓN / MANEJO 15
NOTAS
1. Cantidad (aproximada) de llenado de refrigerante (lubricante) 13
litros (3,4 galones).
2. Separaciónrecomendada enfrente de la puerta del panel de control
1.067 mm (42 pulgadas) o mínima según la requieran las normas
(NEC) nacionales más recientes o los códigos locales
correspondientes.
3. Separaciones recomendadas en los laterales izquierdo y derecho
914 mm (36 pulgadas).
4. Separación mínima recomendada en la parte posterior del
compresor ha de ser 152 mm (6 pulgadas).
5. Las tuberías exteriores no han de ejercer momentos o fuerzas no
solucionados sobre la unidad. Usar tubería tan grande o mayor en la
conexión de descarga.
6. Deberá prescindirse de montar tuberías de plástico o de PVC en
esta unidad o de usarles en conductos cualesquiera aguas abajo.
7. Todo conducto instalado en el campo a o desde el compresor no
podrá añadir más de 12,5 mm ( 1/2”) de resistencia total del aire al
indicador del agua.
8. No conectar a un tanque común con un compresor de vaivén a
menos que el compresor de vaivén utilice un amortiguador de impulsos
de descarga.
9. El tamaño de los componentes eléctricos no suministrados por
Ingersoll–Randes responsabilidad del cliente y deberá decidirse de
conformidad con la información facilitada en la chapa de datos del
compresor, NEC y en los códigos eléctricos a nivel nacional y local.
NOTA
Todas las dimensiones se expresan en milímetros (pulgadas) a menos
que se indiquen de otro modo.
Cerciorarse de que se usan las ranuras o los puntos de elevación
marcados de la carretilla elevadora que sean los correctos siempre
que se eleve o transporte la máquina.
DESEMBALAJE
Normalmente el compresor se entrega con un envoltorio de
politeno.Si se ha de usar un cuchillo para quitar este envoltorio tenga
cuidado de no dañar la pintura exterior del compresor.
Cerciorarse de que todos los materiales utilizados para el
transporte y embalaje se desechen de la manera prescrita por los
códigos locales.
NOTA
Las unidades se despachan teniendo en su posición el perno de
bloqueo de tránsito. Antes de hacer funcionar la unidad, deberá
quitarse este perno y comprobarse la tensión de la correa. Aflojar,
retirar y desechar el perno de despacho de 10 mm. Para el
procedimientode tensión de la correa, sírvanse consultar la sección
de Mantenimiento.
INSTALACIÓN / MANEJO16
CLAVE
1. Compresor
2. Colector de aire
3. Secador de aire
4. Filtros de aire comprimido
5. Puntos de demanda del sistema
AVISO
Los elementos [2] a [5] son opcionales o pueden ser elementos
existentes de la planta. Dirigirse a su distribuidor o representante de
Ingersoll Rand para recomendaciones específicas.
UBICACION EN LA PLANTA
El compresor se puede instalar sobre cualquier suelo nivelado
capaz de soportarlo. Se recomienda que la zona sea seca y bien
ventilada en la que el ambiente sea lo más limpio posible. Deberá
dejarse un mínimo de 150mm (6 pulgadas) en la parte posterior y 1 m
(3 pies) en los costados de la máquina para tener un acceso para
servicio y una ventilación adecuados.
Hay que tener adecuado lugar libre alrededor de la máquina para
hacer sin estorbo las tareas indicadas de mantenimiento.
Cerciórese de situar la máquina con seguridad sobre una superficie
firme. Elimínese por medios apropiados cualquier posibilidad de que
la máquina se mueva, especialmente para que no se esfuerce ninguna
tubería rígida de descarga.
PRECAUCION
Los compresores [1] tipo tornillo no deben instalarse en
sistemas de aire con compresores alternativos sin medios de
independización, tal como un tanque colector común. Se
recomienda que ambos tipos de compresor se conecten a un
colector común utilizando tuberías de aire independientes.
PRECAUCION
El empleo de recipientes de plástico en filtros de conductos o
en otros componentes de los conductos de aire de plástico puede
resultar peligroso. Su seguridad puede verse afectada bien sea
por refrigerantes sintéticos o por aditivos utilizados en aceites
minerales. Ingersoll Rand recomienda utilizar sólo recipientes
de metal en sistemas sometidos a presión.
PRECAUCION
Antes de hacer funcionar la unidad, quitar el perno de
despacho y desecharlo.
PRECAUCION
La unidad de compresor estándar no resulta idónea para operar
bajo temperaturas que puedan ocasionar congelación ya que es
propenso a producirse agua de condensado en el
post–refrigerador y en el colector si se han instalado.
Para mayor información, consultar al distribuidor de
Ingersoll Rand.
TUBERIA DE DESCARGA
La tubería de descarga debe ser por lo menos de igual diámetro que
la conexión de la descarga del compresor. Todas las tuberías y
accesorios deben tener unas características nominales adecuabas a
la presión de descarga.
Es esencial cuando se instala un nuevo compresor [1], revisar el
sistema de aire completo. Esto sirve para conseguir un sistema seguro
y efectivo. Un punto que debe ser tenido en cuenta es el arrastre de
líquido. La instalación de secadores de aire [3], es siempre una buena
práctica ya que seleccionados e instalados correctamente pueden
reducir el arrastre de líquido a cero.
Es una buena práctica colocar una válvula de aislamiento cerca del
compresor e instalar filtros en la tubería [4].
INSTALACIÓN / MANEJO 17
60Hz UP6 15 UP6 20 UP6 25 UP6 30
COMPRESOR 125 150 125 150 200 125 150 200 125 150 200
Presión máxima de trabajo
PSIG (bar)
125
(8.62)
150
(10.34)
125
(8.62)
150
(10.34)
200
(13.79)
125
(8.62)
150
(10.34)
200
(13.79)
125
(8.62)
150
(10.34)
200
(13.79)
Presión de recarga fijada en
fábrica
PSIG (bar)
115
(7.93)
140
(9.66)
115
(7.93)
140
(9.66)
190
(13.10)
115
(7.93)
140
(9.66)
190
(13.10)
115
(7.93)
140
(9.66)
190
(13.10)
Medida del gasto
CFM (m3/MIN)
65
(1.84)
58
(1.64)
83
(2.35)
75
(2.12)
58
(1.64)
102
(2.89)
92
(2.61)
75
(2.12)
125
(3.54)
112
(3.17)
92
(2.61)
Punto de disparo de la
temperatura de descarga de
la unidad compresora
228 F (109 C)
Temperatura ambiente de
trabajo mínimo a máxima
(35 F) » (104 F)(35 F) » (104 F)35 F(+2 C ) 104 F(+40 C)
MOTOR
Envolvente del motor ODP TEFC ODP TEFC ODP TEFC ODP TEFC
Potencia nominal 15HP 20HP 25HP 30HP
Número de revoluciones 1765 RPM 1770 RPM 1765 RPM 1770 RPM 1765 RPM 1770 RPM 1765 RPM 1770 RPM
Tipo de construcción 254TZ 160 M 256TZ 160 L 284TZ 180 M 286TZ 180 L
Arrollamiento F F
REFRIGERADOR
Refrigeración por aire
Corriente volumétrica de aire
refrigerante mediante motor
de ventilador separado
1770 ft3/min 1770 ft3/min 2100 ft3/min 2100 ft3/min
Presión libre para conductos
de aire
0.5 inWg (12.7mmH2O)
Temperatura de salida del aire
comprimido dif. T
13 F (7.2 C) 18 F26 F (14 C) 18 F19 F (10 C) 18 F26 F (14 C)
Temperatura de salida del aire
refrigerante
24 F (13.5 C) 18 F27 F (15 C) 18 F29 F (16 C) 18 F35 F (20 C)
DATOS GENERALES
Contenido restante de aceite 3ppm (3 mg/m3)
Capacidad del depósito de
aceite
4.5 gallons (17 liters)
Carga de aceite total 3.4 gallons (13 liters)
Nivel de emisión según
CAGI–Pneurop
68 dB(A) 68 dB(A) 69 dB(A) 69 dB(A)
Peso – Unidad con base
montada
1142 lbs (518 kg) 1186 lbs (538 kg) 1206 lbs (547 kg) 1292 lbs (586 kg)
Peso – Unidad de 120
galones con depósito
montado
1466 lbs (665kg) 1510 lbs (685 kg) 1530 lbs (694 kg) 1616 lbs (733 kg)
Peso – Unidad de 240
galones con depósito
montado
1735 lbs (787 kg) 1779 lbs (807 kg) 1799 lbs (816 kg) 1885 lbs (855 kg)
PRECAUCION
Las máquinas de doble tensión 230/460 están dotadas de una
calcomanía para indicar la tensión correcta que se ha conectado en
fábrica.
La puerta del arranque lleva montada una calcomanía que describe
el procedimiento para cambiar los conectores para la tensión
alternativa.
El recableado sólo deberá realizarlo un electricista competente.
INSTALACIÓN / MANEJO18
60Hz UP6 15–HA UP6 20–HA UP6 25–HA
COMPRESOR 125 150 200 125 150 200 125 150 200
Presión máxima de trabajo
PSIG (bar)
125
(8.62)
150
(10.34)
200
(13.79)
125
(8.62)
150
(10.34)
200
(13.79)
125
(8.62)
150
(10.34)
200
(13.79)
Presión de recarga fijada en
fábrica
PSIG (bar)
115
(7.93)
140
(9.66)
190
(13.10)
115
(7.93)
140
(9.66)
190
(13.10)
115
(7.93)
140
(9.66)
190
(13.10)
Medida del gasto
CFM (m3/MIN)
65.4
(1.84)
58
(1.64)
45
(1.28)
83
(2.35)
75
(2.12)
58
(1.64)
102
(2.89)
92
(2.61)
75
(2.12)
Punto de disparo de la
temperatura de descarga de
la unidad compresora
228 F (109 C)
Temperatura ambiente de
trabajo mínimo a máxima
(35 F) » (104 F)(35 F) » (104 F)35 F(+2 C ) 122 F(+50 C)
MOTOR
Envolvente del motor ODP TEFC ODP TEFC ODP TEFC
Potencia nominal 15HP 20HP 25HP
Número de revoluciones 1765 RPM 1770 RPM 1765 RPM 1770 RPM 1765 RPM 1770 RPM
Tipo de construcción 256TZ 160 L 284TZ 180 M 286TZ 180 L
Arrollamiento F F
REFRIGERADOR
Refrigeración por aire
Corriente volumétrica de aire
refrigerante mediante motor
de ventilador separado
1770 ft3/min 2100 ft3/min 2100 ft3/min
Presión libre para conductos
de aire
0.5 inWg (12.7mmH2O)
Temperatura de salida del aire
comprimido dif. T
18 F22 F (12 C) 18 F24 F (13 C) 18 F19 F (10 C)
Temperatura de salida del aire
refrigerante
18 F21 F (12 C) 18 F26 F (14 C) 18 F29 F (16 C)
DATOS GENERALES
Contenido restante de aceite 3ppm (3 mg/m3)
Capacidad del depósito de
aceite
4.5 gallons (17 liters)
Carga de aceite total 3.4 gallons (13 liters)
Nivel de emisión según
CAGI–Pneurop
68 dB(A) 69 dB(A) 69 dB(A)
Peso – Unidad con base
montada
1186 lbs (538 kg) 1206 lbs (547 kg) 1292 lbs (586 kg)
Peso – Unidad de 120
galones con depósito
montado
1510 lbs (685 kg) 1530 lbs (694 kg) 1616 lbs (733 kg)
Peso – Unidad de 240
galones con depósito
montado
1779 lbs (807 kg) 1799 lbs (816 kg) 1885 lbs (855 kg)
PRECAUCION
Las máquinas de doble tensión 230/460 están dotadas de una
calcomanía para indicar la tensión correcta que se ha conectado en
fábrica.
La puerta del arranque lleva montada una calcomanía que describe
el procedimiento para cambiar los conectores para la tensión
alternativa.
El recableado sólo deberá realizarlo un electricista competente.
INSTALACIÓN / MANEJO 19
DATOS ELECTRICOS – TODAS LAS UNIDADES UP6–15
Tensión estándar 200V 230V 380V 460V 575V
Motor de accionamiento
Envolvente del motor ODP TEFC ODP TEFC ODP TEFC ODP TEFC ODP TEFC
Potencia 20HP
Corriente a toda carga
(máx.)/HA
47.3A 45.2A 41.2A 39.3A 24.9A 23.8A 20.6A 19.7A 16.4A 15.8A
Corriente de arranque DOL
(ESTRELLA)
258 (151) 224 (132) 136 (114) 112 (66) 90 (53)
Tiempo de arranque DOL
(Estrella Triángulo)
3–5 Sec ( 7–10 Sec)
Frecuencia de maniobras 6
DATOS ELECTRICOS DOL / Estrella Triángulo
Tensión de control 120VAC
Régimen mínimo de cables
Véase la nota 1
90A 80A 50A 40A 35A
Medida mínima de cables
AWG
Véase la nota 2
4 4 6 10 10
DATOS ELECTRICOS – TODAS LAS UNIDADES UP6–20 / UP6 15–HA
Tensión estándar 200V 230V 380V 460V 575V
Motor de accionamiento
Envolvente del motor ODP TEFC ODP TEFC ODP TEFC ODP TEFC ODP TEFC
Potencia 20HP
Corriente a toda carga
(máx.)/HA
65/52.2A 63.1/49.8A 56.4/45.4A 54.8/43.3A 34.1/27.5A 33.3/26.3A 28.2/22.7A 27.5/21.7A 22.6/18.2A 22/17.3A
Corriente de arranque DOL
(ESTRELLA)
336 (150) 292 (130) 177 (79) 146 (65) 117 (52)
Tiempo de arranque DOL
(Estrella Triángulo)
3–5 Sec ( 7–10 Sec)
Frecuencia de maniobras 6
DATOS ELECTRICOS DOL / Estrella Triángulo
Tensión de control 120VAC
Régimen mínimo de cables
Véase la nota 1
90A 80A 50A 40A 35A
Medida mínima de cables
AWG
Véase la nota 2
4 4 6 10 10
INSTALACIÓN / MANEJO20
DATOS ELECTRICOS – TODAS LAS UNIDADES UP6–25 / UP6 20–HA
Tensión estándar 200V 230V 380V 460V 575V
Motor de accionamiento
Envolvente del motor ODP TEFC ODP TEFC ODP TEFC ODP TEFC ODP TEFC
Potencia 25HP
Corriente a toda carga
(máx.)/HA
76.6/66.4A 76.5/64.7A 66.6/57.7A 66.5/56.3A 40.3/35.0A 40.3/34.4A 33.3/28.9A 33.3/28.2A 26.6/23.1A 26.6/22.5A
Corriente de arranque DOL
(ESTRELLA)
411.7 (182.2) 358 (158.4) 217 (96) 179 (79.2) 143.2 (63.4)
Tiempo de arranque DOL
(Estrella Triángulo)
3–5 Sec ( 7–10 Sec)
Frecuencia de maniobras 6
DATOS ELECTRICOS DOL / Estrella Triángulo
Tensión de control 120VAC
Régimen mínimo de cables
Véase la nota 1
125A 100A 60A 50A 40A
Medida mínima de cables
AWG
Véase la nota 2
3 3 4 8 10
DATOS ELECTRICOS – TODAS LAS UNIDADES UP6–30 / UP6 25–HA
Tensión estándar 200V 230V 380V 460V 575V
Motor de accionamiento
Envolvente del motor ODP TEFC ODP TEFC ODP TEFC ODP TEFC ODP TEFC
Potencia 30HP
Corriente a toda carga
(máx.)/HA
91.3/80.8A 91.9/79.8A 79.3/70.3A 79.9/69.4A 48.1/42.6A 48.4/42.0A 39.7/35.2A 40.0/34.7A 31.7/28.1A 32.0/27.8A
Corriente de arranque DOL
(ESTRELLA)
500 (216.7) 434 (188.4) 263 (114) 217 (94.2) 169 (75.4)
Tiempo de arranque DOL
(Estrella Triángulo)
3–5 Sec ( 7–10 Sec)
Frecuencia de maniobras 6
DATOS ELECTRICOS DOL / Estrella Triángulo
Tensión de control 120VAC
Régimen mínimo de cables
Véase la nota 1
150A 125A 80A 60A 50A
Medida mínima de cables
AWG
Véase la nota 2
1 2 4 6 8
1. Si se selecciona un disyuntor, éste deberá ser de tipo de disparo
magnético, regulado por encima de la corriente de arranque prevista
de la máquina, si bien por debajo de la corriente máxima de fallo
posible. El disyuntor o la desconexión de fusible ha de ser capaz de
interrumpir la corriente de fallo posible en sus terminales.
2. Tipo PVC/PVC Calculado usando las siguientes condiciones:
i) Cable aislado de PVC, blindado, conductores de cobre.
ii) Cable grapado a una pared, al aire libre.
iii) Temperatura ambiente de 40 C (104 F) y humedad relativa de 40%.
iv) Recorrido de cable de 20m (65ft).
v) Caída de tensión limitada a –10% durante el arranque, –4% durante
el funcionamiento normal.
vi) Protegido por el interruptor de circuitos arriba indicado.
Si se produce alguna variación con respecto a lo anterior, o son
aplicables normas especiales, la instalación ha de planificarla un
técnico competente y cualificado.
AVISO
¡Los datos técnicos son válidos exclusivamente para la
versión estándar!
INSTALACIÓN / MANEJO 21
CARACTERISTICAS ELECTRICAS
Deberá instalarse junto al compresor un aislador o desconectador
eléctrico independiente.
Los cables/hilos alimentadores deberán ser dimensionados por el
cliente/contratista electricista para asegurarse de que los circuitos
sean equilibrados y no sobrecargados por otros equipos eléctricos. La
longitud del cableado desde un punto adecuado de alimentación
eléctrica resulta crítica dado que las caídas de tensión pueden
perjudicar el rendimiento del compresor.
Las conexiones de los cables/hilos alimentadores al aislador o
desconectador deberán estar bien apretadas y limpias.
La tensión de alimentación debe estar en consonancia con los
valores nominales de la placa de características del motor y el
compresor.
El transformador del circuito de control tiene diferentes tomas de
tensión. Asegurar que está ajustado a la tensión específica aplicada
antes del arranque.
PRECAUCION
Nunca comprobar la resistencia de aislamiento de cualquier parte
de los circuitos de las máquinas, el motor incluido, sin
desconectar por completo el controlador electrónico (si se ha
instalado).
PRECAUCION
Cerciorarse de que el motor gire en el sentido correcto tal
como lo indican las flechas del sentido de rotación y como se
muestra en el dibujo.
Manual de operación y mantenimiento compresor

Más contenido relacionado

La actualidad más candente

Mantenimiento para Unidad Manejadora de Aire
Mantenimiento para Unidad Manejadora de AireMantenimiento para Unidad Manejadora de Aire
Mantenimiento para Unidad Manejadora de AireDeivis Montilla
 
Diagnostico de compresores
Diagnostico de compresoresDiagnostico de compresores
Diagnostico de compresoresYesid Carcamo
 
Nomograma neumático para calculo de tubería de una red neumática
Nomograma neumático para calculo de tubería de una red neumáticaNomograma neumático para calculo de tubería de una red neumática
Nomograma neumático para calculo de tubería de una red neumáticaJosé Mora Torres
 
Programa básico de mantenimiento preventivo para el grupo electrogeno
Programa básico de mantenimiento preventivo para el grupo electrogenoPrograma básico de mantenimiento preventivo para el grupo electrogeno
Programa básico de mantenimiento preventivo para el grupo electrogenoRedes y Sistemas
 
Presentacion de maquinas hidraulicas VENTILADORES
Presentacion de maquinas hidraulicas VENTILADORES Presentacion de maquinas hidraulicas VENTILADORES
Presentacion de maquinas hidraulicas VENTILADORES YENDAVID
 
Introducción a los principios de la termografia
Introducción a los principios de la termografiaIntroducción a los principios de la termografia
Introducción a los principios de la termografiatecnojaume
 
Diagnostico de fallas en el sistema hidraulico
Diagnostico de fallas en el sistema hidraulicoDiagnostico de fallas en el sistema hidraulico
Diagnostico de fallas en el sistema hidraulicoAlberto Perez Rodriguez
 
Entrenamiento Esmeril DeWalt Commando
Entrenamiento Esmeril DeWalt CommandoEntrenamiento Esmeril DeWalt Commando
Entrenamiento Esmeril DeWalt CommandoGRICENTER
 
Presentación turbocompresores axiales
Presentación turbocompresores axialesPresentación turbocompresores axiales
Presentación turbocompresores axialestomislavz
 
Komatsu gestion de mantenimiento de maquinaria pesada - estrategias de mant...
Komatsu   gestion de mantenimiento de maquinaria pesada - estrategias de mant...Komatsu   gestion de mantenimiento de maquinaria pesada - estrategias de mant...
Komatsu gestion de mantenimiento de maquinaria pesada - estrategias de mant...Robert Orosco
 
Manual Puente Grua
Manual Puente GruaManual Puente Grua
Manual Puente Grua16222103
 
TRABAJO DE RESISTENCIA DE MATERIALES
TRABAJO DE RESISTENCIA DE MATERIALES TRABAJO DE RESISTENCIA DE MATERIALES
TRABAJO DE RESISTENCIA DE MATERIALES OMAR ORTIZ AYALA
 
DIAPOSITIVAS MOTONIVELADORA.pptx
DIAPOSITIVAS MOTONIVELADORA.pptxDIAPOSITIVAS MOTONIVELADORA.pptx
DIAPOSITIVAS MOTONIVELADORA.pptxNelsonRamos308058
 
Curso bombas-hidraulicas-funcionamiento-estructura-componentes-clasificacion-...
Curso bombas-hidraulicas-funcionamiento-estructura-componentes-clasificacion-...Curso bombas-hidraulicas-funcionamiento-estructura-componentes-clasificacion-...
Curso bombas-hidraulicas-funcionamiento-estructura-componentes-clasificacion-...universidad jose antonio paez
 
Curso lectura-planos-hidraulicos-komatsu
Curso lectura-planos-hidraulicos-komatsuCurso lectura-planos-hidraulicos-komatsu
Curso lectura-planos-hidraulicos-komatsuJesus Rodriguez
 
mom-cargadores-frontales-950 h-962h
 mom-cargadores-frontales-950 h-962h mom-cargadores-frontales-950 h-962h
mom-cargadores-frontales-950 h-962hFernandezLabioAlex
 

La actualidad más candente (20)

Mantenimiento para Unidad Manejadora de Aire
Mantenimiento para Unidad Manejadora de AireMantenimiento para Unidad Manejadora de Aire
Mantenimiento para Unidad Manejadora de Aire
 
Diagnostico de compresores
Diagnostico de compresoresDiagnostico de compresores
Diagnostico de compresores
 
Nomograma neumático para calculo de tubería de una red neumática
Nomograma neumático para calculo de tubería de una red neumáticaNomograma neumático para calculo de tubería de una red neumática
Nomograma neumático para calculo de tubería de una red neumática
 
Programa básico de mantenimiento preventivo para el grupo electrogeno
Programa básico de mantenimiento preventivo para el grupo electrogenoPrograma básico de mantenimiento preventivo para el grupo electrogeno
Programa básico de mantenimiento preventivo para el grupo electrogeno
 
Presentacion de maquinas hidraulicas VENTILADORES
Presentacion de maquinas hidraulicas VENTILADORES Presentacion de maquinas hidraulicas VENTILADORES
Presentacion de maquinas hidraulicas VENTILADORES
 
Introducción a los principios de la termografia
Introducción a los principios de la termografiaIntroducción a los principios de la termografia
Introducción a los principios de la termografia
 
Diagnostico de fallas en el sistema hidraulico
Diagnostico de fallas en el sistema hidraulicoDiagnostico de fallas en el sistema hidraulico
Diagnostico de fallas en el sistema hidraulico
 
Entrenamiento Esmeril DeWalt Commando
Entrenamiento Esmeril DeWalt CommandoEntrenamiento Esmeril DeWalt Commando
Entrenamiento Esmeril DeWalt Commando
 
Motor io 360 h
Motor  io 360 h Motor  io 360 h
Motor io 360 h
 
Presentación turbocompresores axiales
Presentación turbocompresores axialesPresentación turbocompresores axiales
Presentación turbocompresores axiales
 
compresores tipos, ventajas y desventajas
compresores tipos, ventajas y desventajascompresores tipos, ventajas y desventajas
compresores tipos, ventajas y desventajas
 
Komatsu gestion de mantenimiento de maquinaria pesada - estrategias de mant...
Komatsu   gestion de mantenimiento de maquinaria pesada - estrategias de mant...Komatsu   gestion de mantenimiento de maquinaria pesada - estrategias de mant...
Komatsu gestion de mantenimiento de maquinaria pesada - estrategias de mant...
 
Tabla de amperaje motores
Tabla de amperaje motoresTabla de amperaje motores
Tabla de amperaje motores
 
Manual Puente Grua
Manual Puente GruaManual Puente Grua
Manual Puente Grua
 
TRABAJO DE RESISTENCIA DE MATERIALES
TRABAJO DE RESISTENCIA DE MATERIALES TRABAJO DE RESISTENCIA DE MATERIALES
TRABAJO DE RESISTENCIA DE MATERIALES
 
DIAPOSITIVAS MOTONIVELADORA.pptx
DIAPOSITIVAS MOTONIVELADORA.pptxDIAPOSITIVAS MOTONIVELADORA.pptx
DIAPOSITIVAS MOTONIVELADORA.pptx
 
Fusibles
FusiblesFusibles
Fusibles
 
Curso bombas-hidraulicas-funcionamiento-estructura-componentes-clasificacion-...
Curso bombas-hidraulicas-funcionamiento-estructura-componentes-clasificacion-...Curso bombas-hidraulicas-funcionamiento-estructura-componentes-clasificacion-...
Curso bombas-hidraulicas-funcionamiento-estructura-componentes-clasificacion-...
 
Curso lectura-planos-hidraulicos-komatsu
Curso lectura-planos-hidraulicos-komatsuCurso lectura-planos-hidraulicos-komatsu
Curso lectura-planos-hidraulicos-komatsu
 
mom-cargadores-frontales-950 h-962h
 mom-cargadores-frontales-950 h-962h mom-cargadores-frontales-950 h-962h
mom-cargadores-frontales-950 h-962h
 

Similar a Manual de operación y mantenimiento compresor

Fgl 27 a 38a sep 06 - Servicio Tecnico Fagor
Fgl 27 a 38a sep 06 - Servicio Tecnico FagorFgl 27 a 38a sep 06 - Servicio Tecnico Fagor
Fgl 27 a 38a sep 06 - Servicio Tecnico Fagorserviciotecnicofagor
 
Thermal dynamics icnc performance cnc controller 0 5399es ab
Thermal dynamics icnc performance cnc controller 0 5399es abThermal dynamics icnc performance cnc controller 0 5399es ab
Thermal dynamics icnc performance cnc controller 0 5399es abjutilo
 
Fgl 25 m sep 06 - Servicio Tecnico Fagor
Fgl 25 m sep 06 - Servicio Tecnico FagorFgl 25 m sep 06 - Servicio Tecnico Fagor
Fgl 25 m sep 06 - Servicio Tecnico Fagorserviciotecnicofagor
 
Vibrating-bin-aerators-
Vibrating-bin-aerators-Vibrating-bin-aerators-
Vibrating-bin-aerators-Bijay Sahoo
 
63853 manual de operaciones instr de limp scba msa m7 y cilindros
63853 manual de operaciones instr de limp scba msa m7 y cilindros63853 manual de operaciones instr de limp scba msa m7 y cilindros
63853 manual de operaciones instr de limp scba msa m7 y cilindrosUlisses Moreno Zenteno
 
Fgl 27 m 38m sep 06 - Servicio Tecnico Fagor
Fgl 27 m 38m sep 06 - Servicio Tecnico FagorFgl 27 m 38m sep 06 - Servicio Tecnico Fagor
Fgl 27 m 38m sep 06 - Servicio Tecnico Fagorserviciotecnicofagor
 
Mesurador de CO2, CO, Humitat i Temperatura Indor Air Quality Meter model 7545
Mesurador de CO2, CO, Humitat i Temperatura Indor Air Quality Meter model 7545Mesurador de CO2, CO, Humitat i Temperatura Indor Air Quality Meter model 7545
Mesurador de CO2, CO, Humitat i Temperatura Indor Air Quality Meter model 7545josepmaria1959
 
Equipos de respiracion autonoma
Equipos de respiracion autonomaEquipos de respiracion autonoma
Equipos de respiracion autonomaEduardo Peralta
 
SP765063 - LAVAPISTOLAS AQUADUO.pdf
SP765063 - LAVAPISTOLAS AQUADUO.pdfSP765063 - LAVAPISTOLAS AQUADUO.pdf
SP765063 - LAVAPISTOLAS AQUADUO.pdfAndrés Ovalle
 
Ls 20 180 - 1 de 5 compresores sullair
Ls 20 180 - 1 de 5 compresores sullairLs 20 180 - 1 de 5 compresores sullair
Ls 20 180 - 1 de 5 compresores sullairAlfredo Marchese
 
Bomba hidraulica
Bomba hidraulica Bomba hidraulica
Bomba hidraulica SaulPerez75
 
5f80cb02 du manualde_operacion
5f80cb02 du manualde_operacion5f80cb02 du manualde_operacion
5f80cb02 du manualde_operacionJose Alberto
 
Grren king iv plus diesel
Grren king iv plus dieselGrren king iv plus diesel
Grren king iv plus dieselMarcelo Bouvier
 
E5 cn manual_esp
E5 cn manual_espE5 cn manual_esp
E5 cn manual_espPedro Roman
 
Es boozzter-00205948
Es boozzter-00205948Es boozzter-00205948
Es boozzter-00205948Julio Borasin
 

Similar a Manual de operación y mantenimiento compresor (20)

MANUAL_DE_MANEJO_Y_MANTENIMIENTO_compresora.pdf
MANUAL_DE_MANEJO_Y_MANTENIMIENTO_compresora.pdfMANUAL_DE_MANEJO_Y_MANTENIMIENTO_compresora.pdf
MANUAL_DE_MANEJO_Y_MANTENIMIENTO_compresora.pdf
 
5449792
54497925449792
5449792
 
manual de comprensora portatil.pdf
manual de comprensora portatil.pdfmanual de comprensora portatil.pdf
manual de comprensora portatil.pdf
 
Fgl 27 a 38a sep 06 - Servicio Tecnico Fagor
Fgl 27 a 38a sep 06 - Servicio Tecnico FagorFgl 27 a 38a sep 06 - Servicio Tecnico Fagor
Fgl 27 a 38a sep 06 - Servicio Tecnico Fagor
 
Thermal dynamics icnc performance cnc controller 0 5399es ab
Thermal dynamics icnc performance cnc controller 0 5399es abThermal dynamics icnc performance cnc controller 0 5399es ab
Thermal dynamics icnc performance cnc controller 0 5399es ab
 
Fgl 25 m sep 06 - Servicio Tecnico Fagor
Fgl 25 m sep 06 - Servicio Tecnico FagorFgl 25 m sep 06 - Servicio Tecnico Fagor
Fgl 25 m sep 06 - Servicio Tecnico Fagor
 
Vibrating-bin-aerators-
Vibrating-bin-aerators-Vibrating-bin-aerators-
Vibrating-bin-aerators-
 
63853 manual de operaciones instr de limp scba msa m7 y cilindros
63853 manual de operaciones instr de limp scba msa m7 y cilindros63853 manual de operaciones instr de limp scba msa m7 y cilindros
63853 manual de operaciones instr de limp scba msa m7 y cilindros
 
Fgl 27 m 38m sep 06 - Servicio Tecnico Fagor
Fgl 27 m 38m sep 06 - Servicio Tecnico FagorFgl 27 m 38m sep 06 - Servicio Tecnico Fagor
Fgl 27 m 38m sep 06 - Servicio Tecnico Fagor
 
Mesurador de CO2, CO, Humitat i Temperatura Indor Air Quality Meter model 7545
Mesurador de CO2, CO, Humitat i Temperatura Indor Air Quality Meter model 7545Mesurador de CO2, CO, Humitat i Temperatura Indor Air Quality Meter model 7545
Mesurador de CO2, CO, Humitat i Temperatura Indor Air Quality Meter model 7545
 
Equipos de respiracion autonoma
Equipos de respiracion autonomaEquipos de respiracion autonoma
Equipos de respiracion autonoma
 
SP765063 - LAVAPISTOLAS AQUADUO.pdf
SP765063 - LAVAPISTOLAS AQUADUO.pdfSP765063 - LAVAPISTOLAS AQUADUO.pdf
SP765063 - LAVAPISTOLAS AQUADUO.pdf
 
Ls 20 180 - 1 de 5 compresores sullair
Ls 20 180 - 1 de 5 compresores sullairLs 20 180 - 1 de 5 compresores sullair
Ls 20 180 - 1 de 5 compresores sullair
 
Bomba hidraulica
Bomba hidraulica Bomba hidraulica
Bomba hidraulica
 
Compresor michelin jm
Compresor michelin jmCompresor michelin jm
Compresor michelin jm
 
5f80cb02 du manualde_operacion
5f80cb02 du manualde_operacion5f80cb02 du manualde_operacion
5f80cb02 du manualde_operacion
 
3648 esterilizador
3648 esterilizador3648 esterilizador
3648 esterilizador
 
Grren king iv plus diesel
Grren king iv plus dieselGrren king iv plus diesel
Grren king iv plus diesel
 
E5 cn manual_esp
E5 cn manual_espE5 cn manual_esp
E5 cn manual_esp
 
Es boozzter-00205948
Es boozzter-00205948Es boozzter-00205948
Es boozzter-00205948
 

Más de Nilton García Juárez

Más de Nilton García Juárez (9)

manual_bitzer.pdf
manual_bitzer.pdfmanual_bitzer.pdf
manual_bitzer.pdf
 
Calculando la frecuencia optima de mantenimineto o reemplazo preventivo
Calculando la frecuencia optima de mantenimineto o reemplazo preventivoCalculando la frecuencia optima de mantenimineto o reemplazo preventivo
Calculando la frecuencia optima de mantenimineto o reemplazo preventivo
 
Manual 10
Manual 10Manual 10
Manual 10
 
Frigorista sep 08_sol
Frigorista sep 08_solFrigorista sep 08_sol
Frigorista sep 08_sol
 
C5 herramienta2010
C5 herramienta2010C5 herramienta2010
C5 herramienta2010
 
Caudal de circulación en tuberías comeval
Caudal de circulación en tuberías   comevalCaudal de circulación en tuberías   comeval
Caudal de circulación en tuberías comeval
 
Ejercicios de potencia y energía eléctrica
Ejercicios de potencia y energía eléctricaEjercicios de potencia y energía eléctrica
Ejercicios de potencia y energía eléctrica
 
Quincena6 (1)
Quincena6 (1)Quincena6 (1)
Quincena6 (1)
 
Ejercicios resueltos de_trabajo_potencia_y_energia
Ejercicios resueltos de_trabajo_potencia_y_energiaEjercicios resueltos de_trabajo_potencia_y_energia
Ejercicios resueltos de_trabajo_potencia_y_energia
 

Último

AMBIENTES SEDIMENTARIOS GEOLOGIA TIPOS .pptx
AMBIENTES SEDIMENTARIOS GEOLOGIA TIPOS .pptxAMBIENTES SEDIMENTARIOS GEOLOGIA TIPOS .pptx
AMBIENTES SEDIMENTARIOS GEOLOGIA TIPOS .pptxLuisvila35
 
Propositos del comportamiento de fases y aplicaciones
Propositos del comportamiento de fases y aplicacionesPropositos del comportamiento de fases y aplicaciones
Propositos del comportamiento de fases y aplicaciones025ca20
 
Exposicion. del documentos de YPFB corporación
Exposicion. del documentos de YPFB corporaciónExposicion. del documentos de YPFB corporación
Exposicion. del documentos de YPFB corporaciónjas021085
 
CLASE 2 MUROS CARAVISTA EN CONCRETO Y UNIDAD DE ALBAÑILERIA
CLASE 2 MUROS CARAVISTA EN CONCRETO  Y UNIDAD DE ALBAÑILERIACLASE 2 MUROS CARAVISTA EN CONCRETO  Y UNIDAD DE ALBAÑILERIA
CLASE 2 MUROS CARAVISTA EN CONCRETO Y UNIDAD DE ALBAÑILERIAMayraOchoa35
 
Electromagnetismo Fisica FisicaFisica.pdf
Electromagnetismo Fisica FisicaFisica.pdfElectromagnetismo Fisica FisicaFisica.pdf
Electromagnetismo Fisica FisicaFisica.pdfAnonymous0pBRsQXfnx
 
CAP4-TEORIA EVALUACION DE CAUDALES - HIDROGRAMAS.pdf
CAP4-TEORIA EVALUACION DE CAUDALES - HIDROGRAMAS.pdfCAP4-TEORIA EVALUACION DE CAUDALES - HIDROGRAMAS.pdf
CAP4-TEORIA EVALUACION DE CAUDALES - HIDROGRAMAS.pdfReneBellido1
 
CLASE - 01 de construcción 1 ingeniería civil
CLASE - 01 de construcción 1 ingeniería civilCLASE - 01 de construcción 1 ingeniería civil
CLASE - 01 de construcción 1 ingeniería civilDissneredwinPaivahua
 
produccion de cerdos. 2024 abril 20..pptx
produccion de cerdos. 2024 abril 20..pptxproduccion de cerdos. 2024 abril 20..pptx
produccion de cerdos. 2024 abril 20..pptxEtse9
 
CICLO DE DEMING que se encarga en como mejorar una empresa
CICLO DE DEMING que se encarga en como mejorar una empresaCICLO DE DEMING que se encarga en como mejorar una empresa
CICLO DE DEMING que se encarga en como mejorar una empresaSHERELYNSAMANTHAPALO1
 
CHARLA DE INDUCCIÓN SEGURIDAD Y SALUD OCUPACIONAL
CHARLA DE INDUCCIÓN SEGURIDAD Y SALUD OCUPACIONALCHARLA DE INDUCCIÓN SEGURIDAD Y SALUD OCUPACIONAL
CHARLA DE INDUCCIÓN SEGURIDAD Y SALUD OCUPACIONALKATHIAMILAGRITOSSANC
 
2. UPN PPT - SEMANA 02 GESTION DE PROYECTOS MG CHERYL QUEZADA(1).pdf
2. UPN PPT - SEMANA 02 GESTION DE PROYECTOS MG CHERYL QUEZADA(1).pdf2. UPN PPT - SEMANA 02 GESTION DE PROYECTOS MG CHERYL QUEZADA(1).pdf
2. UPN PPT - SEMANA 02 GESTION DE PROYECTOS MG CHERYL QUEZADA(1).pdfAnthonyTiclia
 
Conservatorio de danza Kina Jiménez de Almería
Conservatorio de danza Kina Jiménez de AlmeríaConservatorio de danza Kina Jiménez de Almería
Conservatorio de danza Kina Jiménez de AlmeríaANDECE
 
Fisiología del azufre en plantas S.S.pdf
Fisiología del azufre en plantas S.S.pdfFisiología del azufre en plantas S.S.pdf
Fisiología del azufre en plantas S.S.pdfJessLeonelVargasJimn
 
Presentación Proyecto Trabajo Creativa Profesional Azul.pdf
Presentación Proyecto Trabajo Creativa Profesional Azul.pdfPresentación Proyecto Trabajo Creativa Profesional Azul.pdf
Presentación Proyecto Trabajo Creativa Profesional Azul.pdfMirthaFernandez12
 
183045401-Terminal-Terrestre-de-Trujillo.pdf
183045401-Terminal-Terrestre-de-Trujillo.pdf183045401-Terminal-Terrestre-de-Trujillo.pdf
183045401-Terminal-Terrestre-de-Trujillo.pdfEdwinAlexanderSnchez2
 
CENTROIDES Y MOMENTOS DE INERCIA DE AREAS PLANAS.pdf
CENTROIDES Y MOMENTOS DE INERCIA DE AREAS PLANAS.pdfCENTROIDES Y MOMENTOS DE INERCIA DE AREAS PLANAS.pdf
CENTROIDES Y MOMENTOS DE INERCIA DE AREAS PLANAS.pdfpaola110264
 
estadisticasII Metodo-de-la-gran-M.pdf
estadisticasII   Metodo-de-la-gran-M.pdfestadisticasII   Metodo-de-la-gran-M.pdf
estadisticasII Metodo-de-la-gran-M.pdfFlorenciopeaortiz
 
Fe_C_Tratamientos termicos_uap _3_.ppt
Fe_C_Tratamientos termicos_uap   _3_.pptFe_C_Tratamientos termicos_uap   _3_.ppt
Fe_C_Tratamientos termicos_uap _3_.pptVitobailon
 
CE.040 DRENAJE PLUVIAL_RM 126-2021-VIVIENDA.pdf
CE.040 DRENAJE PLUVIAL_RM 126-2021-VIVIENDA.pdfCE.040 DRENAJE PLUVIAL_RM 126-2021-VIVIENDA.pdf
CE.040 DRENAJE PLUVIAL_RM 126-2021-VIVIENDA.pdfssuserc34f44
 
Flujo potencial, conceptos básicos y ejemplos resueltos.
Flujo potencial, conceptos básicos y ejemplos resueltos.Flujo potencial, conceptos básicos y ejemplos resueltos.
Flujo potencial, conceptos básicos y ejemplos resueltos.ALEJANDROLEONGALICIA
 

Último (20)

AMBIENTES SEDIMENTARIOS GEOLOGIA TIPOS .pptx
AMBIENTES SEDIMENTARIOS GEOLOGIA TIPOS .pptxAMBIENTES SEDIMENTARIOS GEOLOGIA TIPOS .pptx
AMBIENTES SEDIMENTARIOS GEOLOGIA TIPOS .pptx
 
Propositos del comportamiento de fases y aplicaciones
Propositos del comportamiento de fases y aplicacionesPropositos del comportamiento de fases y aplicaciones
Propositos del comportamiento de fases y aplicaciones
 
Exposicion. del documentos de YPFB corporación
Exposicion. del documentos de YPFB corporaciónExposicion. del documentos de YPFB corporación
Exposicion. del documentos de YPFB corporación
 
CLASE 2 MUROS CARAVISTA EN CONCRETO Y UNIDAD DE ALBAÑILERIA
CLASE 2 MUROS CARAVISTA EN CONCRETO  Y UNIDAD DE ALBAÑILERIACLASE 2 MUROS CARAVISTA EN CONCRETO  Y UNIDAD DE ALBAÑILERIA
CLASE 2 MUROS CARAVISTA EN CONCRETO Y UNIDAD DE ALBAÑILERIA
 
Electromagnetismo Fisica FisicaFisica.pdf
Electromagnetismo Fisica FisicaFisica.pdfElectromagnetismo Fisica FisicaFisica.pdf
Electromagnetismo Fisica FisicaFisica.pdf
 
CAP4-TEORIA EVALUACION DE CAUDALES - HIDROGRAMAS.pdf
CAP4-TEORIA EVALUACION DE CAUDALES - HIDROGRAMAS.pdfCAP4-TEORIA EVALUACION DE CAUDALES - HIDROGRAMAS.pdf
CAP4-TEORIA EVALUACION DE CAUDALES - HIDROGRAMAS.pdf
 
CLASE - 01 de construcción 1 ingeniería civil
CLASE - 01 de construcción 1 ingeniería civilCLASE - 01 de construcción 1 ingeniería civil
CLASE - 01 de construcción 1 ingeniería civil
 
produccion de cerdos. 2024 abril 20..pptx
produccion de cerdos. 2024 abril 20..pptxproduccion de cerdos. 2024 abril 20..pptx
produccion de cerdos. 2024 abril 20..pptx
 
CICLO DE DEMING que se encarga en como mejorar una empresa
CICLO DE DEMING que se encarga en como mejorar una empresaCICLO DE DEMING que se encarga en como mejorar una empresa
CICLO DE DEMING que se encarga en como mejorar una empresa
 
CHARLA DE INDUCCIÓN SEGURIDAD Y SALUD OCUPACIONAL
CHARLA DE INDUCCIÓN SEGURIDAD Y SALUD OCUPACIONALCHARLA DE INDUCCIÓN SEGURIDAD Y SALUD OCUPACIONAL
CHARLA DE INDUCCIÓN SEGURIDAD Y SALUD OCUPACIONAL
 
2. UPN PPT - SEMANA 02 GESTION DE PROYECTOS MG CHERYL QUEZADA(1).pdf
2. UPN PPT - SEMANA 02 GESTION DE PROYECTOS MG CHERYL QUEZADA(1).pdf2. UPN PPT - SEMANA 02 GESTION DE PROYECTOS MG CHERYL QUEZADA(1).pdf
2. UPN PPT - SEMANA 02 GESTION DE PROYECTOS MG CHERYL QUEZADA(1).pdf
 
Conservatorio de danza Kina Jiménez de Almería
Conservatorio de danza Kina Jiménez de AlmeríaConservatorio de danza Kina Jiménez de Almería
Conservatorio de danza Kina Jiménez de Almería
 
Fisiología del azufre en plantas S.S.pdf
Fisiología del azufre en plantas S.S.pdfFisiología del azufre en plantas S.S.pdf
Fisiología del azufre en plantas S.S.pdf
 
Presentación Proyecto Trabajo Creativa Profesional Azul.pdf
Presentación Proyecto Trabajo Creativa Profesional Azul.pdfPresentación Proyecto Trabajo Creativa Profesional Azul.pdf
Presentación Proyecto Trabajo Creativa Profesional Azul.pdf
 
183045401-Terminal-Terrestre-de-Trujillo.pdf
183045401-Terminal-Terrestre-de-Trujillo.pdf183045401-Terminal-Terrestre-de-Trujillo.pdf
183045401-Terminal-Terrestre-de-Trujillo.pdf
 
CENTROIDES Y MOMENTOS DE INERCIA DE AREAS PLANAS.pdf
CENTROIDES Y MOMENTOS DE INERCIA DE AREAS PLANAS.pdfCENTROIDES Y MOMENTOS DE INERCIA DE AREAS PLANAS.pdf
CENTROIDES Y MOMENTOS DE INERCIA DE AREAS PLANAS.pdf
 
estadisticasII Metodo-de-la-gran-M.pdf
estadisticasII   Metodo-de-la-gran-M.pdfestadisticasII   Metodo-de-la-gran-M.pdf
estadisticasII Metodo-de-la-gran-M.pdf
 
Fe_C_Tratamientos termicos_uap _3_.ppt
Fe_C_Tratamientos termicos_uap   _3_.pptFe_C_Tratamientos termicos_uap   _3_.ppt
Fe_C_Tratamientos termicos_uap _3_.ppt
 
CE.040 DRENAJE PLUVIAL_RM 126-2021-VIVIENDA.pdf
CE.040 DRENAJE PLUVIAL_RM 126-2021-VIVIENDA.pdfCE.040 DRENAJE PLUVIAL_RM 126-2021-VIVIENDA.pdf
CE.040 DRENAJE PLUVIAL_RM 126-2021-VIVIENDA.pdf
 
Flujo potencial, conceptos básicos y ejemplos resueltos.
Flujo potencial, conceptos básicos y ejemplos resueltos.Flujo potencial, conceptos básicos y ejemplos resueltos.
Flujo potencial, conceptos básicos y ejemplos resueltos.
 

Manual de operación y mantenimiento compresor

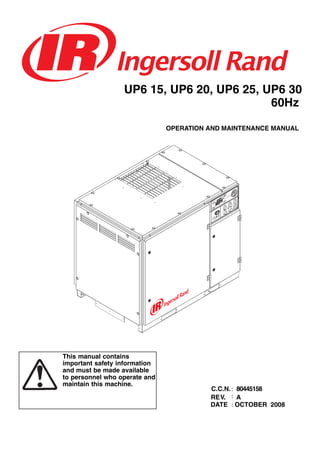
  • 1. UP6 15, UP6 20, UP6 25, UP6 30 60Hz This manual contains important safety information and must be made available to personnel who operate and maintain this machine. C.C.N.: 80445158 REV. A DATE : OCTOBER 2008 OPERATION AND MAINTENANCE MANUAL :
  • 2. Warranty The Company warrants that the equipment manufactured by it and delivered hereunder will be free of defects in material and workmanship for a period of twelve months from the date of placing the Equipment in operation or eighteen months from the date of shipment from the factory,whichever shall first occur.The Purchaser shall be obligated to promptly report any failure to conform to this warranty,in writing to the Company in said period,whereupon the Company shall,at its option,correct such nonconformity,by suitable repair to such equipment or,furnish a replacement part F.O.B.point of shipment,provided the Purchaser has stored,installed,maintained and operated such Equipment in accordance with good industry practices and has complied with specific recommendations of the Company. Accessories or equipment furnished by the Company,but manufactured by others,shall carry whatever warranty the manufacturers have conveyed to the Company and which can be passed on to the Purchaser.The Company shall not be liable for any repairs,replacements,or adjustments to the Equipment or any costs of labor performed by the Purchaser or others without Company‘s prior written approval. The effects of corrosion,erosion and normal wear and tear are specifically excluded.Performance warranties are limited to those specifically stated within the Company‘s proposal.Unless responsibility for meeting such performance warranties are limited to specified tests,the Company‘s obligation shall be to correct in the manner and for the period of time provided above. THE COMPANY MAKES NO OTHER WARRANTY OR REPRESENTATION OF ANY KIND WHATSOEVER, EXPRESSED OR IMPLIED,EXCEPT THAT OF TITLE,AND ALL IMPLIED WARRANTIES OF MERCHANTABILITY AND FITNESS FOR A PARTICULAR PURPOSE,ARE HEREBY DISCLAIMED. Correction by the Company of nonconformities whether patent or latent,in the manner and for the period of time provided above,shall constitute fulfillment of all liabilities of the Company for such nonconformities whether based on contract,warranty negligence,indemnity,strict liability or otherwise with respect to or arising out of such Equipment. The purchaser shall not operate Equipment which is considered to be defective,without first notifying the Company in writing of its intention to do so.Any such use of Equipment will be at Purchaser‘s sole risk and liability. BONDED WARRANTY & REGISTERED START UP Note that this is Ingersoll Rand standard warranty. Any warranty in force at the time of purchase of the compressor or negotiated as part of the purchase order may take precedence over this warranty.
  • 3. CONTENTS & ABBREVIATIONS 1 CONTENTS 1 CONTENTS 2 FOREWORD 3 DECALS 8 SAFETY 10 GENERAL INFORMATION 12 INSTALLATION / HANDLING 21 OPERATING INSTRUCTIONS 25 MAINTENANCE 31 TROUBLE SHOOTING ABBREVIATIONS & SYMBOLS #### Contact Ingersoll Rand for serial number –>#### Up to Serial No. ####–> From Serial No. * Not illustrated { Option NR Not required AR As required SM Sitemaster/Sitepack HA High ambient machine WC Watercooled machine AC Aircooled machine ERS Energy recovery system T.E.F.C. Totally enclosed fan cooled motor (IP55) O.D.P. Open drip proof (motor)
  • 4. FOREWORD2 The contents of this manual are considered to be proprietary and confidential to Ingersoll Rand and should not be reproduced without the prior written permission of Ingersoll Rand. Nothing contained in this document is intended to extend any promise, warranty or representation, expressed or implied, regarding the Ingersoll Rand products described herein. Any such warranties or other terms and conditions of sale of products shall be in accordance with the standard terms and conditions of sale for such products, which are available upon request. This manual contains instructions and technical data to cover routine operation and scheduled maintenance tasks by operation and maintenance staff. Major overhauls are outside the scope of this manual and should be referred to an authorized Ingersoll Rand service department. All components, accessories, pipes and connectors added to the compressed air system should be: . of good quality, procured from a reputable manufacturer and, wherever possible, be of a type approved by Ingersoll Rand. . clearly rated for a pressure at least equal to the machine maximum allowable working pressure. . compatible with the compressor lubricant/coolant. . accompaniedwith instructions for safe installation, operation and maintenance. Details of approved equipment are available from Ingersoll Rand Service departments. The use of non–genuine spare repair parts other than those included within the Ingersoll Rand approved parts list may create hazardous conditions over which Ingersoll Rand has no control. Therefore Ingersoll Rand does not accept any liabilitity for losses caused by equipment in which non–approved repair parts are installed. Standard warranty conditions may be affected. Ingersoll Rand reserves the right to make changes and improvements to products without notice and without incurring any obligation to make such changes or add such improvements to products sold previously. The intended uses of this machine are outlined below and examples of unapproved usage are also given, however Ingersoll Rand cannot anticipate every application or work situation that may arise. IF IN DOUBT CONSULT SUPERVISION. This machine has been designed and supplied for use only in the following specified conditions and applications: . Compression of normal ambient air containing no known or detectable additional gases, vapors. or particles . Operation within the ambient temperature range specified in the GENERAL INFORMATION section of this manual. The use of the machine in any of the situation types listed in table 1:– a) Is not approved by Ingersoll Rand, b) May impair the safety of users and other persons, and c) May prejudice any claims made against Ingersoll Rand. TABLE 1 Use of the machine to produce compressed air for: a) direct human consumption b) indirect human consumption, without suitable filtration and purity checks. Use of the machine outside the ambient temperature range specified in the GENERAL INFORMATION SECTION of this manual. Use of the machine where there is any actual or foreseeable risk of hazardous levels of flammable gases or vapors. THIS MACHINE IS NOT INTENDED AND MUST NOT BE USED IN POTENTIALLY EXPLOSIVE ATMOSPHERES, INCLUDING SITUATIONS WHERE FLAMMABLE GASES OR VAPORS MAY BE PRESENT. Use of the machine fitted with non Ingersoll Rand approved components. Use of the machine with safety or control components missing or disabled. The company accepts no responsibility for errors in translation of this manual from the original English version. COPYRIGHT 2008 INGERSOLL RAND
  • 5. DECALS 3 ISO SYMBOLS GRAPHIC FORM AND MEANING OF ISO SYMBOLS Prohibition / Mandatory Information / Instructions Warning Use fork lift truck from this side only. RESET Do not use fork lift truck from this side. Emergency stop. On (power). Off (power). AUTOMATIC RESTART MAINTENANCE MAINTENANCE PROHIBITED FRAGILE KEEP DRY THIS WAY UP USE NO HOOKS NO SIDE CLAMPS HOURS
  • 6. DECALS4 POWER INSPECT Every X months, if sooner than required by operating hours CHANGE / REPLACE CLEAN
  • 7. DECALS 5 ANSI SYMBOLS GRAPHIC FORM AND MEANING OF ANSI SYMBOLS DANGER INTAKE AIR. Can contain carbon monoxide or other contaminants. Will cause serious injury or death. Ingersoll Rand air compressors are not designed, intended or approved for breathing air. Compressed air should not be used for breathing air applications unless treated in accordance with all applicable codes and regulations. WARNING HAZARDOUS VOLTAGE. Can cause serious injury or death. Disconnect power and bleed pressure from tank before servicing. Lockout/Tagout machine. Compressor must be connected to properly grounded circuit. See Grounding Instructions in manual. Do not operate compressor in wet conditions. Store indoors. RISK OF FIRE OR EXPLOSION. Electrical arcing from compressor components can ignite flammable liquids and vapors which can result in serious injury. Never operate the compressor near flammable liquids or vapors. If used to spray flammable materials, keep compressor at least 20ft away from the spray area. HIGH PRESSURE AIR. Rusted tanks can cause explosion and severe injury or death. Receiver under perssure. Operator should relieve tank pressure before performing maintenance. In addition to automatic drain, operate manual drain valve weekly. Manual drain valve located at bottom of the tank. MOVING PARTS. Can cause serious injury. Do not operate with guards removed. Machine may start automatically. Disconnect power before servicing. Lockout/Tagout machine. HOT SURFACES. Can cause serious injury. Do not touch. Allow to cool before servicing. Do not touch hot compressor or tubing. EXPOSED MOVING BELTS AND SHEAVES. Can cause severe injury or death. Do not operate without guard in place. Disconnect power before servicing. Lockout/Tagout machine. Air flow exhaust may contain flying debris. Safety protection should be worn at all times.
  • 8. DECALS6 VIEW BACK VIEW LEFT INSIDE PACKAGE INSIDE STARTER DOOR VIEW FRONT VIEW RIGHT 60 Hz Units VIEW TOP SECTION A–A Item ccn Qty. Description Item ccn Qty. Description 1 32343519 1 Decal, warning contaminated air Located near air discharge port of receiver tank on tank mounted units 2 32343576 1 Decal, air receiver auto–drain 3 93166460 1 Decal, coolant drain 4 32343501 1 Decal, dual voltage (if needed) 5 – 6 23038466 1 Decal, Ingersoll Rand signature horizontal 20“ 7 23353147 1 Decal, maintenance parts 8 30286686 1 Decal, notice rotation 9 32343543 1 Decal, notice air discharge Located near air discharge port of receiver tank on tank mounted units 10 93171262 4 Decal, notice lift here 11 32343493 1 Decal, overload setting IEC starter 12 SPEC 1 Specifications, compressor package 13 32342669 1 Decal, starter box 14 32017469 1 Decal, voltage 120/1/60 † Optional position
  • 9. 7DECALS VIEW BACK VIEW LEFT INSIDE PACKAGE INSIDE STARTER DOOR VIEW FRONT VIEW RIGHT 60 Hz Units VIEW TOP SECTION A–A Item ccn Qty. Description Item ccn Qty. Description 15 32017436 1 Decal, voltage 230/3/60 32018475 1 Decal, voltage 200/3/60 32236481 1 Decal, voltage 380/3/60 32017444 1 Decal, voltage 460/3/60 32177305 1 Decal, voltage 575/3/60 16 32343527 1 Decal, warning high pressure 17 32343535 1 Decal, warning moving belts 18 32343550 3 Decal, warning exposed fan 19 32343568 2 Decal, warning hazardous voltage 20 32343584 1 Decal, warning hot surface 21 32343634 1 Decal, wiring schematic DOL 60Hz 32343642 1 Decal, wiring schematic Star Delta 60Hz 22 32343907 1 Decal, lock and tag out 23 32343899 1 Decal, warning flying debris 24 22115703 1 Tag, rotation 60Hz 25 32344095 2 Tag, shipping bracket † Optional position
  • 10. SAFETY8 DANGER! Hazard that WILL Cause DEATH, SEVERE INJURY or substantial property damage if ignored. Instructions must be followed precisely to avoid injury or death. WARNING! Hazard that CAN cause DEATH, SEVERE INJURY or substantial property damage if ignored. Instructions which must be followed precisely to avoid injury or death. CAUTIONS! Cautions call attention to instructions which must be followed precisely to avoid damaging the product, process or its surroundings. NOTES Notes are used for supplementary information. BREATHING AIR PRECAUTION Ingersoll Rand air compressors are not designed, intended or approved for breathing air. Compressed air should not be used for breathing air applications unless treated in accordance with all applicable codes and regulations. General Information Ensure that the operator reads and understands the decals and consults the manuals before maintenance or operation. Ensure that the Operation and Maintenance manual is not removed permanently from the machine. Ensure that maintenance personnel are adequately trained, competent and have read the Maintenance Manuals. Do not point air nozzles or sprayers toward anyone. Compressed air and electricity can be dangerous. Before undertakingany work on the compressor, ensure that the electrical supply has been isolated and the compressor has been relieved of all pressure. Wear eye protection when operating or servicing compressor. All persons positioned near to operating machinery should be equippedwith hearing protection and given instructions on its use in accordance with workplace safety legislation. Make sure that all protective covers are in place and that the canopy/doors are closed during operation. The specification of this machine is such that the machine is not suitable for use in flammable gas risk areas. Installation of this compressor must be in accordance with recognised electrical codes and any local Health and Safety Codes. The use of plastic bowls on line filters can be hazardous. Their safety can be affected by either synthetic lubricants, or the additives used in mineral oils. Ingersoll Rand recommends that only filters with metal bowls should be used on a pressurized system. Compressed air Compressed air can be dangerous if incorrectly handled. Before doing any work on the unit, ensure that all pressure is vented from the system and that the machine cannot be started accidentally. WARNING Imposinga normal or emergency stop on the compressor will only relieve pressure upstream of the minimum pressure valve on top of the separator tank. If maintenance work is required downstream of this valve, ensure that all pressure is relieved at the process vent point external to the compressor. Ensure that the machine is operating at the rated pressure and that the rated pressure is known to all relevant personnel. All air pressure equipment installed in or connected to the machine must have safe working pressure ratings of at least the machine rated pressure. If more than one compressor is connected to one common downstream plant, effective isolation valves must be fitted and controlledby work procedures, so that one machine cannot accidentally be pressurized / over pressurized by another. Compressed air must not be used for a direct feed to any form of breathing apparatus or mask. Thedischarged air contains a very small percentage of compressor lubricant and care should be taken to ensure that downstream equipmentis compatible. If the discharged air is to be ultimately released into a confined space, adequate ventilation must be provided. When using compressed air always use appropriate personal protective equipment. All pressure containing parts, especially flexible hoses and their couplings,must be regularly inspected, be free from defects and be replaced according to the Manual instructions. Compressed air can be dangerous if incorrectly handled. Before doing any work on the unit, ensure that all pressure is vented from the system and that the machine cannot be started accidentally. Avoid bodily contact with compressed air. All safety valves located in the separator tank must be checked periodically for correct operation. Do not over–pressurize the receiver tank or similar vessels beyond design limits. Do not use a receiver tank or similar vessels that fail to meet the design requirements of the compressor. Contact your distributor for assistance. Do not drill into, weld or otherwise alter the receiver tank or similar vessels. Materials The following substances are used in the manufacture of this machine and may be hazardous to health if used incorrectly: . preservative grease . rust preventative . compressor coolant AVOID INGESTION, SKIN CONTACT AND INHALATION OF FUMES Transport Whenloading or transporting machines ensure that the specified liftingand tie down points are used. Lifting equipment must be properly rated for the weight of the compressor. Do not work on or walk under the compressor while it is suspended. Electrical Keep all parts of the body and any hand–held tools or other conductiveobjects, away from exposed live parts of the compressor electrical system. Maintain dry footing, stand on insulating surfaces and do not contact any other portion of the compressor when making adjustments or repairs to exposed live parts of the compressor electrical system. WARNING Any electrical connections or adjustments should only be madeby a suitably qualified electrician. Close and lock all access doors when the compressor is left unattended. Do not use extinguishers intended for Class A or Class B fires on electrical fires. Use only extinguishers suitable for class BC or class ABC fires.
  • 11. SAFETY 9 Attempt repairs only in clean, dry, well lighted and ventilated areas. Connect the compressor only to electrical systems that are compatiblewith its electrical characteristics and that are within it’s rated capacity. Condensate disposal As waste water regulations vary by country and region it is the responsibility of the user to establish the limitations and regulations in their particular area. Ingersoll Rand and its associated distributors are happy to advise and assist in these matters. For further information, consult the Material Safety Data Sheets.
  • 12. GENERAL INFORMATION10 SEE TRANSFORMER NAMEPLATE FOR WIRING CONNECTION REQUIREMENTS. WYE (STAR) DELTA MOTOR (OPEN TRANSITION) “POWER ON” OFF ON “STAND BY” “HI TEMP SHUTDOWN” RESET SEE NOTES 1 & 2 LINE NUMBER TO SUPPLY JUMPER LEGEND CPT Transformer, control EDV Valve, electric drain E–STOP Button, emergency stop FU Fuse HM Hourmeter HATR Relay, high air temperature HATS Switch, high air temperature 1M Contactor (main) 2M Contactor (delta) OL Overload, motor starter PS Switch, pressure SS Switch, selector S Contactor (wye / star) 1SV Valve, solenoid (Load) N.C. 3SV Valve, solenoid (Blowdown) N.O. TD Relay, Delta starting (10 second) TR Relay, auto restart time delay (6 min) VAR Varistor Terminal points L1, L2, L3 Light, transformer type NOTES 1. Approved fused disconnect or circuit breaker per code requirementsmust be provided by customer. 2. Dashed lines represent wiring by customer. 3. Sizing of electrical components not supplied by Ingersoll Rand is the responsibility of the customer and should be done in accordance with the information on the compressor data plate and local electrical codes. 4. Unit will not restart automaticlly after power outage. 5. Circuit shown in normal position de–energized. 6. All wiring to be in accordance with local codes.
  • 13. GENERAL INFORMATION 11 SEE TRANSFORMER NAMEPLATE FOR WIRING CONNECTION REQUIREMENTS. COMPRESSOR MOTOR “POWER ON” OFF ON “STAND BY” “HI TEMP SHUTDOWN” RESET SEE NOTES 1 & 2 LINE NUMBER TO SUPPLY JUMPER JUMPER LEGEND CPT Transformer, control EDV Valve, electric drain E–STOP Button, emergency stop FU Fuse HM Hourmeter HATR Relay, high air temperature HATS Switch, high air temperature M Contactor (main) OL Overload, motor starter PS Switch, pressure SS Switch, selector 1SV Valve, solenoid (Load) N.C. 3SV Valve, solenoid (Blowdown) N.O. TR Relay, time delay (6 min) VAR Varistor Terminal points L1, L2, L3 Light, transformer type NOTES 1. Approved fused disconnect or circuit breaker per code requirementsmust be provided by customer. 2. Dashed lines represent wiring by customer. 3. Sizing of electrical components not supplied by Ingersoll Rand is the responsibility of the customer and should be done in accordance with the information on the compressor data plate and local electrical codes. 4. Unit will not restart automatically after power outage. 5. Circuit shown in normal position de–energized. 6. All wiring to be in accordance with local codes.
  • 14. INSTALLATION / HANDLING12 ROTATION VIEW LEFT VIEW FRONT VIEW RIGHT VIEW TOPVIEW BOTTOM VIEW REAR BASE MOUNTED UNITS KEY A Pre filter B Compressor and cooling air intake C Starter box D Cooling air exhaust E 1.00” NPT air discharge F Customer power inlet G Fork lift openings (Fork lift hole covers must be installed after unit is in place to reduce noise and ensure proper cooling of package) H 4 slots 15 (0.6) x 25 (1.0) See notes – Page 15 5 6
  • 15. INSTALLATION / HANDLING 13 ROTATION VIEW LEFT VIEW FRONT VIEW RIGHT VIEW TOP VIEW BOTTOM VIEW REAR TANK MOUNTED (120 GALLON) 60 Hz UNITS KEY A Pre filter B Compressor and cooling air intake C Starter box D Cooling air exhaust E 1.00” NPT air discharge F Customer power inlet G Fork lift openings H Air receiver (120 gallons) I Automatic drain valve J 0.25 inch condensate drain K 4 slots 17 (0.7) x 44 (1.8) See notes – Page 15
  • 16. INSTALLATION / HANDLING14 ROTATION VIEW LEFT VIEW FRONT VIEW RIGHT VIEW TOP VIEW BOTTOM VIEW REAR TANK MOUNTED (240 GALLON) 60 Hz UNITS KEY A Pre filter B Compressor and cooling air intake C Starter box D Cooling air exhaust E 1.00” NPT air discharge F Customer power inlet G Fork lift openings H Air receiver (240 gallons) I Automatic drain valve J 0.25 inch condensate drain K 4 slots 17 (0.7) x 44 (1.8) See notes – Page 15
  • 17. INSTALLATION / HANDLING 15 NOTES 1. Coolant (lubricant) fill quantity (approximate) 3.4 US gallons (13 liters). 2. Recommendedclearance in front of control panel door 42 inches (1067 mm) or minimum as required by the latest national electrical codes (NEC) or applicable local codes. 3. Recommended clearances on left and right sides 36 inches (914mm). 4. Minimum recommended clearance for the rear of the compressor is to be 6 inches (152mm). 5. External piping shall not exert any unresolved moments or forces on the unit. Use pipe size as large or larger at discharge connection. 6. There should be no plastic or pvc piping attached to this unit or used for any lines downstream. 7. Any field installed ducting to and from the compressor cannot add more than 1/2” (12.5mm) water gauge total air resistance. 8. Do not pipe into a common header with a reciprocating compressor, unless the reciprocating compressor utilizes a discharge pulsation damper. 9. Sizing of electrical components not supplied by Ingersoll Rand is the responsibility of the customer and should be done in accordance with the information on the compressor data plate and national and local electrical codes. NOTE All dimensions are in millimeters (inches) unless otherwise stated. Ensure that the correct fork lift truck slots or marked lifting points are used whenever the machine is lifted or transported. UNPACKING The compressor will normally be delivered with a polythene cover. If a knife has to be used to remove this cover ensure that the exterior paintwork of the compressor is not damaged. Ensure that all transport and packing materials are discarded in a manner prescribed by local codes. NOTE Units are shipped with transit locking bolt in place. Prior to running the unit the shipping bolt must be removed and the belt tension checked. Loosen, remove and discard 10mm shipping bolt. For belt tensioning procedure refer to Maintenance section.
  • 18. INSTALLATION / HANDLING16 KEY 1. Compressor 2. Air Receiver 3. Air Dryer 4. Compressed air filters 5. System demand points NOTE Items [2] to [5] are optional or may be existing items of plant. Refer to your Ingersoll Rand distributor / representative for specific recommendations. LOCATION IN THE PLANT The compressor can be installed on any level floor capable of supportingit. A dry, well ventilated area where the atmosphere is clean is recommended. A minimum of 150mm (6 inches) should be left at the rear and 1m (3ft) at the sides of the machine for adequate service access and ventilation. Adequate clearance needs to be allowed around and above the machine to permit safe access for specified maintenance tasks. Ensure that the machine is positioned securely and on a stable foundation. Any risk of movement should be removed by suitable means, especially to avoid strain on any rigid discharge piping. CAUTION Screw type compressors [1] should not be installed in air systems with reciprocating compressors without means of isolation such as a common receiver tank. It is recommended that both types of compressor be piped to a common receiver using individual air lines. CAUTION The use of plastic bowls on line filters and other plastic air line components can be hazardous. Their safety can be affected by either synthetic coolants or the additives used in mineral oils. Ingersoll Rand recommends that only filters with metal bowls should be used on any pressurised system. CAUTION Before starting machine remove shipping bolt and discard. CAUTION The standard compressor unit is not suitable for operation in temperatures liable to cause freezing as Condensate water is liable to be produced in the after cooler and receiver where fitted. Refer to your Ingersoll Rand distributor for further information. DISCHARGE PIPING Discharge piping should be at least as large as the discharge connection of the compressor. All piping and fittings should be suitably rated for the discharge pressure. It is essential when installing a new compressor [1], to review the total air system. This is to ensure a safe and effective total system. One item which should be considered is liquid carryover. Installation of air dryers [3] is always good practice since properly selected and installed they can reduce any liquid carryover to zero. It is good practice to locate an isolation valve close to the compressor and to install line filters [4].
  • 19. INSTALLATION / HANDLING 17 60Hz UP6 15 UP6 20 UP6 25 UP6 30 COMPRESSOR 125 150 125 150 200 125 150 200 125 150 200 Maximum operating pressure PSIG (bar) 125 (8.62) 150 (10.34) 125 (8.62) 150 (10.34) 200 (13.79) 125 (8.62) 150 (10.34) 200 (13.79) 125 (8.62) 150 (10.34) 200 (13.79) Factory set reload pressure PSIG (bar) 115 (7.93) 140 (9.66) 115 (7.93) 140 (9.66) 190 (13.10) 115 (7.93) 140 (9.66) 190 (13.10) 115 (7.93) 140 (9.66) 190 (13.10) Flow rate CFM (m3/MIN) 65 (1.84) 58 (1.64) 83 (2.35) 75 (2.12) 58 (1.64) 102 (2.89) 92 (2.61) 75 (2.12) 125 (3.54) 112 (3.17) 92 (2.61) Airend discharge temperature trip point 228_F (109_C) Ambient operating temperature min. max. 35_F(+2_C ) 104_F(+40_C) MOTOR Motor enclosure ODP TEFC ODP TEFC ODP TEFC ODP TEFC Nominal power 15HP 20HP 25HP 30HP Speed 1765 RPM 1770 RPM 1765 RPM 1770 RPM 1765 RPM 1770 RPM 1765 RPM 1770 RPM Frame 254TZ 160 M 256TZ 160 L 284TZ 180 M 286TZ 180 L Insulation class F COOLING SYSTEM Air cooled Cooling air flow 1770 ft3/min 1770 ft3/min 2100 ft3/min 2100 ft3/min Maximum P in air ducts 0.5 inWg (12.7mmH2O) Compressed air outlet T 13_F (7.2_C) 26_F (14_C) 19_F (10_C) 26_F (14_C) Cooling air outlet T 24_F (13.5_C) 27_F (15_C) 29_F (16_C) 35_F (20_C) GENERAL DATA Residual coolant content 3ppm (3 mg/m3) Separator vessel capacity 4.5 gallons (17 liters) Coolant capacity 3.4 gallons (13 liters) Sound pressure level to CAGI–PNEUROP 68 dB(A) 68 dB(A) 69 dB(A) 69 dB(A) Weight – base mount unit 1142lbs (518 kg) 1186 lbs (538 kg) 1206 lbs (547 kg) 1292 lbs (586 kg) Weight – 120 gallon Receiver mounted 1466 lbs (665 kg) 1510 lbs (685 kg) 1530 lbs (694 kg) 1616 lbs (733 kg) Weight – 240 gallon Receiver mounted 1735 lbs (787 kg) 1779 lbs (807 kg) 1799 lbs (816 kg) 1885 lbs (855 kg) CAUTION 230/460 Dual voltage machines are fitted with a decal to advise the correct voltage as connected from the factory. There is a decal fitted to the starter door describing the procedure to change the connections for the alternative voltage Rewiring should only be effected by a competent Electrician.
  • 20. INSTALLATION / HANDLING18 60Hz UP6 15–HA UP6 20–HA UP6 25–HA COMPRESSOR 125 150 200 125 150 200 125 150 200 Maximum operating pressure PSIG (bar) 125 (8.62) 150 (10.34) 200 (13.79) 125 (8.62) 150 (10.34) 200 (13.79) 125 (8.62) 150 (10.34) 200 (13.79) Factory set reload pressure PSIG (bar) 115 (7.93) 140 (9.66) 190 (13.10) 115 (7.93) 140 (9.66) 190 (13.10) 115 (7.93) 140 (9.66) 190 (13.10) Flow rate CFM (m3/MIN) 65.4 (1.84) 58 (1.64) 45 (1.28) 83 (2.35) 75 (2.12) 58 (1.64) 102 (2.89) 92 (2.61) 75 (2.12) Airend discharge temperature trip point 228_F (109_C) Ambient operating temperature min. max. 35_F(+2_C ) 122_F(+50_C) MOTOR Motor enclosure ODP TEFC ODP TEFC ODP TEFC Nominal power 15HP 20HP 25HP Speed 1765 RPM 1770 RPM 1765 RPM 1770 RPM 1765 RPM 1770 RPM Frame 256TZ 160 L 284TZ 180 M 286TZ 180 L Insulation class F COOLING SYSTEM Air cooled Cooling air flow 1770 ft3/min 2100 ft3/min 2100 ft3/min Maximum P in air ducts 0.5 inWg (12.7mmH2O) Compressed air outlet T 22_F (12_C) 24_F (13_C) 19_F (10_C) Cooling air outlet T 21_F (12_C) 26_F (14_C) 29_F (16_C) GENERAL DATA Residual coolant content 3ppm (3 mg/m3) Separator vessel capacity 4.5 gallons (17 liters) Coolant capacity 3.4 gallons (13 liters) Sound pressure level to CAGI–PNEUROP 68 dB(A) 69 dB(A) 69 dB(A) Weight – base mount unit 1186 lbs (538 kg) 1206 lbs (547 kg) 1292 lbs (586 kg) Weight – 120 gallon Receiver mounted 1510 lbs (685 kg) 1530 lbs (694 kg) 1616 lbs (733 kg) Weight – 240 gallon Receiver mounted 1779 lbs (807 kg) 1799 lbs (816 kg) 1885 lbs (855 kg) CAUTION 230/460 Dual voltage machines are fitted with a decal to advise the correct voltage as connected from the factory. There is a decal fitted to the starter door describing the procedure to change the connections for the alternative voltage Rewiring should only be effected by a competent Electrician.
  • 21. INSTALLATION / HANDLING 19 ELECTRICAL DATA – ALL UNITS UP6–15 Standard voltage 200V 230V 380V 460V 575V Drive motor Motor enclosure ODP TEFC ODP TEFC ODP TEFC ODP TEFC ODP TEFC Power 20HP Full load current (max) / HA 47.3A 45.2A 41.2A 39.3A 24.9A 23.8A 20.6A 19.7A 16.4A 15.8A Starting current DOL (STAR) 258 (151) 224 (132) 136 (114) 112 (66) 90 (53) Starting time DOL (Star Delta) 3–5 Sec ( 7–10 Sec) Starts per hour (maximum) 6 ELECTRICAL DATA DOL / Star Delta Control voltage 120VAC Minimum fuse rating See note 1 90A 80A 50A 40A 35A Minimum wire size AWG See note 2 4 4 6 10 10 ELECTRICAL DATA – ALL UNITS UP6–20 / UP6 15–HA Standard voltage 200V 230V 380V 460V 575V Drive motor Motor enclosure ODP TEFC ODP TEFC ODP TEFC ODP TEFC ODP TEFC Power 20HP Full load current (max) / HA 65/52.2A 63.1/49.8A 56.4/45.4A 54.8/43.3A 34.1/27.5A 33.3/26.3A 28.2/22.7A 27.5/21.7A 22.6/18.2A 22/17.3A Starting current DOL (STAR) 336 (150) 292 (130) 177 (79) 146 (65) 117 (52) Starting time DOL (Star Delta) 3–5 Sec ( 7–10 Sec) Starts per hour (maximum) 6 ELECTRICAL DATA DOL / Star Delta Control voltage 120VAC Minimum fuse rating See note 1 90A 80A 50A 40A 35A Minimum wire size AWG See note 2 4 4 6 10 10 ELECTRICAL DATA – ALL UNITS UP6–25 / UP6 20–HA Standard voltage 200V 230V 380V 460V 575V Drive motor Motor enclosure ODP TEFC ODP TEFC ODP TEFC ODP TEFC ODP TEFC Power 25HP Full load current (max) / HA 76.6/66.4A 76.5/64.7A 66.6/57.7A 66.5/56.3A 40.3/35.0A 40.3/34.4A 33.3/28.9A 33.3/28.2A 26.6/23.1A 26.6/22.5A Starting current DOL (STAR) 411.7 (182.2) 358 (158.4) 217 (96) 179 (79.2) 143.2 (63.4) Starting time DOL (Star Delta) 3–5 Sec ( 7–10 Sec) Starts per hour (maximum) 6 ELECTRICAL DATA DOL / Star Delta Control voltage 120VAC Minimum fuse rating See note 1 125A 100A 60A 50A 40A Minimum wire size AWG See note 2 3 3 4 8 10
  • 22. INSTALLATION / HANDLING20 ELECTRICAL DATA – ALL UNITS UP6–30 / UP6 25–HA Standard voltage 200V 230V 380V 460V 575V Drive motor Motor enclosure ODP TEFC ODP TEFC ODP TEFC ODP TEFC ODP TEFC Power 30HP Full load current (max) / HA 91.3/80.8A 91.9/79.8A 79.3/70.3A 79.9/69.4A 48.1/42.6A 48.4/42.0A 39.7/35.2A 40.0/34.7A 31.7/28.1A 32.0/27.8A Starting current DOL (STAR) 500 (216.7) 434 (188.4) 263 (114) 217 (94.2) 169 (75.4) Starting time DOL (Star Delta) 3–5 Sec ( 7–10 Sec) Starts per hour (maximum) 6 ELECTRICAL DATA DOL / Star Delta Control voltage 120VAC Minimum fuse rating See note 1 150A 125A 80A 60A 50A Minimum wire size AWG See note 2 1 2 4 6 8 1. If a circuit breaker is selected it should only be a magnetic trip type, set above the anticipated starting current of the machine, but below the maximum prospective fault current for the circuit. The circuit breaker or fuseable disconnect must be capable of breaking the prospective fault current at its terminals. 2. PVC/PVC Type Calculated using the following conditions: i) PVC insulated cable, armoured, copper conductors. ii) Cable clipped to a wall, in free air. iii) Ambient temperature of 40_C (104_F) and relative humidity of 40%. iv) 20m (65ft) cable run. v) Volt drop limited to –10% during starting, –4% during normal running. vi) Protected by the circuit breaker listed above. If there are any deviations from the above, or special regulations apply, the installation must be planned by a competent, qualified engineer. NOTE All data applies to standard product only. ELECTRICAL DATA An independent electrical isolator or disconnect should be installed adjacent to the compressor. Feeder cables/wires should be sized by the customer/electrical contractor to ensure that the circuit is balanced and not overloaded by other electrical equipment. The length of wiring from a suitable electrical feed point is critical as voltage drops may impair the performance of the compressor. Feeder cables / wires connections to isolator or disconnect should be tight and clean. The applied voltage must be compatible with the motor and compressor data plate ratings. The control circuit transformer has different voltage tappings. Ensure that these are set for the specific applied voltage prior to starting. CAUTION Never test the insulation resistance of any part of the machines electrical circuits, including the motor without completely disconnectingthe electronic controller (where fitted). CAUTION Ensure that the motor rotates in the correct direction as indicated by direction arrows, and on drawing.
  • 23. OPERATING INSTRUCTIONS 21 GENERAL OPERATION The compressor is an electric motor driven, single stage screw compressor, complete with accessories piped, wired and baseplate mounted. It is a totally self contained air compressor package. The standard compressor is designed to operate in an ambient range of 35.6_F – 104_F (2_C to 40_C) with a special option package available to operate in ambient temperatures ranges from 35.6_F up to 124_F (2_C up to 50_C). The maximum temperature is applicable to either version up to a maximum elevation of 3280ft (1000m) above sea level. Above this altitude significant reduction in maximum allowable ambient temperature is required. Compression in the screw type air compressor is created by the meshing of two (male & female) helical rotors. The air/coolant mixture discharges from the compressor into the separation system. This system removes all but a few PPM of the coolant from the discharge air. The coolant is returned to the cooling system and the air passes through the aftercooler and out of the compressor. Cooling air is moved through the coolers by the cooling fan and discharged from the machine. CAUTION Cooling air is drawn in at the end of the machine package passing through the filter and cooler before being discharged from the top of the machine. Care should be taken to avoid blocking the airflow, or causing any restriction in excess of the maximum backpressure allowed for ducting. Do not direct the airflow at face or eyes. The power transmission from the drive motor to the airend male rotor is by pulley and belts. The constant auto tensioning system, using airend mass torque and gas arm, ensures that the belts are always under the correct tension, eliminating the need for adjustment and maximizing the life of the belts. By cooling the discharge air, much of the water vapor naturally contained in the air is condensed and may be drained from the downstream piping and equipment. The coolant system consists of a sump, cooler, thermostatic valve and a filter. When the unit is operating, the coolant is pressurized and forced to the compressor bearings. The compressor load control system is automatic on–off line. The compressor will operate to maintain a set discharge line pressure and is provided with an auto restart system for use in plants where the air demand varies sufficiently to allow a compressor to shut down and save power. Significant system volume will assist this and is recommended. WARNING When the unit stops running as the result of low air demand, normally indicated by auto restart light, it may restart and return to load at any time. Safety of operation is provided as the compressor will shut down if excessive temperatures or electrical overload conditions should occur. CAUTION This unit is not designed or intended to operate when contaminated with silicone. Lubricants, greases or other items containing silicone should not be used on this unit.
  • 24. OPERATING INSTRUCTIONS22 ELECTRO–PNEUMATIC CONTROL AND INSTRUMENTATION KEY 1. Pressure gauge 2. Pressure switch 3. Tee 4. Connector 5. Combination block 6. Elbow 7. Tee, male run 8. Reducer bushing 9. Valve, solenoid (Blowdown) 10.Valve, solenoid (Load) 11.Indicator air filter 12.Nipple 13.Adaptor 14.Intake valve assembly NOTES: A. Tubing 3/8 inch B. Tubing 1/4 inch 1 2 3 4 5 7 8 A B 6 6 9 6 14 12 6 10 11 13 4
  • 25. OPERATING INSTRUCTIONS 23 1. PRESSURE GAUGE Indicates the system pressure. WARNING DO NOT operate the compressor at discharge pressures exceedingthe maximum operating pressure. 2. HOURMETER Records the total running time of the compressor. 3. EMERGENCY STOP When depressed will stop the compressor immediately. The ’Power on’ indicator will remain illuminated. The emergency stop button must be released before the compressor can be restarted. 4. START/STOP When switched to the ON position will cause the unit to start and run in a loaded condition if there is a demand for air. If there is no demand, the machine will run unloaded before stopping automatically. When switched to the OFF position, will unload and stop the unit if it is running. If the unit is in auto restart it will prevent the unit from re–starting when there is a demand for air. 5. POWER ON (Green) Indicates the presence of control voltage at the controller. 6. AUTO RESTART (White) Will illuminate when the machine has shut-down due to low air demand.The machine will restart and load automatically as soon as the demand for air returns. 7. FAULT / HIGH AIR TEMPERATURE ALARM (Red) Turn off electrical Isolator or disconnect. Investigate cause of fault. 8. RESET BUTTON Press button to reset the control system following compressor trip. PRIOR TO STARTING 1. Make visual check of the machine, ensure that all guards secure and that nothing is obstructing the proper ventilation of, or free access to the machine. 2. Check coolant level. Add if necessary. 3. Make sure main discharge valve is open. 4. Turn on electrical isolator or disconnect. The Power on (5) indicator will light, indicating that line and control voltages are available. 5. Check direction of rotation at initial start or following interruption in power supply. WARNING Make sure that all protective covers are in place. Cooling air flow exhaust may contain flying debris. Safety Protection should be worn at all times to avoid injury. STARTING 1. Push the RESET button (8). The fault indicator (7) will extinguish. Switch the ON/OFF switch (4) to the ON position. The compressor will start and then load automatically.
  • 26. OPERATING INSTRUCTIONS24 NORMAL/EMERGENCY STOPPING 1. Switch the ON/OFF switch (4) to the OFF position. The compressor will unload and stop. 2. Press EMERGENCY STOP button (3) and the compressor will stop immediately. 3. Turn off electrical isolator or disconnect. CAUTION After shutdown never allow unit to stand idle with pressure in receiver/separatorsystem.
  • 27. MAINTENANCE 25 UP Series Maintenance Schedule PERIOD MAINTENANCE Each 24 hours operation Check the coolant level and replenish if necessary. Visual check of machine for any leaks, dust build up or unusual noise or vibration Report immediately, contact Ingersoll R and authorized distributor for assistance if in doubt When compressor is receiver mounted Drain air receiver of condensate, or check that automatic drain is operating Visual check condition of package pre–filter Blow clean if needed If the air filter indicator locks into the red position before the 2000 hour/1 year change out period Check the Condition of filter. Change the air filter if needed. Dusty environments require more frequent replacement or, optional high dust filter (The indicator sould be checked with the unit stopped.) First 150 hours Change the coolant filter. Each month or 100 hours Remove and clean package pre-filter, replace if needed Check the cooler(s) for build up of foreign matter. Clean if necessary by blowing out with air or by pressure washing. Each year or 2000 hours Change the coolant filter. Check scavenge screen for blockage, clean if required. Change the separator cartridge. Change the Air Filter element. Take coolant sample for fluid analysis. Change the package pre–filter. Check the inlet valve flapper, recondition as necessary. Visual Check of Drive Belts and tensioning gas spring. Pressure vessel inspection frequency may be otherwise defined by local or national legislation. Separator vessel and air receiver when fitted. Fully inspect all external surfaces, and fittings. Report any excessive corrosion, mechanical or impact damage, leakage or other deterioration. Every two years or 8000 hours Change drive belt and gas spring. Replace the Ultra Coolant at whichever interval occurs first. Check and replace all items included within 2000 hour service Fit the following reconditioning parts as appropriate: Solenoid valves, Inlet valve kit, Minimum Pressure valve kit, Thermostatic Valve Kit Replace all hoses. Strip, clean and re–Grease motor bearings of ODP motors. Strip, clean and re–Grease motor bearings Replace sealed bearing on motors Fit replacement electrical contactor tips. Separator tank . Remove the cover plate and any necessary fittings. Clean the interior thoroughly and inspect all internal surfaces. ROUTINE MAINTENANCE This section refers to the various components which require periodic maintenance and replacement. It should be noted that the intervals between service requirements may be significantly reduced as a consequence of poor operating environment.This would include effects of atmospheric contamination and extremes of temperature. The SE RVICE/MAINTENANCE CHA R T indicates the various components’descriptions and the intervals when maintenance has to take place. Oil capacities, etc., can be found in the GENERAL INFORM ATION section of this manual. Compressed air can be dangerous if incorrectly handled. Before doing any work on the unit, ensure that all pressure is vented from the system and that the machine cannot be started accidentally. CAUTION: Before beginning any work on the compressor, open, lock and tag the main electrical disconnect and close the isolation valve on the compressor discharge. Vent pressure from the unit by slowly unscrewing the coolant fill cap one turn. Unscrewing the fill cap opens a vent hole, drilled in the cap, allowing pressure to release to atmosphere. Do not remove the fill cap until all pressure has vented from the unit. Also vent piping by slightly opening the drain valve. When opening the drain valve or the coolant fill cap, stand clear of the valve discharge and wear appropriate eye protection. Ensure that maintenance personnel are properly trained, competent and have read the Maintenance Manuals. Prior to attempting any maintenance work, ensure that:– . all air pressure is fully discharged and isolated from the system. If the automatic blowdown valve is used for this purpose, then allow enough time for it to complete the operation. . the machine cannot be started accidently or otherwise. . all residual electrical power sources (mains and battery) are isolated. Prior to opening or removing panels or covers to work inside a machine, ensure that:– . anyone entering the machine is aware of the reduced level of protection and the additional hazards, including hot surfaces and intermittentlymoving parts. . the machine cannot be started accidently or otherwise. Prior to attempting any maintenance work on a running machine, ensure that:– DANGER Only properly trained and competent persons should undertake any maintanence tasks with the compressor running or with electrical power connected. . the work carried out is limited to only those tasks which require the machine to run. . the work carried out with safety protection devices disabled or removed is limited to only those tasks which require the machine to be running with safety protection devices disabled or removed. Check motors with grease fittings and on motors with grease fittings. without grease fittings. grease bearings per motor data tag. UP6 15, UP6 20, UP6 25, UP6 30 Every 4 years or 16000 hours 6 years/16000 hours or as defined by local or national
  • 28. MAINTENANCE26 . all hazards present are known (e.g. pressurised components, electrically live components, removed panels, covers and guards, extreme temperatures, inflow and outflow of air, intermittently moving parts, safety valve discharge etc.). . appropriate personal protective equipment is worn. . loose clothing, jewelry, long hair etc. is made safe. . warning signs indicating that Maintenance Work is in Progress are posted in a position that can be clearly seen. Upon completion of maintenance tasks and prior to returning the machine into service, ensure that:– . the machine is suitably tested. . all guards and safety protection devices are refitted and correctly working. . all panels are replaced, canopy and doors closed. . hazardous materials are effectively contained and disposed of in a manner compliant with local or National environmental protection codes. WARNING Do not under any circumstances open any drain valve or remove components from the compressor without first ensuring that the compressor is FULLY SHUT– DOWN, power isolated and all air pressure relieved from the system. TOP UP COOLANT PROCEDURE The reservoir is designed to prevent overfill. With warm unit stopped in the normal way, the sight tube level should be within 15mm (0.6in) of the top of the green strip. The level should not drop beyond the bottom of the sight tube when running with a steady load. CAUTION Ensure that ULTRA coolant is used. Failure to do so will void manufacturers warranty. COOLANT CHANGE PROCEDURE It is better to drain the coolant immediately after the compressor has been operating as the liquid will drain more easily and any contaminant will still be in suspension. 1. Stop the machine, electrically isolate and vent all trapped pressure. 2. Place a suitable container close to the drain valve. 3. Slowly remove fill/vent cap. 4. Remove plug from drain valve. 5. Open the drain valve and drain coolant into container. 6. Close the drain valve. 7. Replace plug in drain valve. 8. Refill the machine following the ”top up coolant” procedure above. After initial fill, to purge any airlocks, the machine should be run for a few minutes cycling between load and no load, before checking that the level is correct. 9. Replace and tighten oil fill cap. COOLANT FILTER CHANGE PROCEDURE 1. Stop the machine, electrically isolate and vent all trapped pressure. 2. Loosen filter with the correct tool. 3. Remove the filter from the housing. 4. Place the old filter in a sealed bag and dispose of in a safe way. 5. Clean the mating face of the housing taking care to avoid any particles entering the machine. 6. Remove the new Ingersoll Rand replacement filter from its protective package. 7. Apply a small amount of lubricant to the filter seal. 8. Screw the new filter down until the seal makes contact with the housing, then hand tighten a further half turn. 9. Start the compressor and check for leaks. AIR FILTER ELEMENT CHANGE PROCEDURE 1. Stop the machine, electrically isolate and vent all trapped pressure. 2. Unscrew the retaining cap and withdraw the old element. 3. Fit the new element. 4. Replace the retaining cap.
  • 29. MAINTENANCE 27 SEPARATOR CARTRIDGE CHANGE PROCEDURE 1. Stop the machine, electrically isolate and vent all trapped pressure. 2. Loosen separator cartridge with the correct tool. 3. Remove the cartridge from the housing; place it in a sealed bag and dispose of it safely. 4. Clean the mating face of the housing. 5. Remove the new Ingersoll Rand replacement cartridge from its protective package. 6. Apply a small amount of lubricant to the cartridge seal. 7. Screw the new cartridge down until the seal makes contact with the housing, then hand tighten a further half turn. 8. Start the compressor and check for leaks. CAUTION This unit is not designed or intended to operate when contaminated with silicone. Lubricants, greases or other items containing silicone should not be used on this unit. COOLER CLEANING PROCEDURE 1. Stop the machine, electrically isolate and vent all trapped pressure. 2. Remove the top cover to obtain access to the cooler. 3. Clean the cooler. 4. Rebuild in reverse order.
  • 30. MAINTENANCE28 SETTING THE PRESSURE SWITCH (1PS) TO CHECK THE MAXIMUM DISCHARGE PRESSURE (Pressure switch upper trip point) Slowly close the isolation valve located adjacent to the compressor. Observe the rise in pressure and ensure that the pressure switch opens (and unloads the compressor) at the correct Maximum discharge pressure. The maximum discharge pressure is shown on the machine data plate. DO NOT exceed these figures. TO CHECK THE LOWER SET POINT Observe the line pressure fall and note the point at which the pressure switch closes (and loads the compressor). TO ADJUST THE UPPER SET POINT Remove the cover and turn the adjuster [1]. The pointer will move. Turn the adjuster anti–clockwise to increase the set point or clockwise to decrease it. TO ADJUST THE LOWER SET POINT Remove the cover and turn the adjuster [2]. The pointer will move. Turn the adjuster anti–clockwise to increase the set point or clockwise to decrease it. 22505309 REV. A 1 2 NOTE The pressure switch scale is a guide only. Use the machine pressure gauge to verify the upper and lower set points.
  • 31. MAINTENANCE 29 BELT CHANGE / GAS STRUT CHANGE PROCEDURE A. Gas strut. B. Support bracket (part of pivoted assembly). C. Tension cam. 1. Stop the machine, electrically isolate and vent all trapped pressure. 2. Remove the side cover from the machine. 3. Fit a 1/2” square drive wrench in the tension cam located above the airend (access from front door). Turn clockwise 1/4 turn to Position II to release gas strut tension on the belts. 4. Using a small screwdriver under the spring clip, ease the ball ends off the spherical studs at the ends of the gas strut. 5. Replace the gas strut and the studs at the same time by removing and replacing the studs then pushing the new gas strut firmly onto the studs until it clicks into place. 6. Turn the tension cam clockwise 1/4 turn to Position III to raise and support the airend. Place a block of wood or similar under the separator tank for support. 7. Replace the belts from the left side of the machine. 8. Turn the tension cam counter–clockwise 1 /2 turn to Position I to tension the gas strut. 9. Spin the drive to check alignment of the belt ribs on the pulleys (sheaves).
  • 32. MAINTENANCE30 ELECTRIC DRAIN VALVE PRODUCT DESCRIPTION The Electric Drain Valve removes condensed water and oil from the air receiver tank. Additional drains may be installed throughout your compressed air system, including aftercoolers, filters, drip legs and dryers. The Electric Drain Valve operates on a timer which can be set to automatically drain the air receiver tank at operator–determined intervals. Key features include: 100% continuous duty NEMA 4 enclosure Adjustable time on (0.5 – 10 seconds) Adjustable time off (0.5 – 45 minutes) Stainless steel operator LED to indicate electrical power is on LED to indicate valve is open Manual override OPERATION 1. Open the strainer ball valve. Strainer Ball Valve. OPEN CLOSED 2. Set the “time off” and “time on” knobs. See TIMER SETTINGS (below) for an explanation of the settings. 3. During compressor operation, check for air leaks. TIMER SETTINGS The “time off” setting determines the interval between cycles from 30 seconds to 45 minutes. The “time on” setting determines the actual time the compressor drains condensate. The timer’s cycle rate and drain opening time should be adjusted to open just long enough to discharge the condensate. The timer is properly set when it opens and discharges condensate and then vents air for approximately one second before closing. Adjustments may be made depending on mny factors, including humidity and duty cycle. TROUBLESHOOTING TROUBLE CAUSE ACTION Valve will not close. 1. Debris in solenoid valve prevents dia- phragm from seating. 1. Remove solenoid valve, disassemble, clean and reassemble. 2. Short in electrical component. 2. Check and replace power cord or timer as needed. Timer will not activate 1. No electrical supply. 1. Apply power. activate 2. Timer malfunction 2. Replace timer. 3. Clogged port. 3. Clean valve. 4 Solenoid valve mal- function. 4. Replace solenoid valve. 5. Clogged strainer. 5. Clean strainer. MAINTENANCE Periodically clean the screen inside the valve to keep the drain functioning at maximum capacity. To do this, perform the following steps: 1. Close the strainer ball valve completely to isolate it from the air receiver tank. 2. Press the TEST button on the timer to vent the pressure remaining in the valve. Repeat until all pressure is removed. CAUTION! High pressure air can cause injury from flying debris. Ensure the strainer ball valve is completely closed and pressure is released from the valve prior to cleaning. 3. Remove the plug from the strainer with a suitable wrench. If you hear air escaping from the cleaning port, STOP IMMEDIATELY and repeat steps I and 2. 4. Remove the stainless steel filter screen and clean it. Remove any debris that may be in the strainer body before replacing the filter screen. 5. Replace plug and tighten with wrench. 6. When putting the Electric Drain Valve back into service, press the TEST button to confirm proper function.
  • 33. TROUBLE SHOOTING 31 PROBLEM CAUSE REMEDY Compressor fails to start Mains power or Control voltage not available. § Check incoming power supply. § Check the control circuit fuse. § Check the transformer secondary windings for the control voltage. Defective Star / Delta timer. § Change Star / Delta timer. Machine shutsdown periodically High airend temperature. Top up coolant. periodically Motor overload. § Set overload to correct value and switch to manual reset. Belt stretch protection (when fitted). Change belt. Line voltage variation. § Ensure voltage does not drop below 10% on start up and 6% running. High current draw Compressor operating above rated pressure. Set pressure to correct rating for machine. Separator cartridge contaminated. Change air filter, and separator cartridge. Low voltage. § Ensure voltage does not drop below 10% on start up and 6% running. Unbalanced voltage. Correct incoming supply voltage. Damaged airend. † Change Airend. Low current draw Air filter contaminated. Change air filter. Compressor operating unloaded. Set pressure to correct rating for machine. High voltage. Reduce site voltage to correct operating voltage. Defective inlet valve. † Fit inlet valve service kit. High discharge pressure Defective or incorrect pressure switch setting. Replace or set pressure to correct rating for machine. pressure Load solenoid valve defective. † Fit load solenoid service kit. Blowdown valve defective. † Fit blowdown solenoid service kit. Inlet valve malfunction. † Fit inlet valve service kit. Low system air pressure Separator cartridge contaminated. Fit new Separator cartridge. pressure Incorrect pressure switch setting. Set pressure to correct rating for machine. Minimum pressure valve malfunction. † Fit Minimum pressure valve service kit. Load solenoid valve defective. † Fit load solenoid service kit. Blowdown valve defective. † Fit blowdown solenoid service kit. Drive belt slipping. Fit new belt and tensioner. Air system leaks. † Fix leaks. Inlet valve malfunction. † Fit inlet valve service kit. System demand exceeds compressor delivery. Reduce demand or install additional compressor. NOTES: § Must be carried out by a competent electrician. † This work is recommended to be carried out only by an Ingersoll Rand authorized service technician.
  • 34. TROUBLE SHOOTING32 PROBLEM CAUSE REMEDY Compressor trips due to over temperature Compressor operating above rated pressure. Set pressure to correct rating for machine. over temperature Package pre–filter blocked. Clean / replace package pre–filter. Cooler blocked. Clean cooler. Missing or incorrectly fitted enclosure panels Ensure that all enclosure panels are correctly fitted Low coolant level. Top up coolant and check for leaks. High ambient temperature. Re–site compressor. Restricted cooling air flow. Ensure correct air flow to compressor. Excessive coolant consumption Separator cartridge leak. Fit new Separator cartridge. consumption Blocked separator cartridge drain. † Remove fittings and clean. Compressor operating below rated pressure. Set pressure to correct rating for machine. Coolant system leak. † Fix leaks. Excessive noise level Air system leaks. † Fix leaks. Airend defective. † Change Airend. Belts Slipping. Replace belt and tensioner. Motor defective. † Replace motor. Loose components. † Retighten loose items. Shaft seal leaking Defective shaft seal. † Fit Airend shaft seal kit. Pressure relief valve opens Defective switch or incorrect pressure switch setting. Replace or set pressure to correct rating for machine. opens Minimum pressure valve malfunction. † Fit Minimum pressure valve service kit. Load solenoid valve defective. † Fit load solenoid service kit. Blowdown valve defective. † Fit blowdown solenoid service kit. Inlet valve malfunction. † Fit inlet valve service kit. Black residue on belt guard/cooler box Drive belt slipping. Replace belt and tensioner. guard/cooler box Pulleys misaligned. Re–align pulleys. Worn pulleys. † Replace pulleys and belt. Gas strut failed. Replace belt and tensioner. Safety valve blows when compressor goes on load MPV Stuck closed Strip MPV, examine and repair if necessary. Safety valve faulty Check the setting of the safety valve and the rated pressure. NOTES: § Must be carried out by a competent electrician. † This work is recommended to be carried out only by an Ingersoll Rand authorized service technician.
  • 35.
  • 36.
  • 37. UP6 15, UP6 20, UP6 25, UP6 30 60Hz Este manual contiene importante información sobre seguridad y ha de ponerse a disposición del personal encargado del funcionamiento y mantenimiento de la máquina. C.C.N. : 80445158 REV. : A es FECHA : OCTUBRE 2008 MANUAL DE MANEJO Y MANTENIMIENTO Septiemre
  • 38. GARANTIA Y ARRANQUEREGISTRADO Garantía La Compañía garantiza que el equipo por ella fabricado será y entregado en virtud de la presente estará exento de defectos de materiales y de mano de obra durante un período de doce meses a partir de la fecha de puesta en funcionamiento o de dieciocho meses a partir de la fecha de despacho desde la fábrica, si ésta ocurriese primero. El Comprador estará obligado a informar por escrito y con prontitud cualquier fallo de conformidad de esta garantía a la Compañía dentro del citado período, con lo cual la Compañía subsanará, a discreción propia, tal disconformidad mediante la reparación adecuada del equipo o suministrando una pieza de repuesto F.O.B. punto de embarque, siempre que el Comprador haya almacenado, instalado, mantenido y operado tal Equipo de conformidad con las nuevas prácticas de la industria y haya cumplido las recomendaciones específicas de la Compañía. Los accesorios o el equipo suministrado por la Compañía, pero fabricado por otros, se beneficiará de cualquier garantía que los fabricantes hayan proporcionado a la Compañía y que pueda trasladarse al Comprador. La Compañía declinará toda responsabilidad acerca de cualesquiera reparaciones, recambios o ajustes realizados en el equipo y de cualesquiera costos de la mano de obra realizada por el Comprador o por otros, sin previo consentimiento por escrito de la Compañía. Se excluyen específicamente los efectos de corrosión y el uso y desgaste normales. Las garantías de rendimiento se limitan a aquéllos que se indiquen específicamente en la propuesta de la Compañía. A menos que la responsabilidad de cumplir tales garantías de rendimiento se limite a pruebas específicas, la obligación de la Compañía será la de subsanar de la forma y durante el período de tiempo que anteriormente se indica. LA COMPAÑÍA NO CONCEDE GARANTIA O REPRESENTACION ALGUNA DE NINGUN TIPO EN ABSOLUTO, EXPRESA O IMPLICITA, SALVO LA DEL TITULO, Y POR LA PRESENTE RENUNCIA A TODAS LAS GARANTIAS DE COMERCIABILIDAD E IDONEIDAD PARA UN PROPOSITO EN PARTICULAR. La corrección por la Compañía de disconformidades, sean patentes o latentes, de la forma y por el período de tiempo anteriormente indicados constituirá el cumplimiento de todas las responsabilidades de la Compañía en cuanto a tales disconformidades bien sean que se basen en un contrato, negligencia de garantía, indemnización, responsabilidad estricta o de otro modo con respecto a o emanantes de tal Equipo. El Comprador no operará el Equipo que se considere defectuoso, sin notificar previamente por escrito a la Compañía su intención de realizar esto. Cualquier utilización tal del Equipo se llevará a cabo bajo el riesgo y responsabilidad exclusivos del Comprador. Obsérvese que ésta es la garantía normal de Ingersoll Rand. Toda garantía en vigor en el momento de la compra del compresor o negociada como parte del pedido de compra puede tener prioridad sobre esta garantía. Para registrarse en línea, entrar en air.ingersollrand.com Ingersoll Rand Air Solutions Customer Solutions Center 800–B Beaty Street Davidson, NC 28036 air.ingersollrand.com
  • 39. CONTENIDO & ABREVIATURAS 1 CONTENIDO 1 CONTENIDO 2 PREAMBULO 3 CALCOMANIAS 8 SEGURIDAD 10 INFORMACION GENERAL 12 INSTALACIÓN / MANEJO 22 INSTRUCCIONES DE OPERACION 26 MANTENIMIENTO 32 RESOLUCION DE AVERIAS ABREVIATURAS Y SIMBOLOS #### Para el número de derie, sirvanse contactar con Ingersoll Rand –>#### Hasta serie nº ####–> Desde serie nº * No dibujado { Opcion NR No necesario AR Según se necesite SM Sitemaster/Sitepack HA Máquina para ambiente severo WC Máquina refrigerada por agua AC Máquina refrigerada por aire ERS Sistema de recuperación de energía T.E.F.C. Motor totalmente blindado refrigerado por aire (IP55) O.D.P. (motor) Abierto a prueba de goteo
  • 40. PREAMBULO2 El contenido de este manual es propiedad y material confidencial de Ingersoll Rand y no puede reproducirse sin el consentimiento previo por escrito de Ingersoll Rand. Ninguna parte de lo contenido en este documento puede entenderse como promesa, garantía o representación, implícita o explícita, respecto a los productos Ingersoll Rand que en él se describen. Tales garantías u otros términos y condiciones de venta de los productos deberán estar deacuerdo con los términos y condiciones estándar de venta para tales productos, que están a disposición de los clientes si lo solicitan. Este manual contiene instrucciones y datos técnicos para todas las operaciones de empleo normales y de mantenimiento rutinario. Las reparaciones mayores no están comprendidas en este manual y deben encomendarse o consultarse a un concesionario de servicio autorizado Ingersoll Rand. Todos los componentes, accesorios, tuberías y conectores incorporados al sistema de aire comprimido, deberán ser: . de buena calidad, adquiridos a un fabricante de buena reputación y, en lo posible, de un tipo aprobado por Ingersoll Rand . claramentede un régimen adecuado para una presión igual, como mínimo, a la máxima presión de trabajo premisible de la máquina compatibles con el lubricante/ refrigerante del compresor . acompañados de instrucciones para que su instalación, funcionamientoy mantenimiento se lleven a cabo con seguridad. Los departamentos de Servicio de Ingersoll Rand puede facilitar detallesde los equipos aprobados. El empleo de piezas para reparaciones no genuinas y distintas a las incluidas en las listas de piezas aprobadas por Ingersoll Rand, puede originar condiciones de riesgo sobre las que Ingersoll Rand no tiene control alguno. Por consiguiente, Ingersoll Rand declina toda responsabilidad acerca de equipos en los que no se instalen piezas aprobadas. Pueden verse afectadas las condiciones generales de garantía. Ingersoll Randse reserva el derecho a realizar cambios y mejoras de los productos sin previo aviso y sin incurrir en ningún tipo de obligacióna realizar tales cambios o añadir tales mejoras en aquellos productos que se hayan vendido previamente. Los usos para lo que esta diseñada esta máquina estan subrayados abajo y también se dan algunos ejemplos de uso incorrecto, sin embargo Ingersoll Rand no se ouede anticipar a cada aplicación o situación de trabajo que pueda ocurrir. SI TIENE DUDAS CONSULTE AL SUPERVISOR. Esta máquina se ha concebido y suministrado para su utilización únicamentebajo las condiciones y en las aplicaciones especificadas a continuación: . Compresión de aire de ambiente normal sin gases, vapores o partículas adicionales conocidos o detectables. . Funcionamiento dentro de la gama de temperatura ambiente especificada en la sección INFORMACION GENERAL de este manual. Uso de la máquina en cualquiera de las siguientes situaciones:– a) No esta aprobado por Ingersoll Rand. b) Puede perjudicar la seguridad de los usuarios y otras personas, y c) Puede perjudicar cualquier reclamacion hacha contra Ingersoll Rand. TABLA 1 Uso de la máquina para producir aire comprimido para: a) consumo humano directo b) consumo humano indirecto, sin el correspondiente filtrado y purificado. Uso de la máquina fuera del rango de temperatura ambiente especificado en la sección de INFORMACION GENERAL de este manual. Uso de la máquina donde haya riesgo real o potencial de niveles peligrosos de gases o vapores inflamables. ESTA MÁQUINA NI SE HA DESTINADO NI DEBE UTILIZARSE EN AMBIENTES POTENCIALMENTE EXPLOSIVOS, INCLUIDAS LAS SITUACIONES EN LAS QUE SE HALLEN PRESENTAS GASES O VAPORES INFLAMABLES. Uso de la máquina con componentes no aprobados por Ingersoll Rand. Uso de la máquina con componentes de seguridad o de control perdidos o averiados. La compañia no acepta resposabilidades por arrores en la traducción de la versión original en Inglés. COPYRIGHT 2008 INGERSOLL RAND
  • 41. CALCOMANIAS 3 SIMBOLOS ISO FORMA GRAFICA Y SIGNIFICADO DE LOS SIMBOLOS ISO Prohibición/Obligatoriedad Información/Instrucciones Advertencia Utilizar la carretilla elevadora en esta lado. REPOSICIONAR No utilizar la carretilla elevadora en esta lado. Parada de emergencia. Encendido (energia) Apagado (energia). REARRANQUE AUTOMATICO MANTENIMIENTO MANUTENZIONE PROIBITA FRAGIL MANTENER SECO COLOCAR EN ESTA POSICION NO USAR GANCHOS NO USAR MORDAZAS DE AGARRE LATERAL HORAS
  • 42. CALCOMANIAS4 ENERGIA ELECTRICA INSPECCIONAR Cada X meses, si lo requieren más pronto por las horas de funcionamiento CAMBIAR / MONTAR DE NUEVO LIMPIAR.
  • 43. CALCOMANIAS 5 SIMBOLOS ANSI FORMA GRAFICA Y SIGNIFICADO DE LOS SIMBOLOS ANSI PELIGRO AIRE DE ADMISIÓN. Puede contener monóxido de carbono u otros contaminantes. Puede causar lesiones graves o la muerte. Los compresores de aire Ingersoll Rand no están diseñados, destinados para aire respirable. No se debe usar el aire comprimido para aplicaciones de aire respirable a menos que se trate de acuerdo con todas las normas y reglamentos correspondientes. ADVERTENCIA VOLTAJE PELIGROSO. Puede causar lesiones graves o la muerte. Desconecte la energía y descargue la presíon del tanque antes de darle servicio. Bloquear/etiquetar la máquina. El compresor debe estar conectado a un circuito adecuadamente puesto a tierra. Ver las instruccciones de puesta a tierra en el manual. No haga funcionar el compresor en ambientes húmedos. Debe almacenarse en el interior. RIESGO DE INCENDIO O EXPLOSIÓN. El arco eléctrico producido por los componentes del compresor puede encender los líquidos y vapores inflamables, causando lesiones graves. No haga funcionar nunca el compresor cerca de líquidos o vapores inflamables. Si se utiliza para aspersión de materiales inflamables, debe mantenerse el compresor a una distancia mínima de 20 pies (6 metros) del área de aspersión. AIRE A ALTA PRESÍON. Los tanques oxidados pueden producir una explosión y lesiones graves o la muerte. Receptor bajo presión. Antes de efectuar el mantenimiento, el operador deberá reducir la presión del tanque. A demás del drenaje automático, haga funcionar la válvula manual de desagüe una vez por semana. La válvula manual de drenaje está ubicada en la parte inferior del tanque. PARTES MÓVILES. Puede causar lesiones graves. No opere la máquina si se ha retirado el protector. La máquina puede empezar a funcionar automáticamente. Desconecte la energía ante de darle servicio a la máquina. Bloquear/etiquetar la máquina. SUPERFICIE CALIENTE. Puede causar lesiones graves. No tocar. Deje que se enfríe antes de dar servicio. No toque el compresor ni las tuberías calientes. Correas y poleas expuestas. Pueden causar heridas severas o muerte. No opere con las cubiertas fuera de su lugar. Desconecte el suministro electrico, asegure el interruptor y marquelo antes de dar mantenimiento. El flujo de escape puede expulsar desechos en suspensión. Debe usarse protección de seguridad en todo momento.
  • 44. CALCOMANIAS6 VISTA POSTERIOR VISTA IZQUIERDA DENTRO DE LA UNIDAD DENTRO DE LA PUERTA DEL ARRANQUE VISTA FRONTAL VISTA DERECHA Unidades de 60 Hz VISTA SUPERIOR SECCION A–A Elemento ccn Cantidad Descripción Elemento ccn Cantidad Descripción 1 32343519 1 Calcomanía, advertencia aire contaminado Situado cerca de la puerta de descarga de aire del depósito de almacenamiento en unidades con depósito montado 2 32343576 1 Calcomanía,desagüe de aire del depósito de aire 3 93166460 1 Calcomanía, desagüe de refrigerante 4 32343501 1 Calcomanía, doble tensión (si se necesita) 5 – 6 23038466 1 Calcomanía, Ingersoll Rand firma horizontal 20“ 7 23353147 1 Calcomanía, piezas de mantenimiento 8 30286686 1 Calcomanía, aviso rotación 9 32343543 1 Calcomanía, aviso descarga de aire Situado cerca de la puerta de descarga de aire del depósito de almacenamiento en unidades con depósito montado 10 93171262 4 Calcomanía, aviso levantar aquí 11 32343493 1 Calcomanía, configuración de sobrecarga arranque IEC 12 SPEC 1 Especificaciones, unidad de compresor 13 32342669 1 Calcomanía, caja de arranque 14 32017469 1 Calcomanía, tensión 120/1/60 † Posición opcional.
  • 45. 7CALCOMANIAS VISTA POSTERIOR VISTA IZQUIERDA DENTRO DE LA UNIDAD DENTRO DE LA PUERTA DEL ARRANQUE VISTA FRONTAL VISTA DERECHA Unidades de 60 Hz VISTA SUPERIOR SECCION A–A Elemento ccn Cantidad Descripción Elemento ccn Cantidad Descripción 15 32017436 1 Calcomanía, tensión 230/3/60 32018475 1 Calcomanía, tensión 200/3/60 32236481 1 Calcomanía, tensión 380/3/60 32017444 1 Calcomanía, tensión 460/3/60 32177305 1 Calcomanía, tensión 575/3/60 16 32343527 1 Calcomanía, advertencia alta presión 17 32343535 1 Calcomanía, advertencia coreas en movimiento 18 32343550 3 Calcomanía, advertencia ventilador al descubierto 19 32343568 2 Calcomanía, advertencia tensión peligrosa 20 32343584 1 Calcomanía, advertencia superficie caliente 21 32343634 1 Calcomanía,diagrama de cableado DOL 60Hz 32343642 1 Calcomanía, diagrama de cableado estrella triángulo 60Hz 22 32343907 1 Calcomanía, bloquear y etiquetar 23 32343899 1 Calcomanía, advertencia desechos volantes 24 22115703 1 Etiqueta, rotación 60Hz 25 32344095 2 Etiqueta, Soporte de expedición † Posición opcional.
  • 46. SEGURIDAD8 ¡PELIGRO! El riesgo OCASIONARA la MUERTE, GRAVES LESIONES o importantesdaños en los bienes si se pasa por alto. Las instrucciones deberán respetarse con precisión para evitar las lesiones o la muerte. ¡ADVERTENCIA! El riesgo PUEDE ocasionar la MUERTE, GRAVES LESIONES o importantesdaños en los bienes si se pasa por alto. Las instrucciones deberán respetarse con precisión para evitar las lesiones o la muerte. PRECAUCIONES Las precauciones llaman la atención sobre las instrucciones que deben seguirse estrictamente para evitar daños en el equipo, el proceso o sus alrededores. AVISOS Los avisos se utilizan para dar información suplementaria. PRECAUCION DE AIRE RESPIRABLE Los compresores de aire Ingersoll Rand no han sido concebidos, destinados o aprobados para aire respirable. El aire comprimido no deberá utilizarse para aplicaciones de aire respirable, a menos que sea tratado de conformidad con todos los códigos y reglamentos aplicables. Información general Asegúrese de que el operador lea y entienda las pegatinas y consulte el manual antes de realizar mantenimiento u operación de la unidad. Asegúrese de que el Manual de Funcionamiento y Mantenimiento no se retire permanentemente de la máquina. Asegúerese que el personal de mantenimiento esta entrenado convenientementey que han leído los Manuales de Mantenimiento. No apuntar con boquillas de aire o pulverizadores a persona alguna. El aire comprimido y la energía eléctrica pueden ser peligrosos. Antes de comenzar cualquier trabajo sobre el compresor, asegurar que la alimentación eléctrica ha sido cortada y que el compresor ha sido despresurizado. Utilice protección para los ojos cuando funcione el compresor o realice trabajos de mantenimiento en el mismo. Todas las personas situadas cerca de maquinaria en funcionamiento deberán llevar protección para los oídos y recibir instrucciones sobre su modo de empleo de conformidad con la legislación sobre seguridad en el lugar de trabajo. Asegúrese de que todas las cubiertas protectoras estén en su lugar y que la capota o las puertas estén cerradas durante la operación. Las especificaciones de esta máquina son tales que no es adecuada para usarla en áreas donde exista riesgo de gas inflamable. La instalación de este compresor debe estar de acuerdo con códigos eléctricos reconocidos y con cualquier código local de Seguridade Higiene. El empleo de recipientes de plástico en filtros de conductos puede resultar peligroso. Su seguridad puede verse afectada bien sea por lubricantes sintéticos o por aditivos utilizados en aceites minerales. Ingersoll Rand recomienda utilizar sólo recipientes de metal en sistemas sometidos a presión. Aire comprimido El aire comprimido puede ser peligroso si no se utiliza correctamente.Antes de realizar ningún tipo de trabajo en la unidad, asegúrese de que se ha liberado toda la presión del sistema y que la máquina no puede arrancar accidentalmente. ASVERTENCIA Imponiendo en el compresor una parada normal o de emergenciasólo desahogará la presión aguas arriba de la válvula de presión mínima encima del tanque separador. Si se requiere trabajo de mantenimiento aguas abajo de esta válvula, cerciorarse de que se desahogue toda la presión en el punto de ventilación del proceso exterior al compresor. Asegúrese que la máquina trabajando a la presión es conocida por el personal apropiado. Todo el equipo de presión de aire instelado o conectado a la máquinatienen que funcionar a presiones de trabajo de seguridad o al menos a la presión de tarado de la máquina. Si se conecta más de un compresor a una planta común aguas abajo, deberán instalarse y controlarse por procedimientos de trabajo válvulas de aislamiento eficaces, de forma que una máquina no sea sometida a presión / sobrepresión accidentalmente por otra. El aire comprimido no tiene que usarse directamente por ningún aparato de respiración o máscara. El aire descargado contiene un porcentaje muy pequeño de aceite lubricante del compresor y se deberá tener cuidado de que sea compatibleel equipo situado aguas abajo. Si el aire de descarga se va a liberar en un espacio reducido, debe proporcionarseuna ventilación adecuada. Cuando se emplee aire comprimido, el personal deberá llevar un equipo de protección adecuado. Todas las piezas sometidas a presión, especialmente tubos flexibles y sus acoplamientos, tienen que ser inspeccionados regularmente, no tener ningún defecto y han de ser sustituídos de acuerdo al Manual de instrucciones. El aire comprimido puede ser peligroso si no se utiliza correctamente.Antes de realizar ningún tipo de trabajo en la unidad, asegúrese de que se ha liberado toda la presión del sistema y que la máquina no puede arrancar accidentalmente. Evite el contacto de cualquier parte del cuerpo con el aire comprimido. Deberá comprobarse periódicamente el funcionamiento de todas las válvulas de seguridad situadas en el tanque separador. No someter a presión excesiva al tanque colector o a recipientes similares superando los límites de diseño. No usar un tanque colector ni recipientes similares que no cumplan los requisitos de diseño del compresor. Sírvanse contactar con el distribuidor si se precisa asistencia. No taladrar, soldar o alterar de otro modo el tanque colector o recipientes similares. Productos Las siguientes substancias han sido utilizadas en la fabricación de esta máquina y pueden ser peligrosas para la salud si se utilizan incorrectamente:– . grasa conservante . inhibidor de óxido . refrigerante EVITE LA INGESTION, EL CONTACTO CON LA PIEL Y LA INHALACION DE HUMOS Transporte Cuando se transporte o carque una máquina, asegurarse que se usan los puntos específicos de elevación y de remolque. El equipo de elevación ha de tener capacidad adecuada para el peso del compresor. No trabajar ni pasar por debajo del compresor mientras esté suspendido. Sistema eléctrico Mantener alejados del sistema eléctrico del compresor todas las partes del cuerpo y las herramientas de mano u otros objetos conductores. Mantener los pies sobre un suelo seco y estar en pie sobre superficies aislantes y no entrar en contacto con parte alguna del compresor cuando se realicen ajustes o reparaciones en partes expuestas con corriente del sistema eléctrico del compresor.
  • 47. SEGURIDAD 9 ADVERTENCIA Cualquier conexión eléctrica o ajuste sólo deberá ser realizado por un electricista cualificado competente. Cerrar y bloquear con lave todas las puertas de acceso cuando el compresor quede desatendido. No utilizar extintores destinados a incendios de la Clase A o Clase B cuando se trate de incendios eléctricos. Utilizar solamente extintores idóneos para incendios de la clase AB o de la clase ABC. Efectuar reparaciones únicamente en zonas limpias, secas, bien iluminadasy ventiladas. Conectar el compresor únicamente a sistemas eléctricos que sean compatibles con sus características eléctricas y que sean de su capacidad nominal. Eliminación del condensado Dado que las normas sobre aguas residuales varían entre países y regiones, el usuario tiene la responsabilidad de establecer los límites y respetar las normas de su zona en particular. Ingersoll Rand y sus distribuidores correspondientes se complacerían en asesorar y ayudar en estos aspectos. Para mayor información, consulte las hojas de datos de seguridad de materiales.
  • 48. INFORMACION GENERAL10 VER LA CHAPA DEL FABRICANTE DEL TRANSFORMADOR PARA LOS REQUISITOS DE CONEXIÓN DEL CABLEADO MOTOR WYE (ESTRELLA) TRIANGULO (TRANSICION ABIERTA) “POTENCIA CONECTADA”APAGADO – ENCENDIDO “EN ESPERA” “PARADA POR ALTA TEMPERATURA” REPOSICIONAR LINEA NUMERO LINEA NUMERO AL SUMINISTRO PUENTE LEYENDA CPT Transformador, control EDV Válvula de purga eléctrica E–STOP Botón, parada de emergencia FU Fusible HM Contador horario HATR Relé, alta temperatura del aire HATS Interruptor, alta temperatura del aire 1M Bobina, arranque del motorContactor (Principal) 2M Bobina, arranque del motorContactor (Triangulo) OL Sobrecarga, arranque del motor PS Interruptor de presión SS Interruptor, selector S Bobina, arranque del motorContactor (wye / star) 1SV Válvula de solenoide N.C. 3SV Válvula de solenoide N.O. TD Relé, arranque triángulo (10 segundos) TR Relé, retardo de tiempo de rearranque automático (6 minutos) VAR Varistor Puntos terminales L1, L2, L3 Transformador de tipo ligero NOTAS 1. La desconexión o interruptor de circuitos con fusible y aprobados según los requisitos del código han de ser proporcionados por el cliente. 2. Las líneas de trazos representan el cableado del cliente. 3. El tamaño de los componentes eléctricos no suministrados por Ingersoll Randes responsabilidad del cliente y deberá decidirse de conformidad con la información facilitada en la chapa de datos del compresor y en los códigos eléctricos a nivel local. 4. La unidad no arrancará de nuevo automáticamente después de una interrupción/fallo de potencia. 5. El circuito se muestra en posición normal desactivado. 6. Todo el cableado ha de ser de conformidad con los códigos locales. UP6 15, UP6 20, UP6 25, UP6 30 http://air.ingersollrand.com
  • 49. INFORMACION GENERAL 11 VER LA CHAPA DEL FABRICANTE DEL TRANSFORMADOR PARA LOS REQUISITOS DE CONEXIÓN DEL CABLEADO COMPRESOR MOTOR “POTENCIA CONECTADA” APAGADO – ENCENDIDO “EN ESPERA” “PARADA POR ALTA TEMPERATURA” REPOSICIONAR LINEA NUMERO LINEA NUMERO AL SUMINISTRO PUENTE PUENTE LEYENDA CPT Transformador, control EDV Válvula de purga eléctrica E–STOP Botón, parada de emergencia FU Fusible HM Contador horario HATR Relé, alta temperatura del aire HATS Interruptor, alta temperatura del aire M Bobina, arranque del motorContactor (Principal) OL Sobrecarga, arranque del motor PS Interruptor de presión SS Interruptor, selector 1SV Válvula de solenoide N.C. 3SV Válvula de solenoide N.O. TR Relé, retardo de tiempo de rearranque automático (6 minutos) VAR Varistor Puntos terminales L1, L2, L3 Transformador de tipo ligero NOTAS 1. La desconexión o interruptor de circuitos con fusible y aprobados según los requisitos del código han de ser proporcionados por el cliente. 2. Las líneas de trazos representan el cableado del cliente. 3. El tamaño de los componentes eléctricos no suministrados por Ingersoll Randes responsabilidad del cliente y deberá decidirse de conformidad con la información facilitada en la chapa de datos del compresor y en los códigos eléctricos a nivel local. 4. La unidad no arrancará de nuevo automáticamente después de una interrupción/fallo de potencia. 5. El circuito se muestra en posición normal desactivado. 6. Todo el cableado ha de ser de conformidad con los códigos locales.
  • 50. INSTALACIÓN / MANEJO12 ROTACION VISTA IZQUIERDA VISTA FRONTAL VISTA DERECHA VISTA SUPERIORVISTA INFERIOR VISTA POSTERIOR UNIDADES CON BASE MONTADA CLAVE A Filtro previo B Compresor y admisión del aire refrigerante C Caja del arranque D Escape del aire refrigerante E Descarga de aire de 1,00” NPT F Entrada de potencia del cliente G Aberturas para carretilla elevadora Deben instalarse cubiertas en los agujeros de la carretilla elevadora después de que la unidad está en su sitio, para reducir el ruido y asegurar un enfriamiento adecuado del conjunto. H 4 ranuras de 15 (0,6) x 25 (1,0) Véanse notas – Página15 5 6
  • 51. INSTALACIÓN / MANEJO 13 ROTACION VISTA IZQUIERDA VISTA FRONTAL VISTA DERECHA VISTA SUPERIOR VISTA INFERIOR VISTA POSTERIOR UNIDADES DE 60 Hz (120 GALONES) CON DEPOSITO MONTADO CLAVE A Filtro previo B Compresor y admisión del aire refrigerante C Caja del arranque D Escape del aire refrigerante E Descarga de aire de 1,00” BSPT F Entrada de potencia del cliente G Aberturas para carretilla elevadora H Recipiente de almacenamiento del aire (120 galones) I Válvula de desagüe automática J Desagüe del condensado de 0,25 pulgadas K 4 agujeros de 17 (0,7) x 44 (1,8) Véanse notas – Página 15
  • 52. INSTALACIÓN / MANEJO14 ROTACION VISTA IZQUIERDA VISTA FRONTAL VISTA DERECHA VISTA SUPERIOR VISTA INFERIOR VISTA POSTERIOR UNIDADES DE 60 Hz (240 GALONES) CON DEPOSITO MONTADO CLAVE A Filtro previo B Compresor y admisión del aire refrigerante C Caja del arranque D Escape del aire refrigerante E Descarga de aire de 1,00” BSPT F Entrada de potencia del cliente G Aberturas para carretilla elevadora H Recipiente de almacenamiento del aire (240 galones) I Válvula de desagüe automática J Desagüe del condensado de 0,25 pulgadas K 4 agujeros de 17 (0,7) x 44 (1,8) Véanse notas – Página 15
  • 53. INSTALACIÓN / MANEJO 15 NOTAS 1. Cantidad (aproximada) de llenado de refrigerante (lubricante) 13 litros (3,4 galones). 2. Separaciónrecomendada enfrente de la puerta del panel de control 1.067 mm (42 pulgadas) o mínima según la requieran las normas (NEC) nacionales más recientes o los códigos locales correspondientes. 3. Separaciones recomendadas en los laterales izquierdo y derecho 914 mm (36 pulgadas). 4. Separación mínima recomendada en la parte posterior del compresor ha de ser 152 mm (6 pulgadas). 5. Las tuberías exteriores no han de ejercer momentos o fuerzas no solucionados sobre la unidad. Usar tubería tan grande o mayor en la conexión de descarga. 6. Deberá prescindirse de montar tuberías de plástico o de PVC en esta unidad o de usarles en conductos cualesquiera aguas abajo. 7. Todo conducto instalado en el campo a o desde el compresor no podrá añadir más de 12,5 mm ( 1/2”) de resistencia total del aire al indicador del agua. 8. No conectar a un tanque común con un compresor de vaivén a menos que el compresor de vaivén utilice un amortiguador de impulsos de descarga. 9. El tamaño de los componentes eléctricos no suministrados por Ingersoll–Randes responsabilidad del cliente y deberá decidirse de conformidad con la información facilitada en la chapa de datos del compresor, NEC y en los códigos eléctricos a nivel nacional y local. NOTA Todas las dimensiones se expresan en milímetros (pulgadas) a menos que se indiquen de otro modo. Cerciorarse de que se usan las ranuras o los puntos de elevación marcados de la carretilla elevadora que sean los correctos siempre que se eleve o transporte la máquina. DESEMBALAJE Normalmente el compresor se entrega con un envoltorio de politeno.Si se ha de usar un cuchillo para quitar este envoltorio tenga cuidado de no dañar la pintura exterior del compresor. Cerciorarse de que todos los materiales utilizados para el transporte y embalaje se desechen de la manera prescrita por los códigos locales. NOTA Las unidades se despachan teniendo en su posición el perno de bloqueo de tránsito. Antes de hacer funcionar la unidad, deberá quitarse este perno y comprobarse la tensión de la correa. Aflojar, retirar y desechar el perno de despacho de 10 mm. Para el procedimientode tensión de la correa, sírvanse consultar la sección de Mantenimiento.
  • 54. INSTALACIÓN / MANEJO16 CLAVE 1. Compresor 2. Colector de aire 3. Secador de aire 4. Filtros de aire comprimido 5. Puntos de demanda del sistema AVISO Los elementos [2] a [5] son opcionales o pueden ser elementos existentes de la planta. Dirigirse a su distribuidor o representante de Ingersoll Rand para recomendaciones específicas. UBICACION EN LA PLANTA El compresor se puede instalar sobre cualquier suelo nivelado capaz de soportarlo. Se recomienda que la zona sea seca y bien ventilada en la que el ambiente sea lo más limpio posible. Deberá dejarse un mínimo de 150mm (6 pulgadas) en la parte posterior y 1 m (3 pies) en los costados de la máquina para tener un acceso para servicio y una ventilación adecuados. Hay que tener adecuado lugar libre alrededor de la máquina para hacer sin estorbo las tareas indicadas de mantenimiento. Cerciórese de situar la máquina con seguridad sobre una superficie firme. Elimínese por medios apropiados cualquier posibilidad de que la máquina se mueva, especialmente para que no se esfuerce ninguna tubería rígida de descarga. PRECAUCION Los compresores [1] tipo tornillo no deben instalarse en sistemas de aire con compresores alternativos sin medios de independización, tal como un tanque colector común. Se recomienda que ambos tipos de compresor se conecten a un colector común utilizando tuberías de aire independientes. PRECAUCION El empleo de recipientes de plástico en filtros de conductos o en otros componentes de los conductos de aire de plástico puede resultar peligroso. Su seguridad puede verse afectada bien sea por refrigerantes sintéticos o por aditivos utilizados en aceites minerales. Ingersoll Rand recomienda utilizar sólo recipientes de metal en sistemas sometidos a presión. PRECAUCION Antes de hacer funcionar la unidad, quitar el perno de despacho y desecharlo. PRECAUCION La unidad de compresor estándar no resulta idónea para operar bajo temperaturas que puedan ocasionar congelación ya que es propenso a producirse agua de condensado en el post–refrigerador y en el colector si se han instalado. Para mayor información, consultar al distribuidor de Ingersoll Rand. TUBERIA DE DESCARGA La tubería de descarga debe ser por lo menos de igual diámetro que la conexión de la descarga del compresor. Todas las tuberías y accesorios deben tener unas características nominales adecuabas a la presión de descarga. Es esencial cuando se instala un nuevo compresor [1], revisar el sistema de aire completo. Esto sirve para conseguir un sistema seguro y efectivo. Un punto que debe ser tenido en cuenta es el arrastre de líquido. La instalación de secadores de aire [3], es siempre una buena práctica ya que seleccionados e instalados correctamente pueden reducir el arrastre de líquido a cero. Es una buena práctica colocar una válvula de aislamiento cerca del compresor e instalar filtros en la tubería [4].
  • 55. INSTALACIÓN / MANEJO 17 60Hz UP6 15 UP6 20 UP6 25 UP6 30 COMPRESOR 125 150 125 150 200 125 150 200 125 150 200 Presión máxima de trabajo PSIG (bar) 125 (8.62) 150 (10.34) 125 (8.62) 150 (10.34) 200 (13.79) 125 (8.62) 150 (10.34) 200 (13.79) 125 (8.62) 150 (10.34) 200 (13.79) Presión de recarga fijada en fábrica PSIG (bar) 115 (7.93) 140 (9.66) 115 (7.93) 140 (9.66) 190 (13.10) 115 (7.93) 140 (9.66) 190 (13.10) 115 (7.93) 140 (9.66) 190 (13.10) Medida del gasto CFM (m3/MIN) 65 (1.84) 58 (1.64) 83 (2.35) 75 (2.12) 58 (1.64) 102 (2.89) 92 (2.61) 75 (2.12) 125 (3.54) 112 (3.17) 92 (2.61) Punto de disparo de la temperatura de descarga de la unidad compresora 228 F (109 C) Temperatura ambiente de trabajo mínimo a máxima (35 F) » (104 F)(35 F) » (104 F)35 F(+2 C ) 104 F(+40 C) MOTOR Envolvente del motor ODP TEFC ODP TEFC ODP TEFC ODP TEFC Potencia nominal 15HP 20HP 25HP 30HP Número de revoluciones 1765 RPM 1770 RPM 1765 RPM 1770 RPM 1765 RPM 1770 RPM 1765 RPM 1770 RPM Tipo de construcción 254TZ 160 M 256TZ 160 L 284TZ 180 M 286TZ 180 L Arrollamiento F F REFRIGERADOR Refrigeración por aire Corriente volumétrica de aire refrigerante mediante motor de ventilador separado 1770 ft3/min 1770 ft3/min 2100 ft3/min 2100 ft3/min Presión libre para conductos de aire 0.5 inWg (12.7mmH2O) Temperatura de salida del aire comprimido dif. T 13 F (7.2 C) 18 F26 F (14 C) 18 F19 F (10 C) 18 F26 F (14 C) Temperatura de salida del aire refrigerante 24 F (13.5 C) 18 F27 F (15 C) 18 F29 F (16 C) 18 F35 F (20 C) DATOS GENERALES Contenido restante de aceite 3ppm (3 mg/m3) Capacidad del depósito de aceite 4.5 gallons (17 liters) Carga de aceite total 3.4 gallons (13 liters) Nivel de emisión según CAGI–Pneurop 68 dB(A) 68 dB(A) 69 dB(A) 69 dB(A) Peso – Unidad con base montada 1142 lbs (518 kg) 1186 lbs (538 kg) 1206 lbs (547 kg) 1292 lbs (586 kg) Peso – Unidad de 120 galones con depósito montado 1466 lbs (665kg) 1510 lbs (685 kg) 1530 lbs (694 kg) 1616 lbs (733 kg) Peso – Unidad de 240 galones con depósito montado 1735 lbs (787 kg) 1779 lbs (807 kg) 1799 lbs (816 kg) 1885 lbs (855 kg) PRECAUCION Las máquinas de doble tensión 230/460 están dotadas de una calcomanía para indicar la tensión correcta que se ha conectado en fábrica. La puerta del arranque lleva montada una calcomanía que describe el procedimiento para cambiar los conectores para la tensión alternativa. El recableado sólo deberá realizarlo un electricista competente.
  • 56. INSTALACIÓN / MANEJO18 60Hz UP6 15–HA UP6 20–HA UP6 25–HA COMPRESOR 125 150 200 125 150 200 125 150 200 Presión máxima de trabajo PSIG (bar) 125 (8.62) 150 (10.34) 200 (13.79) 125 (8.62) 150 (10.34) 200 (13.79) 125 (8.62) 150 (10.34) 200 (13.79) Presión de recarga fijada en fábrica PSIG (bar) 115 (7.93) 140 (9.66) 190 (13.10) 115 (7.93) 140 (9.66) 190 (13.10) 115 (7.93) 140 (9.66) 190 (13.10) Medida del gasto CFM (m3/MIN) 65.4 (1.84) 58 (1.64) 45 (1.28) 83 (2.35) 75 (2.12) 58 (1.64) 102 (2.89) 92 (2.61) 75 (2.12) Punto de disparo de la temperatura de descarga de la unidad compresora 228 F (109 C) Temperatura ambiente de trabajo mínimo a máxima (35 F) » (104 F)(35 F) » (104 F)35 F(+2 C ) 122 F(+50 C) MOTOR Envolvente del motor ODP TEFC ODP TEFC ODP TEFC Potencia nominal 15HP 20HP 25HP Número de revoluciones 1765 RPM 1770 RPM 1765 RPM 1770 RPM 1765 RPM 1770 RPM Tipo de construcción 256TZ 160 L 284TZ 180 M 286TZ 180 L Arrollamiento F F REFRIGERADOR Refrigeración por aire Corriente volumétrica de aire refrigerante mediante motor de ventilador separado 1770 ft3/min 2100 ft3/min 2100 ft3/min Presión libre para conductos de aire 0.5 inWg (12.7mmH2O) Temperatura de salida del aire comprimido dif. T 18 F22 F (12 C) 18 F24 F (13 C) 18 F19 F (10 C) Temperatura de salida del aire refrigerante 18 F21 F (12 C) 18 F26 F (14 C) 18 F29 F (16 C) DATOS GENERALES Contenido restante de aceite 3ppm (3 mg/m3) Capacidad del depósito de aceite 4.5 gallons (17 liters) Carga de aceite total 3.4 gallons (13 liters) Nivel de emisión según CAGI–Pneurop 68 dB(A) 69 dB(A) 69 dB(A) Peso – Unidad con base montada 1186 lbs (538 kg) 1206 lbs (547 kg) 1292 lbs (586 kg) Peso – Unidad de 120 galones con depósito montado 1510 lbs (685 kg) 1530 lbs (694 kg) 1616 lbs (733 kg) Peso – Unidad de 240 galones con depósito montado 1779 lbs (807 kg) 1799 lbs (816 kg) 1885 lbs (855 kg) PRECAUCION Las máquinas de doble tensión 230/460 están dotadas de una calcomanía para indicar la tensión correcta que se ha conectado en fábrica. La puerta del arranque lleva montada una calcomanía que describe el procedimiento para cambiar los conectores para la tensión alternativa. El recableado sólo deberá realizarlo un electricista competente.
  • 57. INSTALACIÓN / MANEJO 19 DATOS ELECTRICOS – TODAS LAS UNIDADES UP6–15 Tensión estándar 200V 230V 380V 460V 575V Motor de accionamiento Envolvente del motor ODP TEFC ODP TEFC ODP TEFC ODP TEFC ODP TEFC Potencia 20HP Corriente a toda carga (máx.)/HA 47.3A 45.2A 41.2A 39.3A 24.9A 23.8A 20.6A 19.7A 16.4A 15.8A Corriente de arranque DOL (ESTRELLA) 258 (151) 224 (132) 136 (114) 112 (66) 90 (53) Tiempo de arranque DOL (Estrella Triángulo) 3–5 Sec ( 7–10 Sec) Frecuencia de maniobras 6 DATOS ELECTRICOS DOL / Estrella Triángulo Tensión de control 120VAC Régimen mínimo de cables Véase la nota 1 90A 80A 50A 40A 35A Medida mínima de cables AWG Véase la nota 2 4 4 6 10 10 DATOS ELECTRICOS – TODAS LAS UNIDADES UP6–20 / UP6 15–HA Tensión estándar 200V 230V 380V 460V 575V Motor de accionamiento Envolvente del motor ODP TEFC ODP TEFC ODP TEFC ODP TEFC ODP TEFC Potencia 20HP Corriente a toda carga (máx.)/HA 65/52.2A 63.1/49.8A 56.4/45.4A 54.8/43.3A 34.1/27.5A 33.3/26.3A 28.2/22.7A 27.5/21.7A 22.6/18.2A 22/17.3A Corriente de arranque DOL (ESTRELLA) 336 (150) 292 (130) 177 (79) 146 (65) 117 (52) Tiempo de arranque DOL (Estrella Triángulo) 3–5 Sec ( 7–10 Sec) Frecuencia de maniobras 6 DATOS ELECTRICOS DOL / Estrella Triángulo Tensión de control 120VAC Régimen mínimo de cables Véase la nota 1 90A 80A 50A 40A 35A Medida mínima de cables AWG Véase la nota 2 4 4 6 10 10
  • 58. INSTALACIÓN / MANEJO20 DATOS ELECTRICOS – TODAS LAS UNIDADES UP6–25 / UP6 20–HA Tensión estándar 200V 230V 380V 460V 575V Motor de accionamiento Envolvente del motor ODP TEFC ODP TEFC ODP TEFC ODP TEFC ODP TEFC Potencia 25HP Corriente a toda carga (máx.)/HA 76.6/66.4A 76.5/64.7A 66.6/57.7A 66.5/56.3A 40.3/35.0A 40.3/34.4A 33.3/28.9A 33.3/28.2A 26.6/23.1A 26.6/22.5A Corriente de arranque DOL (ESTRELLA) 411.7 (182.2) 358 (158.4) 217 (96) 179 (79.2) 143.2 (63.4) Tiempo de arranque DOL (Estrella Triángulo) 3–5 Sec ( 7–10 Sec) Frecuencia de maniobras 6 DATOS ELECTRICOS DOL / Estrella Triángulo Tensión de control 120VAC Régimen mínimo de cables Véase la nota 1 125A 100A 60A 50A 40A Medida mínima de cables AWG Véase la nota 2 3 3 4 8 10 DATOS ELECTRICOS – TODAS LAS UNIDADES UP6–30 / UP6 25–HA Tensión estándar 200V 230V 380V 460V 575V Motor de accionamiento Envolvente del motor ODP TEFC ODP TEFC ODP TEFC ODP TEFC ODP TEFC Potencia 30HP Corriente a toda carga (máx.)/HA 91.3/80.8A 91.9/79.8A 79.3/70.3A 79.9/69.4A 48.1/42.6A 48.4/42.0A 39.7/35.2A 40.0/34.7A 31.7/28.1A 32.0/27.8A Corriente de arranque DOL (ESTRELLA) 500 (216.7) 434 (188.4) 263 (114) 217 (94.2) 169 (75.4) Tiempo de arranque DOL (Estrella Triángulo) 3–5 Sec ( 7–10 Sec) Frecuencia de maniobras 6 DATOS ELECTRICOS DOL / Estrella Triángulo Tensión de control 120VAC Régimen mínimo de cables Véase la nota 1 150A 125A 80A 60A 50A Medida mínima de cables AWG Véase la nota 2 1 2 4 6 8 1. Si se selecciona un disyuntor, éste deberá ser de tipo de disparo magnético, regulado por encima de la corriente de arranque prevista de la máquina, si bien por debajo de la corriente máxima de fallo posible. El disyuntor o la desconexión de fusible ha de ser capaz de interrumpir la corriente de fallo posible en sus terminales. 2. Tipo PVC/PVC Calculado usando las siguientes condiciones: i) Cable aislado de PVC, blindado, conductores de cobre. ii) Cable grapado a una pared, al aire libre. iii) Temperatura ambiente de 40 C (104 F) y humedad relativa de 40%. iv) Recorrido de cable de 20m (65ft). v) Caída de tensión limitada a –10% durante el arranque, –4% durante el funcionamiento normal. vi) Protegido por el interruptor de circuitos arriba indicado. Si se produce alguna variación con respecto a lo anterior, o son aplicables normas especiales, la instalación ha de planificarla un técnico competente y cualificado. AVISO ¡Los datos técnicos son válidos exclusivamente para la versión estándar!
  • 59. INSTALACIÓN / MANEJO 21 CARACTERISTICAS ELECTRICAS Deberá instalarse junto al compresor un aislador o desconectador eléctrico independiente. Los cables/hilos alimentadores deberán ser dimensionados por el cliente/contratista electricista para asegurarse de que los circuitos sean equilibrados y no sobrecargados por otros equipos eléctricos. La longitud del cableado desde un punto adecuado de alimentación eléctrica resulta crítica dado que las caídas de tensión pueden perjudicar el rendimiento del compresor. Las conexiones de los cables/hilos alimentadores al aislador o desconectador deberán estar bien apretadas y limpias. La tensión de alimentación debe estar en consonancia con los valores nominales de la placa de características del motor y el compresor. El transformador del circuito de control tiene diferentes tomas de tensión. Asegurar que está ajustado a la tensión específica aplicada antes del arranque. PRECAUCION Nunca comprobar la resistencia de aislamiento de cualquier parte de los circuitos de las máquinas, el motor incluido, sin desconectar por completo el controlador electrónico (si se ha instalado). PRECAUCION Cerciorarse de que el motor gire en el sentido correcto tal como lo indican las flechas del sentido de rotación y como se muestra en el dibujo.